Table of Contents
Advertisement
Quick Links
Advertisement
Table of Contents

Related Manuals for Mpio FL 400


Summary of Contents for Mpio FL 400
- Page 1 User’s Manual...
- Page 2 For more information on the MPIO products, visit our web site on the Internet. You can find many answers to the customer’s various enquiries, or upgrade the product performance through firmware upgrade (system software) that operates this product.
-
Page 3: Safety Precautions
2. When storing important data, please make a back-up copy. The data may be damaged due to malfunction or other elements such as outer impact or lack of battery. Please note that in case of data loss, MPIO Co., Ltd. will not be responsible for the lost data. -
Page 4: Table Of Contents
■ Table of Contents Getting Started Basic Usage ■ ■ Safety Precautions ... 4 Basic Operation ... 26 ■ ■ Product Features ... 8 Changing Modes ... 28 ■ ■ Components ... 9 Voice Recording ... 29 ■ ■ Name of the Parts ... 10 Using the Navigation ... -
Page 5: Product Features
Data can be transferred and used faster and more conveniently using USB 2.0 interface. ■ Supports USB mass storage MP3 player can be used as a removable disc. You can save and use the data conveniently at any time and place. -
Page 6: Name Of The Parts
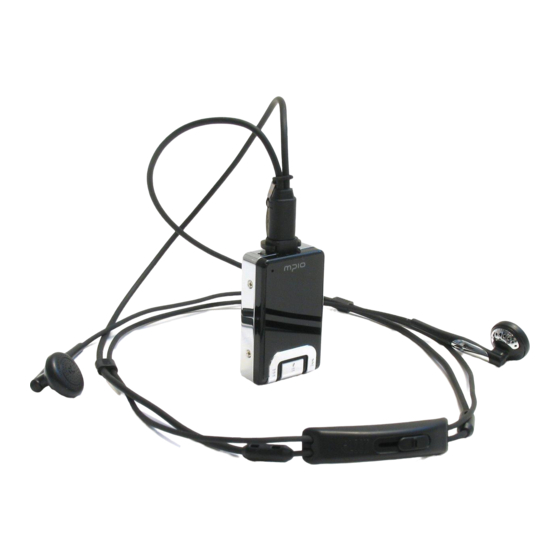
■ Name of the Parts RESET Hole Microphone Power/Play/Pause Button Menu, Navigation Setting Note ● You can initialize it by pressing the reset hole with a fine pin. ● When you reset, all settings revert to the default settings. LCD Screen █... -
Page 8: Recharging
● The battery usage time will differ depending on how the product is used and how long, usage temperature, and other environmental matters. USB connection screen when the power is ON/OFF Note ● Contact MPIO Service Center for replacing the internal battery. -
Page 9: Connecting To A Pc
In Windows ME, 2000, XP, FL400 may be used as a Removable Disk without any separate programs. FL400 is accessible though the Windows Explorer. ● To format, or upgrade the firmware of FL400 in Windows 98, 98SE, ME, 2000 or XP, please install the MPIO Utility. Installing the Software █... - Page 10 - Windows Media Player Plug-in Click the [Install] button to install the selected utilities in order. Click Click the [Finish] button to finish the installation. Check the MPIO Utility icon on the desktop to confirm installation. Click Click ...
-
Page 11: Connect With A Usb Connector
Check the Device Manager to confirm the installation. Confirming USB Installation ■ Windows 98/ME: [Control Panel] → [Systems] → [Device Manager] → [Hard Disk Controllers] → MPIO FL400 USB Device ■ Windows 2000/XP: [Control Panel] → [Systems] →[Hardware]→[Device Manager] →[Disk Drives]→ MPIO FL400 USB Device Note ●... -
Page 12: Using A Removable Disk
■ Windows 98/ME: [ Control Panel ] → [ Systems ] → [ Device Manager ] → [ Hard Disk Controllers ]→ MPIO FL400 USB Device Note ● In Windows 98 / 98SE, the program must be installed to use FL400 as a removable disk. Please install the USB drivers before use. -
Page 13: Disconnecting The Usb Connection
[Delete] Select USB Mass Storage Device from the list of hardware, and click the [Stop] button. When the “Stop a Hardware Device” window appears, select MPIO FL400 USB Device. Then, click the [OK] button and disconnect the USB Connector. Note ●... -
Page 14: Basic Operation
■ Basic Operation To Play Music (Turning Power ON) █ Navigation screen will appear by pressing longer button after turning the player on with a logo screen. Select file you wish to playback. Press the button to play music. For more ... -
Page 15: Changing Modes
■ Changing Modes Hold down the MENU button during music playback. Press the / button after selecting the Mode with the After selecting the desired mode (Music ↔ Radio) with the / button, change the mode by pressing the button. -
Page 16: Using The Navigation
■ Using the Navigation You can search for the desired file or folder easily using the navigation. During playback or pausing, if you press the MENU button it moves to navigation mode. ■ The file list screen comes up on the LCD window. Select the file you want to play. -
Page 17: Changing A Saved Frequency
■ Listening to the Radio Changing a saved frequency █ You can change an already saved channel to another frequency. ■ At a new frequency, if you press the MENU button, the save channel screen appears. Press the button after selecting the saved channel ... -
Page 18: Menu Structure
■ Menu Structure The menu structure can be different for the convenient use and improvement with firmware upgrades. Browser Normal Repeat Repeat One Repeat All Random Normal Rock Jazz Classic Vocal User EQ Sound Effect Pure Studio Concert Sound Groove Dynamic Bass ■... -
Page 19: Saving The Settings
■ Menu Operation Saving the settings █ ■ You can change the settings with the / button; save the settings with the button. After saving the settings, move to the previous menu. ■ If you press the MENU button, you cannot save the settings, you will leave the screen. -
Page 20: Setting Sound Effects
■ Setting the Menu [Volume Settings] Setting Sound Effects █ This device supports a Spatializer UltraMobile HD with 3D sound effects, and the Spatializer gives off abundant sound effects on mobile audio devices. Comprised of Natural Headphone, 3D Stereo, PCE, and Vi.B.E, and the selected 3D Sound effects apply to the applicable sound. -
Page 21: Setting The Menu [Radio Settings]
■ Setting the Menu [Radio Settings] Saving Auto Preset █ The earphones work as an antenna, so please connect them before using. First see page 28, then switch to radio mode and set. ■ Please select Auto Preset from the Radio menu. ■... -
Page 22: Setting The Menu [System Settings]
■ Setting the Menu [System Settings] Setting AutoPlay █ You can set a file to Auto Play. ■ Please select Auto Play from the System menu. ■ Off: When you turn the device on, the navigation screen appears, and if you press the button, it plays music. -
Page 23: Setting Fade In
■ Setting the Menu [System Settings] Setting Fade In █ When a file is in play, you can set it so that the volume slowly rises. ■ Select Fade In settings from the System menu. ■ Off: When the file starts playing again, it plays with the set volume. On: When the file is in play, the introduction of the volume gradually rises as it plays. -
Page 24: Setting Contrast
■ Setting the Menu [System Settings] Setting Contrast █ You can set up the contrast of the LCD window. ■ Please select Contrast from the System menu. Note ● You can set up the contrast from 1~3. Setting the Language █... -
Page 25: Checking Device Information
■ Please select Info from the System menu. You can confirm the system’s information. ■ Formatting You can format FL400 from a Windows PC using MPIO Utility. Turn on the device and connect the device to the computer with the USB connector. System Alarm Double-click MPIO Utility icon in your desktop. - Page 26 ● When formatting the device using the Windows format Command, it must be formatted in FAT or FAT16. To Click use the device after it has been formatted, the default settings must be restored using MPIO Utility. See page 52 [Storing Default Settings] for more information.
-
Page 27: Storing Default Settings
■ Upgrading Firmware The files in FL400 will be lost after upgrading firmware. See page 17 [Installing the software] for information on how to install MPIO Utility. Download the firmware from MPIO web site and save it on the PC. (www.mpio.com) Turn the power of FL400 ON and connect it to a computer using a USB connector. -
Page 28: Upgrading Firmware In Macintosh
█ The files in FL400 will be lost after upgrading firmware. Download the firmware upgrade for Macintosh at MPIO web site, uncompress it and save it on the computer. (www.mpio.com) Turn the power of FL400 ON and connect it to a computer using a USB connector. -
Page 29: Troubleshooting
■ If the remaining charge is not enough, it may not set up functions properly. Please check the remaining charge. Upgrading the firmware is too hard. ■ Try using the bundled MPIO utility. Macintosh users can just copy the provided file into FL400. -
Page 30: Product Specifications
■ Product Specifications Dimensions 46(W) × 28(H) × 13.5(D)/mm Weight 25.5g Display(LCD) 128×48 Full Graphic LCD Memory 256MB / 512MB / 1GB / 2GB Decoding MPEG 1/2/2.5 Layer3, WMA, OGG Voice Recording Frequency Range 20Hz ~ 20kHz Audio S/N ratio 90dB Output Power 15mW/Channel (Europe : 6mW/Channel)
Need help?
Do you have a question about the FL 400 and is the answer not in the manual?
Questions and answers