Table of Contents
Advertisement
Quick Links
Advertisement
Table of Contents

Summary of Contents for King Jim pomera DM250
- Page 3 Preparation before use Basic operation Editing text Make use of file/folder management tools Formatting to set the screen display. Configurati on of the unit Appendix.
- Page 5 Introduction. Thank you for purchasing the digital memo 'Pomera' DM250. Please read this manual carefully before using the Pomera and use it correctly. Keep this manual in a readily accessible place and take care not to lose it. We sincerely hope that you will continue to use Pomera together with this publication for many years to come.
- Page 6 cause accidents or malfunctions.
- Page 7 SIG, Inc. Mac and OS X are trademarks of Apple Inc. Android and Gmail are trademarks of Google LLC. KING JIM, KING JIM, Pomera and pomera are trademarks or registered trademarks of King Jim Ltd. Other company and product names mentioned are the trademarks or registered...
-
Page 8: Safety Precautions
Safety precautions ... must b e observed! In order to prevent harm to the user and other people and damage to property, the following information is indicated which must be observed. When using the unit, be sure to read the operating instructions carefully and use the unit correctly. - Page 9 hazard About the main unit Do not use, charge, leave or store the unit in places w h e r e it will be exposed to high temperatures (near a fire, near a stove or in the hot sun). Doing so may cause rupture, ignition or heat generation.
- Page 10 Warning. Do not use the product with a voltage other than the indicated supply voltage. Doing so may cause fire, rupture or electric shock. About radio Do not use this unit in places where the use of radio waves is prohibited, such as hospitals.
- Page 11 atten tion About the main unit (hee If the liquid inside the battery gets on your skin, rinse it off thoroughly with clean water immediately. If leakage of liquid occurs, immediately unplug the USB cable from the unit and switch off the unit. Other.
- Page 12 Handling instructions. About the built-in battery Batteries have a life span. If charging does not restore functionality, the battery has reached the end of its service life and needs to be replaced and repaired. Continued use of a deteriorated battery may cause rupture, ignition or heat generation. Note that the service life depends on the conditions of use.
-
Page 13: Other Notes On Radio
Other notes on radio. About wireless LANs The frequency band of the wireless LAN used by this unit overlaps with the premises radio stations and specified low-power radio stations for mobile identification devices used in medical equipment, industrial and scientific equipment such as microwave ovens, and factory production lines, which may cause interference in radio communications due to radio wave interference. - Page 14 About Bluetooth This unit has received construction design certification as radio equipment for the radio station of a low-power data communication system in accordance with the Radio Law. Therefore, a radio station licence is not required when using this unit. This unit uses the 2.4 GHz frequency band.
-
Page 15: Copyright Notice
Copyright notice. The use of copyrighted works by means of this product is permitted under copyright law only when the reproduction or compilation of the work is used for personal or domestic use. In the absence of the user's own copyright in the work to be reproduced or having received permission from the copyright holder to reproduce the work, reproduction or editing of the work or use of the reproduced or edited work beyond this scope constitutes an infringement of the copyright,... -
Page 16: Table Of Contents
Table of Contents 5 Making use of tools......69 Introduction ............ 1 Safety precautions ... must be observed! ... 3 Browse electronic dictionaries ......69 Other notes on radio .......... 8 Copying the contents of an electronic dictionary Copyright notice ............. 10 ................ - Page 17 Formatting the SD card ........137...
- Page 18 9 Annex..........139 About software updates ........139 List of shortcut keys ..........139 Pomera shortcut keys in general ....139 MS-IME shortcut keys ........142 ATOK shortcut keys ......... 144 US sequence shortcut keys ......146 Bluetooth-enabled keys ......... 146 About keytop stickers ..........
-
Page 19: Preparation Before Use
Preparation before use Check the contents of the set. Main unit key top sticker (US sequence, for thumb shift) AC adapter (AS0530U) operating instructions (this manual) certificate USB cable (USB Type-A/Type-C 1m) *Keep the warranty card in a safe place. DMC5 case for Pomera... -
Page 20: Body (Of A Machine)
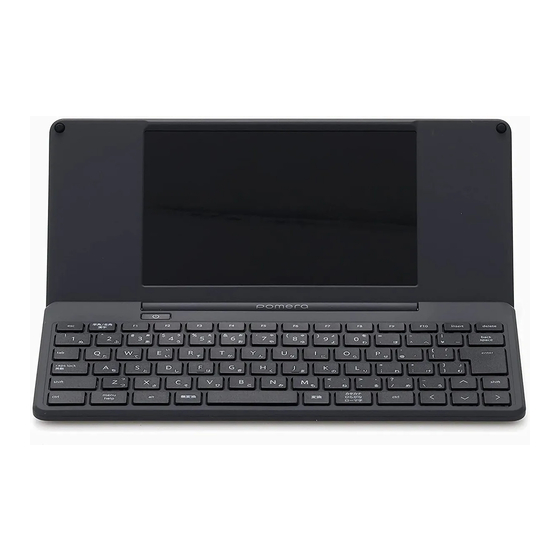
Name of each part body (of a machine) (i) LCD screen Displays text file editing and menu screens. 2) Keyboard. Press the key to enter characters. ( page 31) (iii) Power button Press and hold to switch the power on or off. (4) LED for charge confirmation The LED lighting colour indicates the charging status. -
Page 21: Status Bar
status bar The status bar can be hidden by displaying it in full screen mode. ( page 97) (v) (vi) (vii) (viii) ix. (ii) (i) File name The name of the text file being edited is displayed. ( page 53) (ii) Editing icon. - Page 22 (iii) Character count. Displays the number of characters determined in the text when setting the character count. ( ➔ 118) (Page) If the frame display is on, the frame number is also displayed. ( page 107) (iv) Keylock icon. This is displayed if the modifier key is locked.
- Page 23 (vi) ATOK palette. Information required for entering and converting text, such as the input mode, is displayed. ( ➔ page 108) (vii) Battery level remaining The remaining battery level (%) is displayed.
- Page 24 (viii) Battery icon. The battery status is displayed. Battery icon Battery level 100 - 90%. 89 - 60%. 59 - 30%. 29 - 10%. 9 - 0%. Charging (ix) Time display complete. ~ (after a number, e.g. (while) 1, 2, 3, 4, 5, 6) charging The time set on the unit is displayed.
-
Page 25: Charging
Charging. Before using the unit, charge it with the supplied AC adapter. Connect the supplied USB cable to the USB Type-C port on the unit. Connect the AC adapter and USB cable Connect the AC adaptor to an electrical outlet. attention (heed) If the terminals are difficult to insert, do not force them in. -
Page 26: Load The Sd Card (Sold Separately)
Load the SD card (sold separately). Load the SD card. This not only increases the file storage area, but also allows data exchange with the PC. Insert the SD card. Insert the SD card in the back until it 'clicks' into place, taking care to orientate it. bottom of the main unit attention (heed) -
Page 27: Basic Operation
basic operation Power on / off turn on power Press and hold the power button. The power is switched on and the text editing screen (or calendar screen) appears. M e m o . When the power is switched on, the 'pomera' logo appears on the screen; after the 'pomera' logo disappears, you move to the editing screen. -
Page 28: About Sleep
turn off power Press and hold the power button. If there is a file being edited, the contents are retained and the unit is switched off. attention (heed) When opening and closing the LCD screen, take care not to get your fingers or other objects caught in it. - Page 29 This can be changed under 'Settings' - 'Power management'. ( page 117)
-
Page 30: Basic Keyboard Operation
Basic keyboard operation This section describes the main uses of the keys other than for entering text. 14 13 (1) Halfwidth / Fullwidth Kanji key Turns Japanese input on or off. (ii) esc (escape) key. Returns to the previous screen. (iii) Numeric keys Enter a number;... - Page 31 ( page 139) ctrl (control) key. Press in combination with other keys to perform shortcut functions. ( page 139)
- Page 32 menu / help key. Calls up the menu screen and exits the menu screen. Pressing in combination with the alt key displays the help screen. (viii) alt key. Press in combination with other keys to perform shortcut functions. ( page 139) (ix) Space key Enter a space or convert the character you are typing.
- Page 33 Each key is assigned a function specific to this unit. ( page 139)
-
Page 34: Displaying The Menu Screen
Display the menu screen. The menu screen allows you to edit and manage files and configure the unit's settings. Press the menu key. The menu screen is displayed. Basic operation of the menu screen This section describes the main keyboard operations on the menu screen. Key : Moves the cursor left or right. -
Page 35: What You Can Do With The Menu Screen
What you can do on the menu screen. This section describes the operations that can be performed from the menu screen and the settings. file Newly created Creates a new text-format file (. txt file). open (a file, etc.) Select and open files stored in the main unit memory, on the SD card, in a backup or in the recycle bin. - Page 36 editi return to the point (of a discussion) Undo any previous edits made. redoing Redo any edits that were undone immediately before. cutting off Cuts out text in the area selected by the cursor. copy Copies the characters in the range selected by the cursor. paste Cut or Copy pastes the selected text at the cursor position.
- Page 37 Search/Inse search (e.g. for someone using a search engine) Searches for the specified string in the text being edited. ( page 34) substitution Replaced by a string of characters. ( ➔ p a g e 36) Searches for the specified string in the text being edited and replaces it with another string.
- Page 38 export supplementary dictionary Save the word registration data to You can set the specialised dictionary to be used for the conversion. ( the SD card. ( page page 52) import Load the word registration data on the SD card into this unit.
- Page 39 Tool. electronic dictionary You can. ( ➔ page 69) Browse thesaurus, Japanese dictionary, English-Japanese dictionary and Japanese-English dictionary. QR Code. ( ➔ p a g e 7 2 ) . ( ➔ page 73) Convert the text data being edited into a QR code and display it.
- Page 40 displ full screen display Display. ( ➔ p a g e 97) Hide the status bar and only the text editing area. outline Text headings can be created and displayed. ( page 98) scenario Displays suitable formats for creating scripts, scripts, etc. ( ...
- Page 41 screen are inverted to black and white. frame Displays a frame with the specified number of characters and lines. ( ➔ 107) (Page) line number Displays line numbers on the text editing screen. reversal of monochr backgrou nd colour and text on the editing...
- Page 42 blan ATOK input settings Sets whether proofreading assistance is provided when typing. ( page 109) Set the ATOK input method, input style, etc. You can also set the Default settings: input method / Roman input, input form character type / Hiragana, expression mode / General, input style / MS-IME, proofreading support.
- Page 43 setti Date-Time (of a Set the date and time on the unit. ( page 115) pute r or file, power management etc.) Sleep and auto power-off settings. ( ➔ page 116) Default settings: sleep /3 minutes, auto power off /5 minutes file management Set the default file name, save location and initial screen at start-up.
- Page 44 ( page 135) Main unit information It displays the remaining battery level, memory usage capacity, MAC address and various certification information (Radio Law, Telecommunications Business Law, VCCI). The Initialises software version can also be checked and updated. The following is a list of the most important issues to be addressed. ( page the main 139) unit...
-
Page 45: Editing Text
Editing text Entering text When the power is switched on, the text editing screen appears. On the text editing screen, you can enter and edit text in the same way as you would in a general text editor. The keyboard operation of the input styli selected in the screen 'Format' - 'ATOK input settings' ( ... - Page 46 M e m o . To deselect text, do not press the shift key. Press one of the / / / keys without pressing the shift key. The maximum number of characters per file is approximately 200,000 characters at 3 bytes per character. If a text file contains environment-dependent characters, it cannot be viewed, edited or operated with this unit.
-
Page 47: Calibration Support
Calibration support The system automatically checks and points out errors in reading, kana usage and misuse of the text you have entered. By setting the proofreading assistance to active, you can reduce errors when entering text. ( page 109) . Reading - kana usage errors (e.g. -
Page 48: Search Text
Search text. You can search for and display specified strings within the text being edited. Select 'Search/Insert' - 'Search' in the menu screen and press enter. The 'Search' screen appears. Enter the string you want to search for. M e m o . The searchable string is limited to 18 full-width characters. - Page 49 Use the / keys to move the cursor and the spacebar to select the search criteria. Search upwards:. When searching, the search is directed upwards with reference to the cursor. Case sensitive / lower case:. Select whether to make the search case-sensitive or not. Use regular expression:.
- Page 50 Strings matching the search criteria are retrieved. M e m o . If the 'String to search' field is empty, pressing the enter key does not start the search. Enter a string or press the esc key. The menu screen is displayed. Pressing the F3 (shift + F3) key can also be used to continue the previous search string.
-
Page 51: Replaces The Searched Text
Replaces the searched text. You can search for a string and replace it with a specified string. Select 'Find/Insert' - 'Replace' in the menu screen and press enter. The 'Replace' screen appears. Enter the string you want to search for in and enter the string you want to replace. - Page 52 Use the / keys to move the cursor and the spacebar to select the search criteria. Search upwards:. When searching, select the direction to search with reference to the cursor. Case sensitive / lower case:. Select whether to make the search case-sensitive or not. Use regular expression:.
-
Page 53: Jump To Specified Line
Jump to the specified line. You can jump the cursor to a specified line in the text being edited. On the menu screen, select 'Search/Insert' - 'Line-specified jump' and press the enter key. The 'Line-specified jump' screen appears. Enter the number of lines to jump to and press enter. - Page 54 Set canned messages Set the canned text that can be inserted during text editing. 20 types of canned text can be registered. Select 'Search/Insert' - 'Canned text' in the menu screen and press enter. A list of registered canned messages is displayed. *If there are no registered canned messages, the 'Edit canned messages' screen appears immediately.
- Page 55 Enter the desired settings and press the esc key. The canned text is set and you are returned to the Canned Text List screen. M e m o . Up to 20 canned messages can be registered. The maximum number of characters registered for a standard text is approximately 500 double-byte characters per type.
-
Page 56: Inserting Canned Text
Inserting canned text Inserts registered canned text. Select 'Search/Insert' - 'Canned text' in the menu screen and press enter. A list of registered canned messages is displayed. Select a canned text with the keys and press ENTER. The selected canned text is inserted at the cursor position. M e m o . - Page 57 use a sticky note Sticky notes act like bookmarks inserted into text data. Inserting a sticky note into a text allows you to jump to the position of the sticky note with a single action while editing. Inserting them in a large amount of text allows more efficient text editing. On the menu screen, select 'Search/Insert' - 'Sticky note' and press the enter key.
- Page 58 Enter the sticky text and press enter. A sticky note is inserted at the cursor position of the text. To jump to the position of a sticky note Select 'Jump forward' or 'Jump backwards' and press enter. The cursor jumps to the position of the sticky note. M e m o .
-
Page 59: Entering Text In Character Codes
Entering text in character codes Enter kanji characters and symbols that you do not know how to read, using Unicode or Shift_JIS character codes. Select 'Search/Insert' - 'Character palette' in the menu screen and press enter. The 'Character palette' screen appears. Press the tab key to select 'Unicode' or 'Shift_JIS'. -
Page 60: Managing Word Registrations
Managing word registrations Register a word Register frequently used words and phrases as words. On the menu screen, select 'Register words' - 'Register words' and press the enter key. The 'Register word' screen appears. *If there are no registered or automatically learned words, the screen for entering words appears immediately. - Page 61 Use the / key (or tab key) to move through the input items and enter the data for the word you want to register. Words:. Enter the words to be registered. Read:. Enter the reading of the word you want to register. Part of speech:.
-
Page 62: Register / Edit Auto-Learned Words
Register / Edit auto-learned words Edit registered words. You can also delete registered words. On the menu screen, select 'Register words' - 'Register words' and press the enter key. The 'Register word' screen appears. M e m o . Words marked with a circle for automatic learning become registered words when edited, and the circle is removed. - Page 63 To delete a registered word Select the word you want to delete using the / keys and press the delete key. A confirmation screen is displayed. To select multiple words, hold down the SHIFT key. Press the / key while holding down the shift key. Select 'Yes' with the / keys and press enter.
- Page 64 Register / Save auto-learnt words to SD card Save the registered and automatically learned words as a .txt file on the SD card. attention (heed) If the battery level is below 29% , charge the battery before using this function. On the menu screen, select 'Register words' - 'Export' and press enter.
- Page 65 Load dictionary data stored on an SD card into the main unit. Load dictionary data (.txt or .dic files) stored on an SD card into the unit's memory. attention (heed) If the battery level is below 29% , charge the battery before using this function.
- Page 66 Select 'Yes' with the keys and press ENTER. The dictionary data stored on the SD card is loaded into the unit and returns to the menu screen. attention (heed) DM5, DM10, DM11G, DM20, DM20Y, DM25, DM30, DM100 and Word registration files (atok.dic) used on the DM200 can be imported into the DM250.
- Page 67 Set auxiliary dictionaries. Select an auxiliary dictionary of technical terms for convenient conversion. On the menu screen, select 'Word registration' - 'Auxiliary dictionary' and press the enter key. The 'Auxiliary dictionaries' screen appears. Use the / keys to move the cursor and the spacebar to select an auxiliary dictionary.
-
Page 68: File/Folder Management
File/folder management Save the file Name and save files edited on the unit. You can select either the unit's memory or the SD card as the destination for the file. M e m o . Edited files are saved as .txt files. Select 'File' - 'Save As' in the menu screen and press enter. - Page 69 Enter a file name Enter any file name. attention (heed) Some one-byte characters (" * / : < > ? \ |). Half-width spaces and ". ' (half-width period) cannot be used at the beginning of a file name. M e m o . The maximum number of characters that can be entered for a file name is 18 double-byte characters.
- Page 70 M e m o . If you enter a file name that already exists, a confirmation screen for 'Save Overwrite' is displayed. Select 'No' to give the file another name or 'Yes' to overwrite an already existing file and press enter. If a file in the unit's memory is overwritten and saved when auto-backup is enabled, the entire folder structure of the file before the overwritten file is automatically saved in the backup area.
-
Page 71: Create Folder
Create folders Create folders for organising saved files. You can select either the main unit memory or the SD card as the folder creation destination. Select 'File' - 'Open' in the menu screen and press the enter key. The 'Open' screen appears. M e m o . - Page 72 Press F4 key. The folder name input area appears. Enter a folder name. Enter any folder name. Press the enter key. A folder is created with the folder name entered. attention (heed) Half-width characters (" * / : < > ? \ |) in folder names. Half-width spaces a n d ".
-
Page 73: Copying/Moving Files
Copying/moving files Saved files can be copied or moved between the unit's memory and SD card and between folders. Copying duplicates the file, leaving the original file in place. When moving, the file does not remain in its original location. Select 'File' - 'Open' in the menu screen and press the enter key. - Page 74 attention (heed) Folders cannot be copied/moved. If there is insufficient capacity at the copy (or move) destination, the saving operation is interrupted. Files that are being edited cannot be moved. If the SD card is locked, data on the SD card cannot be manipulated, except for viewing and copying data.
-
Page 75: Deleting Files/Folders
Deleting files/folders Delete saved files/folders. Select 'File' - 'Open' in the menu screen and press the enter key. The 'Open' screen appears. Use the tab key to select the stored memory. A list of files/folders in the destination is displayed. Se le c t th e f ile o r f ol de r y ou wa nt to de le te wi t h t he key s a nd press delete. - Page 76 M e m o . Multiple files or folders can be selected using the shift + / keys. When the recycle bin is not in use, the "Do you want to delete the selected file/folder?" message is displayed. If you select 'Yes', the data will be deleted completely.
-
Page 77: Renaming A File/Folder
Renaming a file/folder Rename the saved file/folder. Select 'File' - 'Open' in the menu screen and press the enter key. The 'Open' screen appears. Use the tab key to select the stored memory. A list of files/folders in the destination is displayed. Select the file or folder you want to rename with the keys and press F2. - Page 78 attention (heed) One-byte characters that cannot be used in file or folder names (" * / : < > ? \ | ) in file or folder names. Half-width spaces and "." (half-width period) cannot be used at the beginning of a file or folder name.
- Page 79 Search f i l e s / f o l d e r s / text body Searches for files/folders and text bodies stored in the unit's memory and on the SD card. O n t h e menu screen, select [File] - [Open] and press the enter key. The 'Open' screen appears.
- Page 80 Enter the name of the file/folder/text body you want to search. M e m o . The maximum number of characters that can be entered is 18 double-byte characters. Press the enter key. Files / folders / text bodies that match the search criteria are searched. M e m o .
-
Page 81: Auto-Backup Of Files
Auto-backup of files. When using auto-backup, each time a file in the main unit memory is 'overwritten and saved', the file in the state before the overwrite is saved is automatically stored in the backup area. From the backup area, files can be restored to the main unit memory. Select 'File' - 'Open' in the menu screen and press the enter key. - Page 82 When recovering files Select the file with the keys and press ENTER. M e m o . It is not possible to restore entire folders from the backup area. When the file is recovered, it is saved in the first level of the unit's memory under the file name "(file name)_ bak*".
- Page 83 Move files/folders to the recycle bin Using the recycle bin, folders/files deleted from the main unit memory are automatically moved to the recycle bin. From the recycle bin, files can be restored to the main unit memory. Select 'File' - 'Open' in the menu screen and press the enter key. The 'Open' screen appears.
- Page 84 When recovering folders/files Select the folder/file with the / keys and press ENTER. M e m o . Folders in the recycle bin cannot be recovered as stand-alone files stored in the folder. Please recover the entire folder. The selected folder/file is restored to the first level of the main unit memory.
-
Page 85: Making Use Of Tools
Making use of tools Browse electronic dictionaries Four dictionaries are built into the unit: the Kadokawa Dictionary of New Linguistics .S, the Meikyo Japanese Dictionary MX, the Genius English-Japanese Dictionary MX a n d t h e G e n i u s Japanese-English Dictionary MX. Select 'Tools' - 'Electronic dictionary' in the menu screen and press the enter key. - Page 86 key (o r tab key) to select the dictionary you want to browse and press enter. The selected electronic dictionary is displayed. M e m o . When a character is selected on the editing screen, it is conveniently quoted in the dictionary search.
- Page 87 If the word description is long, the full text can be viewed by scrolling the screen.
- Page 88 M e m o . To redo the search, press the esc key. The search field is cleared and you can enter the word again. Press F2 to check the search history. For each dictionary, you can go back up to the last 100 entries.
-
Page 89: Copying The Contents Of An Electronic Dictionary
Copying the contents of an electronic dictionary You can copy the description of the word you are looking up into the file you are editing. Search for the description of the word you want to copy. Select a word using the / keys and press the enter key (or tab key). Focus shifts to the word description screen. -
Page 90: Creating A Qr Code
Creating a QR code Text data being edited is converted into a QR code and displayed. Using a QR code reader such as a mobile phone, you can easily create long emails or update blogs. Select [Tools] - [QR Code] on the menu screen and press the enter key. The text data is converted and the QR code screen is displayed. - Page 91 Press F2 to select the size of the QR code. Sets the number of characters to be converted into a QR code. The maximum amount of information displayed per QR code is as follows Large:. Approx. 1800 bytes (approx. 600 characters in UTF-8, approx. 1110 characters in Shift_JIS) Medium:.
- Page 92 contact the manufacturer of the respective mobile phone model.
- Page 93 Create a date memo (calendar). Specify a date and create a memo. You can make notes on schedules and create diaries. Select [Tools] - [Calendar] in the menu screen and press enter. The calendar screen is displayed. M e m o . Press F1 key (alt + key or shift + tab key) to display the previous month or previous week's calendar.
- Page 94 Select the date for which you want to create a memo with the keys and press ENTER. The Edit Date Memo screen appears. M e m o . Only one date memo can be saved per day. If you select a date for which a date memo already exists, the existing memo will be displayed on the edit screen.
- Page 95 M e m o . The maximum number of characters that can be entered in a date memo is approximately 8,000 double-byte characters per day. The date memo text data is stored in the unit's memory; it cannot be stored on the SD card.
- Page 96 Set the style The background of the text editing screen displays a 400-character vertical or horizontal manuscript sheet. Select 'Tools' - 'Style' in the menu screen and press enter. The 'Select style' screen appears. Select the direction of the document paper with the / keys and press the enter key.
-
Page 97: Connect With The App
Connect with the app Using the wireless LAN c o n n e c t i o n f u n c t i o n , y o u c a n c o n n e c t t o iOS/Android d e v i c e s a n d send and receive files via the d e d i c a t e d 'pomera Link' application. - Page 98 Select 'Yes' with the key A screen appears waiting for the connection. M e m o . Press the F1 key to change the SSID and password of the unit; the default value SSID DIRECT-pomeraDM250 random alphanumeric value is assigned to the password. Turn on wireless LAN on iOS/Android devices The wireless LANs in the vicinity are searched.
- Page 99 Pomera displays an 'App connection in progress' message. Launch the dedicated application 'pomera Link' on your iOS/Android device. M e m o . You cannot operate the Pomera while it is connected to an iOS/Android device. Only one iOS/Android device can be connected at a time. To disconnect, terminate the connection on the iOS/Android device or press the esc key on the Pomera.
-
Page 100: Upload By
Upload. Files are sent by e-mail using the wireless LAN. You can print from the unit by sending an email to the printer to which you have been assigned an email address. attention (heed) The configuration of the wireless LAN environment is outside the scope of our support. - Page 101 Select 'Tools' - 'Upload' in the menu screen and press enter. The 'Upload' screen appears. Select 'Network' with the keys and press ENTER. The 'Network settings' screen appears. attention (heed) When connecting to a network where " " is displayed, the password must be entered.
- Page 102 Select the wireless LAN connection destination and press ENTER. A screen for entering a password is displayed. M e m o . If you selected 'Other' in step 2, a screen for entering the ' N etwork Name', ' P assword' and ' S ecurity' will be displayed.
- Page 103 Select the account type and press enter. A screen for entering an email address and 'password' will appear. M e m o . Once you have set up your account, you will not need to do this next time. If 'Other' is selected in step 5, a screen for entering 'Email' and 'SMTP' is displayed. Enter the account information and press enter.
- Page 104 Select 'Destination' with the keys and press ENTER. The 'Destination' screen appears. *If there are no registered destinations, the Edit Destination screen appears immediately. To register a new destination Press F1 key. The 'Edit Destination' screen appears. To change a registered destination Select the destination with the key and press the key.
- Page 105 Specify the destination and press enter. The destination is selected and you are returned to the 'Upload' screen. Select 'filename' with the keys and press ENTER. The 'File selection' screen appears. Decide which files you want to upload and select 'Start' on the 'Upload' screen. Select.
-
Page 106: Connecting To A Computer
Connecting to a computer Connecting the unit to a PC with the supplied USB cable enables access to the unit's files from the PC. Connect the unit to the PC with the USB cable supplied. On the menu screen, select [Tools] - [PC Link] and press the enter key The unit enters the PC link state and the PC recognises the unit's memory (text and date memo) and SD card storage area as new hardware. -
Page 107: Open Files In The Pomera On Your Computer
Open files in the Pomera on your computer. When connected to a PC, you can open files in the unit's memory or SD card from the PC. This section uses Windows 11 operation as an example. Select the drive of the main unit's memory (or SD card) from [Explorer] - [PC] on the PC. - Page 108 Copying/moving files between this unit and a computer. When connected to a computer, various files can be copied (or moved) between the unit's memory or SD card and a computer. However, files that can be opened on this unit are in text format (. txt files) that can be opened with this unit. This section uses Windows 11 operation as an example.
- Page 109 Disconnect the unit from the computer. To disconnect the device from the PC, perform 'Secure Hardware Removal' from the PC to break the PC link status. The following example shows the operation under Windows 11. R i g h t - c l i c k t h e USB icon in the notification area of the PC. The menu is displayed.
- Page 110 Disconnect the USB cable. attention (heed) When disconnecting the unit from the computer, please ensure that the correct operation is carried out. If the unit is removed without correct operation, the data may be damaged. The power supply cannot be switched off until the USB cable is disconnected. If you are unable to 'Safely remove hardware', turn the computer on.
-
Page 111: Use As A Bluetooth Keyboard
Use as a Bluetooth keyboard The Bluetooth function allows the unit to be used as a keyboard for smartphones and tablets. M e m o . Other functions cannot be used while Bluetooth is in use. The Bluetooth function cannot copy or move files between the unit and a PC. Connect to a smartphone or other device and use it as a keyboard. - Page 112 Select [Tools] - [Bluetooth keyboard] in the menu screen of the device and press the enter key. The Bluetooth search screen appears. O n t h e iPhone, select the detected 'pomera DM250'. The passkey is displayed on the iPhone. The device also displays a screen for entering the passkey.
- Page 113 attention (heed) If the Bluetooth connection does not work, check the following items. - If the unit and the connected device are too far apart, move them closer together. Do not place or cover anything between them that could block communication.
-
Page 114: Termination Of Connection
Termination of connection To terminate the Bluetooth connection, perform the disconnection operation on the unit. Switch off the power or close the LCD screen. attention (heed) Only one unit can be connected at a time. M e m o . It can also be disconnected by terminating the Bluetooth connection on the side of the currently connected device. -
Page 115: Full Screen
Set screen display Full screen. Hide the status bar on the text editing screen. On the menu screen, select 'View' - 'Full screen' and press enter. A confirmation screen is displayed. Select 'Yes' with the keys and press ENTER. The screen changes to a full-screen display and returns to the menu screen. M e m o . -
Page 116: Show Outline
Show outline The editing screen is split vertically, with the list of headings on the left and the text editing screen on the right. Headings can be moved and repositioned in units of headings. This function is useful when creating text in chapters. Select 'View' - 'Outline' in the menu screen and press enter. - Page 117 M e m o . The heading corresponding to the cursor position in the editing window is marked with a grey band. In the edit window, the heading text is displayed in bold. When in outline view, 'Edit' - 'Expand All' and 'Collapse All' have been added to the menu screen, which can also be selected to toggle the display of headings.
- Page 118 The heading moves. M e m o . It moves to include the hierarchy below the selected heading.
- Page 119 Select a heading in the heading window and press ctrl + (to lower the hierarchy) or ctrl + key (to raise the hierarchy). The hierarchy of headings in the heading window and the edit window changes in tandem. M e m o . The hierarchy below the selected heading is also changed.
-
Page 120: Display In Scenario Mode
Display in scenario mode. The editing screen is divided into areas for scene structure and characters (scene and name area) and dialogue (text area). This format is suitable for creating scripts and scripts. Select 'View' - 'Scenario' in the menu screen and press enter. The scene/name area (1) and the text area (2) appear on the text editing screen. - Page 121 M e m o . The heading corresponding to the cursor position in the text area is marked with a grey band. In the body area, heading text appears in bold. When in scenario view, 'Edit' - 'Expand All' and 'Collapse All' have been added to the menu screen, which can also be selected to toggle the display of headings.
- Page 122 Scene - Select the heading in the name area and press ctrl + C (copy) or ctrl + X key (cut). Select the heading you want to paste with the keys and press ctrl + V (paste). A heading is added to the right of the selected heading.
-
Page 123: Side-By-Side Comparison Of Two Files
Side-by-side comparison of two files Two files can be opened simultaneously and the text edited while comparing the files. Cross-referencing and citation is easy. Select 'View' - 'Compare' in the menu screen and press enter. The 'Open' screen appears. Select the file you want to compare and press ENTER. The text editing screens appear side by side on the left and right. - Page 124 When scrolling through a window that is not selected Press the ctrl + key o r t h e ctrl + key to scroll the window. To terminate the comparison 1. select 'View' - 'Compare' in the menu screen and press the enter key 2. select the file to finish editing M e m o .
-
Page 125: Split A Single File And Display It Separately
Split a single file and display it separately. You can split a single file into left and right sections and edit the text while switching between the windows. Select 'Display' - 'Split' in the menu screen and press the enter key. The text editing screen is split vertically. -
Page 126: Display
Display frames with a specified number of lines and characters. Displays a frame with a specified number of lines and characters on the editing screen. This function is useful when creating text with a limited number of characters. Select 'View' - 'Frame' in the menu screen and press the enter key. The 'Frame display settings' screen appears. - Page 127 It cannot be used for...
-
Page 128: Formatting
Formatting. Configuring ATOK Configure settings for ATOK text input. About the ATOK palette The status bar on the text editing screen allows you to check the currently set character type, input mode and other information required for text input and conversion. - Page 129 Thumb shift (1) Thumb shift (2)
- Page 130 Configure ATOK input method and other settings. Select 'Format' - 'ATOK Input Settings' in the menu screen and press the enter key. The 'ATOK input settings' screen appears. Select an item with the key and press the key. Select the desired setting with the key and press the key.
- Page 131 Press the enter key. The text input method is set and the display returns to the menu screen. The settings you have made are displayed as icons in the status bar of the text editing screen.
- Page 132 Set the display text type, size, etc. Set the type and size of text to be used when editing text. Select 'Format' - 'Text settings' in the menu screen and press enter. The 'Text settings' screen appears. Select an item with the key and press the key.
- Page 133 Set the cursor position at start-up. Sets the cursor position when the unit is started up. Select 'Format' - 'Cursor position' in the menu screen and press enter. The 'Cursor position' screen appears. Select an item with the keys and press ENTER. Open at the beginning of the sentence:.
-
Page 134: Setting Punctuation Marks
Setting punctuation marks Set the punctuation used. Sets the types of punctuation, symbols and parentheses to be used. This function is useful, for example, when creating documents with punctuation notation rules. Select 'Format' - 'Punctuation settings' in the menu screen and press enter. The 'Punctuation settings' screen appears. - Page 135 Set up automatic conversion of punctuation input. Set up the system so that previously unconverted text automatically starts converting when punctuation marks, etc. are entered. Select 'Format' - 'Punctuation Settings' in the menu screen and press enter. The 'Punctuation settings' screen appears. / key to select the "Punctuation Conversion"...
- Page 136 Setting up the unit Set the date and time You can set the clock built into the unit. On the menu screen, select [Settings] - [Date/Time] and press the enter key. The 'Date and time settings' screen appears. Select the item you want to change with the / key and press Select the value with the / key.
-
Page 137: Manage Power Supply
Manage power supply Setting up sleep You can set the time it takes for the screen display to disappear after a certain period of inactivity after switching the power on. The screen is displayed after any key input. The default setting is 3 minutes. Select 'Settings' - 'Power management' in the menu screen and press enter. - Page 138 Set auto power off. You can set the time it takes for the power to switch off after a certain period of inactivity after switching the power on. The default setting is 5 minutes. Select 'Settings' - 'Power management' in the menu screen and press enter. The Power Management screen appears.
- Page 139 Set up the file. Set how files are saved. Sets the default file name and destination, which is pre-populated when saving new text. Select 'Settings' - 'File management' on the menu screen and press the enter key. The 'File management' screen appears. Select an item with the / keys and press the key.
- Page 140 Autosave:. When a file needs to be overwritten (when opening a file, when connecting to Bluetooth or wireless LAN, or when connecting to a PC) , the file is automatically overwritten and saved. Use of bins:. Files and folders deleted from the unit's memory are temporarily stored in the recycle bin.
- Page 141 with a "UTF-8" BOM.
- Page 142 M e m o . If [File Save To] is set to SD card and no SD card is loaded, the main unit memory is displayed when the [Open] or [Save As] screen is opened. When auto-backup is enabled, the entire folder structure is stored in the backup area.
- Page 143 Set a password You can set a password for starting up the unit. By default, no password is set. important Make sure you do not forget the password you set, for example by writing it down on a piece of paper. If you have forgotten your password, please contact the Customer Service Centre.
- Page 144 Enter the string you want to set in 'Enter password' and 'Retype password' and press enter. The password is set and the password entry end screen is displayed. M e m o . The password must be between 4 and 8 alphanumeric characters long. Press the enter key.
-
Page 145: Change Password
Change password You can change passwords that have already been set. Select 'Settings' - 'Password' on the menu screen and press enter. The 'Set password' screen appears. Select 'Change password' with the keys and press enter. A screen for changing the password is displayed. Enter the password currently set in 'Enter current password'. - Page 146 Enter the string you want to set in 'New password' and 'Retype new password' and press enter. The password is set and the password entry end screen is displayed. M e m o . The password must be between 4 and 8 alphanumeric characters long. Press the enter key.
-
Page 147: Configuring Keyboard Functions
Configuring keyboard functions Changes the alignment of some keys or puts modifier keys in a locked state. Set key allocation You can replace the functions set for some keys and customise them to your liking. Select 'Settings' - 'Key settings' on the menu screen and press the enter key. The 'Key Settings' screen appears. - Page 148 Select the item to which you want to assign a function using the / keys and press Select the content or key for which you want to set the function with the / key and press the key. ctrl:. Sets whether the functions of the caps and ctrl keys are swapped. halfwidth / fullwidth:.
- Page 149 M e m o . If you want to return the keyboard function settings to their initial state, press the F1 key. A confirmation screen appears and you can initialise the keyboard functions.
- Page 150 Swap shortcut key functions. Swap the functions assigned to shortcut keys to customise them to suit your typing style. Select 'Settings' - 'Key settings' on the menu screen and press the enter key. The 'Key Settings' screen appears. key to select 'Shortcut keys' and press ENTER. The 'Shortcut keys' screen appears.
- Page 151 If you want to return the shortcut key function settings to their initial state, press the F1 key. A confirmation screen appears and you can initialise the keyboard functions.
-
Page 152: Setting Up Thumb Shift Input
Setting up thumb shift input You can change the keyboard layout to thumb shift. Select 'Settings' - 'Key settings' in the menu screen and press the enter key. The 'Key Settings' screen appears. Select 'thumb shift' with the / keys and press the enter key. The 'Thumb shift settings' screen appears. - Page 153 M e m o . Attach the sticker to the keyboard. T h e key layout will change if you use the thumb shift setting. Use the supplied keytops. ( page 149) Pressing the F1 key in the thumb shift menu allows you to check the key a r r a n g e m e n t o f While using the unit as a Bluetooth keyboard, the Kana input and thumb shift settings are disabled.
- Page 154 Set up US array input. You can change the keyboard layout to US layout. Select 'Settings' - 'Key settings' in the menu screen and press the enter key. The 'Key Settings' screen appears. Select 'US Array' with the / keys and press the enter key. The 'US Array' screen appears.
- Page 155 Configuring Bluetooth keyboard input It can be used as a keyboard for smartphones and tablets. Select 'Settings' - 'Key settings' on the menu screen and press the enter key. The 'Key Settings' screen appears. Select "Bluetooth keyboard" with the / keys and press the enter key. The 'Bluetooth keyboard' screen appears.
-
Page 156: Lock Modifier Keys
Lock modifier keys. It can be locked by holding down the shift, ctrl and alt keys respectively. You can use shortcut keys, for example, without having to press two keys at the same time. Using this function, you can easily enter text with one hand. Select 'Settings' - 'Key settings' on the menu screen and press the enter key. -
Page 157: Set Language
Set the language Sets the display language for menus, dialogue boxes and calendars. The operation to switch from Japanese to English is used here as an example. Select 'Settings' - 'Language' on the menu screen and press enter. The 'Select language /Language' screen appears. Select the language with the / keys and press ENTER. - Page 158 Select 'Yes' with the keys and press enter. A screen for selecting a layout is displayed. Select the layout to be used with the / keys and press enter. The menu display, for example, changes to the selected language. M e m o . Even if the display is set to English, it is possible to enter text in Japanese.
-
Page 159: Format The Memory
Format the memory Format the body memory. Erase and format all files and folders in the unit's internal memory. attention (heed) Formatting erases all data in the unit (folders/files, registered words, ATOK learning data, Bluetooth and wireless LAN settings, password settings, etc.) and returns the unit to the factory settings. - Page 160 Select "Main unit memory" with the / keys and press the enter key. The format confirmation screen appears. Select 'Yes' with the keys and press ENTER. The internal memory is formatted and an end-of-format message is displayed. Press the enter key. The unit restarts and the text editing screen appears.
- Page 161 Formatting the SD card All files on the SD card inserted in the unit can be erased and formatted. attention (heed) Files and folders erased by formatting cannot be restored. Select 'Settings' - 'Format' in the menu screen and press enter. The 'Format' screen appears.
- Page 162 Select 'Yes' with the keys and press ENTER. The SD card is formatted and an end-of-format message is displayed. Press the enter key. Returns to the menu screen. attention (heed) The time required for formatting varies depending on the capacity of the SD card. If the SD card is locked, data on the SD card cannot be manipulated, except for viewing or copying data.
-
Page 163: Annex
Annex. About software updates For information on the latest software versions and detailed instructions for updating, see our HP (https://www.kingjim.co.jp/download/pomera/dm250/) . M e m o . To update the software, a USB cable and SD card must be loaded into the unit; for information on how to load the SD card, see 'Loading the SD card'. - Page 164 Font size change (small) shift + F6 font switching View direction switching Backlight change (light) Backlight change (dark) shift + F9 property F10 / alt + I Selecting a character shift + cursor keys caps lock (fixes alphabetic characters shift + caps to uppercase).
- Page 165 overwrite save ctrl + S search (e.g. for someone using a search ctrl + F engine) substitution ctrl + R line jump ctrl + G comparison ctrl + T return to the point (of a discussion) ctrl + Z / alt + backspace redoing ctrl + Y / ctrl + shift + Z cutting off...
-
Page 166: Ms-Ime Shortcut Keys
MS-IME shortcut keys Conversion / Next candidate space / conversion /. / ctrl + X shift + space / shift + convert /. Conversion / Previous candidate ctrl + E Hiragana (post) conversion F6 / ctrl + U Katakana (post) conversion F7 / ctrl + I Half-width (post) conversion F8 / ctrl + O... - Page 167 Show next candidate group shift + Show previous candidate group shift + Move to next group tab / ctrl + J Go to previous group shift + tab Sentence breaks moved shift + / ctrl + K / / ctrl + E forward Sentence breaks moved shift + .
- Page 168 Copy the focus passage. ctrl + C...
-
Page 169: Atok Shortcut Keys
ATOK shortcut keys Space / shift + space / Convert / Convert Conversion / Next candidate shift + conversion Conversion / Previous candidate / ctrl +. Hiragana (post) conversion F6 / ctrl + U Katakana (post) conversion F7 / ctrl + I Half-width (post) conversion F8 / ctrl + O Full-width nonconversion... - Page 170 Show next candidate group transformation Show previous candidate group shift + conversion Move to next group tab / ctrl + J Go to previous group shift + tab Sentence breaks moved / ctrl + K forward Sentence breaks moved / ctrl + L backwards Move the focus clause forward.
-
Page 171: Us Sequence Shortcut Keys
US sequence shortcut keys Half- alt + ` / shift + caps / ctrl + space Full-width hiragana Half- alt + caps Full-width katakana Full- width katakana Half- ctrl + caps Full-width hiragana Full- width hiragana caps lock (fixes alphabetic caps characters to uppercase). - Page 172 shift + @ shift + [ key (input) \blow shift + ] shift + : " shift + ; insert Show/hide the Spotlight search screen. menu alt option command non-conversion ASCII coding transformation (at sentence end) should I? katakana hiragana romaji invalid Half-width / Full-width shift + half/fullwidth...
-
Page 173: About Keytop Stickers
About keytop stickers The keyboard can be customised to US keyboard or thumb shift by attaching the included keytop sticker to the keyboard. M e m o . -top sticker you use. ( page 128, 130) Change the key arrangement on the keyboard to match the keytop sticker y o u a r e u s i n g . -
Page 174: Thumb Shift (1)
Thumb shift (1) Keyboard stickers *Stickers on greyed-out keys are not used in thumb shift (1). Paste image. -
Page 175: Thumb Shift (2)
Thumb Shift (2) Keyboard stickers *Stickers for greyed-out keys are not used in thumb shift (2). Paste image. -
Page 176: Roman Input Table
Roman input table that (afte fourth (after a long (before bein that that come (somet sign of noun) (great, (i.e. a noun) (someo hing Chinese used swingin mere cram ne or mentio zodiac when someth adje (The calling stride before ctive Hare, out to... - Page 177 and . yuzu (spec mid- ies of sentenc arom e) used atic to catch Asiat one's breath citro Citru juno road next to exactly (esp. coun (after a living noun, next anci adjectiv door song e stem, Chin onomat drug opoeic- infor mimeti...
-
Page 178: I Thought It Might Be A Fault
I thought it might be a fault. Nothing appears on the LCD screen when the power button is pressed. Is the battery low or fully discharged? Recharge the battery if the battery charge is low. page 17 'Charging the battery'. Are you using the supplied AC adapter? Charge the battery using the supplied AC adapter and USB cable. - Page 179 and the LCD screen will turn off if no operation is performed for more than a certain period of time with the USB cable unconnected. The default setting is to switch off the power after 5 minutes of inactivity. page 117 'Setting auto power off'. Freeze.
- Page 180 LCD screen disappears Is it not a sleep function? When the sleep function is set, the LCD screen automatically switches off after a certain period of inactivity. The default setting is for the lights to turn off after 3 minutes of inactivity. ...
- Page 181 The SD card is not recognised by the Pomera. Check whether the SD card is recognised correctly by other devices such as a PC. If it is not recognised correctly, the SD card may be faulty. For information on the latest operation-confirmed SD cards for the digital memo "Pomera"...
-
Page 182: Index
index overwrite save symbol LCD screen .dic files (dictionary files) Export 26,49 .txt files (text) auto save (File) 49,50,53,90 Auto-backup 65,118 / (cursor) key Auto power-off setting 20,30,117 thumb shift 30,128 alphanumeric character -ist (used after a noun indicating someone's alt (alt) key 22,132 ATOK shortcut keys... - Page 183 numeric key Style. 27,78 status bar space bar All folded Select all Expand all sleep setting 20,30,116 control character full screen display 28,97 Half/full kanji key distance between outstretched thumb Comparison 28,104 and middle finger (approx. 18 cm) Date and time 30,115 Time stamp Date notes.
- Page 184 (computer) format 30,135 Delete folders Renaming folders Searching folders Create folders font tag-line (e.g. to a newspaper) 26,42 Jump to the location of the sticky text. frame 28,107 property division 28,106 help help key Editing icon certificate supplementary dictionary 26,52 files between the unit and the PC.
-
Page 185: Specification
(technical) specification body (of a machine) Keyboard : JIS keyboard, key pitch 17 mm Body memory : approx. 1.3 GB Screen. 7.0 inch TFT LCD, WSVGA (1024 x 600 dots), with backlight Interface. USB 2.0 (Type-C) PC link, used as charging port External dimensions Approx. - Page 186 Bluetooth keyboard compatible OS iOS 12 or later / Android 9 or later Depending on the product used, the keyboard may not be compatible. For products that cannot communicate with this unit, contact the respective terminal/device manufacturer. For use with various operating systems: For special symbols, etc., for which some input methods differ, see the Bluetooth compatible keys in the operating instructions.
-
Page 187: After-Sales Service
Opening hours: weekdays (Mon-Fri) 00 am - Thank you for purchasing a King Jim product. By registering as a customer, you can receive support services provided by King Jim, such as information on products and services and receipt of enquiries. - Page 189 Digital Memo 'Pomera' DM250 I n s t r u c t i o n M a n u a l , April 2022, 1st ed. King Jim Ltd. 10-18, Higashi-Kanda 2-chome, Chiyoda-ku, Tokyo 101-0031, Japan https://www.kingjim.co.jp/...
- Page 192 ©2021 KING JIM Printed in China 08-①...
Need help?
Do you have a question about the pomera DM250 and is the answer not in the manual?
Questions and answers