Advertisement
Quick Links
Advertisement

Summary of Contents for CHEMAT TECHNOLOGY KW-4A
- Page 1 Spin Coater W‐4A Owner’s Manual Page | 1 ...
-
Page 2: Limitation Of Liability
LIMITATION OF LIABILITY In no event shall CHEMAT TECHNOLOGY INC. be held responsible nor liable for any direct, indirect, incidental, special or consequential damages or costs whatsoever resulting from or ated to the use or misuse of the Spin Coater KW‐4A, even if CHEMAT TECHNOLOGY INC. h as been advised, know, or should be aware of the possibility of such damages. CHETMAT TECHNOLOGY INC. emphasizes the importance of consulting experienced and qualified professionals to assure the bes results of using the Spin Coater KW‐4A. t Page | 2 ... - Page 3 . Features 1. Dual spee d controls with con tinuous speed adjustme nt and individual timers. Initially, spinner ro tates at a low speed (S d I) for a pre‐set cyc le time (Timer I) and automatically switch es to a high spee d (Speed II) for a pr e‐set cycle of time (Timer II) FEATURE MINIMUM MAXIMUM Speed I in rmp 500 2,500 Speed II in rmp 1,000 8,000 Timer I in seconds 2 18 Timer II 3 60 ...
-
Page 4: Safety Precautions
II. Safety Precautions 1. DO NOT touch or hold the shaft or chuck while rotating. Severe injury may result. ubstrate may fly off rotating chuck. Precautions should be taken to protect operator nd others from injury while operating spin coater equipment. angerous electrical potentials are present inside the cabinet. Be sure to unplug the line cord before opening the cabinet. Motor brushes and switch contacts may produce sparks. DO NO use the laboratory spinner in the presence of any explosive atmosphere. WARNING Early Terminations of Pre‐Set cycle may result in machine reverting to maximum revolutions when restarting. Please shut off machine before resetting. Page | 4 ... -
Page 5: Controls And Functions
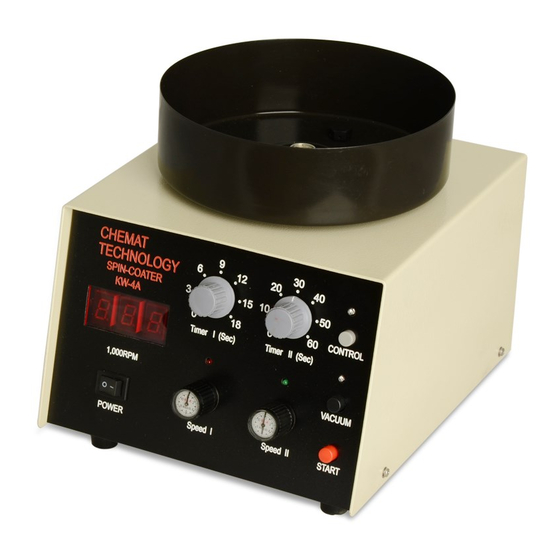
III. Controls and Functions A schematic of the con trol panel is shown in Figure 1. The function of each switch is described as follows: 1. Power: Turns spin coater power on and off. 2. Speed I: Adjusts the spinning operation speed in lower range. 2500 rpm is the maximum for Speed I. Speed II: Adjusts the spinning operation speed in higher range. 8000 rpm is maximum for Speed II. 3. Control: This button should be pressed before any spinning operations begin. This button should be pressed again whenev er any spinning operation to stop. 4. Vacuum: Control vacuum to the vacuum chuck. The motor will not oper ate if this button is not pressed. Re‐pressing this button during spinning will cause the spinning operation to stop. 5. Start: Starts the spinning operation cycle. Spinning operation will start only when both the “Control” and “Vacuum” buttons are pressed. . Timer I: Sets the spinning operation cycle time for the Speed I range or ... - Page 6 Figure1. IV. Operations Note: Determine the spinning speeds and spin cycle time required by your coating materials and substrate accordingly 1. Select and install a sample chuck (optional acce ssory, not included) which fits the size of substrate to be coated. Match the notch at bottom of the chuck with the pin on the center shaft, and mount the chuck firmly on the spinning shaft. 2. Turn the “Power” switch on. Press the “Control” Button one time only. 3. Set spin cycle time and speeds accordingly. Speed I is the low speed and the spin cycle time for this speed range should be set with Timer I. Speed II is for high speed and the spin cycle time for the speed range should be set with Timer II. Page | 6 ...
- Page 7 4. Place the substrate on the sample chuck and make sure the substrate is centered before spinning operation begins. 5. Press “Vacu um” Button one time only to turn on the vacuum. Coating material must be ready for substrate before “Start” button is pressed since coating material must be applied at the low speed or Speed I during the time of spin cycle period set by Timer I. 6. Push the “Start” button to start spinning operation. The substrate will spin at the low speed or Speed I for the time period pre‐set by Timer I. The Substrate will spin at high speed or Speed II for the time period pre‐set by Timer II. 7. Coating material applied to the su bstrate must be applied at the low speed or Speed I, not at the high speed or Speed II. 8. Place the bowl cover over the bowl. 9. When cycle ends, press “Vacuum” button to turn the vacuum off. 10. Remove the bowl cover. 11. Remove the substrate. Note: make sure that “Vacuum” button is ...
- Page 8 Diagram I This equipment has been modified and can be connected to an external exhaust system. uring the coating operation it can reduce harmful vapor getting into the air. asten the bowl with the two screws supplied and connect an exhaust system to the exhaust outlet. (see sketch) Page | 8 ...
- Page 9 NOTICE: The Substrate size should always be bigger than the size of the chuck which you are using. (Recommended ¼ inch bigger than the chuck’s size). If not, the coating solution will easily be sucked into the vacuum system. Page | 9 ...
- Page 10 LIMITED ONE YEAR GUARANTEE KW‐4A Spin Coater Chemat Technology Inc. warrants the KW‐4A Spin Coater against defects in materials and workmanship, under normal use from the confirmed date of purchase, by the original purchaser. Upon written notice of any defec ts, Chemat Technology Inc. will either repair or replace the faulty product or components thereof. Any warranty stated hereunder is extended to the original purchases and is not transferable. Chemat Technology Inc. does not assume liability for consequential damages or liability as a result of our product’s use. Chemat Technology Inc. liability extends, but does not exceed, the original selling price of the equipment. In addi tion, there is no assumption, in the following: 1. Shipment to or from the customer or Chemat Technology Inc. 2. Improper environment, temperature extremes, electr ical power surges or failure or other misuse or negligence. 3. Adjustment or repair by personnel not authorized by Chemat Techn ology Inc. 4. Improper in stallation or failure to follow installation instructions 5. Forces beyond the control of Chemat Technology Inc. including but not limited to an act of God, war, insurrection, civil disturbance, natural disasters, labor disputes or government regulations. In order to obtain service under this guarantee, you must first call Chemat Technology Inc. Mechanical Engineering department and obtain a Return Authorization number before shipping the product to Chemat Technology Inc. (1‐800) 475‐3628 ...
Need help?
Do you have a question about the KW-4A and is the answer not in the manual?
Questions and answers