Table of Contents
Advertisement
Quick Links
Elite 3.5 LCD ZUMspot kit user guide
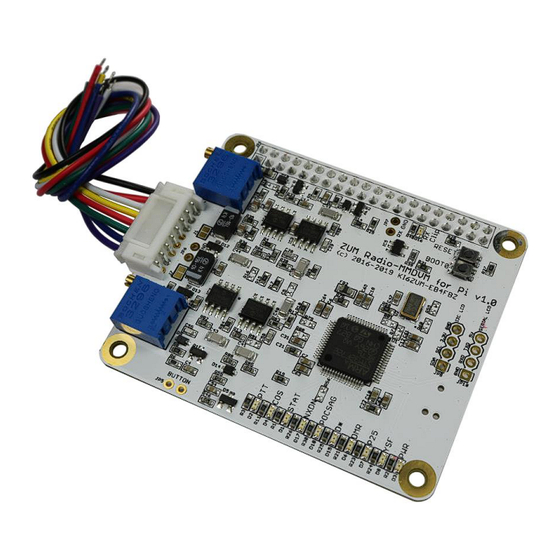
MMDVM-Pi rev. 1.0 board
The MMDVM-Pi hardware radio interface is part of the Multi-Mode Digital Voice Modem open source
project. It combines the power of an ARM processor and analog radio interface to create a modem to
handle all amateur digital voice modes.
Copyright 2019-2022 ZUM Radio, Inc
1
Rev 1.0
Advertisement
Table of Contents

Related Manuals for ZUM Radio MMDVM-Pi


Summary of Contents for ZUM Radio MMDVM-Pi
- Page 1 Elite 3.5 LCD ZUMspot kit user guide MMDVM-Pi rev. 1.0 board The MMDVM-Pi hardware radio interface is part of the Multi-Mode Digital Voice Modem open source project. It combines the power of an ARM processor and analog radio interface to create a modem to handle all amateur digital voice modes.
-
Page 2: Table Of Contents
Wiring connections ............................3 Adjusting signal levels (hardware) ........................ 4 Adding an external display ..........................6 Configuring Pi-Star (including adjusting signal levels via software) ............. 8 Building MMDVM-Pi firmware ........................11 On Windows 10 ............................11 On Ubuntu............................... 12 On macOS ..............................12 On Pi-Star .............................. -
Page 3: Specifications
Elite 3.5 LCD ZUMspot kit user guide Specifications The MMDVM-Pi board is designed for repeater and high power hotspot applications – connects to user supplied Raspberry Pi board and radio(s) Utilizes a high performance 32bit ARM processor (STM32F722) running at 180Mhz (Room for future upgrades) ... -
Page 4: Adjusting Signal Levels (Hardware)
The signal on JP7 is the RX signal audio on the ADC input pin of the STM32 chip. JP6 has the TX signal audio on the pin going to the radio. Copyright 2019-2022 ZUM Radio, Inc Rev 1.0... - Page 5 Enable DC blocking capacitor on Radio TX end LED Description Table LED NAME Description Board is transmitting Board is receiving STAT Status NXDN NXDN Enabled POCSAG POCSAG Enabled D-Star Enabled DMR Enabled P25 Enabled YSF Enabled Board is receiving power Copyright 2019-2022 ZUM Radio, Inc Rev 1.0...
-
Page 6: Adding An External Display
JP8 is where you can solder a header for connecting an OLED display. JP10 is where you can solder a header for connecting a NEXTION display. For connecting a NEXTION display, make sure that each colored wire matches the connections shown in the image below. Copyright 2019-2022 ZUM Radio, Inc Rev 1.0... - Page 7 Turning the TX audio trim pot counter clockwise will decrease the signal level, while turning the trim pot clockwise will increase the signal level. When there is no audio stream coming in, adjust the RX pot until the RX CLIP LED barely lights up. Copyright 2019-2022 ZUM Radio, Inc Rev 1.0...
-
Page 8: Configuring Pi-Star (Including Adjusting Signal Levels Via Software)
Elite 3.5 LCD ZUMspot kit user guide Configuring Pi-Star (including adjusting signal levels via software) From the “Configuration” menu, set the Radio/Modem type to “ZUM Radio-MMDVM for Pi (GPIO) and then select Apply Changes. Next select the “expert” menu, and then select “MMDVMHost”... - Page 9 Elite 3.5 LCD ZUMspot kit user guide Scroll down to the “Modem” section to access the invert and level settings then select “Apply Changes” Scroll back up to the top of the page and select “Configuration”. Copyright 2019-2022 ZUM Radio, Inc Rev 1.0...
- Page 10 Elite 3.5 LCD ZUMspot kit user guide Next, select “Power” Next, select “Reboot” Copyright 2019-2022 ZUM Radio, Inc Rev 1.0...
-
Page 11: Building Mmdvm-Pi Firmware
● Edit Config.h. Uncomment the line: #define MODE_LEDS ○ If you want to connect a Nextion display, then also uncomment the line: #define SERIAL_REPEATER ● To start build run: make pi-f722 ● Binaries will be under the bin/ folder Copyright 2019-2022 ZUM Radio, Inc Rev 1.0... -
Page 12: On Ubuntu
● Edit Config.h. Uncomment the line: #define MODE_LEDS ○ If you want to connect a Nextion display, then also uncomment the line: #define SERIAL_REPEATER ● To start build run: make pi-f722 ● Binaries will be under the bin/ folder Copyright 2019-2022 ZUM Radio, Inc Rev 1.0... -
Page 13: On Pi-Star
Elite 3.5 LCD ZUMspot kit user guide On Pi-Star NOTE! You cannot build firmware for the MMDVM-Pi v1.0 under Pi-Star v3.4.17 or below because the compiler doesn’t fully support the STM32F7 chips. You must use the latest Pi-Star Beta v4.1.0-RC4 or above. - Page 14 #define MODE_LEDS ○ If you want to connect a Nextion display, then also uncomment the line: #define SERIAL_REPEATER ● To start build run: make pi-f722 ● Binaries will be under the bin/ folder Copyright 2019-2022 ZUM Radio, Inc Rev 1.0...
-
Page 15: Flashing Mmdvm-Pi
Pi-Star via the IP address then that is what would go there. ○ Enter username which is pi-star ○ Enter password. If you haven’t changed it then it should be: raspberry ○ Press the “Login” button in order to connect to the Raspberry Pi Copyright 2019-2022 ZUM Radio, Inc Rev 1.0... - Page 16 ○ If a window pops up asking if you want to continue connecting, select “Yes” ○ Once logged in you should see a screen similar to this ○ Navigate to the folder where you built the firmware Copyright 2019-2022 ZUM Radio, Inc Rev 1.0...
- Page 17 Windows section ● Copy and paste the following command and then press Enter: ○ sudo chmod +x MMDVM-Pi_FW_Update.sh ● Run command ./MMDVM-Pi_FW_Update.sh ● The install script will take care of flashing the MMDVM-Pi Copyright 2019-2022 ZUM Radio, Inc Rev 1.0...
-
Page 18: Linux And Macos
Linux and macOS section ● Copy and paste the following command and then press Enter: ○ sudo chmod +x MMDVM-Pi_FW_Update.sh ● Run command ./MMDVM-Pi_FW_Update.sh ● The install script will take care of flashing the MMDVM-Pi Copyright 2019-2022 ZUM Radio, Inc Rev 1.0... -
Page 19: Pi-Star
Star section ● Copy and paste the following command and then press Enter: ○ sudo chmod +x MMDVM-Pi_FW_Update.sh ● Run command ./MMDVM-Pi_FW_Update.sh ● The install script will take care of flashing the MMDVM-Pi Copyright 2019-2022 ZUM Radio, Inc Rev 1.0... -
Page 20: Find Ip Address
● Once it is done a pop-up window will show you how many hosts are connected to your network. Click “Close” to dismiss it. ● Now scroll through the addresses until you find one named PI-STAR. Copyright 2019-2022 ZUM Radio, Inc Rev 1.0... -
Page 21: Info For Use Under Windows 10
DMR: https://www.f5uii.net/en/installation-calibration-adjustment-tunning-mmdvm-mmdvmhost-raspberry- motorola-gm360/5/ Another document describing the spectrum adjustment process: http://www.swedmr.se/wp-content/uploads/2017/08/Justering-av-repeater-med-MMDVM.pdf Support Great video from W1MSG showing getting started with Pi-Star: https://www.youtube.com/watch?v=B5G4gYDdJeQ MMDVM groups.io group: https://groups.io/g/OpenDV Pi-Star support forum: https://forum.pistar.uk/ Copyright 2019-2022 ZUM Radio, Inc Rev 1.0... - Page 22 Elite 3.5 LCD ZUMspot kit user guide Pi-Star Facebook support group: https://www.facebook.com/groups/pistar/ Pi-Star Wiki: http://wiki.pistar.uk A web page describing the setup of an MMDVM repeater: https://sadigitalradio.com/digital-radio-how-tos/make-mmdvm-digital-repeater/ Copyright 2019-2022 ZUM Radio, Inc Rev 1.0...
Need help?
Do you have a question about the MMDVM-Pi and is the answer not in the manual?
Questions and answers