
Related Manuals for Toshiba SD-44HKSB


Summary of Contents for Toshiba SD-44HKSB
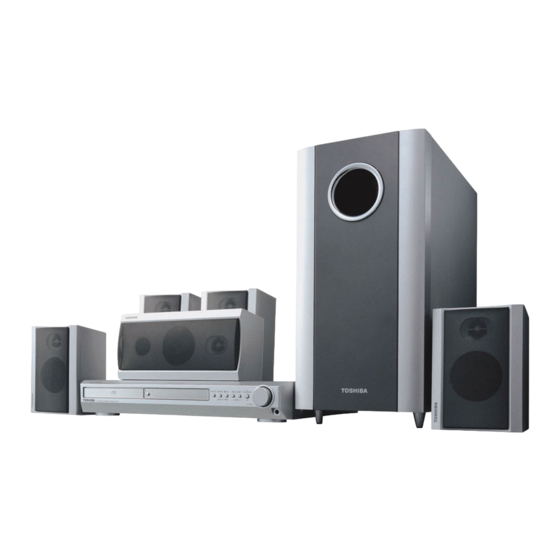
- Page 1 DVD HOME CINEMA SYSTEM OWNER’S MANUAL MODEL : SD-44HKSB Before connecting up, operating or repairing this product, please read this instruction booklet carefully and completely.
-
Page 2: Safety Precautions
Safety Precautions CAUTION This unit operates on a mains supply of POWER: AC 100~240V, 50/60Hz RISK OF ELECTRIC SHOCK DO NOT OPEN This appliance is supplied with BS 1363 approved 13 Amp fused mains plug. When replacing the fuse CAUTION: TO REDUCE THE RISK always use a 5 Amp BS 1362 approved type. -
Page 3: Some Dos And Don'ts On The Safe Use Of Equipment
Some Dos and Don’ts on the Safe Use of Equipment This equipment has been designed and manufactured to meet international safety standards but, like any electrical equipment, care must be taken if you are to obtain the best results and safety is to be assured. So, please read the points below for your own safety. -
Page 4: Table Of Contents
Table of Contents Introduction Operation with Audio CD and MP3/WMA Disc. 23-24 Playing an Audio CD and MP3/WMA Disc ..23 Safety Precautions ......2 Notes on MP3/WMA Recordings . -
Page 5: Before Use
Before Use Playable Discs Disc-related terms Title (DVD video discs only) The main film content or accompanying feature content DVD video discs or additional feature content, or music album. (8 cm / 12 cm disc) Each title is assigned a title reference number enabling Video CD (VCD) you to locate it easily. -
Page 6: Precautions
Before Use (Continued) Precautions Storing discs After playing, store the disc in its case. Handling the unit Do not expose the disc to direct sunlight or sources of heat, or leave it in a parked car exposed to direct sun- When shipping the unit light, as there may be a considerable temperature The original shipping carton and packing materials may... -
Page 7: Front Panel And Display Window
Front Panel and Display Window VOLUME controller DISPLAY Window ON/STANDBY indicator Lights red when the receiver is in Standby mode. Lights green when the receiver is in on mode (on). STOP/MEMO OPEN/CLOSE Remote sensor DISC Tray FUNCTION/PLAY Press and hold down this button about 3 seconds, then press repeatedly to select other function. -
Page 8: Remote Control Overview
Remote Control Overview POWER OPEN/CLOSE FM/AM FUNCTION SELECTOR You can also select the desired function with the FUNC./PLAY on the front panel. SLEEP (p. 29) NUMBER SUBTITLE (p. 22) SOUND (p. 15) SUBTITLE RETURN (p. 17, 20, 25) AUDIO (p. 22, 24) DISPLAY (p. -
Page 9: Rear Panel
Rear Panel POWER CORD SPEAKER Connectors COAXIAL DIGITAL IN Connector AV2 AUDIO Input (L/R)/VIDEO IN Connectors AV1 AUDIO Input (L/R)/VIDEO IN Connectors VIDEO OUTPUT SELECTOR Select either COMPONENT VIDEO OUT or RGB signal of EURO AV OUTPUT(TO TV) terminal depending on how you connect the DVD/CD Receiver to the TV. -
Page 10: Connections
Connections TV Connections Make one of the following connections, depending on Progressive Scan connection the capabilities of your existing equipment. If your television is a high-definition or “digital ready” When you connect the DVD/CD Receiver to other television, you may take advantage of the DVD/CD equipment, be sure to turn off the power and unplug Receiver’s progressive scan output for the higher all of the equipment from the wall outlet before... -
Page 11: Optional Equipment Connections
Connections (Continued) Optional Equipment Connections Connect a VCR to the AV1 connectors. Connect an additional VCR to the AV2 connectors. Connect an optical output of DVD Player (or Digital Audio Device etc) to the OPTICAL IN connector. Connect an coaxial output of DVD Player (or Digital Audio Device etc) to the COAXIAL N connector. Additional VCR VIDEO VIDEO... -
Page 12: Aerial Connections
Connections Aerial Connections Connect the supplied FM/AM aerial for listening to the radio. Connect the AM Loop aerial to the AM aerial connector. Connect he FM Wire aerial to the FM aerial connector. AM Loop aerial (supplied) FM Wire aerial (supplied) Notes To prevent noise pickup, keep the AM Loop aerial away from the DVD/CD Receiver and other components. -
Page 13: Speaker System Connection
Connections (Continued) Speaker System Connection Connect the speakers using the supplied speaker cords. To obtain the best possible surround sound, adjust the speaker parameters (volume, distance, etc.). Front speaker Front speaker (Right) (Left) Center speaker Rear speaker Rear speaker (Right surround) (Left surround) Subwoofer Notes... -
Page 14: Speaker Positioning
Connections (Continued) Speaker Positioning In the case of normal positioning using the 6 speakers (2 front speakers, centre speaker, 2 rear speakers and sub- woofer). If you want to play the excellent bass sound, DTS digital surround or Dolby Digital surround, you should connect a subwoofer. -
Page 15: Before Operation
Before Operation Mini Glossary for Audio Stream & Sound Mode Surround mode You can enjoy surround sound simply by selecting one of the pre-programmed sound fields according to the program you want to listen to. Press CD/DVD to select Allows you to enjoy 5.1(or 6) discrete channels of high quality DVD mode. -
Page 16: General Explanation
Before Operation (Continued) General Explanation Press 1 1 /2 2 to change the setting of an item. The number buttons can be also be used for setting This manual gives basic instructions for operating the numbers (e.g., title number). For some functions, DVD/CD Receiver. -
Page 17: Initial Setup
Before Operation (Continued) Initial Setup Picture TV Aspect You can set your own Personal Preferences on the DVD/CD Receiver. 4:3 Letterbox: Select when a standard 4:3 TV is con- nected. Displays theatrical images with masking bars General and Operation above and below the picture. 4:3 Panscan: Select when a conventional TV set is Press SETUP. -
Page 18: Speaker Setup
Before Operation (Continued) Speaker Setup Auto Play You can set up the DVD/CD Receiver so a DVD disc 5.1 Speaker settings automatically starts playing whenever the DVD is insert- Select speaker settings, including volume balance and delay time, or test the speaker settings. If Auto Play mode is set to On, this DVD/CD Receiver Speaker settings are only active on the Analog Multi- will search a title that playback time is longest and then... -
Page 19: Parental Control
Before Operation (Continued) Parental Control Area Code Enter the code of a country/area whose standards were Rating used to rate the DVD video disc, referring to the list Movies on DVDs may contain scenes not suitable for (See “Area Code List”, page 31). children. -
Page 20: Operation With Dvd And Video Cd
Operation with DVD and Video CD Playing a DVD and Video CD General Features Playback Setup Note VCD2.0 VCD1.1 Unless stated otherwise, all operations described use Turn on the TV and select the video input source con- the remote control. Some features may also be nected to the DVD/CD Receiver. -
Page 21: Still Picture And Frame-By-Frame Playback
Operation with DVD and Video CD (Continued) General Features (continued) Video CDs - Repeat Track/All/Off 1 To repeat the track currently playing, press REPEAT. Still Picture and Frame-by-frame playback The Repeat Track icon appears on the TV screen. 2 To repeat the disc currently playing, press REPEAT a VCD2.0 VCD1.1 second time. -
Page 22: 3D Surround
Operation with DVD and Video CD (Continued) General Features (continued) 3 Press CLEAR. The Marker number will be erased from the list. 4 Repeat steps 2 and 3 to erase additional Marker 3D Surround BYPASS VCD2.0 VCD1.1 3D SUR numbers. 5 To remove the MARKER SEARCH menu, press This unit can produce a 3D Surround effect, which SEARCH. -
Page 23: Operation With Audio Cd And Mp3/Wma Disc
Operation with Audio and MP3/WMA Disc Playing an Audio CD and MP3/WMA Disc Notes on MP3/WMA Recordings About MP3 An MP3 file is audio data compressed by using the The DVD/CD Receiver can play MP3/WMA formatted MPEG1 audio layer-3 file-coding scheme. We call recordings on CD-ROM, CD-R or CD-RW discs. -
Page 24: Pause
Operation with Audio and MP3/WMA Disc (Continued) Pause Repeat A-B 1 Press PAUSE/STEP during playback. To repeat a sequence. 2 To return to playback, press PLAY or press 1 During disc playback, press REPEAT A-B at your cho- PAUSE/STEP again. sen starting point. -
Page 25: Operation With Jpeg Disc
Operation with JPEG Disc Moving to another File Viewing a JPEG disc JPEG Press SKIP . or > once during viewing a picture This DVD/CD Receiver can play discs with JPEG files. to advance to the next file or to the previous file. Before playing JPEG recordings, read the notes on Still Picture JPEG Recordings on right. -
Page 26: Programmed Playback
Programmed Playback VCD2.0 VCD1.1 Programmed Playback with Audio CD Programmed Playback with Video CD and MP3/WMA Disc Note The Program function enables you to store your On a Video CD with PBC, you must set PBC to Off on the favourite tracks from any disc in the receiver memory. -
Page 27: Speaker Setup
Speaker Setup Additional Information Adjust the following settings for the built-in 5.1 channel Last Condition Memory surround decoder. VCD1.1 Disc Audio This DVD/CD Receiver memorizes the user settings for Disc Subtitle the last disc that you have viewed. Settings remain in Disc Menu memory even if you remove the disc from the player or Rating... -
Page 28: Operation With Radio
Operation with Radio Presetting the radio stations Listening to the radio You can preset 50 stations for FM and AM (MW). Before Preset radio stations in the DVD/CD Receiver’s memory tuning, make sure that you have turned down the vol- first (see “Presetting radio stations”... -
Page 29: Other Function
Other Function Sleep Timer Setting Notes You can set the DVD/CD Receiver to turn off automati- There is only one set of OPTICAL and COAXIAL input cally at a specified time. connectors. They are common for AV1 and AV2. The Optical input function is available only when the Press SLEEP to set the desired sleep time. -
Page 30: Language Code List
Language Code List Enter the appropriate code number for the initial settings “Disc Audio”, “Disc Subtitle” and/or “Disc Menu” (See page 17). Code Language Code Language Code Language Code Language 6566 Abkhazian 7074 Fiji 7678 Lingala 8373 Singhalese 6565 Afar 7073 Finnish 7684... -
Page 31: Country Code List
Area Code List Enter the appropriate code number for the initial setting “Area Code” (See page 19). Code Area Code Area Code Area Code Area Andorra Eritrea Saint Lucia Seychelles United Arab Emirates Spain Liechtenstein Sudan Afghanistan Ethiopia Sri Lanka Sweden Antigua and Barbuda Finland... -
Page 32: Troubleshooting
Troubleshooting Check the following guide for the possible cause of a problem before contacting service. Cause Correction Symptom • The power cord is disconnected. • Plug the power cord securely into the No power. wall outlet. • No disc is inserted. •... - Page 33 Troubleshooting (Continued) Symptom Cause Correction • The antenna is positioned or connected • Connect the antenna securely. Radio stations cannot poorly. be tuned in. • Adjust the antennas and connect an external antenna if necessary. • The signal strength of the stations is too •...
-
Page 34: Specification
❋ Designs and specifications are subject to change without notice. ❋ Exemptions ■ Toshiba is not liable for any damage caused by fires, natural disaster (such as thunder, earthquake, etc.), acts by third parties, accidents, owner’s misuse, or uses in other improper conditions. ■... - Page 35 Printed in Indonesia P/N: 3834RH0050W...