Advertisement
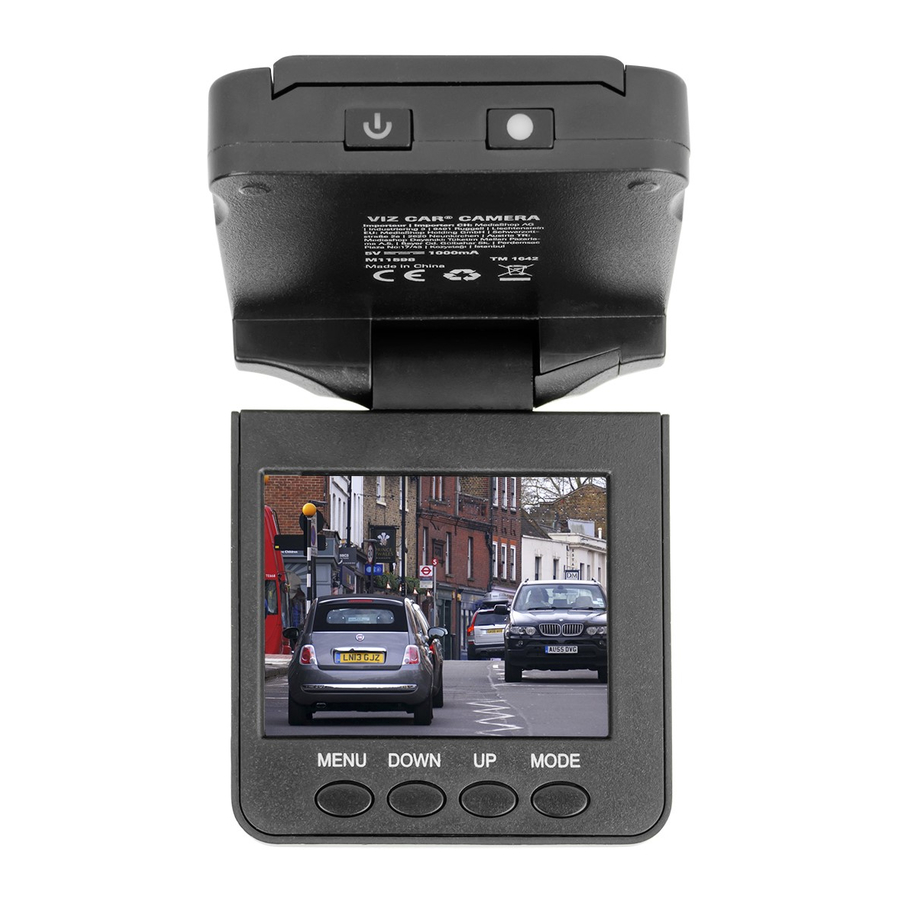
Product Description

- ON/OFF button
- Record button
- Battery compartment
- Slot for SD or TF/microSD card
- Menu button
- Down button (to navigate the menu)
- Up button (to navigate the menu)
- Mode button
 ON/OFF BUTTON:Turns device on/off
 RECORD/OK BUTTON: Starts and stops recording/selects and confirms menu options / plays and pauses during playing
MENU Opens and closes the menu
DOWN Moves down in the menu options
UP Moves up in the menu options
MODE Selects operating mode: Video/Photo/Audio Record/Play
The set includes:
1 Viz Car® Camera
1 Adjustable suction-cup mount
1 Battery charger
1 USB cable
1 Rechargeable battery
Operating Instructions
Inserting the Memory Card
- Insert the SD memory card or TF/microSD memory card with adapter (up to 32 GB, not included) in the SD card slot. You will hear a click when the card is inserted correctly. It is important to insert the card in the camera before using the product. The card IS NOT INCLUDED. The SD card can be inserted directly into the slot. To insert the TF/microSD card, you will need an adapter.
- To remove the SD card, press the card gently and it will partially eject, thereby allowing you to remove it.
- If an SD or TF/microSD card is not inserted in the slot, your Viz Car® Camera will show the "No card" message on the display and the product will not function.
- If the device does not recognize or detect the SD card, please remove it from the slot and re-insert it.

- If the SD memory card or TF/microSD card with adapter is inserted incorrectly, the memory card or the camera may suffer damage.
- Once the memory card has been inserted correctly, it will automatically be recognized by the device.
Charging the Battery
The camera includes a rechargeable lithium battery. Charge the battery as follows before using the device for the first time:
- Insert the battery in the back of the device.
- Connect the device to the 12V/24V car charger (included).
- Charge time: 3-5 hours.
- When the battery is fully charged, the battery symbol shown on the display will be completely green.

- When the battery charge is low, the device will enter Energy Saving Mode or will operate intermittently. Please recharge the battery fully to ensure correct operation of the device.
- To optimize battery life, we recommend fully charging the battery using the 5V/1A wall charger (not included). -
- Note: The rechargeable battery included with the device is not designed to operate for long periods of time without a power supply. When disconnected from the power supply, the maximum life of the battery is 35-50 minutes from a full charge.
INSTALLING THE CAMERA IN THE CAR
Attach the suction-cup mount to the orifice on the back of the camera and place the camera on the car windscreen. Open out the full HD display to an angle of 120°. The camera is now ready to record while you drive.
Changing Modes
- Insert the SD card or TF/microSD card.
- Press the ON/OFF button to turn on the device. The device will begin to record automatically.
- Press the RECORD/OK button to stop or start video recording. When recording is stopped, the device will automatically save the file.
- Press MODE to select other modes (Video/Photo/Audio/Play).
- Press the ON/OFF button for 3 seconds to turn off the device.
Options Menu
To set the options of the Video, Photo, Audio and Play modes, please follow these instructions:
VIDEO SET-UP
With the device turned on, press MODE until you reach Video mode (an icon of a video camera in a red frame will appear in the upper right corner of the display). Press MENU to set the mode options.
- Size: Select video resolution. Options: [HD] 1080x720/720 x 480/VGA (640x480). The standard setting is 720x480.
- Insert time stamp: Choose whether you want to show the date and time on the display: Yes/No.
- Motion detection: Choose whether to activate motion detection: Yes/No. If you select "Yes", the device will automatically begin recording when motion is detected and the recording will be saved automatically. When the motion is no longer detected, the device will go into sleep mode but will re-start recording if motion is detected again. The device must be turned on for Motion Detection mode to function. To exit Motion Detection mode, please press the MODE button.
- Loop time: Turn loop recording on/off and set the recording time. If loop recording is on, the device will automatically record videos of time intervals of your choice (1, 3, 5 or 10 minutes). When the SD or TF/microSD memory card is full, the device will record over the existing recordings, starting with the oldest files. If loop mode is off, the camera will record indefinitely.
- Voice Recording: Choose whether to turn audio recording on while recording video: Yes/No.
After making your selection, confirm it by pressing the RECORD/OK button. Your selection will be set. Then press MENU to exit the menu.
PHOTO SET-UP
With the device turned on, press MODE until you reach Photo mode (an icon of a blue letter "A" will appear in the upper right corner of the display). Press MENU to set the mode options. Then, press the RECORD/OK button to select the photo resolution.
- Size: Select the size of the image file. Options: (1920 x 1440) (3M)/1600x1200 (2M)/1280x960 (1.3M)/640x480 (VGA)
After making your selection, confirm it by pressing the RECORD/OK button. Your selection will be set. Then press MENU to exit the menu.
PLAY SET-UP
Press the MODE button until you reach Play mode (an icon with the play arrow will appear in the upper right corner of the display). Press the UP/DOWN buttons to select the saved files. The name of each file will be shown at the top of the display, with the ".AVI" file extension for videos, ".JPG" for images and ".WAV" for audio. To play video and audio files, press the RECORD/OK button and press RECORD/OK again to pause.
You can access the play set-up menu by pressing MENU:
- Delete: Select this option to delete one or more files. Options: Delete selected file/Delete all files.
- Lock file: Select this option to lock/unlock saved files. Options:
- Lock selected file / Lock all files / Unlock selected file / Unlock all files
- Thumbnails: The saved files are shown as thumbnails.
- Volume: Select a volume level from 0 to 6.
After making your selection, confirm it by pressing the RECORD or OK button. Your selection will be set. Then press MENU to exit the menu.
SYSTEM SET-UP:
With the device turned on, press MENU twice to enter system set-up. When the device is in Audio recording mode, you need to press MENU only once.
Press the RECORD/OK button to select System Set-Up.
- Format: Select this option to format the SD or TF/microSD card. Options: OK/Cancel. If you select OK, the SD or TF/microSD card will be formatted. Please remember that formatting the memory card will delete any information it contains!
- Language: Select the language to be used in all menus.
- Auto Off (Energy Saving): Option to program the device to turn off after 1.3 or 5 minutes IF THE CAMERA IS NOT RECORDING! If the camera is recording, this function will be activated when the recording has finished.
- Reboot system: Options: Cancel/OK. If you select OK, the system will reboot to factory settings (as new).
- Flicker frequency: This option is used to establish the flicker frequency when recording with artificial light. Options: 50 Hz or 60 Hz.
NOTE: In the United States, the frequency should be 60 Hz. Outside of the United States, the standard frequency established by the national energy authority should be selected (probably 50 Hz). - Date and time: To set the date and time: [Year/Month/Day], [Day/Month/Year] or [Month/Day/Year]; HH: MM.
- USB: Select this option if you want to use the camera as a webcam/Disk Drive. (Select PC Cam to enable easy connection to a personal computer/laptop, without the need to install USB drivers).
Press the UP/DOWN buttons to make your selection and confirm it by pressing the RECORD/OK button. Then press MENU to exit the menu.
OPERATION
Auto Start on Ignition:
- Connect the Viz Car® Camera to the adapter (included) and plug it into the cigarette lighter receptacle.
- The Viz Car® Camera will start up and begin to record automatically when the car starts.
Manual Recording While Charging:
- Connect the device to a wall charger or car charger.
- Press the MODE button to select Video mode.
- Press the RECORD/OK button to record.
- Press the RECORD/OK button to pause.
Note: The device cannot record while connected to a computer.
LOOP RECORDING:
- When recording on a loop, the device will automatically save each file at intervals of 1/3/5/10 minutes. When the SD or TF/microSD memory card is full, the device will record over the oldest saved file, which will be deleted.
NIGHT VISION RECORDING:
- Press the ON/OFF button to select Night Vision (an icon with a moon and a star will appear on the display). We recommend you leave Night Vision Mode on, as the quality of daylight recording is not affected.
RECORDING WITH AUDIO MODE:
- Connect the device to the wall charger or car charger.
- Press the MODE button to select Audio mode. A microphone icon will appear in the upper right corner of the display.
- Press the RECORD/OK button to record.
- Press the RECORD/OK button to pause recording.
PHOTO MODE
- Press the MODE button to select Photo mode. A blue letter "A" will appear in the upper right corner of the display.
- Press the RECORD/OK button to take photos.
PLAY MODE
- Press the MODE button until you get to Play mode. The play icon will appear in the upper right corner of the display.
- Press the UP/DOWN buttons to select the files you want to play.
- Press the RECORD/OK button to play the file.
- Press the RECORD/OK button to stop and re-start recording.
SPECIFICATIONS
| Video resolution | 1080x720/720x480/640x480 |
| Lens | 120° wide angle |
| File format | AVI (Video) / WAV (Audio) / JPG (Photo) |
| Display | 2.5-inch colour LCD display with 270° rotation |
| Output | USB |
| Photo |
(1920 x 1440) (3M)/1600x1200 (2M)/1280x960 (1.3M)/640x480 (VGA) |
| Power | (Li-Ion rechargeable 3.7V 1050 mAh battery/car charger/USB cable |
- Audio recording
- Night vision recording
Quality Warranty:
This product is covered by a warranty against manufacturing defects subject to the time periods stipulated by the legislation in force in each country.
This warranty does not cover damages resulting from inadequate use, negligent commercial use, abnormal wear and tear, accidents or improper handling.
DISPOSAL OF MATERIALS

A symbol of a crossed-out wheeled bin means you should find out about and follow local regulations about disposing of this kind of product. Do not dispose of this product as you would other household waste.
Dispose of this device in accordance with the corresponding local regulations.
Electrical and electronic devices contain hazardous substances that can have harmful effects on the environment and/or human health and should be recycled properly.
Australia & New Zealand only
This product has the benefit of certain Consumer Guarantees. These are prescribed by the Australian Consumer Law & the New Zealand Consumer
Guarantees Act 1993 both of which provide protection for consumers. There is no express warranty for this product in Australia or New Zealand. The above paragraph refers to other countries.

Documents / ResourcesDownload manual
Here you can download full pdf version of manual, it may contain additional safety instructions, warranty information, FCC rules, etc.
Advertisement
Need help?
Do you have a question about the CAMERA and is the answer not in the manual?
Questions and answers