Table of Contents
Advertisement
Quick Links
Operation Manual
You must read the Usage and Safety Precautions before use.
©2022 ZOOM CORPORATION
Copying or reprinting this manual in part or in whole without permission is prohibited.
Product names, registered trademarks and company names in this document are the property of their respective companies. All trademarks and
registered trademarks in this document are for identification purposes only and are not intended to infringe on the copyrights of their respective owners.
Proper display is not possible on grayscale devices.
Advertisement
Table of Contents

Related Manuals for Zoom M4 MicTrak


Summary of Contents for Zoom M4 MicTrak
- Page 1 Operation Manual You must read the Usage and Safety Precautions before use. ©2022 ZOOM CORPORATION Copying or reprinting this manual in part or in whole without permission is prohibited. Product names, registered trademarks and company names in this document are the property of their respective companies. All trademarks and registered trademarks in this document are for identification purposes only and are not intended to infringe on the copyrights of their respective owners.
-
Page 2: Notes About This Operation Manual
• Recording from copyrighted sources, including CDs, records, tapes, live performances, video works and broadcasts, without permission of the copyright holder for any purpose other than personal use is prohibited by law. ZOOM CORPORATION will not assume any responsibility related to infringements of copyrights. -
Page 3: Table Of Contents
Contents Notes about this Operation Manual........................2 M4 overview................................. 5 Realizing high audio quality throughout recording and editing................5 Functions of parts................................9 Overview of main screens............................14 Recording process..............................21 Making preparations..............................22 Inserting microSD cards............................22 Supplying power................................ 23 Connecting input devices............................26 Turning the power on/off............................ - Page 4 Changing bit depth and exporting files (Export)....................69 Checking file information............................71 Using as a USB mic..............................72 Installing drivers................................ 72 Connecting computers, smartphones and tablets....................73 USB mic muting................................. 76 Disconnecting from computers, smartphones and tablets................77 Making USB mic settings............................78 Transferring files to computers and other devices.....................
-
Page 5: M4 Overview
M4 overview Realizing high audio quality throughout recording and editing With dual A/D converter circuits and support for 32-bit float WAV files, the M4 enables the highest audio quality to be maintained from recording to editing in a DAW or other software. Recording Dual AD converter circuits enable recording from quiet to loud volumes without any need to make gain adjustments. - Page 6 Dual A/D converter circuit overview For each input circuit, the M4 has two A/D converters with different input gains. This design enables high-quality audio recording without the need to adjust gain settings, a step that normally had been indispensable. Providing amazing dynamic range By combining two A/D converters, a wide dynamic range not possible with a single A/D converter has been realized.
- Page 7 Switching between two A/D converters The M4 constantly monitors data from the two A/D converters and automatically selects the one that provides the best recording results. Low noise No clipping Low noise because high-gain because low-gain because high-gain AD converter selected AD converter selected AD converter selected...
- Page 8 32-bit float WAV file overview 32-bit float WAV files have the following advantages over conventional 16/24-bit WAV files. These features enable the quality of the sound during recording to be maintained even when editing with DAW software afterward. Resolution advantage 32-bit float WAV files have the advantage of being able to maintain high resolution even at low volumes.
-
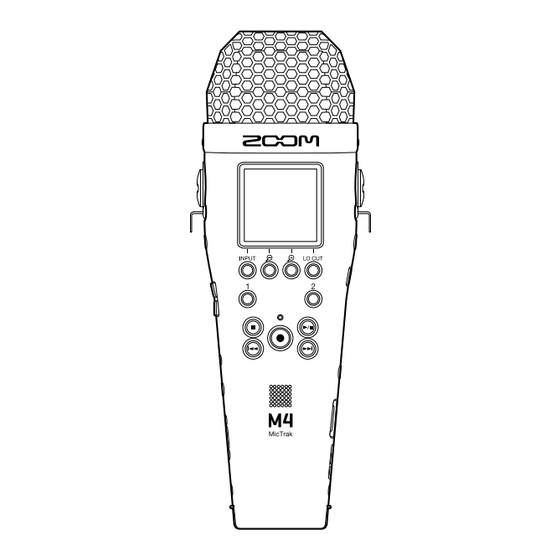
Page 9: Functions Of Parts
Functions of parts Front and back ■ Front ■ Back ❶ Built-in XY mic This stereo mic has two crossing directional mics. This mic can record three-dimensional sound with natural depth and width. ❷ Display This shows various types of information. ❸... - Page 10 ❼ 2 button Switch input set on the Home Screen (INPUT 2 or built-in mic). ❽ STOP button This stops recording and playback. Press this when playing or paused to close the Playback Screen and open the Home Screen. ❾ PLAY/PAUSE button This starts and pauses playback.
- Page 11 ■ Operation button overview When operation icons are shown at the bottom of the Menu Screen and Playback Screen, for example, use the corresponding operation buttons (which are right below the icons) to select and confirm items on the screen. ...
- Page 12 VOLUME buttons Use these to adjust the volume of the headphones/built-in speaker. ❹ REMOTE jack A dedicated remote control (ZOOM RC2, RC4, RCH-5 or RCH-6) can be connected here. This enables operating the M4 from a distance. ❺ LINE OUT jack This stereo mini jack can be used to output sound to another device.
- Page 13 ❽ microSD card slot Insert a microSD card here. ❾ TIME CODE IN/OUT jack This inputs and outputs timecode. Tip: Input to M4 (output from external device) Ring: Output from M4 (input to external device) Sleeve: GND ❿ MENU button This opens the Menu Screen and returns to the Home Screen.
-
Page 14: Overview Of Main Screens
Overview of main screens This section explains the screens that are shown on the M4 display. Home Screen This appears on the display when the M4 power is turned on. This shows the state of the M4, including the recording status and the waveforms of input signals. ❶... - Page 15 • R: Built-in XY mic right signal • 1: INPUT 1 • 2: INPUT 2 (→ Making input Various settings can be made for the selected input. settings) (→ Selecting inputs for making to select inputs. settings) ❻ Built-in XY mic recording format (when built-in XY mic selected) (→ Changing the recording file format for the This shows the recording format for the built-in XY mic.
- Page 16 Playback Screen When the Home Screen is open, pressing to start playback will also open this screen. This screen shows the M4 playback status, including the playback time and recording file waveform. ❶ Status icon Icons show the playback status. •...
- Page 17 ❻ Operation icons By pressing the operation buttons below the corresponding operation icons on the display, the playback position can be skipped and the screen can be changed. The file can also be deleted or exported and information about it can be checked. (→ Operation button overview) ❼...
- Page 18 FILE LIST Screen Press when the Playback Screen is open to open this screen. The files on the microSD card will be shown in a list on the display, so the content of the card can be checked and files can be played and deleted, for example. ❶...
- Page 19 HINT: • Press to stop playback and reopen the Home Screen. • Press to open the Playback Screen.
- Page 20 Menu Screen Use the Menu Screen to make various settings, including recording, output and hardware settings. ❶ Menu title ❷ Menu items These include setting items and setting values. ❸ Operation icons By pressing the operation buttons below the corresponding operation icons on the display, menu items can be selected and selected items can be confirmed.
-
Page 21: Recording Process
Recording process Recording follows the process shown below. (→ Inserting microSD • Insert a microSD card cards) (→ Installing → Connecting an AC • Supply power batteries, adapter) Preparation before (→ Connecting input • Connect mics to the inputs, for example devices) recording (→ Turning the power •... -
Page 22: Making Preparations
Making preparations Inserting microSD cards When the power is off, open the microSD card slot cover, and insert a microSD card all the way into the slot with the pins facing up. To remove a microSD card, push it further into the slot and then pull it out. Close the microSD card cover. -
Page 23: Supplying Power
Supplying power The M4 can be powered by batteries or a power supply connected to the USB port (AC adapter, USB bus power or portable battery). When a power supply is connected to the USB port, it will be used before the batteries. ... - Page 24 Insert the battery case into the M4, and tighten the battery compartment locking screw. NOTE: • Use only one type of battery (alkaline, NiMH or lithium) at a time. • Set the type of battery used correctly so that the amount of remaining battery charge can be shown (→ Setting the type of batteries accurately.
- Page 25 Connecting an AC adapter Connect the cable of the dedicated AC adapter (AD-17) to the USB port (Type-C), and connect the adapter to an outlet. USB (Type-C) Using other power sources By connecting a computer to the USB port (Type-C), the M4 can be operated using USB bus power. In addition, a 5V portable battery (commercially-available) can also be used for power.
-
Page 26: Connecting Input Devices
Connecting input devices Using the built-in XY microphone The M4 has 2 mic units in an inward-facing XY stereo arrangement. By having the left and right diaphragms facing inward toward each other, a wide recording range can be covered while also clearly capturing sound in the center. Furthermore, since the positions of sound capture are almost the same, phase differences between the left and right channels will not occur. - Page 27 ■ Connecting line level equipment Connect mixers and other line level equipment with TRS plugs to INPUT 1 and 2. (→ Setting INPUT 1/2 sources and • When connecting line level equipment, set the input source to “LINE”. phantom power) (→ Setting INPUT 1/2 sources and phantom •...
- Page 28 Connecting lavalier mics to the MIC/LINE IN jack The M4 has a MIC/LINE IN jack that can be used to connect an external mic or line-level device. (→ Using plugin Power can be supplied to mics that support plug-in power by setting Plugin Power to On. power) NOTE: When using the MIC/LINE IN jack, the built-in XY mic cannot be used.
- Page 29 Connection examples The following kinds of recording are possible according to the situation. ■ Recording performances with a voice and instrument Use the built-in XY mic to record the sound of playing an instrument, and use an external mic to record vocals.
- Page 30 ■ Concert recording Use the built-in XY mic to record the sound of the performance and the audience, and record a stereo mix made on a mixer.
-
Page 31: Turning The Power On/Off
Turning the power on/off Turning the power on Slide toward (→ Home This turns the M4 power on and opens the Home Screen on the display Screen). The first time the power is turned on immediately after purchase as well as after restoring the M4 to its factory default state, screens for setting the display language and date and time will appear on (→ Setting the language shown (first time starting the display, so make these settings. - Page 32 NOTE: When the power is turned off, “Please wait. Saving data...” will appear and the current settings of the M4 will be saved. Do not disconnect the AC adapter or remove the batteries while this is happening.
-
Page 33: Setting The Language Shown (First Time Starting Up)
Setting the language shown (first time starting up) The first time you turn the power on after purchase, set the display language when the Language Setting Screen opens. to select the display language, and press to confirm. This will confirm the language shown on the display, and open a screen to set the date format, so set (→ Setting the date format (first time starting the format. -
Page 34: Setting The Date Format (First Time Starting Up)
Setting the date format (first time starting up) The first time you turn the power on after purchase, after setting the display language, the date format settings screen will be shown on the display, so set it. The date written in recording files will be in the format selected here. to select the date format, and press to confirm. -
Page 35: Setting The Date And Time (First Time Starting Up)
Setting the date and time (first time starting up) The first time you turn the power on after purchase, after setting the date format, the date and time settings screen will be shown on the display, so set them. The date and time are written to recording files. to select the item to set, and press to confirm. -
Page 36: Setting The Type Of Batteries Used (First Time Starting Up)
Setting the type of batteries used (first time starting up) The first time you turn the power on after purchase, after setting the date and time, the battery type setting screen will be shown on the display. Select correctly the type of batteries used in the M4 so that the remaining battery charge can be shown accurately on the display. -
Page 37: Preventing Misoperation (Hold Function)
Preventing misoperation (hold function) In order to prevent misoperation, the hold function can be used to disable the buttons on the M4. Slide to HOLD. This turns on the hold function, disabling all button operations. To disable the hold function, slide back to the center position. -
Page 38: Making Input Settings
Making input settings Selecting inputs for making settings Settings can be made separately for each input. On the Home Screen, select the input to set: the built-in XY mic, INPUT 1 or INPUT 2. Selecting the built-in XY mic Press to select the built-in XY mic. - Page 39 Selecting INPUT 2 Press to select INPUT 2. Pressing will switch between the built-in XY mic and INPUT 2. The following parameters can be set for each input. Item Explanation (→ Changing the recording file format for the On/Off This turns the input on/off. built-in XY mic, Setting INPUT 1/2 sources and phantom...
-
Page 40: Changing The Recording File Format For The Built-In Xy Mic
Changing the recording file format for the built-in XY mic The audio format used to record the built-in XY mic can be selected. When “STEREO”, left and right channels will be recorded together as stereo audio. When “MONO”, left and right channels will be mixed together and recorded as mono audio. -
Page 41: Setting Input 1/2 Sources And Phantom Power
Setting INPUT 1/2 sources and phantom power INPUT 1/2 can be selected and enabled as inputs to use. Enabled inputs are armed for recording and their signals are output from the PHONE OUT and LINE OUT jacks. Moreover, when INPUT 1 and 2 are enabled, input source and phantom power on/off settings can be set according to the connected equipment. - Page 42 When an input is set to “OFF”, its volume will stop being shown on the Home Screen. Example: Input 2 set to “OFF” NOTE: • When equipment that does not support phantom power is connected, do not use the “MIC ”...
-
Page 43: Reducing Noise (Low-Frequency Cut)
Reducing noise (low-frequency cut) Low frequencies can be cut to reduce the sound of wind and vocal pop noises, for example. (→ Selecting inputs for making Select the input to set on the Home Screen. settings) Press repeatedly to set the cutoff frequency. The selected frequency is shown on the Home Screen. -
Page 44: Changing Phantom Power Voltage
Changing phantom power voltage The voltage for phantom power can be set to +24 V or+48 V. The selected voltage will be applied to both INPUT 1 and INPUT 2. Press when the Home Screen is open. This opens the Menu Screen. to select “System”... - Page 45 to select the voltage, and press to confirm. HINT: • When using mics that can operate with +24 V phantom power, setting the phantom voltage to +24 V can increase battery operation time.
-
Page 46: Using Plugin Power
Using plugin power Make the following setting when a mic that is compatible with plug-in power is connected to the MIC/LINE IN jack. Press when the Home Screen is open. This opens the Menu Screen. to select “System” and press to confirm. -
Page 47: Making Output Settings
Making output settings Adjusting the line output level The line level output to other devices can be adjusted. Minimize the input gain of the other device. Use an audio cable to connect the external mic jack of the other device with the M4 LINE OUT jack. NOTE: When output to another device is not necessary, the battery operation time can be lengthened by removing the connection cable from the LINE OUT jack. -
Page 48: Recording
Recording Adjusting the volume display size to make checking easier The M4 records using 32-bit float format, making input gain adjustments unnecessary. Depending on the input signal, however, the volume shown on the display could be too small or too large, making it difficult to check. -
Page 49: Monitoring Input And Playback Sounds
Monitoring input and playback sounds Input and playback sounds can be monitored using headphones, for example, and the monitoring volume can be adjusted. Connect headphones, for example, to the PHONE OUT jack. to adjust the volume of the headphones or other connected device. The volume will be shown on the display while it is being adjusted. -
Page 50: Making Recording Settings
Making recording settings Setting the sample rate The sampling rate used to record files can be set. Press when the Home Screen is open. This opens the Menu Screen. to select “Rec Settings” and press to confirm. to select “Sample Rate” and press to confirm. - Page 51 Capturing audio before recording starts (pre-recording) The input signal is always buffered for a set amount of time, so it can be captured for up to 6 seconds before is used to start recording (pre-recording). This is useful when is used late, for example. Press when the Home Screen is open.
- Page 52 to select “On” and press to confirm. (→ Setting the sample The pre-recording time when set to “On” depends on the sample rate setting rate). Sample Rate Pre-recording time 44.1 kHz 6 seconds 48 kHz 6 seconds 47.952 kHz 6 seconds 48.048 kHz 6 seconds 96 kHz...
- Page 53 to select “Rec Start Tone” and press to confirm. to select “On” and press to confirm. Use a stereo minijack cable to connect the camera input jack and the M4 LINE OUT jack. NOTE: Be careful with the volume if you are monitoring the input sound with headphones, for example.
-
Page 54: Recording
Recording Press when the Home Screen is open. The REC indicator will light red, recording will start and the name of the file being recorded will be shown on the display. The elapsed recording time is shown while recording. Press to stop. -
Page 55: Adding Marks During Recording
Adding marks during recording Marks can be added to a file while it is being recorded. Added marks are shown on the Playback Screen where can be used to move the playback position between them. Press while recording. This adds a mark at the position of the current elapsed recording time. NOTE: •... -
Page 56: Playing Recordings
Playing recordings Playing recordings Press when the Home Screen is open. This opens the Playback Screen on the display and starts playback. “Playback Screen operations“ for details about operations when the Playback Screen is open. NOTE: • The M4 cannot play files that it did not record or files that have been edited elsewhere after recording. •... - Page 57 Playback Screen operations ❶ This opens the FILE LIST Screen. ❷ This moves the playback position 3 seconds backward. ❸ This moves the playback position 10 seconds forward. ❹ This opens the file options, which include operations explained in the following sections: Optimizing file volume (normalization),...
- Page 58 ❾ This adds a mark at the current playback position. If there is already a mark at the current playback (→ Adding/deleting marks during position, that mark will be deleted. playback)
-
Page 59: Adding/Deleting Marks During Playback
Adding/deleting marks during playback Marks can be added to a file while it is being played. Added marks are shown on the Playback Screen where can be used to move the playback position between them. Adding marks When the Playback Screen is open, press to add a mark at the desired playback position. -
Page 60: Using Automatic Playback Volume Adjustment
Using automatic playback volume adjustment By setting “Auto Play Vol” to “On”, the playback volume can be made even regardless of the recording level loudness. Press when the Home Screen is open. This opens the Menu Screen. to select “System” and press to confirm. -
Page 61: Managing Files
Managing files Files created by the M4 are saved on the microSD card. Recording files on the microSD card can be selected. Then, they can be normalized and have their bit depths converted as well as be deleted. M4 folder and file structure Folder and file structure When recording with the M4, files are created on microSD cards in the following manner. - Page 62 • Stereo files will be created when the recording format for the built-in XY mic is set to “STEREO”. (→ Changing the recording file format for the built-in XY mic) • Mono files will be created when using INPUT 1/2 and when the recording format for the built-in XY (→ Changing the recording file format for the built-in XY mic is set to “MONO”.
- Page 63 Recording file naming File names are assigned in the following format. File name example Explanation ❶ Date The set date is used. ❷ Take number This number is increased by one every time recording is started anew. In addition, if the file size exceeds 2 GB when recording for a long time, the new file that is created will also be numbered one higher.
-
Page 64: Checking Files (File List Screen)
Checking files (FILE LIST Screen) Use the FILE LIST Screen to check files on the microSD card. Files can also be played and deleted on this screen. Press on the Playback Screen. This will open the FILE LIST Screen, which shows a list of files on the microSD card. “FILE LIST Screen operations”... - Page 65 FILE LIST Screen operations ❶ This opens the Playback Screen. ❷ Use these to select the previous/next file. ❸ (→ Deleting files on the FILE LIST This deletes the selected file. Screen) ❹ This stops playback and reopens the Home Screen. ❺...
-
Page 66: Deleting Files
Deleting files The selected file on the FILE LIST Screen and the playing file on the Playback Screen can be deleted. Deleting files on the FILE LIST Screen On the FILE LIST Screen, use to select the file to delete and press to select “Delete”... - Page 67 Deleting the playing file on the Playback Screen Press on the Playback Screen. This shows the file options. to select “Delete” and press to select “Delete” and press to confirm. Select “Cancel” to cancel deletion. HINT: (→ Deleting files on the FILE LIST Files can also be deleted on the FILE LIST Screen by pressing Screen)
-
Page 68: Optimizing File Volume (Normalization)
Optimizing file volume (normalization) Volume can be optimized by normalizing recorded files. Press on the Playback Screen. This shows the file options. to select “Normalize” and press to confirm. to select “Execute” and press to confirm. Select “Cancel” to return to the original screen. NOTE: Normalized files are saved with the same 32-bit float format and can be played as is on the M4. -
Page 69: Changing Bit Depth And Exporting Files (Export)
Changing bit depth and exporting files (Export) The M4 can only record in 32-bit float format, but it can convert recorded files to other formats and export them. This is convenient when loading files recorded by the M4 on computers, smartphones and tablets when the application being used does not support 32-bit float format, for example. - Page 70 to select whether or not to normalize and press to confirm. Select “On” to normalize. to select “Execute” and press to confirm. The converted file will be saved in the Export folder. Select “Cancel” to return to the original screen. HINT: Normalization is a function that measures the highest volume of the audio data and adjusts the volume, keeping it in a range that does not distort.
-
Page 71: Checking File Information
Checking file information A variety of information about the current playback file can be checked. Press on the Playback Screen. This shows the file options. to select “Information” and press to confirm. to check the various information items. File creation File format File length date and time... -
Page 72: Using As A Usb Mic
Using as a USB mic Signals input to the M4 can be sent to computers, smartphones and tablets, and playback signals from these devices can be output from the M4. Moreover, the M4 can also record audio while being used as a USB mic. Installing drivers Windows computers Download the M4 Driver to the computer from zoomcorp.com. -
Page 73: Connecting Computers, Smartphones And Tablets
Connecting computers, smartphones and tablets Press when the Home Screen is open. This opens the Menu Screen. to select “USB” and press to confirm. to select “USB MIC w/REC” and press to confirm. to select the connected device and press to confirm. - Page 74 NOTE: • Bus power operation might not be possible depending on the USB bus power supply capability of the computer. In this case, select “Mobile Device” to power the unit with batteries when connecting. • When used as a USB mic, the sample rate is 48 kHz. Use a USB cable (Type-C) to connect the M4 to the computer, smartphone or tablet.
- Page 75 NOTE: • Even if “ZOOM M4” cannot be selected in the computer “Sound” settings, the M4 can still be used as a 32- bit float USB mic if it is selected as the “Audio” or “Input/Output” device in an application that supports 32-bit float format.
-
Page 76: Usb Mic Muting
USB mic muting When connected using the USB mic function, temporarily muting the sound from the mic is possible so that it is not sent to the computer, smartphone or tablet. Press when the Home Screen is open (and connected using the USB mic function). The MUTE message will be shown and output to the computer, smartphone or tablet will be muted. -
Page 77: Disconnecting From Computers, Smartphones And Tablets
Disconnecting from computers, smartphones and tablets Press when the Home Screen is open (and connection is using the USB mic function). This opens the Menu Screen. to select “Exit USB MIC” and press to confirm. Disconnect the USB cable that is connecting the M4 and the computer, smartphone or tablet. -
Page 78: Making Usb Mic Settings
Making USB mic settings When the M4 is used as a USB mic, the monitoring sound and the signal sent to the computer, smartphone or tablet can be set. Changing the built-in XY mic stereo/mono setting The sound captured by the built-in XY mic of the M4 can be mixed to mono for monitoring and sending to the computer, smartphone or tablet. - Page 79 Reducing noise (low-frequency cut) When using the M4 as a USB mic, low frequencies from the built-in XY mic can be cut, reducing the sound of wind and pop noises, for example. On the Home Screen (when connected using the USB mic function), select the built-in XY mic. (→ Selecting inputs for making settings) Press...
- Page 80 0. If using an app that does not support 32-bit float format, unexpected loud sound could be output causing harm to hearing, for example. • A driver is necessary to use 32-bit float format with Windows. Download the driver from the ZOOM website (zoomcorp.com).
- Page 81 Enabling direct monitoring This directly outputs the sound being input to the M4 before sending it to the computer, smartphone or tablet. This enables monitoring without latency (direct monitoring function). Press when the Home Screen is open (and connection is using the USB mic function). This opens the Menu Screen.
-
Page 82: Transferring Files To Computers And Other Devices
Transferring files to computers and other devices By connecting the M4 to a computer, smartphone or tablet, files on the microSD card can be checked and moved. Connecting computers, smartphones and tablets Press when the Home Screen is open. This opens the Menu Screen. to select “USB”... - Page 83 Setting Explanation PC/Mac Use for connecting to a computer. Mobile Device Use for connecting to a smartphone or tablet. Please use batteries to power the M4. This opens the File Transfer Screen. Use a USB cable (Type-C) to connect the M4 to the computer, smartphone or tablet. USB (Type-C) ❶...
-
Page 84: Disconnecting From Computers, Smartphones And Tablets
Disconnecting from computers, smartphones and tablets End the connection from the computer, smartphone or tablet. • Windows: Select M4 from "Safely Remove Hardware and Eject Media”. • macOS: Drag the M4 icon to the Trash and drop it. • Smartphone/tablet: Refer to the operation manual for the device. -
Page 85: Making Various Settings
Making various settings Setting the language shown The language shown on the M4 screen can be changed. Press when the Home Screen is open. This opens the Menu Screen. to select “System” and press to confirm. to select “Language” and press to confirm. -
Page 86: Setting The Date And Time
Setting the date and time Use this to set the date and time added to recording files. Press when the Home Screen is open. This opens the Menu Screen. to select “System” and press to confirm. to select “Date/Time” and press to confirm. - Page 87 to change the value, and press to confirm. Repeat steps 5–6 to set the date and time. After setting all items, use to select , and press to confirm. NOTE: Changing the date and time will also reset the take numbers used for recording files. HINT: The first time you turn the power on after purchase, this screen opens automatically after you set the date format.
-
Page 88: Setting The Date Format
Setting the date format The date format used with recording files can be changed. Press when the Home Screen is open. This opens the Menu Screen. to select “System” and press to confirm. to select “Date/Time” and press to confirm. to select the date format, and press to confirm. - Page 89 to select the date format, and press to confirm. The current set date will be shown at the bottom of the screen as a concrete example of the date format set. Setting Explanation YYMMDD The date is shown in year, month, day order. MMDDYY The date is shown in month, day, year order.
-
Page 90: Setting Display Power Saving
Setting display power saving To conserve energy, the display backlight can be set to dim after a set amount of time without use. Press when the Home Screen is open. This opens the Menu Screen. to select “System” and press to confirm. - Page 91 to select a setting, and press to confirm. Setting Explanation Off The display backlight always stays bright. The display backlight always stays dark. 30 seconds The display backlight becomes dark if no operation occurs for 30 seconds.
-
Page 92: Setting The Display Brightness
Setting the display brightness The brightness can be adjusted if the display appears too light or too dark, making it difficult to view. Press when the Home Screen is open. This opens the Menu Screen. to select “System” and press to confirm. - Page 93 to set the display brightness, and press to confirm. HINT: This can be set from 5 to 100.
-
Page 94: Setting The Type Of Batteries Used
Setting the type of batteries used Set the type of battery used by the M4 correctly so that the amount of remaining battery charge can be accurately displayed. Press when the Home Screen is open. This opens the Menu Screen. to select “System”... - Page 95 to select the battery type, and press to confirm. Setting Explanation Alkaline Alkaline batteries Ni-MH Nickel-metal hydride batteries Lithium Lithium batteries HINT: The first time you turn the power on after purchase, the battery type setting is shown after you set the date and time.
-
Page 96: Setting The Time Until The Power Turns Off Automatically
Setting the time until the power turns off automatically The M4 can be set to automatically turn off if it is not operated for a specific amount of time. To keep the power on at all times, set Auto Power Off to Off. Press This opens the Menu Screen. - Page 97 to select the amount of time until the power turns off, and press confirm. Setting Explanation Off The power will not turn off automatically. 10 min The power will automatically turn off if it is unused for 10 minutes. 60 min The power will automatically turn off...
-
Page 98: Managing Microsd Cards
Managing microSD cards Formatting microSD cards To maximize the performance of a microSD card, format it for use with the M4. Press when the Home Screen is open. This opens the Menu Screen. to select “SD Card” and press to confirm. to select “SD Format”... - Page 99 to select “Execute” and press to confirm. This formats the microSD card. NOTE: • The microSD card formatting screen can also be opened by pressing while turning the power on. • Always format microSD cards in order to maximize their performance after purchasing them new or using them with a different device.
-
Page 100: Testing Microsd Cards
Testing microSD cards This tests whether the microSD card writing speed performance can save data recorded by the M4 without problems. A Quick Test can be done in a short amount of time, while a Full Test examines the entire microSD card. Conducting a quick test Press when the Home Screen is open. - Page 101 The result of the test will be shown when it completes. NOTE: Even if a performance test result is "OK", there is no guarantee that writing errors will not occur. This information is just to provide guidance. HINT: Testing can be canceled while in progress by pressing...
- Page 102 Conducting a full test Press when the Home Screen is open. This opens the Menu Screen. to select “SD Card” and press to confirm. to select “Full Test” and press to confirm. The amount of time required for the full test will be shown. to select “Execute”...
- Page 103 NOTE: Even if a performance test result is "OK", there is no guarantee that writing errors will not occur. This information is just to provide guidance. HINT: Testing can be paused by pressing , and resumed by pressing Testing can be canceled while in progress by pressing...
-
Page 104: Using Timecode
Using timecode Timecode overview The M4 can input and output SMPTE timecode. Timecode is time information written to data when recording video and audio. It is used for video editing, control of other devices, and synchronization of audio and video, for example. ... - Page 105 Connection examples Connections like the following are possible according to application. ■ Synchronizing with a video camera The M4 records with the built-in XY mic and transmits timecode. The M4 records the timecode that it generates itself with the audio data. The timecode received by the video camera is recorded with the video data.
-
Page 106: Making Timecode Settings
Making timecode settings Setting the timecode mode Use this setting to enable/disable the M4 timecode function. When the M4 timecode function is enabled, timecode can be set to run freely or it can be set to follow an external timecode source. Press when the Home Screen is open. - Page 107 to select the mode to set, and press to confirm. Setting Explanation Off No timecode will be written to recording files. Timecode will not be output from the TIME CODE IN/OUT jack. Internal Internal timecode will run at all times. External The internal timecode will chase the external timecode.
- Page 108 Setting the frame rate for internal timecode When using timecode, frame rates must be set to be the same for devices being used and video and audio data. Press when the Home Screen is open. This opens the Menu Screen. to select “Timecode”...
- Page 109 Setting Explanation 29.97ND This is a frame rate used for NTSC color video and HD cameras. The count is slower than the actual time by 0.1%. This is used for NTSC video, which is used in Japan, the United States and other countries. 29.97D This is an adjusted frame rate that uses a drop frame to make NTSC match the actual time.
- Page 110 Using external timecode to set the internal timecode (jamming) Timecode input through the TIME CODE IN/OUT jack can be used to set internal timecode. Press when the Home Screen is open. This opens the Menu Screen. to select “Timecode” and press to confirm.
- Page 111 Resetting internal timecode The internal timecode value can be reset to “00:00:00:00”. Press when the Home Screen is open. This opens the Menu Screen. to select “Timecode” and press to confirm. to select “Reset Timecode” and press to confirm. This resets the timecode value to “00:00:00:00”. NOTE: (→ Setting the timecode This can only be set when “Mode”...
-
Page 112: Restoring Factory Default Settings
Restoring factory default settings You can restore the M4 settings to their factory defaults. Press when the Home Screen is open. This opens the Menu Screen. to select “System” and press to confirm. to select “Factory Reset” and press to confirm. to select “Execute”... -
Page 113: Managing The Firmware
Managing the firmware Checking firmware versions The firmware versions used by the M4 can be checked. Press when the Home Screen is open. This opens the Menu Screen. to select “System” and press to confirm. to select “Firmware” and press to confirm. -
Page 114: Updating The Firmware
Updating the firmware The M4 firmware can be updated to the latest versions. Files for the latest firmware updates can be downloaded from the ZOOM website (zoomcorp.com). Follow the instructions in the “M4 Firmware Update Guide” on the M4 download page. -
Page 115: Using Optional Remote Controls
Using optional remote controls The M4 can be operated from a distance by using an optional remote control. Connect the remote control to the REMOTE jack on the M4. ❶ Remote control (RC2, RC4, RCH-5 or RCH-6) Use the remote control. NOTE: •... -
Page 116: Appendix
Appendix Troubleshooting If you think that the M4 is operating strangely, check the following items first. Recording/playback trouble There is no sound or output is very quiet • Check the orientation of the mic or the volume settings of the connected equipment. (→ Monitoring input and •... - Page 117 32-bit float format. • Even if “ZOOM M4” cannot be selected in the computer “Sound” settings, the M4 can still be used as a 32- bit float USB mic if it is selected as the “Audio” or “Input/Output” device in an application that supports 32-bit float format.
- Page 118 • Due to their characteristics, using nickel metal hydride batteries (especially high-capacity ones) or lithium batteries should enable longer use than alkaline batteries when power consumption is high.
-
Page 119: M4 Metadata Lists
M4 metadata lists Metadata contained in BEXT chunks in WAV files Explanation Remarks zSPEED= Frame rate Menu > Timecode > FPS zTAKE= Take number zUBITS= User bits Menu > System > Date/Time zSCENE= Scene name Menu > System > Date/Time zTAPE= zCIRCLED= zTRK1=... - Page 120 Metadata contained in iXML chunks in WAV files ○ = YES × = NO iXML master tag iXML sub tag Written Read Remarks ○ <PROJECT> × ○ ○ <SCENE> Menu > System > Date/Time ○ ○ <TAKE> ○ <TAPE> × ○...
- Page 121 iXML master tag iXML sub tag Written Read Remarks <SYNC_POINT_LIST> <SYNC_POINT> <SYNC_POINT_TYPE> × × <SYNC_POINT> <SYNC_POINT_FUNCTION> × × <SYNC_POINT> <SYNC_POINT_COMMENT> × × <SYNC_POINT> <SYNC_POINT_LOW> × × <SYNC_POINT> <SYNC_POINT_HIGH> × × <SYNC_POINT> <SYNC_POINT_EVENT_DURATION> × × iXML master tag iXML sub tag Written Read Remarks...
- Page 122 iXML master tag iXML sub tag Written Read Remarks <TRACK_LIST> ○ <TRACK_LIST> <TRACK_COUNT> × ○ <TRACK> <CHANNEL_INDEX> × ○ <TRACK> <INTERLEAVE_INDEX> × ○ <TRACK> <NAME> × <TRACK> <FUNCTION> × ×...
-
Page 123: Specifications
Specifications Input and Inputs Built-in mic (stereo) output MIC/LINE (mono) channels /LINE IN Outputs LINE OUT PHONE OUT Built-in speaker (mono) Inputs Built-in mic 90º XY stereo format Directionality Unidirectional Sensitivity −42 dB/1 Pa at 1 kHz Maximum sound pressure 135 dB SPL input MIC/LINE (mono) - Page 124 3.3 Vpp Output impedance 50 Ω or less REMOTE Dedicated remote control (ZOOM RC2, RC4, RCH-5 or RCH-6) Power 4 AA batteries (alkaline, NiMH or lithium) AC adapter (ZOOM AD-17): DC 5 V/1 A • USB bus power is supported.
- Page 125 Estimated continuous operation times using 2-track recording (built-in Alkaline batteries: about 19 hours batteries XY mic), 48kHz/32-bit float, NiMH batteries (1900 mAh): about 14.5 • These values are approximate. phantom power off, no hours • Continuous battery operation times were headphones, no line out, Lithium batteries: about 31 hours determined using in-house testing methods.
- Page 126 ZOOM CORPORATION 4-4-3 Kanda-surugadai, Chiyoda-ku, Tokyo 101-0062 Japan zoomcorp.com Z2I-4757-01...
Need help?
Do you have a question about the M4 MicTrak and is the answer not in the manual?
Questions and answers