Advertisement
Quick Links
Manufactured by:
Backyard Discovery
3305 Airport Drive, Pittsburg, KS 66762
800-856-4445
Basepoint Business Centre: Rivermead Drive,Westlea, Swindon SN5 7EX Phone: 0800-118-2476 J.P. Coenstraat 7, The Bridge, The Hague, 2595 WP, Netherlands Phone: 08005678990
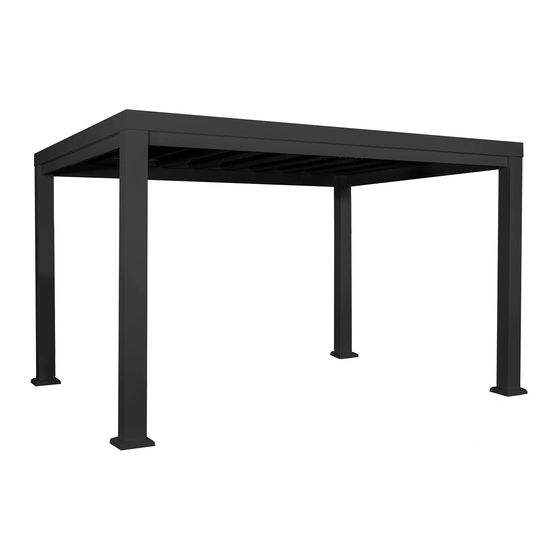
12x10 TRENTON, WINDHAM PERGOLA
MODEL #'s : 2105133, 2105164, 2105430B, 2105461B
2105164, 2105461B AU
WINDHAM (WHITE)
Please visit www.backyarddiscovery.com
For the most up to date assembly manual, to register your product, or to order
replacement parts Para obtener instrucciones en español, visite
www.backyarddiscovery.com
EASY STEP-BY-STEP
3D INTERACTIVE INSTRUCTIONS
DOWNLOAD THE FREE APP
INS-2105133, 2105164, 2105430B, 2105461B-A-12X10 MODERN PERGOLA-ENG 3-11-22
2105133, 2105430B AU
TRENTON (BLACK)
INSTALLATION
SERVICES
AVAILABLE!
See inside for details
See inside for details
*
Made in China
Advertisement

Related Manuals for Backyard Discovery TRENTON 2105133


Summary of Contents for Backyard Discovery TRENTON 2105133
- Page 1 Manufactured by: Backyard Discovery 3305 Airport Drive, Pittsburg, KS 66762 800-856-4445 Basepoint Business Centre: Rivermead Drive,Westlea, Swindon SN5 7EX Phone: 0800-118-2476 J.P. Coenstraat 7, The Bridge, The Hague, 2595 WP, Netherlands Phone: 08005678990 12x10 TRENTON, WINDHAM PERGOLA MODEL #'s : 2105133, 2105164, 2105430B, 2105461B...
- Page 2 Owner's Manual Basic Setup Dimensions & Assembly Notes It is critically important that you start with square and level footings, concrete pad or deck to attach your structure • Pay close attention to the items needed for each step. Make sure you are using the correct hardware for each step.
-
Page 3: Parts Identification
Owner's Manual Parts Identification Metal Components (Not to Scale) A POST-A4M01436 (x4) 6"X6"X89" (152x152x2261) B1 JOIST END-A4M01469 (x2) 1 3/8"X5 1/4"X71 7/8" (36x134x1826) B2 JOIST END-A4M01470 (x2) 1 3/8"X5 1/4"X71 7/8" (36x134x1826) C1 JOIST END-A4M01471 (x2) 1 3/8"X5 1/4"X65 3/4" (36x134x1670) C2 JOIST END-A4M01472 (x2) 1 3/8"X5 1/4"X65 3/4"... - Page 4 Owner's Manual Parts Identification Metal Components (Not to Scale) G1 BRACKET-A4M01452 (x8) 1 1/4"X4 1/8"X5" (32x104x128) W BRACKET-A4M01453 (x4) 3"X5 1/8"X9 1/8" (78x130x233) SPLICE BRACKET-A4M01438 SPLICE BRACKET-A4M01437 (x10) 1 1/2"X3"X15 3/4" (37x77x400) (x4) 1 1/4"X5 1/8"X15 3/4" (33x131x400) SPLICE BRACKET-A4M01439 SPLICE BRACKET-A4M01440 (x2) 1 1/4"X5 1/8"X19 5/8"...
-
Page 5: Hardware Components
Owner's Manual Parts Identification Hardware Components TORX PAN HEAD H101101 1/4-20x3/4" (324) H101053 STEEL WASHER H101054 SEALANT WASHER (344) (344) 6x20 TORX PAN HEAD H101102 1/4-20x4" (20) TORX SOCKET SCREW H101103 1/4-20 (16) CONCRETE ANCHOR H100120 1/4x2 (16) H100114 TORX WRENCH T-30 H101100 BIT EXTENSION... -
Page 6: Metal Parts
PRE-ASSEMBLY STEP 1 - SORTING PARTS It is critical for ease of assembly that you take the time to sort and organize the parts and hardware. METAL PARTS: • Organize metal parts by the three-digit, alpha-numeric number stamped on each part (ex. P01). •... - Page 7 PRE-ASSEMBLY STEP 2 - TOOLS REQUIRED Drill Attachments: Square Phillips Head 3/16" Concrete Drill Bit Cordless Drill or Electric Drill Phillips Screw Driver Rubber Mallet - Optional Level 24" Tape Measure...
- Page 8 PRE-ASSEMBLY STEP 3 - CHOOSE YOUR ASSEMBLY METHOD There are several types of assembly instructions available to you. 1. Printed Assembly Manual included with your set 2. BILT APP - 3D interactive instructions 3. Combination of the Printed Manual and BILT APP (Note: Step numbers can differ between the two methods)
- Page 9 PERGOLA ASSEMBLY STEP 1 TORX PAN HEAD F JOIST END-A4M01466 H101101 1 5/8"X3 1/8"X58 1/2" (41x81x1485) STEEL WASHER (x10) H101053 1/4-20x3/4" (40) 6x20 (40) SPLICE BRACKET-A4M01438 (x10) 1 1/2"X3"X15 3/4" (37x77x400) SEALANT WASHER H101054 (40) COMPLETE THIS STEP TEN TIMES.
- Page 10 PERGOLA ASSEMBLY STEP 2 H101101 TORX PAN HEAD STEEL WASHER H101053 1/4-20x3/4" (40) 6x20 (40) F JOIST END-A4M01466 1 5/8"X3 1/8"X58 1/2" (41x81x1485) (x10) SEALANT WASHER H101054 (40) COMPLETE THIS STEP TEN TIMES.
- Page 11 PERGOLA ASSEMBLY STEP 3 H101101 TORX PAN HEAD E2 JOIST END-A4M01468 STEEL WASHER H101053 1/4-20x3/4" (12) 1 3/8"X5 1/4"X53 3/4" (36x134x1365) (x2) 6x20 (12) SEALANT WASHER H101054 H1 SPLICE BRACKET-A4M01437 (x2) 1 1/4"X5 1/8"X15 3/4" (33x131x400) (12) COMPLETE THIS STEP TWICE.
- Page 12 PERGOLA ASSEMBLY STEP 4 H101101 TORX PAN HEAD STEEL WASHER H101053 1/4-20x3/4" (12) 6x20 (12) E1 JOIST END-A4M01467 1 3/8"X5 1/4"X53 3/4" (36x134x1365) (x2) SEALANT WASHER H101054 (12) COMPLETE THIS STEP TWICE.
- Page 13 PERGOLA ASSEMBLY STEP 5 H101101 TORX PAN HEAD D1 JOIST END-A4M01464 STEEL WASHER H101053 (x2) 1/4-20x3/4" 1 3/8"X5 1/4"X59 7/8" (36x134x1521) (12) 6x20 (12) SEALANT WASHER H1 SPLICE BRACKET-A4M01437 H101054 (x2) 1 1/4"X5 1/8"X15 3/4" (33x131x400) (12) COMPLETE THIS STEP TWICE.
- Page 14 PERGOLA ASSEMBLY STEP 6 D2 JOIST END-A4M01465 H101101 TORX PAN HEAD (x2) 1 3/8"X5 1/4"X59 7/8" (36x134x1521) STEEL WASHER H101053 1/4-20x3/4" (12) 6x20 (12) SEALANT WASHER H101054 N1 A6P00493 (x4) (12) L PLUG COMPLETE THIS STEP TWICE.
- Page 15 PERGOLA ASSEMBLY STEP 7 H101101 TORX PAN HEAD C1 JOIST END-A4M01471 STEEL WASHER H101053 1/4-20x3/4" (x2) 1 3/8"X5 1/4"X65 3/4" (36x134x1670) 6x20 SPLICE BRACKET-A4M01440 (x2) 1 1/4"X5 1/8"X11" (33x130x280) SEALANT WASHER H101054 COMPLETE THIS STEP TWICE.
- Page 16 PERGOLA ASSEMBLY STEP 8 H101101 TORX PAN HEAD STEEL WASHER H101053 1/4-20x3/4" 6x20 C2 JOIST END-A4M01472 (x2) 1 3/8"X5 1/4"X65 3/4" (36x134x1670) SEALANT WASHER H101054 COMPLETE THIS STEP TWICE.
- Page 17 PERGOLA ASSEMBLY STEP 9 B1 JOIST END-A4M01469 H101101 TORX PAN HEAD 1 3/8"X5 1/4"X71 7/8" (36x134x1826) (x2) STEEL WASHER H101053 1/4-20x3/4" (12) 6x20 (12) SPLICE BRACKET-A4M01439 SEALANT WASHER H101054 (x2) 1 1/4"X5 1/8"X19 5/8" (33x131x500) (12) COMPLETE THIS STEP TWICE.
- Page 18 PERGOLA ASSEMBLY STEP 10 H101101 TORX PAN HEAD STEEL WASHER H101053 1/4-20x3/4" (12) 6x20 (12) JOIST END-A4M01470 (x2) 1 3/8"X5 1/4"X71 7/8" (36x134x1826) SEALANT WASHER H101054 (12) COMPLETE THIS STEP TWICE.
- Page 19 PERGOLA ASSEMBLY STEP 11 POST-A4M01436 H101101 TORX PAN HEAD (x4) 6"X6"X89" (152x152x2261) STEEL WASHER H101053 1/4-20x3/4" (16) 6x20 (16) SEALANT WASHER H101054 P1 A4M01454 P2 A4M01455 (x 4) (16) (x4) POST FOOT POST FOOT COVER COMPLETE THIS STEP FOUR TIMES.
- Page 20 PERGOLA ASSEMBLY STEP 12 H101101 TORX PAN HEAD POST ASSEMBLY - FROM STEP 11 STEEL WASHER H101053 1/4-20x3/4" (16) 6x20 (16) SEALANT WASHER H101054 G1 BRACKET-A4M01452 (16) (x8) 1 1/4"X4 1/8"X5" (32x104x128) COMPLETE THIS STEP FOUR TIMES.
- Page 21 PERGOLA ASSEMBLY STEP 13 H101101 TORX PAN HEAD STEEL WASHER H101053 1/4-20x3/4" (16) 6x20 (16) INNER END JOIST ASSEMBLY - FROM STEPS 3 & 4 SEALANT WASHER H101054 (16) COMPLETE THIS STEP TWICE.
- Page 22 PERGOLA ASSEMBLY STEP 14 H101101 TORX PAN HEAD STEEL WASHER H101053 1/4-20x3/4" (12) 6x20 (12) INNER SIDE JOIST ASSEMBLY - FROM STEPS 7 & 8 SEALANT WASHER H101054 (12)
- Page 23 PERGOLA ASSEMBLY STEP 15 H101101 TORX PAN HEAD (16) 1/4-20x3/4" STEEL WASHER H101053 6x20 (16) OUTER SIDE JOIST ASSEMBLY - FROM STEPS 9 & 10 H101103 TORX SOCKET SCREW 1/4-20 SEALANT WASHER H101054 (16)
- Page 24 PERGOLA ASSEMBLY STEP 16 H101101 TORX PAN HEAD (16) 1/4-20x3/4" STEEL WASHER H101053 6x20 (16) OUTER END JOIST ASSEMBLY - FROM STEPS 5 & 6 H101103 TORX SOCKET SCREW 1/4-20 SEALANT WASHER H101054 (16)
- Page 25 PERGOLA ASSEMBLY STEP 17 H101101 TORX PAN HEAD STEEL WASHER H101053 1/4-20x3/4" (32) 6x20 (32) W BRACKET-A4M01453 (x4) 3"X5 1/8"X9 1/8" (78x130x233) SEALANT WASHER H101054 (32)
- Page 26 PERGOLA ASSEMBLY STEP 18 TORX PAN HEAD H101102 STEEL WASHER H101053 1/4-20x4" (20) 6x20 (20) JOIST ASSEMBLY - FROM STEPS 1 & 2 (10) SEALANT WASHER H101054 (20)
- Page 27 PERGOLA ASSEMBLY STEP 19 L ANGLED ROD-A4M01450 H101101 TORX PAN HEAD (x4) 1 1/4"X1 1/2"X36 3/8" (33x38x924) STEEL WASHER H101053 1/4-20x3/4" (32) 6x20 (32) ANGLED ROD-A4M01451 (x4) 1 1/4"X1 1/2"X12 7/8" (33x38x327) SEALANT WASHER H101054 (32) COMPLETE THIS STEP FOUR TIMES.
- Page 28 PERGOLA ASSEMBLY STEP 20 H100120 CONCRETE ANCHOR FLAT WASHER H100630 1/4x2 (16) (16) BLK 8x19...
- Page 29 PERGOLA ASSEMBLY STEP 21 N2 A4M01352 (x16) HOLE COVER...
-
Page 30: Electrical Enclosure
ELECTRICAL ENCLOSURE FOR ELECTRICAL ENCLOSURE INSTALLATION REFER TO ASSEMBLY INSTRUCTIONS THAT COMES PACKAGED WITH THE ELECTRICAL ENCLOSURE KIT. INSTALL ON ANY POST THAT IS DESIRED. FOLLOW DIRECTIONS FOR PROPER INSTALLATION.
Need help?
Do you have a question about the TRENTON 2105133 and is the answer not in the manual?
Questions and answers