Advertisement
Quick Links
Advertisement
Chapters

Related Manuals for MSI US60G


Summary of Contents for MSI US60G
- Page 1 MSI US60G Wireless 11g Turbo G USB Adapter User’s Manual...
- Page 2 Übereinstimmung mit den grundlegenden Anforderungen und den anderen relevanten Vorschriften der Richtlinie 1999/5/EG befindet. Die Konformitätserklärung kann auf folgender website eingesehen werden: http://www.msi-computer.de/support/dl_man.php Hereby, Micro Star International CO., LTD declares that this device is in compliance with the essential requirements and other relevant provisions of Directive 1999/5/EC.
- Page 3 - open computer systems, etc. - Microwave oven, etc, Communication (exchange data) is dependent on the software of the WLAN or Bluetooth devices. ® MSI Technology GmbH Hanauer Landstraίe 306 60314 Frankfurt Telefon: +49 (0)69 40893-0 Telefax: +49 (0)69 40893-202...
-
Page 4: Copyright Notice
FCC Caution 1. The device complies with Part 15 of the FCC rules. Operation is subject to the following two conditions: (1) This device may not cause harmful interference, and (2) This device must accept any interference received, including interference that may cause undesired operation. -
Page 5: Important Safety Precautions
Important Safety Precautions Always read and follow these basic safety precautions carefully when handling any piece of electronic component. Keep this User’s Manual for future reference. Keep this equipment away from humidity. Lay this equipment on a reliable flat surface before setting it up. The openings on the enclosure are for air convection hence protects the equipment from overheating. -
Page 6: Table Of Contents
Chapter 1. Introduction 1 1.1 US60G - MSI Wireless 11g Turbo G USB Adapter ... 1 1.2 How US60G W orks ... 2 1.3 Specifications ... 4 1.4 System Requirements ... 6 1.5 Package Contents ... 6 1.6 Product View ... 7 Chapter 2. -
Page 7: Chapter 1. Introduction
*Experiencing the high throughouput of the MSI Turbo G mode, MSI Turbo G series wireless products are highly recommended as your best choices. MSI Turbo G mode is suggested to func- tion with MSI Turbo G series wireless products to optimize performance. -
Page 8: How Us60G Works
Internet with a shared modem. In this kind of network, new devices can be quickly added; however, users can only communicate with other wireless LAN computers that are in this wireless LAN workgroup, and are within range. US60G MSI Wireless 11g Turbo G USB Adapter... - Page 9 Infrastructure Mode : The difference between Infrastructure net- work and Ad-hoc network is that the former one includes an Access Point. In an Infrastructure network, the Access Point can manage the bandwidth to maximize bandwidth utilization. Addi- tionally, the Access Point enables users on a wireless LAN to access an existing wired network, allowing wireless users to take advantage of the wired networks resources, such as Internet, email, file transfer, and printer sharing.
-
Page 10: Specifications
Antenna Data Rate Media Access Protocol Channel Transmission Modulation Network Architecture *MSI Turbo G Mode support is also required on RG60G and US60G. IEEE 802.11b/g 2.400-2.4835GHz Support MSI Turbo G Mode* Technology USB 2.0 compliant with USB 1.1 Build-in IEEE802.11g (auto-fallback): - OFDM: 54, 48, 36, 24, 18, 12, 9 and 6 Mbps IEEE 802.11b (auto-Fallback):... -
Page 11: Receiver Sensitivity
Temperature (Operating Storage) Humidty Pow er Consumption Output Power Receiver Sensitivity Range Security Operating System Certification Dimension C to 70 C to 100 10% - 90% (non-condensing) 802.11g (54Mbps) 270mA@3.3v in continue Tx 230mA@3.3v in continue Rx 195mA@3.3V in Standby mode 802.11b(11Mbps) 340mA@3.3V in continue Tx 240mA@3.3V in continue Rx... -
Page 12: System Requirements
The package should contain the follow- ing items: - One Wireless 11g Turbo G USB Adapter - US60G. - One USB extion cable. - One Quick Installtion Manual. -
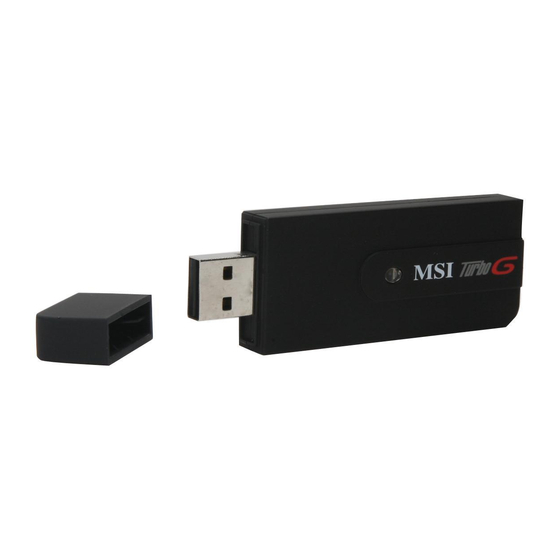
Page 13: Product View
>>> 1.6 Product View Wireless 11g Turbo G USB Adapter US60G Cover USB Connector LNK/ACT LED - GREEN, indicating the networking status by: ON - US60G is connected to computer. Flash -US60G is transmitting over the network. -
Page 14: Chapter 2. Hardware Installation
Hardware Installation The following diagrams provide you with a basic installa- tion for your US60G, including how to install and remove the USB Adapter. >>> 2.1 Connecting US60G Connection 1. The hardware installation for US60G is simply plugging it into an available USB port on your desktop/notebook computer. -
Page 15: Removing Us60G
Connection 2. If necessary, you can connect the provided USB cable to your computer, and connect US54G to the cable. >>> 2.2 Removing US60G The MSI US60G supports hot-plug function, so that you can remove it under W indows operating system without shutting down the system. Note: DO NOT remove US54G while transferring data (the LED is flashing). -
Page 16: Chapter 3. Software Installation
Setup CD to copy necessary files during the installation. Please NOTE that the US60G should be installed into your computer before installing the driver and utility. Then, the operating system will detect a new device and start to configure the new device. -
Page 17: Software Setup
>>> 3.1 Software Setup After installing the W ireless USB Adapter to your com- puter and then turning on the computer, the operating system will detect a new device and start the configuraton automatically. Please CANCEL the pop-up window from Found New Hardare Wizard to install necessary driver and utility from the InstallShield Wizard of your Software Insert the Software CD into your CD-ROM driver, and the... - Page 18 The program will copy the necessary files to the system. ST EP The progress indicator shall show the installing status. Click Finish when the installation is completed. The ST EP MSI Wireless LAN icon will appear in the status area. MSI Wireless LAN icon...
-
Page 19: Chapter 4. Wireless Network Utility
Wireless Network Utility After installing the driver, MSI US60G provides a conven- ient and powerful utility that allows you to set up, configure, and know your networking status easily and clearly. >>> 4.1 Introduction 4.1.1 The MSI Wireless LAN icon - Not connected to the network. - Page 20 Utility at your reference. Switch to AP Mode If your MSI wireless LAN adapter supports Software AP function, you shall see this item under the sub-menu, which allows you to use MSI wireless adapter as a virtural access point. Exit Close the program.
-
Page 21: Changing The Control Setting (For Windows Xp/Vista)
Under Windows XP/Vista environment, the wireless LAN is controlled by the operating system (default). To take full advantage of your MSI wireless adapter, it is recom- mended to use the MSI W ireless Network Utility to con- trol your wireless LAN. To change the control setting:... -
Page 22: Networking
>>> 4.2 Networking Since US60G is installed in your computer, you have to configure the settings for communication to start working in your network environment. 4.2.1 Infrastructure Mode Infrastructure mode allows your computer to communi- cate with the other computers in the network through an Access Point. - Page 23 In the tab of Site Survey, select the network you want, ST EP and then click Connect. You also can click Rescan to search the available Access Point in the network again. Select If the Access Point selected to connect has been ST EP connected and had set up the Authentication and Security, you need to have the W PA Pre-shared Key or...
-
Page 24: Advanced Network Settings
Please refer to page 19 for more detail configuration ST EP regarding Add to Profile selection. Advanced network settings: Click the Advanced in the MSI Wireless Utility window ST EP to set advanced network settings. W ireless mode: Select wireless mode. 802.11 B/G mix, 802.11b only, and 802.11g only modes are supported. - Page 25 Radio Off: Indicate to turn off radio. Apply: Apply the above changes. Add Profile to keep your favorite wireless settings: Click the Profile in the MSI Wireless Utility window to ST EP select Add or click Add to Profile after you select one of available Access Point under Site Survey window to configure your favorite wireless settings.
- Page 26 After click Add to bring up the Configuration dialogue ST EP window as below. Profile Name: User chose name for this profile. SSID: User can key in the intended SSID name or use pull . Power Save Mode: Choose from CAM (Constantly Awake Mode) or Power Saving Mode.
- Page 27 Preamble: There are three types, Auto, Long and Short are supported. Ad hoc wireless mode: There are five types. 802.11b only, 802.11 b/g mix, and 802.11g only modes are supported. I. RTS Threshold: User can adjust the RTS threshold number by sliding the bar or key in the value directly II.
-
Page 28: Ad-Hoc Mode
- All the computers connected should be set to Ad-hoc mode. - The computers have the same SSID (network name) setting. To build the Ad-hoc network: Click the MSI Wireless LAN icon to bring up the ST EP Wireless Network Connection window. Then, click Profile tab. Click Add. - Page 29 Check Network Type option and select Ad-hoc mode to ST EP enable the Ad-hoc mode. Select Click Authentication and Security to setup Authentica- ST EP tion Type, Encrypation and WPA Pre-shared Key. Set the SSID Set the configuration for your needs.
-
Page 30: Link Status
>>> 4.3 Link Status Link Status Link Status tab displays the detailed information regarding current connection. Status: Current connection status. If no connection, if will show Disconnected. Otherwise, the SSID and BSSID will show here. Extra Info: Display link status and current channel in use. -
Page 31: Statistics
>>> 4.4 Statistics Statistics Statistics tab displays the detailed counter information based on 802.11 MIB counters. This tab translates MIB counters into an easier format for users to understand. Transmit Statistics: a. Frames Transmitted Successfully: Frames successfully sent. b. Frames Transmitted Successfully Without Retry: Frames successfully sent without any retry. -
Page 32: About
>>> 4.5 About About tab contains the wireless card and driver version information. Connect to MSI website:MSI Technology, Corp. Display Configuration Utility, drivers, and EEPROM version. Display W ireless NIC MAC address. -
Page 33: Chapter 5. Msi Software Ap Setup
MSI Software AP Setup A new way to build your wireless network! The MSI Soft- ware AP brings a variety of innovations to home network- ing and small business users that enhance ease-of-use, set and cost effective. W ith this powerful utility, our computer that installed with... - Page 34 To enable the Software AP, right-click the MSI W ireless LAN icon, and select “Switch to AP mode”. The MSI Wireless LAN icon shall change to MSI Software AP icon. Select Setting the SSID ST EP SSID (Service Set Indentifier) is the name designated for a specific wireless local area network ( WLAN).
- Page 35 Setting the Authentication and Encryption ST EP Click the button Auth vs. Security to select the Authenti- cation Type, Encryption Type, and setup the WPA Pre- shared key. If you select Open as your Authentication type, WEP as Encryption type, you have to setup the WEP Key for your needs, click OK here.
-
Page 36: Setup
MSI Turbo G series wire- less products to optimize performance. The compatibil- ity of other brands of wireless products with MSI Turbo G mode is not guaranteed. (MSI Turbo G Mode support is also required on host/ router side, such as the MSI RG60G and US60G). -
Page 37: Configuration
Choose MSI Configuration Tool for MSI Utility ST EP configuration. Select Optimize for performance mode. ST EP... - Page 38 Wait a few seconds until Setup has finished installing. ST EP...
- Page 39 >>> 6.2 Configuratrion To connect MSI Turbo G Router (ex. RG60G), configure ST EP the settings as below: ST EP...
-
Page 40: Confirmation
>>> 6.3 Confirmation You may find out whether you’re in Turbo Mode by checking the following default value. Make sure both “TxBurst” and “Enable TCP Window ST EP Size” items have been checked, then click “Apply”. Immediate restart computer is suggested to validate default value. -
Page 41: Chapter 7. Networking Basics
Networking Basics This chapter describes how to prepare for connection to network and some basic outline of networking basics, including sharing files, printing from a computer on the network, or accessing the Internet on multiple comput- ers with one connection. >>>... - Page 42 Under Windows 2000/XP/Vista Click Start and choose Control Panel to open the Control Panel window. Double-click the Network Connection icon to open the Network Connection window. Right-click the Wireless Network Connection icon and click Properties from the shortcut menu. The Wireless Network Connection Properties window appears to show the current network settings of the system.
-
Page 43: Computer Identification
>>>7.2 Computer Identification Please verify that each computer has a unique name and common workgroup name, if you had previously given your Windows 98SE/ME/2000/XP/Vista computers names. Under Windows 98SE/ME Enter a name for your computer (less than 15 characters without space. Your computer will belong to this workgroup. - Page 44 Under Windows 2000/XP/Vista Right-click My Computer icon on your Windows desktop, and click Properties from the shortcut menu. Right-click The System Properties window appears; choose Computer Name tab. Enter some information for reference. Your computer’s name. Your computer will belong to this workgroup.
- Page 45 To rename the computer and join a workgroup/ domain, click Change. The Computer Name Changes window appears as below. Enter a Computer Name, select Workgroup and enter the name of your workgroup. Please NOTE that each computer’s name must be unique on a particular network to avoid confusion.
-
Page 46: Configuring A Dynamic/Fixed Ip Address
>>> 7.3 Configuring a Dynamic/Fixed IP Address W hen the drivers are installed, the default setting here is set to obtain IP dynamically through a DHCP server. If you want to change the settings, please follow the steps below: Under Windows 98SE/ME Go to Start ->... - Page 47 To configure a fixed IP address, choose IP Address tab and check the Specify an IP Address option. Then, enter an IP address into the empty field. Suggested IP Address Range is 192.168.1.253, and suggested Subnet Mask is 255.255.255.0. Check this 4.a Configuring a dynamic IP address Enter a fixed IP address and Subnet Mask...
- Page 48 Under Windows 2000/XP/Vista Click Start and choose Control Panel to open the Control Panel window. Double-click the Network Connection icon to open the Network Connection window. Right-click the IEEE802.11g Wireless USB Adapter icon and click Properties from the shortcut menu. When the Wireless Network Connection Properties window appears, choose General tab and select Internet Protocol [TCP/IP], and...
- Page 49 Check this 5.a Configuring a dynamic IP address Check this Enter a fixed IP address and Subnet Mask 5.b Configuring a fixed IP address Click OK to complete the configuration.
-
Page 50: Checking Tcp/Ip Address
>>> 7.4 Checking TCP/IP Address Under Windows 98SE/ME Go to Start -> Run... Type winipcfg Type here. The IP Configuration screen will appear, click More Info to bring up a screen containing detail information of your wireless network adapter. Check the configuration of IP Address, Subnet Mask, and Default Gateway are correct. - Page 51 Under Windows 2000/XP/Vista Go to Start -> Run... Type Type here. A DOS prompt window appears. Type and press [Enter] to display IP information. in the Open box and click OK. Your Wireless LAN adapter model Check the configuration of IP Address, Subnet Mask, and Default Gateway are correct.
-
Page 52: Checking Connection By Pinging
>>> 7.5 Checking Connection by Pinging Go to Start -> Run... Type (W indows 2000/XP/Vista) in the Open box and click OK. A DOS prompt window appears. Type 59.147.160 IP address of the Gateway in this case, and press [Enter]. You will get reply if the pinging is successful. -
Page 53: Sharing Files
>>> 7.6 Sharing Files You may now open and save files on other computers once your computers are connected together on a network. You will also be able to specify particular fold- ers or disk drives to share and even password to protect them. - Page 54 Select the I want to be able to give others access to my files option, and click OK. Check this Click OK in the Network dialog box. Provide the W indows Setup CD or direct the path tothe proper location of the installation files if prompted.
- Page 55 Select the Share As option to set the param eters for sharing this particular disk drive or folder. Share Name This is used to identify the disk drive or folder you are sharing to other computers in the network, which can be helpful as more resources in your network for others.
- Page 56 Password This option allows you to apply a level of security to your shared disk drive and folder. Any other computer (user) will be asked to enter the password you set here before accessing the disk drive or folder. Two passwords are used to give two levels of security (or access) to others in the network using the Depends on Password setting.
-
Page 57: Chapter 8. Trouble Shooting
2. Open your wireless utility software by clicking on the icon in the system tray at the bottom right-hand corner of the screen. If you’re using this MSI US60G W ireless 11g Turbo G USB Adapter, the icon in the system tray should look like the one below. - Page 58 3. The exact screen shall vary depending on the model of wire- less card you have at hand; however, any of the utilities shall have a list of ”Site Surveys” or “ Available Networks”. Site Sur- veys” or “ Available Networks” are available wireless networks you are able to connect to.
- Page 59 The default channel the router is shipped with is channel 11, you may choose from several other channels by your region. See yor router manual for instructions on how to choose other channels. Limiting the wireless transmit rate - Limiting the wireless trans- mit rate can help to improve the maximun wireless range as well as connection stability.
- Page 60 Step 3: From the Advanced tab, uncheck Use Windows to con- figure my wireless network. Once the box is unchecked, click OK to close the window. You are now using the Ralink wireless utility to configure the wireless adapter.
-
Page 61: Appendix: Ce Compliance Booklet
CE Compliance Booklet... - Page 62 Table of Content English... 1 Detusch ... 2 Français... 3 Čeština... 4 Dansk... 5 Nederlands ... 6 Eesti ... 7 SUOMEKSI ... 8 Ελληνικάη... 9 Magyar ... 10 Italiano ... 11 Latviska ... 12 Lietuvių... 13 Malti ... 14 Polski ... 15 Português...
-
Page 63: English
- Buildings, trees, etc. - Heaters, ferroconcrete, etc. - open computer systems, etc. - Microwave oven, etc, Communication (exchange data) is dependent on the software of the WLAN or Bluetooth devices. © Copyright MSI Technology GmbH 2005. All rights reserved. - Page 64 - offen betriebene Computer, etc. - Mikrowellenherde, etc, Die Kommunikation zwischen unterschiedlichen WLAN- oder Bluetooth -Geräten ist von der jeweiligen Software und dem entsprechenden Versionsstand abhängig MSI Technology GmbH. Frankfurt a. M. © Copyright MSI Technology GmbH 2005. All rights reserved.
-
Page 65: Français
- Bâtiments, arbres, etc. - Chauffage, bétons armés, etc. - boîtier d’ordinateur non fermé. - Micro-ondes, etc. La communication (échange des données) dépend du logiciel des dispositifs WLAN ou Bluetooth . © Copyright MSI Technology GmbH 2005. All rights reserved. -
Page 66: Čeština
- vysokofrekvenční emise jakéhokoli druhu, - budovy, stromy atd. - topidla, železobeton atd. - otevřené počítačové systémy atd. - mikrovlnná trouba atd. Komunikace (výměna dat) závisí na softwaru zařízení WLAN nebo Bluetooth . © Copyright MSI Technology GmbH 2005. All rights reserved. -
Page 67: Dansk
- højfrekvens udsendelse af enhver art, - Bygninger, træer, osv. - Varmekilder, jernbeton, osv. - Åbne computersystemer, osv. - Mikroovne, osv, Kommunikation (dataudveksling) er afhængig af softwaren til WLAN eller Bluetooth enhederne. © Copyright MSI Technology GmbH 2005. All rights reserved. -
Page 68: Nederlands
- Gebouwen, bomen, etc. etc. - Verwarmingen, gewapend beton, etc. - Open computer systemen, etc. - Magnetron-oven, etc, Communicatie (uitwisselen van data) hangt af van de software van het WLAN of Bluetooth apparaat. © Copyright MSI Technology GmbH 2005. All rights reserved. -
Page 69: Eesti
Seinad, betoonpõrand (raud), mitmekihilised aknad, sõiduki kere jne. Täiendavad elektromagnetilised häiringud: - igat liiki kõrgsageduskiirgus, - ehitised, puud jne, - kütteseadmed, raudbetoon jne, - avatud arvutisüsteemid jne, - mikrolaineahjud jne. Side (andmevahetus) oleneb WLAN- või Bluetooth -seadmete tarkvarast. © Copyright MSI Technology GmbH 2005. All rights reserved. -
Page 70: Suomeksi
Lisää sähkömagneettista häiriötä: - mikä tahansa korkeataajuinen säteily, - rakennukset, puut, jne. - lämmitin, teräsbetoni, jne. - avoimet tietokonejärjestelmät, jne. - mikroaaltouuni, jne. Tietojen vaihto riippuu WLAN- tai Bluetooth -laitteiden ohjelmistoista. © Copyright MSI Technology GmbH 2005. All rights reserved. -
Page 71: Ελληνικάη
- Κτίρια, δέντρα, κτλ. - Καλοριφέρ, μπετόν-αρμέ, κτλ. - αναμμένα συστήματα υπολογιστών, κτλ. - Φούρνος μικροκυμάτων, κτλ, Η επικοινωνία (ανταλλαγή δεδομένων) εξαρτάται από το λογισμικό των συσκευών WLAN ή Bluetooth . © Copyright MSI Technology GmbH 2005. All rights reserved. -
Page 72: Magyar
- bármilyen fajta magas frekvenciájú sugárzás, - épületek, fák, stb. - fűtőtestek, vasbeton, stb. - nyitott számítógéprendszerek, stb. - mikrohullámú sütő, stb. A kommunikáció (adatforgalom) függ a szoftvertől amelyek a WLAN vagy Bluetooth eszközöket működtetik. © Copyright MSI Technology GmbH 2005. All rights reserved. -
Page 73: Italiano
- Edifici, alberi, ecc. - Caloriferi, cemento armato, ecc. - Computer aperti, ecc. - Forni a microonde, ecc, La comunicazione (scambio di dati) dipende dal software delle periferiche WLAN o Bluetooth . © Copyright MSI Technology GmbH 2005. All rights reserved. -
Page 74: Latviska
- jebkura veida augstfrekvences starojums - ēkas, koki u.c. - sildķermeņi, dzelzsbetons u.c. - atvērtas datorsistēmas u.c. - mikroviļņu krāsns u.c. Komunikācija (datu apmaiņa) ir atkarīga no WLAN vai Bluetooth ierīču programmatūras. © Copyright MSI Technology GmbH 2005. All rights reserved. -
Page 75: Lietuvių
Lietuvių Šiuo dokumentu Micro Star International CO., LTD, MSI pareiškia, kad šis prietaisas atitinka pagrindinius 1999/5/EB direktyvos reikalavimus ir kitas atitinkamas sąlygas. Atitinkamą Atitikimo pažymėjimą galima rasti internete adresu: IEEE 802.11b/g ir Bluetooth 2.4 GHz veikimas Europa: dažniai: 2.400 – 2.4835 GHz Prancūzija: dažniai: 2.4465–... -
Page 76: Malti
- Bini, siġar, eċċ. - Ħiters, konkrit bil-ħadid, eċċ. - sistemi tal-kompjuter miftuħin, eċċ. - Fran tal-majkrowejv, eċċ. Il-kommunikazzjoni (skambju ta’ data) hija dipendenti fuq is-software għall-apparat tal-WLAN jew Bluetooth . © Copyright MSI Technology GmbH 2005. All rights reserved. -
Page 77: Polski
- różnego rodzaju wysokie częstotliwości, - budynki, drzewa itd. - grzejniki, beton, żelazo, - otwarte obudowy komputerów, - kuchenki mikrofalowe itp. Połączenie (wymiana danych) zależy od oprogramowania urządzeń WLAN lub Bluetooth . © Copyright MSI Technology GmbH 2005. All rights reserved. -
Page 78: Português
- Emissões de alta frecuência de qualquer classe, - Edifícios, árvores, etc. - Aquecedores, etc. - Sistemas de computador abertos, - Forno Microondas, A comunicação (intercâmbio de dados) depende do software dos dispositivos WLAN ou Bluetooth . © Copyright MSI Technology GmbH 2005. All rights reserved. -
Page 79: Slovensky
- vysokofrekvenčné emisie rôzneho druhu, - Budovy, stromy, atď. - Ohrievače, železobetón, atď. - otvorené počítačové systémy, atď. - Mikrovlnná rúra, atď, Komunikácia (výmena dát) je závislá od softvéru WLAN alebo Bluetooth zariadení. © Copyright MSI Technology GmbH 2005. All rights reserved. -
Page 80: Slovenèina
- kakršno koli visoko frekvenčno oddajanje - zgradbe, drevesa, ipd. - grelci, železobeton, ipd. - odprti računalniški sistemi, ipd. - mikrovalovne peči, ipd. Komunikacija (prenos podatkov) je odvisna od programske opreme WLAN ali Bluetooth naprave. © Copyright MSI Technology GmbH 2005. All rights reserved. -
Page 81: Español
Sistemas informáticos abiertos, etc. Microondas, etc La comunicación (intercambio de datos) depende del software de los dispositivos WLAN o Bluetooth © Copyright MSI Technology GmbH 2005. All rights reserved. 2.4 GHz operación que se atenga a las exigencias del IEEE 802.11... -
Page 82: Svenska
– någon slags emission på hög frekvens, – Byggnader, träd o.s.v. – Värmare, betongjärn o.s.v. – öppna datorsystem o.s.v. – Mikrovågsugn o.s.v. Kommunikation (utbyte av data) är beroende av WLAN eller Bluetooth - anordningarnas mjukvara. © Copyright MSI Technology GmbH 2005. All rights reserved.
Need help?
Do you have a question about the US60G and is the answer not in the manual?
Questions and answers