Advertisement
Quick Links
Use and warrantie booklet for satellite antenna
Serial Number:
Dish Diameter:
Firmware:
Customer:
STAMP/SIGN RESELLER:
ELECTRICAL LINKS
KEYS FUNCTIONS
PROBLEMS
WARRANTIE
CONTACT
INCLINATIONS GEO-CHART
READ CAREFULLY THIS BOOKLET BEFORE
INSTALL OR USE THE PRODUCT.
GIOCAMPER M7 T-Sat
By EMMEGI Electronics
Di Gasperini M.G.
____________________
____________________
____________________
____________________
INDEX:
Date:
1
____/____/____
Pag. 2
Pag. 3
Pag. 6
Pag. 7
Pag. 11
Pag. 12
Pag. 14
Pag. 15
Advertisement

Summary of Contents for emmegi GIOCAMPER M7 T-Sat
-
Page 1: Table Of Contents
Use and warrantie booklet for satellite antenna GIOCAMPER M7 T-Sat By EMMEGI Electronics Di Gasperini M.G. Serial Number: ____________________ Dish Diameter: ____________________ Firmware: ____________________ Customer: ____________________ Date: ____/____/____ STAMP/SIGN RESELLER: INDEX: PREAMBLE Pag. 2 INSTALLATION Pag. 3 ELECTRICAL LINKS Pag. 6 KEYS FUNCTIONS Pag. -
Page 2: Preamble
PREAMBLE Preamble: GIOCAMPER M7 T-SAT is a motorized antenna with automatic alignment. Automatic alignment is provided using the GPS position and integrated tuner information for satellite identification. Some external factors could prolong or fail the automatic alignment of the antenna, such as: trees, buildings or great obstacles positioned between the antenna and the satellite, vehicle not in good lateral/frontal inclination, unstable vehicle due to peoples moving during the alignment. -
Page 3: Installation
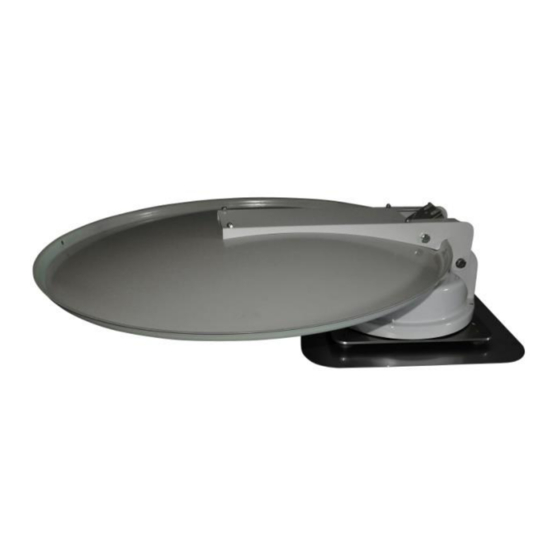
INSTALLATION Dish Installation: 1. Place the sat dish bracket in vertical position, putting inside the 2 spacing washer and the screws as in the figure (Bolt – Steel washer – Dish Bracket – Alloy Washer – motor structure), when positioned tight the 2 screws with a 13 mm tighten tool. - Page 4 6. Untighten the 2 dish holder screws and leave the dish to go down, leaning on the abs white carter as shown in the picture. The LNB have to be in contact with the dish. (do not put any material between LNB and dish) 7.
- Page 5 BACK SIDE OF CAMPER FRONT SIDE OF CAMPER Positioning of User Consolle: User Consolle is designed to be placed in an hole in the wood furniture. If you do not want do any holes you have to purchase the plastic box (Optional). ...
- Page 6 Where electrical connection will be made you must have a positive 12Vcc coming from the camper plant that have energy only when the alternator run, this is to have an Emergency Closure function in case you forget antenna opened (Be careful do not use alternator imput to close antenna instead of normal user consolle imput, this is only an emergency feature).
- Page 7 HOW DOES IT WORKS WARNING: DO NOT USE ANTENNA WITH STRONG WIND OR STRONG GUST. Key Functions: ON – OFF – OK 1. Turn ON and OFF the User Consolle. 2. Save modifications on the PROTECTED MENU. Menu – SET 1.
- Page 8 Satellite Allignment Procedure: WARNING: Before start automatic alignment of satellite, we suggest you to stabilize the camper to avoid roll or yaw movement caused by people walking. This action will help you to avoid satellite aligment failure. We suggest you to place the camper levelled to avoid alignment problems. ...
- Page 9 Select desired satellite by pressing orizontal arrow keys. Press AUT key to start alignment process. When antenna will find and align the correct satellite, a message “SATELLITE TROVATO” will be shown. Anytime you need you can stop research. Just press any arrows to interrupt automatic movement and enter in “manual movement mode”.
-
Page 10: Pag
Press AUT key to enter in the MENU AUTOMATICO page. MENU AUTOMATICO __________________________ Satellite= Hotbird AUT= Inizia Ricerca SET= Chiude Parabola GPS attivo Gradi inizio ricerca: 38 __________________________ Press SET key to start automatic closure of antenna. The antenna will move in travel position. -
Page 11: Pag
With antenna in OPEN position start the camper engine to force an automatic closure and a reset of the system. If problem is still present please contact post sales service of EMMEGI Electronics refering to the Pag. 14. -
Page 12: Pag
With antenna in OPEN position start the camper engine to force an automatic closure and a reset of the system. If problem is still present please contact post sales service of EMMEGI Electronics refering to the Pag. 14. - Page 13 SHIPPING COMING NOT PAID WILL BE REFUSED. If the fault of the product is recognized as covered from warranty, shipping costs to send back the product (On ITALIAN field) to the customer will be at EMMEGI Electronics di Gasperini Maria Grazia charge.
- Page 14 CONTACT Headquarter: EMMEGI Electronics di Gasperini M. Grazia Via per Mombello, 30/B 21033 Cittiglio (VA) Commercial contact: Phone: 0332 1894539 (Just for commercial info)(No English Speacker) Fax: 0332 1894538 Mail: contattaci@giocamper.it OPENING TIMETABLE From Monday to Friday From 9.00 till 12.00 From 15.00 till 18.30...
- Page 15 GEO-CHARTS Degrees have to be considered as “more or less”, so an error tolerance of 2/3 degrees is acceptable. Antenna will perform the research even if the degrees are not perfectly correct.
Need help?
Do you have a question about the GIOCAMPER M7 T-Sat and is the answer not in the manual?
Questions and answers