Table of Contents
Advertisement
Quick Links
Advertisement
Table of Contents

Subscribe to Our Youtube Channel
Summary of Contents for Deli 888T
- Page 1 USER MANUAL THERMAL LABEL PRINTER MODEL: 888T...
-
Page 2: Table Of Contents
CONTENTS MANUAL INFORMATION....................1 SAFETY PRECAUTIONS....................1 CHAPTER 1. PRODUCT INTRODUCTION................5 1.1 Unpacking checklist............................5 1.2 Physical appearance and components..................6 1.3 Product dimensions............................7 CHAPTER 2. PRODUCT SPECIFICATIONS..............8 2.1 Technical specifications...........................8 CHAPTER 3 INSTALLATION AND OPERATION.............9 3.1 Installation media............................9 3.1.1 Loading the paper roll..........................9 3.1.2 Installing folding paper..........................12 3.1.3 Installing the external paper roll bracket................14 3.1.4 Installing the ribbon..........................15... -
Page 3: Manual Information
Manual information This user manual contains essential information for the installation and use of the product. The following section provides a more detail description about various tech- nical issues and information. 1.Windows Driver Manual This manual provides Windows driver installation instructions. 2.Printer Utility Manual The manual specifies how to use the product's function selection software and its operating conditions. - Page 4 • Do not use the electrical outlet if it’s not compatible with the power cord plug. • You should only use standard multi-outlet power strips. 2) You should only use the adapter provided in this package. • It is not safe to use other adapters. 3) Do not unplug it by pulling on the power cord •...
- Page 5 6) Other matters to note. Leave enough space around the printer for operation and maintenance pur- pose Keep the printer away from water, direct sunlight, strong light and heat sources. Do not use or store the printer in places with high temperature, high humidi- ty or heavy pollution.
- Page 6 4.WEEE (Waste Electrical and Electronic Equipment) The symbol placed on the product indicates that the item should not be mixed with general household waste. If such waste is not properly managed, it may harm both environment and human health. To prevent possible harm to the environment or human health from uncontrolled waste disposal, please separate these items from other types of waste and recycle them responsibly to promote the sustainable reuse of ma-...
-
Page 7: Chapter 1. Product Introduction
2) Please contact the dealer for any defect and/or missing of accessory. Printer,power adapter, power cord,USB cable,installation CD, carbon ribbon + paper roll ( carbon ribbon is exclusively for DL-888T), user manual, warranty card, QA certificate. Printer... -
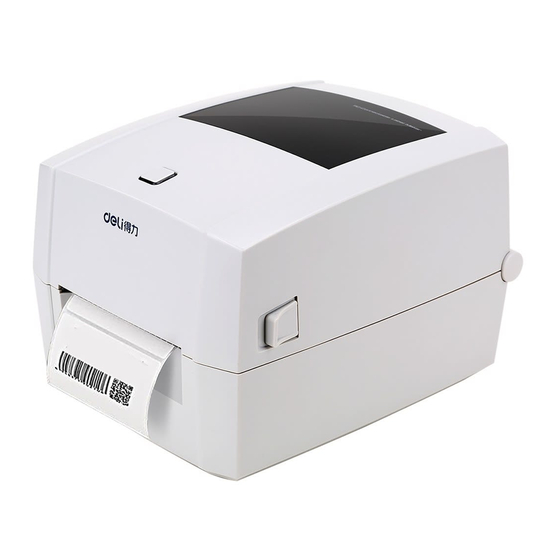
Page 8: Physical Appearance And Components
1.2 Physical appearance and components paper feed button (status indicator) top cover USB port power connector power switch top cover release button tape supply shaft tape recovery shaft paper roll holder (adjustable) latch paper guide (adjustable) rubber roller movable paper detector Top cover bracket lock... -
Page 9: Product Dimensions
1.3 Product dimensions... -
Page 10: Chapter 2. Product Specifications
2 PRODUCT SPECIFICATIONS... -
Page 11: Chapter 3 Installation And Operation
3 INSTALLATION AND OPERATION 3.1 Installation media 3.1.1 Installing the paper roll 1. Facing the front of the printer, open the top cover button in the direction indicated by the arrow and lift the top cover upward. 2. Open the paper roll holder and adjust the width in according to the width of the paper roll, insert the paper roll. - Page 12 3. Ensure the paper roll is securely attached to the paper roll holder, and then press down the latch. 4. Pull out part of the paper roll through the paper guide, and close the paper guide according to the paper width to regulate both sides of the paper.
- Page 13 5. Hold the top cover of the printer with your left hand, press the top cover bracket lock with your right hand in the direction of the arrow, and lower the top cover. 6. Press down until you hear a click. Tear off any excess paper in the direction of the cutting blades.
-
Page 14: Installing Folding Paper
3.1.2 Installing folding paper 1. Place the folded label paper at the back of the printer. With the printing side facing up, insert into the printer from the external paper roll inlet. 2. Open the printer top cover, pull out the paper roll to the front of the printer, and adjust the paper guide according to the paper size. - Page 15 3. Hold the top cover with your left hand, and press the top cover bracket lock with your right hand in the direction shown. 4. Press down the top cover until it locks with a click.
-
Page 16: Installing The External Paper Roll Bracket
3.1.3 Installing the external paper roll bracket When folding paper is used, or the paper roll is too large to be put into the paper bin, you can feed the paper from the paper inlet of the external paper roll as shown in the figure below, and then pass the paper underneath the paper guide, adjust the guide based on the paper width to regulate the paper. -
Page 17: Installing The Ribbon
3.1.4 Install the Thermal Transfer Ribbons(DL-888T only) 1. Facing the front of the printer, press the open button for the top cover with both hands simultaneously, lift the top cover up, and the printing support brackets will automatically open. printing support brackets 2. - Page 18 3. Turn the ribbon pick-up shaft gear counterclockwise to rewind the ribbon to a tight and flat condition. (ribbon supply core, ribbon pick-up core, rear ribbon wheel set, front ribbon wheel set, ribbon pin) 4. Close the top cover of the printer, and the print head assembly will automatically close.
-
Page 19: Power Connection
3.2 Power connection 1. Make sure the printer's power switch is off (O). 2. Connect the power adapter to the printer. 3. Connect the power cord to the power adapter. 4. Plug the power cord into the other end of the power supply. Off... -
Page 20: Interface Connection
3.3 Interface connection Connect the interface cable as shown in the figure below. This printer supports the following communication interface standards: --USB B-Type cable 1) Turn off the printer (O). 2) Please plug the communication cable to into the corresponding communication connectors of printer. - Page 21 3.5 Operation panel Power-on: When connected to power supply, move the power switch on the back side of the printer into the On position, the printer turns on and the indicator light is on. Power-off: Move the power switch on the back side of the printer into the Off...
-
Page 22: Printing Test
3.6 Basic function 3.6.1 Power ON/OFF Press "O" to turn off the power, and press "l" to turn on the power. 3.6.2 Paper feed Press the paper feed button and the printer will feed the paper to the speci- fied outlet according to the type of paper used. For continuous paper, press and hold the paper feed button and the printer will feed a fixed length of paper;... -
Page 23: Label Printing Training
3.6.4 Label printing training Note: Under the following situations, the users may learn about label posi- tioning so that they can better position the labels with this printer: Set up your printer for the first time; Use the printer for the first time after the sensor is cleaned; Reuse the printer after a period of not using;... -
Page 24: Chapter 4 Interface Signal
4 INTERFACE SIGNAL Signal Pin number name VBUS... -
Page 25: Chapter 5 Cleaning The Printer
5 CLEANING THE PRINTER Printing quality might be degraded by dust, foreign substance, adhesive substance, or other pollution materials stuck in the printer head or inside the printer.When dirty, clean the print head as follows ※ Caution 1) Make sure to turn the printer power off prior to cleaning. 2) Turn the printer off...
Need help?
Do you have a question about the 888T and is the answer not in the manual?
Questions and answers