Table of Contents
Advertisement
Quick Links
Advertisement
Table of Contents

Related Manuals for EMMO ADO


Summary of Contents for EMMO ADO
- Page 1 EMMO ADO EMMO ADO OWNER'S MANUAL...
- Page 2 Preface An Important Message From EMMO Thank you for choosing EMMO. Congratulations on your purchasing of a new ADO. This document is intended as a short introduction to your new e-bike. It contains essential safety, performance and service information.Please read and understand this manual fully before assembling and riding your bike. Be sure to watch the offical Emmo ADO assembly video available at https://emmo.ca/pages/e-bike-assembly-guide.
-
Page 3: Table Of Contents
Contents About This Manual ������������������������������������������������������������������������������������������������������������������������������ About EMMO ��������������������������������������������������������������������������������������������������������������������������������������� Rules and Regulations ������������������������������������������������������������������������������������������������������������������������� Safety Disclaimer ������������������������������������������������������������������������������������������������������������������������������ Description ��������������������������������������������������������������������������������������������������������������������������������������� Schematic Diagram ������������������������������������������������������������������������������������������������������������������������������������������������������������������ 13 Side View ......................................Handlebar Attachments ..................................Speedometer ...................................... Operation Guide��������������������������������������������������������������������������������������������������������������������������������� How to Turn on the Bike ������������������������������������������������������������������������������������������������������������������������������������������������������������ 18 Key Ignition/Steering Lock ............................18 Seat ........................................ - Page 4 Right Switches ��������������������������������������������������������������������������������������������������������������������������������������������������������������������������� 25 Left Switches ����������������������������������������������������������������������������������������������������������������������������������������������������������������������������� 26 Throttle �������������������������������������������������������������������������������������������������������������������������������������������������������������������������������������� 27 Storage �������������������������������������������������������������������������������������������������������������������������������������������������������������������������������������� 28 Tail box ........................................ Charger �������������������������������������������������������������������������������������������������������������������������������������������������������������������������������������� 29 Lead Acid Charger ....................................Lithium Charger ....................................Battery ��������������������������������������������������������������������������������������������������������������������������������������������������������������������������������������� 44 Battery Safety Precautions ............................44 Disposal ....................................... Storage & Maintenance ..................................Stand �����������������������������������������������������������������������������������������������������������������������������������������������������������������������������������������...
- Page 5 Lights ����������������������������������������������������������������������������������������������������������������������������������������������������������������������������������������� 53 Headlight ......................................Tail light & Brake Light ..................................Signal Lights ....................................... Adjusting the Brake ������������������������������������������������������������������������������������������������������������������������������������������������������������������� 56 Cleaning / Lubricating the Chain ����������������������������������������������������������������������������������������������������������������������������������������������� 57 Tire Pressure ����������������������������������������������������������������������������������������������������������������������������������������������������������������������������� 58 Serial Number ���������������������������������������������������������������������������������������������������������������������������������������������������������������������������� 60 Frame Number ................................60 Motor Number ................................61 Checking List Before Riding ������������������������������������������������������������������������������������������������������������������������������������������������������...
-
Page 6: About This Manual
About This Manual This document is intended as a short introduction to your new e-bike. It contains important safety, performance and service information. Read and understand it along with the information provided during the on-delivery instructions before using the product. Pay special attention to the safety messages as shown here, and keep the manual handy for future reference. WARNING: Warning about a situation that can cause death, serious physical injury and or heavy material damage if one does not obey the safety instructions. -
Page 7: About Emmo
Backed by our comprehensive warranty, we ensure riders are confident in the purchase of their Emmo. Emmo believes that a greener future is not only possible, it’s necessary, and we want to do our part to build greener communities by making e-bikes more accessible. -
Page 8: Rules And Regulations
Rules and Regulations According to Canada’s Motor Vehicle Safety Regulations ( MVSR ). A qualified e-bike (defined as Power Assist Bicycle) must meet the following requirements: • The e-bike must have operable pedals • Upper wattage limit for the motor is 500W •... - Page 9 Rules and Regulations Useful links: E-Bike Regulations in Ontario: https://www.ontario.ca/page/riding-e-bike E-Bike Regulations in British Columbia: https://www.bclaws.gov.bc.ca/civix/document/id/complete/statreg/151_2002 E-Bike Regulations in Alberta: http://www.transportation.alberta.ca/content/doctype45/production/mopedpowerbikes.pdf E-Bike Regulations in Manitoba: https://web2.gov.mb.ca/laws/statutes/ccsm/h060e.php E-Bike Regulations in Saskatchewan: https://www.sgi.sk.ca/motorcycle/-/knowledge_base/motorcycle-handbook/power-assisted-bicycles1 E-Bike Regulations in Quebec: https://saaq.gouv.qc.ca/en/road-safety/modes-transportation/electric-bike E-Bike Regulations in New Brunswick: https://www2.gnb.ca/content/gnb/en/services/services_renderer.200814.Motor_Vehicle_Registration.html...
- Page 10 E-Bike Regulations in Nova Scotia: https://novascotia.ca/just/regulations/regs/mv18786.htm E-Bike Regulations in Prince Edward Island: hhttps://www.princeedwardisland.ca/en/information/transportation-and-infrastructure/power-assisted-bicycles E-Bike Regulations in Newfoundland: Know and obey all relevant local laws It is your responsibility to research and understand relevant laws where you ride your bike. Such laws may cover required helmets and safety gear, required lights and reflectors, required hand signals, where you can legally ride a bike (bikes and ebikes may have different restrictions), how fast you can go, what (if any) cargo or passengers you can carry, rider age, and more.
-
Page 11: Safety Disclaimer
Safety Disclaimer This manual contains important safety, performance and service information� Read and understand it along with the information provided during the on-delivery instructions before using the product, and keep it for reference� Ensure that you comprehend all instructions and safety notes/ warnings� WARNING: Ensure the bike FITS you properly before use. - Page 12 & charger to any big shocks. • Charge the battery only with the charger that was supplied with the e-bike supplied by an official EMMO dealer. • DO NOT use the battery & charger for other purposes.
- Page 13 In no event shall EMMO be responsible for any direct, indirect or consequential damages, including without limitation, personal injury, property damage, or economic losses, whether based on contract, warranty,...
-
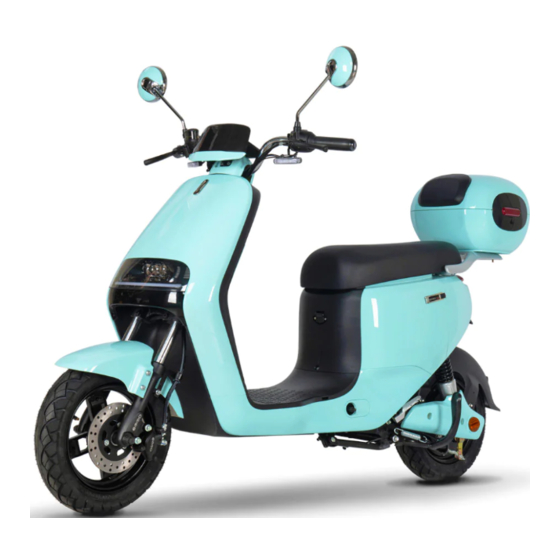
Page 14: Description
Description 1. Schematic Diagram a� Side View Headlight Charging Port Side Kickstand Passenger Footpeg Centre Stand Seat Cushion Tail Box Tail Light Front Fender Front Shocks Front Wheel Rear Shocks Rear Fender Rear Reflector Chain Cover Rear Wheel... -
Page 15: Handlebar Attachments
Description 1. Schematic Diagram b� Handlebar Attachments Rear View Mirrors Speedometer Rear Brake Lever Left Grip Left Switch Housing Storage Brake Fluid Tank Front Brake Lever Throttle Right Switch Housing Ignition Helmet Hook... -
Page 16: Speedometer
Description 1. Schematic Diagram c� Speedometer READY READY km/h km/h... - Page 17 Description 1. Schematic Diagram c� Speedometer READY Ride-Ready Mode Indicator Lights up when the bike is ready for operation. Flashes green when the turning signal switch is silded to the left. This Left Turning Signal arrow remains flashing until the turning signal is canceled. Indicates the speed level (this function may not be available for certain Speed Mode Indicator models).
- Page 18 Description 1. Schematic Diagram c� Speedometer I. Warning Lights Motor Failure Motor is out of order. Throttle Failure Throttle is out of order. Controller Failure Controller is out of order. Brake Sensor Failure Brake is applied (brake sensor is activated)/ Brake sensor failure. Cruise Control Activated Cruise control function is activated.
-
Page 19: Operation Guide
Operation Guide 1. How to Turn on the Bike a� Key Ignition/Steering Lock Power Off Power On Steering Lock (push) C, D Seat Lock This is a four-position switch that is located on the body: • Power Off • Power On •... - Page 20 Operation Guide 1. How to Turn on the Bike a� Key Ignition/Steering Lock POWER POWER To turn on the bike: • Insert the key. • Follow the marking on the ignition, turn the key to the right to turn on the bike.
- Page 21 Operation Guide 1. How to Turn on the Bike a� Key Ignition/Steering Lock To lock the steering: • Turn the ignition off. • Turn the handlebar all the way to the left. • Follow the marking on the igntion, push the key TURN THE HANDLEBAR in and turn the key anti-clockwise.
-
Page 22: Seat
Operation Guide 1. How to Turn on the Bike b� Seat OPEN THE SEAT To Open the Seat: • Turn the ignition off. • turn the key anti-clockwise (don't push the key). • The seat will pop up when unlocked. - Page 23 Operation Guide 1. How to Turn on the Bike b� Seat PUSH To Lock the Seat: • On the bottom of the seat cushion, locate the seat lock hook (U shape bracket). • Close the seat. • Gently push the seat cushion down at the position of the seat lock hook. •...
-
Page 24: Remote
Operation Guide 1. How to Turn on the Bike c� Remote Press the button once to activate the Lock Button anti-theft alarm system. Press the button once to cancel the Unlock/Cancel Button alarm or to turn off the bike if the bike is turned on with the remote. -
Page 25: Circuit Breaker
• Follow the marking on the circuit breaker,turn on/off the circuit breaker. • Close the seat. WARNING: DO NOT The wires inserted into the circuit breaker could have high voltage output. touch any bare wires. If you have any concern, contact your EMMO dealer for assistance. -
Page 26: Right Switches
Operation Guide 2. Right Switches The switch housing on the handlebar hold these switches that control the lights, signals, horn and etc.. Headlight Slide the switch to turn on the headlight and tail light. Tail light Slide the switch to turn on Tail Light the tail light. -
Page 27: Left Switches
Operation Guide 3. Left Switches Left Turning Slide the switch to the left will turn on Signal the left side turning signals. Low Beam Slide the button down will turn the low Light beam on. Hight Beam Slide the button up will turn the hight Light beam on. -
Page 28: Throttle
Operation Guide 4. Throttle The throttle controls the speed of the e-bike. As shown below, twist the throttle towards you to operate. • Before turning the throttle, please deactivate the parking mode by pressing the ‘P’ but ton or applying the brake. •... -
Page 29: Storage
Operation Guide 5. Storage a� Tail box Unlock the tail box: • Insert the key to the tail box lock. • Turn the key clockwise to unlock. • Keep the tail box lock at the unlock position, open the tail box. Lock the tail box: •... -
Page 30: Charger
Operation Guide 6. Charger a� Lead Acid Charger Front Label Charging Indicator Charger Specification Label Charging Plug... - Page 31 Operation Guide 6. Charger a� Lead Acid Charger A. Front Label The front label contains brief information of the voltage and capacity of the battery that the charger should be used for (more details are included in the specification label on the back of the charger). •...
- Page 32 Operation Guide 6. Charger a� Lead Acid Charger B. Charging Indicator Charging Indicator Explanation: • During normal charging, red light keeps on. • The indicator will turn green when the battery is fully charged. NOTICE: If the charger gets warm during regular use, this is a normal response and is no cause for concern.
- Page 33 Operation Guide 6. Charger a� Lead Acid Charger C. Charger Specification Label WARNING...
- Page 34 Operation Guide 6. Charger a� Lead Acid Charger D. Charging Plug How to charge: • The charging port is below the front of the seat. (Refer to "side view", on page 13. • Open the charging port lid and plug in the charger. •...
- Page 35 Operation Guide 6. Charger a� Lead Acid Charger How to Remove the Battery and Charge it off the Bike II� Disconnect the power plug and III� Take the battery cases out of the I� Open the seat, switch off the circuit breaker.
- Page 36 Operation Guide 6. Charger a� Lead Acid Charger How to Remove the Battery and Charge it off the Bike V� Plug in the charger plug to the VI� Connect the charger with power IV� Connect the battery connector. battery. supply.
-
Page 37: Lithium Charger
Operation Guide 6. Charger b� Lithium Charger Charging Indicator Charger Specification Label Power Cord Socket Power Cord Charging Plug... - Page 38 Operation Guide 6. Charger b� Lithium Charger A. Chagring Indicator Charging Indicator Explanation: • During normal charging, red light keeps on. • The indicator will turn green when the battery is fully charged. NOTICE: If the charger gets warm during regular use, this is a normal response and is no cause for concern.
- Page 39 Operation Guide 6. Charger b� Lithium Charger B. Charger Specification Label ! ATTENTION !...
- Page 40 Operation Guide 6. Charger b� Lithium Charger C. Power Cord Socket D. Power Cord Connecting the charger: • Plug the device connector C of the power cable into the device socket D on the charger. • Before using the charger, plug the power cord C to the power cord socket D. WARNING: You MUST NOT plug the power cord directly to the bike/battery.
- Page 41 Operation Guide 6. Charger b� Lithium Charger E. Charging Plug How to charge: • The charging port is below the front of the seat. (Refer to "side view", on page 10.) • Open the charging port lid and plug in the charger. •...
- Page 42 Operation Guide 6. Charger b� Lithium Charger How to Remove the Battery and Charge it off the Bike II� Disconnect the power plug. III� Take out the battey from the bike. I� Open the seat, switch off the circuit breaker.
- Page 43 Operation Guide 6. Charger b� Lithium Charger How to Remove the Battery and Charge it off the Bike V� Connect the charger with power IV� Connect the charging plug with battery. supply.
- Page 44 Charging Precautions WARNING: • You must use the compatible charger(approved by EMMO) to charge the battery. • DO NOT submerge or allow the charger to become submerged in water or any liquid. • DO NOT use the charger if the cord becomes frayed, has expose sulation or wires or shows any significant damage.
-
Page 45: Battery
Operation Guide 7. Battery a� Battery Safety Precautions • Be sure to use the original/compatible battery (approved by EMMO). Using batteries from other brands may lead to severe accidents. • Inspect the battery for any damage, leaking, overheating or smoking. -
Page 46: Disposal
NOTICE • Used batteries must be treated as hazardous waste. • Batteries must be disposed of in accordance with the the regulations set forth by your local government/organizations. • In case of uncertainty contact EMMO customer service department. -
Page 47: Storage & Maintenance
Operation Guide 7. Battery c� Storage & Maintenance • For storage, please disconnect the battery from the bike and charge the battery on a regular basis (at least once a month). • Battery packs and chargers need to be stored in a clean, dry, ventilated place, avoid contact with corrosive material, and keep them away from heat and fire. -
Page 48: Stand
Operation Guide 8. Stand a� Side Kickstand How to use the side kickstand: • Kick the side stand down and gently lean the bike on the side kickstand. • Make sure it is stable before you leave your bike. -
Page 49: Centre Stand
Operation Guide 8. Stand b� Centre Stand II� Keep your balance, grab the III� And grab the rear rack at the I� Stand on the left side of the bike. The centre stand is under the handlebar. same time. swing arm. - Page 50 Operation Guide 8. Stand b� Centre Stand IV� Step on the centre stand peg V� While keeping your balance, step VI� To get the bike off the centre down the peg firmly and lift the stand, put your right foot in front firmly with your right foot.
- Page 51 • Both side kickstand and centre stand should be kicked up before you ride the bike. • Be careful when trying putting the bike on the centre stand.If you find it difficult to use the centre stand, visit your EMMO dealer for a more detailed demonstration on how to use the centre stand.
-
Page 52: Passenger Footpeg
Operation Guide 9. Passenger Footpeg Foldable Passenger Footpegs: • Passenger footpegs are located near the front of the swing arm cover. • Unfold the footpegs as showed. -
Page 53: Pedal
Operation Guide 10. Pedal PUSH How to fold the pedals: • Push the pedal from the side (as showed). • Fold the pedal up when keeping pushing from the side. -
Page 54: Lights
Operation Guide 11. Lights a� Headlight The headlight assembly has multiple operation modes - high beam, low beam and daytime running light, to accommodate your needs under different conditions. -
Page 55: Tail Light & Brake Light
Operation Guide 11. Lights b� Tail light & Brake Light Tail light increase the visibility at night/under dark conditions. Brake light notifies the traffic behind that you are slowing down so that they can adjust the speed accordingly. E-BIKE www�emmo�ca... -
Page 56: Signal Lights
Operation Guide 11. Lights c� Signal Lights The built-in turning signals give the nearby traffic a better insight of your intended route. -
Page 57: Adjusting The Brake
Operation Guide 12. Adjusting the Brake LOOSEN TIGHTEN How to Adjust the Rear Drum Brake: • The adjustment nut is located near the rear wheel hub. • Turn the adjustment nut to loosen/tighten the brake as needed. -
Page 58: Cleaning / Lubricating The Chain
Operation Guide 13. Cleaning / Lubricating the Chain How to Clean the Chain: • Put the bike on the centre stand. • Locate the chain on the right side of the bike, near the rear wheel hub. • Hold a clean cloth to the chain (as showed). •... -
Page 59: Tire Pressure
Operation Guide 14. Tire Pressure It is recommended to check the tire pressure on a regular basis to keep things at their best working conditions. 35 PSI II� Remove the valve cap. III� Use an air pump with gauge I� Locate the valve on the rim. to adjust the tire pressure to 35 PSI. - Page 60 Operation Guide Tire Pressure • Riding comfort • Travel distance WARNING: • You MUST inflate the tire to the recommended tire pressure before the first ride.Failure to do so may damage your bike and void your warranty. • DO NOT over-inflate, as this could damage the tire or wheel. (a recommended tire pressure range is marked on both tires by the manufacturer)
-
Page 61: Serial Number
Operation Guide 15. Serial Number a� Frame Number Locate the VIN cover in the panel facing driver. Find the Frame Number: • Use a flat head screwdriver to remove the VIN cover. • You will find the Frame Number engraved on the frame. •... -
Page 62: Motor Number
Operation Guide 15. Serial Number b� Motor Number Located on the motor. EN140MKM0009 The motor number could be located at the following locations: • Location 1: On the motor cover plate. • Location 2: Behind the sprocket on the motor. -
Page 63: Checking List Before Riding
Riding Guide 1. Checking List Before Riding • Whether the handlebar is stable and flexible when turning. • Whether the right and left switches on the handlebar can work properly or not. • Whether the throttle can work properly or not. •... -
Page 64: Warranty Policy
Any warranty is extended to the original owner with the original purchase paperwork. This portion does not cover the purchase of parts or the purchase of products sold by Emmo Inc that is not an electric bike, electric scooter ebike, electric motorcycle style ebike, electric mobility scooter, kick-style electric scooter, or ride-on toy. - Page 65 Please note the damage on the shipper’s Bill of Delivery prior to signing off on the shipment� Shipping damage is not covered by Emmo Inc if you choose your own shipping method or freight forwarder� The cost of shipping will not be covered under warranty unless Emmo Inc agrees in writing to cover the shipping cost�...
- Page 66 • For repairs that are done on items that are not from Emmo Inc, only a 7-day Parts Warranty will be included� Emmo Inc is not responsible for items modified from its intended use or purpose resulting in damage to the ebike or injury to the customer or third party�...
-
Page 67: E-Bike Registration
E-Bike Registration Once you have purchased an EMMO E-Bike, you can register your vehicle with us to validate your warranty. In order to register your E-Bikes, please follow the steps listed below: 1. Fill out the following form: E-BIKE REGISTRATION... - Page 68 E-Bike Registration Survey: How did you find out about EMMO Inc.? (Please select the options that apply) Returning Customer Family / Friend Passing by Store Kjiji TERA Google Yelp Other 2. Send the information listed above to our email: info@emmo.ca...
-
Page 69: Contact Us
Contact Us LOCATION EMMO Mississauga EMMO Toronto 1224 Dundas St E, Unit 6 438 Spadina Ave, Unit 2 Mississauga, ON L4Y 2C5 Toronto, ON M5T 2G8 Canada Canada EMMO Vaughan Toronto Service Center 1750 Steeles Avenue West, Unit 15-17 8 Oxford Street...
Need help?
Do you have a question about the ADO and is the answer not in the manual?
Questions and answers