Table of Contents
Advertisement
Quick Links
Advertisement
Table of Contents

Subscribe to Our Youtube Channel
Related Manuals for AC Infinity IONBEAM


Summary of Contents for AC Infinity IONBEAM
- Page 1 IONBEAM GROW LIGHT BAR SYSTEM USER MANUAL...
- Page 3 WELCOME Thank you for choosing AC Infinity. We are committed to product quality and friendly customer service. If you have any questions or suggestions, please don’t hesitate to contact us. Visit www.acinfinity.com and click contact for our contact information. EMAIL LOCATION support@acinfinity.com...
- Page 4 MANUAL CODE NE2201X1 PRODUCT MODEL UPC-A IONBEAM S11 AC-NES11 819137023352 IONBEAM S16 AC-NES16 819137023369 IONBEAM S16-UV AC-NEU16 819137023475...
-
Page 5: Table Of Contents
Key Features ................. Page 7 Product Contents ................Page 8 Installation ..................Page 9 Programming ................. Page 16 Starter Guide ................. Page 17 Connecting to UIS ..............Page 20 Other AC Infinity Products ............. Page 22 Warranty ..................Page 23... -
Page 6: Product Warning
PRODUCT WARNING TO REDUCE THE RISK OF FIRE, ELECTRIC SHOCK, OR INJURY TO PERSONS, OBSERVE THE FOLLOWING: Ensure your power source conforms to the electrical requirements of this product. Read all instructions before installing and using this product. Be careful not to damage or cut the wire insulation (covering) during the installation. Do not permit wires to come in contact with any sharp edges. -
Page 7: Key Features
KEY FEATURES HUMIDITY-RESISTANT COMPATIBILITY DIMMER AND TIMER Unibody construction tightly Compatible with select UIS Adjust four light intensity sealed to IP-65 standards controllers to access climate levels for each grow stage to block liquid and dust from triggers, timers, grow cycles, and set four timer settings entering and seeping through. -
Page 8: Product Contents
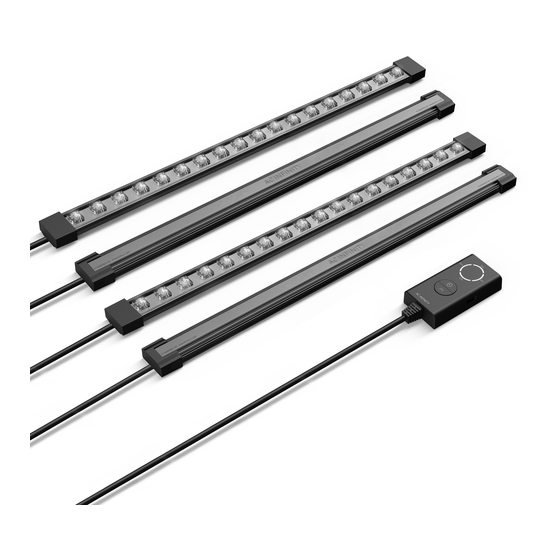
PRODUCT CONTENTS (X) = Full Spectrum Models, [X] = Ultra-Violet Model LIGHT BAR LIGHT BAR LIGHT MOUNTING (SINGLE-CORDED) (DUAL-CORDED) CONTROLLER (x1) [x1] (x3) [x1] (x1) [x1] (x4) [x2] POWER UIS EXTENSION BAR EXTENSION ADAPTER CORD (M-M) CORD (M-F) (x1) (x1) (x3) [x1] HOOK AND LOOP WIRE... -
Page 9: Installation
INSTALLATION LIGHT BAR CHAIN ASSEMBLY STEP 1 Connect the single-corded LED light bar's female port to the dual-corded LED light bar's male connector. Repeat this with as many light bars as needed. STEP 2 Connect the light controller's male connector to the other end of the dual-corded LED light bar. - Page 10 INSTALLATION LIGHT BAR MOUNTING POLE MOUNTING You may magnetically mount the light bar(s) directly on your grow tent steel pole. You may also use the included hook and loop cable ties around the light bar(s) and mounting bar to adjust the lighting angle and for extra security.
- Page 11 INSTALLATION LIGHT BAR MOUNTING STEP 1 — WALL MOUNTING Make sure your mounting area is free from obstruction. Use a mounting bar to mark your drilling holes with the logo facing the wall. STEP 2 — WALL MOUNTING Drill holes into the marked locations.
- Page 12 INSTALLATION LIGHT BAR MOUNTING STEP 3 — WALL MOUNTING If you are mounting onto anything other than a wood support or stud, insert the included four wall anchors into the drilled mounting holes. You may need to use a hammer to secure them through the holes.
- Page 13 INSTALLATION LIGHT BAR MOUNTING STEP 5 — WALL MOUNTING Set the light bar(s) magnet ends onto the mounting bar(s).
- Page 14 INSTALLATION CONTROLLER MOUNTING MAGNET MOUNTING You may magnetically mount the light controller onto any steel surface. STEP 1 — WALL MOUNTING Locate a spot free of obstruction and secure the anchor into your wall. Twist the wood screw into the anchors. STEP 2 —...
- Page 15 INSTALLATION POWERING STEP 1 Plug the power adapter into a wall outlet.
-
Page 16: Programming
PROGRAMMING 1. LIGHTING Pressing the light button will increase the light intensity level in 10/30/60/100% increments, displayed with white LED indicators. Pressing this button at 100% intensity will cycle to 0%. Holding the light button will shut off the lighting. Pressing it again will return the light intensity to its previous setting. -
Page 17: Starter Guide
STARTER GUIDE FULL SPECTRUM LIGHTING The charts below offer suggested mounting heights and light intensities for each stage in the growing process. These factors will vary based on the plant you are growing. Height refers to the minimum recommended distance from the canopy (tip of the plant) to the light. GROW Height Intensity... - Page 18 STARTER GUIDE FULL SPECTRUM LIGHTING GROW Height Intensity Set Up STAGE Vegetative 6 IN. Stage Flowering 6 IN. 100% Stage...
- Page 19 STARTER GUIDE FULL SPECTRUM LIGHTING SETTING ACTIVE LIGHTING TIMERS The included controller can set timers in 3/6/12/18-hour increments. Use either the 3HR or the 6HR timer to extend your plant's daily exposure to light, in conjunction with natural sunlight, or when growing plants that don't require extended exposure to lighting. Use either the 12HR or the 18HR timer to complement common light cycles used to grow high yield plants indoors.
-
Page 20: Connecting To Uis Tm
Advance UIS controllers can provide each connected UIS device with their own automated programming like temperature, humidity, cycles, schedules, and dynamic levels, while also pairing with the AC Infinity app. - Page 21 CONNECTING TO UIS IONBEAM LED grow lights can connect with select smart controllers as part of an integrated system using the included UIS extension cord. CONNECTING TO UIS CONTROLLERS Use the included UIS M-M extension cord to connect the LED light bar(s) to your selected UIS controller via the light controller's side port.
-
Page 22: Other Ac Infinity Products
150 lb. weight capacity. Includes a mounting plate to install your AC Infinity controller onto. Humidity Dome The humidity dome is designed to maintain moisture levels to create the ideal environment for seed germination. -
Page 23: Warranty
WARRANTY This warranty program is our commitment to you, the product sold by AC Infinity will be free from defects in manufacturing for a period of two years from the date of purchase. If a product is found to have a defect in material or workmanship, we will take the appropriate actions defined in this warranty to resolve any issues. - Page 24 No part of the materials including graphics or logos available in this booklet may be copied, photocopied, reproduced, translated or reduced to any electronic medium or machine readable form, in whole or in part, without specific permission from AC Infinity Inc.
- Page 28 www.acinfinity.com...
Need help?
Do you have a question about the IONBEAM and is the answer not in the manual?
Questions and answers
Will the ionbeam 4u be able to be controlled by controller 69 pro?