Table of Contents
Advertisement
Quick Links
Advertisement
Table of Contents

Summary of Contents for Wildlife Monitoring Solutions Wilsus Accento
- Page 1 Wilsus Accento User manual...
-
Page 2: Table Of Contents
Contents 1. INTRODUCTION ................. - 3 - 1.1 O .............. - 4 - VERVIEW OF EATURES 1.2 L ..........- 5 - IST OF PECIFICATIONS EATURES 2. QUICK START ................- 6 - ’ 2.1 W ? ..............- 6 - S IN THE 2.2 P .............. -
Page 3: Introduction
1. Introduction We hope this manual helps you set up and use your camera! If you have any questions, please feel free contact info@wildlifemonitoringsolutions.nl. can also check our website’s FAQ section to see if your question is listed there. We would also be very happy to receive images made by you with your new wildlife camera. -
Page 4: Overview Of Features
You can subscribe to the newsletter on our website! 1.1 Overview of Features The Wilsus Accento trail camera has been designed to offer the most stable product quality as well as superior product features, including Sony IMX335 sensor, Leica M6 program, 2.31' LCD screen, 100°... -
Page 5: List Of Key Specifications/Features
1.2 List of Key Specifications/Features Trigger speed: 0.4 seconds • FOV: 100 degrees • PIR angle: 80 degrees • Image resolutions: 5/8/12/16 MP • Highest video resolution: 1080p • IR LEDs: 6pcs 850nm • IR range: 20 meters (65 feet) •... -
Page 6: Quick Start
2. Quick Start 2.1 What’s in the Box? Trail camera x 1 • Instruction manual x 1 • USB cable × 1 • Mounting strap × 1 • Quick Start Guide × 1 • - 6 -... -
Page 7: Parts Of The Camera
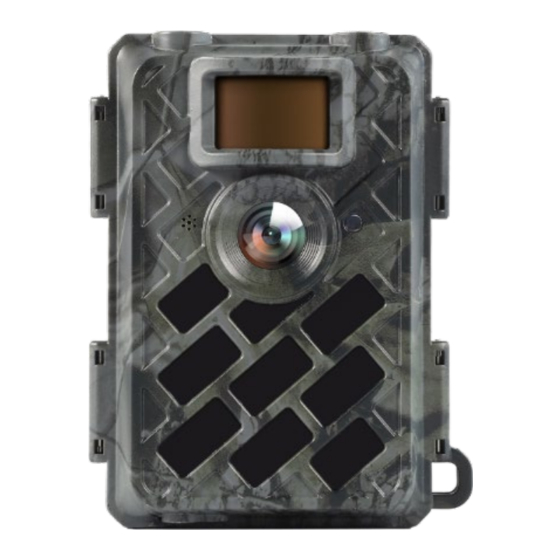
2.2 Parts of the Camera Figure 1: Front View of Camera ① PIR ② Lens ③ Indicator LED ④ IR LEDs - 7 -... - Page 8 Figure 2: Bottom View of Camera *Ensure the SD card’s contacts are down towards the front housing of the camera. ⑤ Mini USB Port ⑥ SD Card Slot (Supports 4~32GB) ⑦ DC-in (12V/1~2A) ⑧ Battery - 8 -...
- Page 9 Figure 3: Internal View of Camera ⑨ LCD Color Screen ⑩ Navigation (Up/Down/Left/Right) ⑪ Power Switch Buttons/OK Button ⑫ Battery Compartment (ON/OFF/SETUP(Test) Modes) ⑬ MENU Button - 9 -...
-
Page 10: How To Set Up The Camera
2.3 How to Set up the Camera 1. Insert the batteries Open the camera’s housing and insert the batteries with the polarities in the direction as marked in the battery compartment. Note: 8 Alkaline or Ni-MH AA batteries are recommended. For optimal performance, set the corresponding type of batteries you are using in the “Battery Type”... - Page 11 2. Insert the SD card Note: 4-32 GB SD cards are compatible. Please insert it in the direction shown below. - 11 -...
- Page 12 2.3.1 Points of Attention 1. Insert the SD memory card correctly. 2. Please use high-quality AA batteries in order to prevent battery corrosion and/or leakage. 3. If using a power adapter, ensure that it is of the correct type (12V/2A). 4.
-
Page 13: How To Use The Camera
2.4 How to Use the Camera 1. Power on the camera Move the Power Switch to ON; the camera’s motion detection sensor will now be operational. (Note: the screen will not light up in ON Mode). The camera can now be mounted and will operate as per the default settings. -
Page 14: Details Of Use
When you have made the desired settings’ changes and wish to begin using the camera, move the Power Switch to ON. 3. Details of Use 3.1 Power Supply A. Batteries The camera runs on 8 AA batteries (9-12V power supply is required to ensure proper performance of all functions);... - Page 15 standard of voltage for lithium batteries, the power bar may not accurately indicate the amount of battery power left. The batteries should be inserted with the electrodes in the right direction, as marked in the battery compartment. Placing batteries in the wrong direction may cause the device to malfunction.
- Page 16 3.1.1 Battery life Please refer to the table below to see the camera’s battery life using 8 AA alkaline batteries. Note: due to varying conditions of use, and different brands/quality of batteries being used, figures provided approximations only and you may achieve longer or shorter battery life according to your own method of usage.
- Page 17 Testing conditions: 8 AA alkaline batteries, ON mode, PIR smart monitoring Photos Mode Use Time (/day) (days) IR LEDs On (“Night Mode”) Max. Range Balanced Min. Blue IR LEDs Off (Daytime) Video Time Use Time (secs) (/day) (days) IR LEDs On (“Night Mode”) IR LEDs Off (Daytime) - 17 -...
- Page 18 B. Power Adapter The applicable power adapter is 12V/2A with 4.0mm*1.7mm male plug. recommend this option if you are using your trail camera for home surveillance purposes. C. Solar Panel This camera is designed to work with most standard 12V/2A built-in lithium battery solar panels.
-
Page 19: Sd Card
3.2 SD Card A memory card must be inserted into the camera before it can be operated. If the camera is in ON mode and no memory card has been inserted, the screen will display "No card". The SD slot of the camera has a 32GB memory capacity. -
Page 20: Usb Connection
3.2.1 SD Card Storage Capacity 4 GB 8 GB 16 GB 32 GB Resolution Photos (no.) 1613 3371 6887 13919 12 MP 1176 2466 5037 10213 16 MP 1833 3755 7599 22 MP Video (hours) 640 x 480 00:22:28 00:46:57 01:35:56 03:13:52 00:16:13... -
Page 21: Camera Menu
4. Camera Menu 4.1 Modes and Basic Operations Mode Instructions /Operation 1. Use the Left/Right/Up/Down ) buttons to highlight the desired setting/option in red Making 2. Press the OK button. selections Note: when in Menu Mode (see below), you can also select a setting by pressing the Right button. - Page 22 In Test Mode you can see the camera’s live view on the screen and take test photos or videos, depending on the Cam Mode 1. Open the camera 2. Move the Power Switch to SETUP 3. You will enter Test Mode Test Mode 4.
- Page 23 In View Mode you can view all the photos/video stored on the SD card. 1. In Test Mode, press the Up button to enter View Mode. View Left/Right Mode buttons to scroll between photos/videos. 3. Press the OK button to play videos.
- Page 24 2. At the top you will see the Main Menu bar with the 4 main menus: “Cam”, “PIR” and “Settings”. menu currently selected will be highlighted in red and you can see all the settings in that menu listed underneath. 4.
- Page 25 bar, press the MENU button to return to Test Mode. Note: in Menu Mode, the camera will not automatically power off. You can choose to delete Deleting individual photos/videos or photos all the photos/videos stored /videos on the camera’s SD card. stored on - 25 -...
- Page 26 the SD Note: once files are card deleted from the SD card they cannot be reclaimed. 1. In View Mode scroll to find the photo/video you wish to delete 2. Press the MENU button 3. You will see the “Delete File, YES, NO”...
- Page 27 maintain card’s full speed performance. Note: formatting the SD card will delete all the files stored on it. 1. In View Mode, press the MENU button to enter the camera’s menu, press the navigation buttons to move through the settings 2.
- Page 28 that the SD card has successfully been formatted 6. Press the Up button to return to Test Mode - 28 -...
-
Page 29: Settings
4.2 Settings Default (in red) and Optional (in black) Menu Camera Cam Mode Photo/Video/PIC+Video Multi-shot 1P/2P/3P/4P/5P Image Size 5M/8M/12M/16M VGA(640x480) Video Size /HD(1280x720) /FHD(1920x1080) Video Length 05s-59s Max.Range/Balanced Night Mode /Min.Blur/No.Blur Flash LED High/Low Cam Name ON/OFF Menu PIR Switch ON/OFF PIR Sensitivity High/Middle/Low PIR Delay... - Page 30 Time Lapse ON/OFF Work Time1 ON/OFF Work Time2 ON/OFF Menu Settings Language English Stamp ON/OFF MM-DD-YY HH:MM Date/Time DD-MM-YY HH:MM Battery Type Alkaline/NI-MH Password ON/OFF SD Cycle ON/OFF Format SD Yes/No Reset Yes/No Software Firmware—Yes/No Update Frequency 50Hz/60Hz FW Ver: About MCU:5.6 - 30 -...
-
Page 31: Changing Settings
4.3 Changing Settings A. Cam Setting Explanation There are 3 camera modes: a) “Photo”: the camera will only capture photos b) “Video”: the camera will only capture videos Mode c) “PIC+Video”: the camera will first takes one or more pictures, immediately followed by a video (so-called “Hybrid - 31 -... - Page 32 mode”). 1. Select “Cam Mode” 2. Select the desired option: “Photo”, “Video” or “PIC+Video” 3. The setting will be saved and you will automatically return to the Cam Menu. In Photo or PIC+Video modes, you can select how many photos are captured each time the camera’s motion detection sensors are triggered: 1 (“1P”) through 5 (“5P”).
- Page 33 You can set the camera to capture different photo resolutions: a) 5MP (2560 x 1920 ) b) 8MP (3264 x 2448) c) 12MP (4032 x 3024) Image d) 16MP (4608 x 3456) Size 1. Select “Image Size” 2. Select the desired option: “5M”, “8M”...
- Page 34 1. Select “Video Size” 2. Select the desired option: “FHD-1080P”, “HD-720P” or “VGA” 3. The setting will be saved and you will automatically return to the Cam Menu. In Video or PIC+Video Modes, you can program the length of the video the camera captures each time the camera’s motion detection sensor is triggered, from 5 seconds through 59...
- Page 35 the Cam Menu. The camera has 4 night vision modes: a) Maximum Range (“Max.Range”): large range; possible blur b) Minimum Blur (“Min.Blur”): small range; c) Balanced: medium range; Night medium blur. Mode d) No Blur 1. Select “Night Mode” 2. Select the desired option: “Max.Range”, “Min.Range”, “Balanced”...
- Page 36 You can choose whether the camera uses a high energy consumption, for brighter night vision photos/videos, or low consumption, extend battery life. Flash 1. Select “Flash LED” 2. Select the desired option: “High” or “Low” 3. The setting will be saved and you will automatically return to the Cam Menu.
- Page 37 2. Select the desired option: “ON” or “OFF” 3. a) “OFF”: you will return to the Cam Menu b) “ON”: you will go to the ID screen 4. Choose a new Name: a) Press the Up button to move from numbers (0-9) to letters (A-Z) to space (_), or the down navigation button to move from space to letters (Z-...
- Page 38 B. PIR Setting Explanation By turning this setting off program camera to disable its motion detection sensor (PIR PIR Switch Sensor). 1. Select “PIR Switch” 2. Select the desired option: “OFF” or “ON” You can choose to set the camera’s (motion Sensitivity detection sensor) to one of...
- Page 39 a) High: the camera is triggered by the movement of objects that are smaller and further away – false triggers more likely (recommended high- temperature conditions) b) Middle: mid-way (recommended in normal- temperature conditions) c) Low: the camera is triggered by the movement of objects that are larger and closer –...
- Page 40 3. The setting will be saved will automatically return to the Cam Menu. By turning this setting on program camera temporarily disable its motion detection sensor after capturing a photo/video for the duration of the delay you set (also called “Trigger interval”). PIR Delay Setting longer delay times will reduce the number of...
- Page 41 3. a) “OFF”: the setting will be saved and you will automatically return to the Cam Menu b) “ON”: you will go to a screen with the current setting (“HH”: hours, “MM: minutes, “SS”: seconds) 4. Set a new time: a) “HH”: press the Up button (0-23) or Down button (23-0)
- Page 42 the values 5. Once you have inputted a time, press OK to save it 6. Press the MENU button to return to the Cam Menu. Note: you should not use the Delay setting and the Time Lapse settings simultaneously. This setting allows you to program the camera to automatically take...
- Page 43 1. Select “Time Lapse” 2. Select the desired option: “OFF” or “ON” 3. a) “OFF”: the setting will be saved and you will automatically return to the Cam Menu b) “ON”: you will go to a screen with the current setting (units of time: “HH”...
- Page 44 c) “SS”: press the Up button (0-59), or Down button (59-0) d) Use the Left/Right buttons to switch between the units of time 5. Once you have inputted a time, press OK to save it 6. Press the MENU button to return to the Cam Menu.
- Page 45 camera capture photos/videos only within specific time periods of the day. independent timers, to be able to monitor dawn and dusk periods, for instance. 1. Select “Work Time” 2. Select the desired option: “OFF” or “ON” 3. a) “OFF”: the setting will be saved and you will automatically return to the Cam Menu...
- Page 46 00:00 by default.) 4. Set a new start and end time, using the Left/Right buttons to switch between the values: a) “HH”: press the Up button (0-23), or Down button (23-0) b) “MM”: press the Up button (0-59), or Down button (59-0) 5.
- Page 47 C. Settings Setting Explanation Language English With this setting turned on, each photo/video captured by your trail camera will be stamped with the: Camera Name, Moon phase, Stamp Temperature, Date Time. 1. Select “Stamp” 2. Select the desired option: - 47 -...
- Page 48 “OFF” or “ON” 3. Your setting will be saved and you will automatically return to the Other Menu. So that you get accurate stamps your photos/videos, ensure all of the camera’s functions work optimally, please set the Date/Time before operating your camera for the first time.
- Page 49 month (01-12) and year b) “Time” (24-hr clock): use the Up/Down buttons to input the correct time c) Switch between the units of time using the Left/Right buttons 3. To abandon the changes press the MENU button; to save the changes press the OK button 4.
- Page 50 you input the type of battery you are using here, to ensure that the power bar can accurately indicate the amount of battery power left. You can choose between: a) Alkaline b) NiMH (“NI-MH”) 1. Select “Battery Type” 2. Select the desired option: “Alkaline”...
- Page 51 standard of voltage for lithium batteries, the power bar may not accurately indicate the amount of battery power left. It is always recommended to secure your electronic devices with a password, including this trail camera. 1. Select “Password” 2. Select the desired option: “OFF”...
- Page 52 a) Use the Up button (0-9), or Down button (9-0) b) Move between the digits using the Left/Right buttons 5. When you have inputted a password, press the OK button and you will return to the Other Menu. Note: it’s a good idea to write the password down in a safe place to avoid forgetting it.
- Page 53 1. Select “SD Cycle” 2. Select the desired option: “OFF” or “ON” 3. Your setting will be saved and you will automatically return to the Other Menu. Select “Yes” to erase all data on the SD card. Be careful! Once card Format SD formatted, all data that was...
- Page 54 this setting. If you are, you can choose between the following two frequencies: a) 50Hz: for older models of TV in Europe b) 60Hz: for older models of TV in the US. 1. Select “Frequency” 2. Select the desired option: “50Hz”...
-
Page 55: Full Specifications
5. Full Specifications Image Sensor 5 Mega Pixels Color CMOS Effective Pixels 2560x1920 Day/Night Mode IR LED range IR LED Setting 6pcs 850nm Memory SD Card (4GB – 32GB) Operating keys F=2.4; FOV=100°; Auto IR-Cut- Lens Remove (at night) PIR Angle 80°... - Page 56 Video Length 05-59sec. Shooting 1P-5P,1 pic per 1 second Numbers Trigger Time 0.4s Trigger Interval 4s-7s Camera + Video Device Serial No. Time Lapse SD Card Cycle ON/OFF Operation Power Battery: 12V; DC: 12V-2A Battery Type External DC Stand-by Current 0.210mA Stand-by Time 6 months...
- Page 57 Mounting Strap Operating Temp. -25°C to 60°C Storage Temp. -30°C to 70°C Humidity 5%-90% Waterproof spec IP66 Dimensions 123x90x74mm Weight 250g Certification CE, FCC, RoHs - 57 -...
-
Page 58: Troubleshooting
6. Troubleshooting 1.The camera takes photos/videos without any target objects in them (false triggers) The PIR sensitivity is set too high: In addition to troubleshooting using the solutions below, you should first check the camera’s PIR sensitivity level Hot air: The camera is triggered by detecting the movement of heat sources, so avoid mounting the camera near any equipment... - Page 59 Rising/setting sun: So as to avoid targeting the sun as it rises or sets, mount the camera to face north or south. Unstable mounting: If the camera’s mounting is not stable, then it may move and mistake this for the movement of objects in its field of view.
- Page 60 a) Mount the camera further back from the trail b) Mount it at a 45° angle to the trail. Tree leaves/branches: Grass swaying in the wind, falling leaves or falling/moving tree branches/twigs can reflect the sun’s heat and potentially cause false triggers.
- Page 61 solutions below, you should first ensure that the Power Switch is set to ON. Batteries have insufficient power: Check the battery power bar directly on the camera’s screen. If the battery power is very low, replace/recharge the batteries. SD card is full: a) Upload the files saved on the SD card to your computer, delete them from the card and re-use the same card, or...
- Page 62 3.Night vision range is limited “Night Mode” is set to “Min.Blur”: In addition to troubleshooting using the solutions below, you should first ensure that “Night Mode” is set to “Max.Range” or “Balanced” Batteries have insufficient power: Check the battery power bar directly on the camera’s screen.
- Page 63 infrared light that is emitted and reflected back off the objects in the target area, then captured by the camera’s image sensor. Therefore, if the target area is too open, i.e. with very few objects to reflect the IR light, then the night vision image will appear very dark.
-
Page 64: Warranty
7. Warranty Based on a strict QC system, we offer all our customers two year long time limited warranty. Our products are warranted against defects in materials and workmanship for a period of two years from the date of original purchase. If a defect exists, we will, at our option and to extent permitted by law (1) repair the product at no charge using new or refurbished parts;... - Page 65 - 65 -...
Need help?
Do you have a question about the Wilsus Accento and is the answer not in the manual?
Questions and answers