Table of Contents
Advertisement
Advertisement
Table of Contents

Related Manuals for Razer NAGA V2 HYPERSPEED


Summary of Contents for Razer NAGA V2 HYPERSPEED
- Page 1 RAZER NAGA V2 HYPERSPEED MASTER GUIDE ™ F O R G A M E R S . B Y G A M E R S .
- Page 2 Rise to the top of your guild with the Razer Naga V2 HyperSpeed—a best-in- slot wireless ergonomic MMO mouse. Optimize skill rotations with an arsenal of 19 buttons and a dual mode scroll wheel. Power through raid progression with potent wireless performance backed by up to 250 hours of battery life.
-
Page 3: Table Of Contents
5. SETTING UP YOUR RAZER NAGA V2 HYPERSPEED ................. 6 6. USING YOUR RAZER NAGA V2 HYPERSPEED ..................11 7. CONFIGURING YOUR RAZER NAGA V2 HYPERSPEED VIA RAZER SYNAPSE ......... 13 8. SAFETY AND MAINTENANCE ........................ 29 9. LEGALESE .............................. 31 ™... -
Page 4: What's Inside
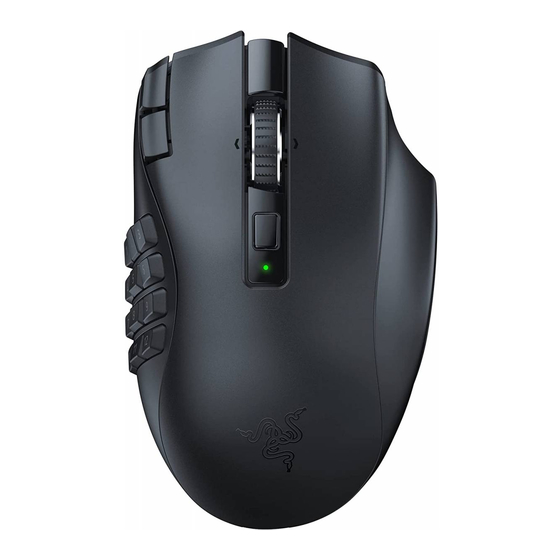
1. WHAT'S INSIDE ▪ Razer Naga V2 HyperSpeed DPI stage up button* Status indicator DPI stage down button* 12-button thumb grid Left mouse button Razer HyperSpeed wireless USB dongle Right mouse button PTFE mouse feet Left tilt-click Slider switch Scroll wheel •... -
Page 5: What's Needed
2. WHAT'S NEEDED PRODUCT REQUIREMENTS ▪ USB Type A port or Bluetooth connectivity RAZER SYNAPSE REQUIREMENTS ▪ Windows® 10 64-bit (or higher) ▪ Internet connection for software installation 3. LET'S GET YOU COVERED Register your product and score exclusive benefits razerid.razer.com/warranty... -
Page 6: Technical Specifications
4. TECHNICAL SPECIFICATIONS ▪ Razer™ Focus Pro 30K Optical Sensor with 99.8% resolution accuracy ▪ Up to 750 inches per second (IPS) / 50 G acceleration ▪ Advanced Lift-off / Landing distance customization ▪ Razer™ Mechanical Mouse Switches Gen-2 rated for 60-million clicks ▪... -
Page 7: Setting Up Your Razer Naga V2 Hyperspeed
5. SETTING UP YOUR RAZER NAGA V2 HYPERSPEED INSERTING A BATTERY 1. Remove the top cover of the mouse and insert the AA battery as indicated in the battery compartment. Caution: The included AA battery is non-rechargeable. Dispose of batteries in accordance with your local environmental laws. - Page 8 CONNECTING YOUR MOUSE A. VIA RAZER™ HYPERSPEED WIRELESS (2.4 GHZ) MODE 1. Remove the top cover of the mouse and take out the wireless USB dongle. 2. Reattach the top cover and plug the wireless USB dongle into your PC.
- Page 9 3. Push the slider switch to Razer™ HyperSpeed Wireless (2.4 GHz) mode. When connected, the status indicator will briefly turn static green. Your Razer Naga V2 HyperSpeed is now ready for use in wireless mode. ™ F O R G A M E R S . B Y G A M E R S .
- Page 10 B. VIA BLUETOOTH MODE 1. Push the slider switch to Bluetooth mode ( ). 2. Press and hold button 12 on the thumb grid and the DPI stage up and down buttons simultaneously for three seconds to activate pairing mode. The status indicator will start blinking to show that the mouse is in pairing mode.
- Page 11 Razer Naga V2 HyperSpeed 4. Wait until the mouse pairs with your device. The Razer logo will briefly turn static blue when paired. Once paired, your Razer Naga V2 HyperSpeed will automatically reconnect to your device whenever in Bluetooth mode and within range. Keep your devices close to each other for a faster and more stable connection.
-
Page 12: Using Your Razer Naga V2 Hyperspeed
Change your mouse's DPI to match your playstyle with a press of the DPI stage up or DPI stage down buttons, or re-configure them to your favorite key binds using the Razer Synapse app. The status indicator will briefly change color to show which DPI stage is active. - Page 13 SWITCHING SCROLL MODES The scroll mode button allows you to control how you speed through content using the scroll wheel. Press the scroll mode button to switch between Free-Spin Scrolling for unbridled scroll wheel navigation and Tactile Cycling for more precise control of scroll wheel movement. Free-Spin Scrolling / Tactile Cycling ™...
-
Page 14: Configuring Your Razer Naga V2 Hyperspeed Via Razer Synapse
SYNAPSE TAB The Synapse tab is your default tab when you first launch Razer Synapse. This tab allows you to navigate the Dashboard subtab. Dashboard The Dashboard subtab is an overview of your Razer Synapse, where you can access all your Razer devices, modules, and online services. - Page 15 Modules The Modules subtab displays all installed and available modules for installation. ™ F O R G A M E R S . B Y G A M E R S .
- Page 16 Global Shortcuts Bind operations or Razer Synapse functions to custom key combinations from any Razer Synapse- enabled device inputs, which apply across all device profiles. Learn more about Profiles Only Razer Synapse-enabled device inputs will be recognized. ™ F O R G A M E R S . B Y G A M E R S .
- Page 17 MOUSE TAB The Mouse tab is the main tab for your Razer Naga V2 HyperSpeed. From here, you can change your device's settings, such as button assignment and DPI sensitivity. Changes made under this tab are automatically saved to your system and cloud storage.
- Page 18 Use this feature to pair an additional HyperSpeed-compatible device with the wireless USB dongle of your Razer Naga V2 HyperSpeed. As its wireless USB dongle can support a keyboard and mouse simultaneously, you'll be able to remove the usage of separate dongles for each peripheral.
- Page 19 Alternatively, you can skip to a specific button assignment by selecting it on the Customize tab. Upon selecting a button assignment, you may then change it to one of the following functions: Default This option enables you to return the mouse button to its original setting. Keyboard Function This option changes the button assignment into a keyboard function.
- Page 20 Sensitivity This function allows you to manipulate the DPI setting of your Razer Naga V2 HyperSpeed with a touch of a button. Listed below are the Sensitivity options and their description: ▪...
- Page 21 Switch Lighting allows you to switch between all advanced lighting effects easily. This function will only be visible when the Chroma Studio module is installed. Razer Hypershift Setting the button to Razer Hypershift will allow you to activate Hypershift mode as long as the button is held down. Launch Program Launch Program lets you open an app or a website using the assigned button.
- Page 22 Windows Shortcuts This option allows you to assign your preferred button to a Windows Operating System shortcut command. For more information, please visit: support.microsoft.com/kb/126449 Text Function Text Function enables you to type a prewritten text with a touch of a button. Write your desired text on the given field, and your text will be typed whenever the assigned button is pressed.
- Page 23 Allows you to access the Windows Mouse Properties, where you modify operating system settings that can directly affect your Razer Naga V2 HyperSpeed. Calibration The Calibration subtab allows you to optimize your Razer Precision Sensor to any surface for better tracking. ™...
- Page 24 Smart Tracking Smart Tracking lets you set the distance at which the sensor stops tracking when it is lifted from its surface to avoid unwanted cursor movement. By selecting the Enable Asymmetric Cut-Off, you may assign different values to the lift-off and landing distances. ™...
- Page 25 Power The Power subtab allows you to set your device to enter sleep mode when idle for a certain amount of time or manage its energy consumption when wireless. ™ F O R G A M E R S . B Y G A M E R S .
- Page 26 PROFILES TAB The Profiles tab is a convenient way to manage all your profiles and link them to your games and applications. Devices View which games are linked to each device's profiles or which Chroma Effect is linked to specific games using the Devices subtab.
- Page 27 Razer device. To link games to connected Razer devices or Chroma Effects, simply click on any game from the list, and then click Select a device and its profile to launch automatically during gameplay to select the Razer device or Chroma Effect it will link with.
- Page 28 The Settings window, accessible by clicking the ( ) button on Razer Synapse, enables you to configure the startup behavior and display language of Razer Synapse, view the master guides of each connected Razer device, or perform a factory reset on any connected Razer device.
- Page 29 Reset tab The Reset tab allows you to perform a factory reset on all connected Razer devices with on-board memory and/or reset Razer Synapse tutorials to acquaint yourself again with Razer Synapse's new features on its next launch. All profiles stored on the selected device's on-board memory will be erased when you reset a Razer device.
-
Page 30: Safety And Maintenance
8. SAFETY AND MAINTENANCE SAFETY GUIDELINES To achieve maximum safety while using your Razer Naga V2 HyperSpeed, we suggest that you adopt the following guidelines: Should you have trouble operating the device properly and troubleshooting does not work, unplug the device and contact the Razer hotline or go to support.razer.com... - Page 31 Razer. Some surfaces will cause undue wear on the feet requiring constant care and eventual replacement. Do note that the sensor of the Razer Naga V2 HyperSpeed is 'tuned' or optimized specially for the Razer mouse mats. This means that the sensor has been tested extensively to confirm that the Razer Naga V2 HyperSpeed reads and tracks best on Razer mouse mats.
-
Page 32: Legalese
Product. In no event shall Razer's liability exceed the retail purchase price of the Product.
Need help?
Do you have a question about the NAGA V2 HYPERSPEED and is the answer not in the manual?
Questions and answers