
Related Manuals for DR.ÖTEK MT-XE


Summary of Contents for DR.ÖTEK MT-XE
- Page 1 DR.ÖTEK User Manual Metal Detector MT-XE If there are any issues, or you are not 100% satisfied in any way, please contact us at support@drotekor.com...
- Page 2 Preface This product is a product with excellent sensitivity and discrimination ability, can identify and display six categories of metals, but also can finely indicate the metal material by using two digits. The boot is set to the most commonly used NORMAL state, reducing error operation.The working mode is set according to the scene.
-
Page 3: Specifications
Specifications Working mode: 5 + 1 + 1 Move mode: ALL-METAL, PASTURE, PARK, SAND, DISC. Preset mode: NORMAL Non-mobile mode: PINPOINT Coin depth indication: 2〞,4〞,6〞,8〞 Sensitive control: 4 Levels Target metal identification: 6 types 0-99 digital discrimination P-P signal intensity indication: 4-level LED Sound frequency: Three different frequencies indicate different metals (PARK). -
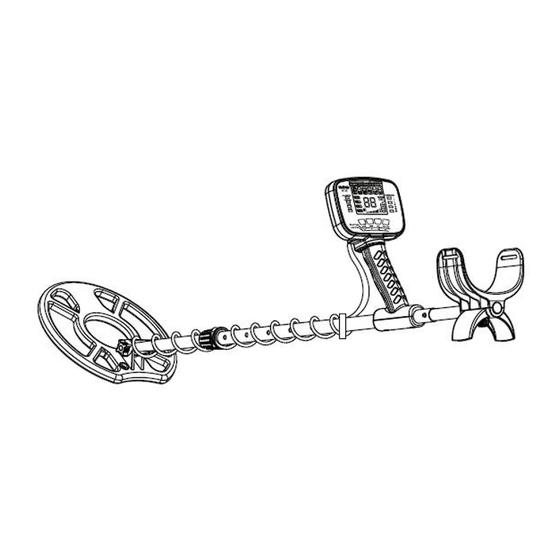
Page 4: Installation
Installation 1. loosen the bolt, insert the lower stem into the search coil and lock it (see graph1). The rubber washer should be located correctly. - Page 5 graph 1 2. Insert the control box into the hole in the middle stem grip, spin into the 3mm screw and tighten.(see graph 2) graph 2 3. Relax the LOCK NUT on the middle stem. Press the silver-white button (silver button) on the lower stem, insert it into the middle stem, and adjust the depth that it inserts, which can adjust the total length of the stem, so that you can straighten your arm and detect it comfortably (see graph 3).
- Page 6 graph 3 4. Release the screws under the support arm to separate the support arm and fit it on the upper stem (see graph 4). graph 4 5. Press the silver-white button on the upper stem and insert the upper stem into the middle stem (see graph 5).
- Page 7 graph 5 6. Circle the cable on the detection plate around the aluminum bar, tighten moderately, so that the cable does not shake, and the cable plug at the socket, plug to the end. Note not to pull the cable or plug. Attach the cable with nylon tape (see graph 6).
- Page 8 indicator in the battery box. If the detector is not to be used for an extended period, please remove the battery from the battery case. (see graph 7) graph 7 Panel (LCD, LED, and keys) (see graph 8)
- Page 9 *Mode Cursor: indicates four ways with MODE LED: ALL METAL, PASTURE, PARK, SAND. The DISC model has only a LCD and no LED indication. *Target ID Cursor: divided into 6 categories. To indicate the target metal sought for. *Normal Cursor: boot preset, "NORM" light, into the most common working mode, namely ALL-METAL, sensitivity level 3, volume middle level.
-
Page 10: All Metal
Keys All four keys were divided into two states: short / long press. ON-NORM/OFF Key: Short press-boot. Enter the NORM state, namely sensitivity level 3, mode ALL METAL. Volume mid-range. A short press again will enter the NORM state again. Long press about 2 seconds, the detector will shut off. - Page 11 electrical conductive. The detector suppressed some of the signal and overpitched to other metals Long press: volume change level. Press low volume-High volume-mute loop. SENS/Back Light Key: Short press-Sensitivity change level 1. Press 1-2-3-4. Long press-backlight lit. About 10 minutes. Quick Start 1.
- Page 12 2. Starting up Press POWER, the detector emits two chirping sounds, all LCD patterns are lit for a moment, the detector default NORMAL status 3. ALL METAL mode test After turning on, the ALL METAL cursor and LED are on. Samples of six metal (nails, 5 ¢...
- Page 13 graph 10 PASTURE mode test a)Press MODE again for the PASTURE cursor and LED to light on. b)Six samples were successively crossed at approximately 7 – 10cm(2.7-3.9’’) above the search coil. c)Bass as the nails cross. Other metals are pitched when across. d)As the metal sample crosses, the corresponding target cursor flashes, and the digital cursor displays the corresponding number.(See graph 11, with 1 ¢...
- Page 14 5.PARK mode test a)Press MODE again to light on the PARK cursor and LED. b)Six samples were successively crossed at 7 – 10cm (2.7-3.9’’)above the search coil. c)Bass as the nails cross.5 ¢ nickel coins, pull ring, 1 ¢ zinc coins across the medium sound.10 ¢...
- Page 15 d)When other metal samples are crossed, the machine emits a high pitch, the corresponding target cursor flashes, and the digital cursor displays the corresponding number. (See graph 13, taking 10¢ copper coin as an example) graph 13 DISC mode test a)DISC mode is set with another key.
- Page 16 b)Short press "DISC/P-P" again, and cycle from left to right to select the metals you want to exclude. For example, to exclude iron and nickel coins, short press twice, and the first and second target cursors on the left will go out. c)Swipe the six samples in sequence 7-10cm above the probe.
- Page 17 graph 16 b)Holding a 25¢ silver coin, slowly move closer to the probe plate. At about 7"-8", the first signal strength LED lights up and the sound becomes louder. Continue to move the 25¢ silver coin closer to the probe, and all four signal strength LED lights will light up and the sound will be louder.
-
Page 18: Field Operation
c)Long press the "DISC/P-P" key again, the P-P cursor goes out, indicating that the PINPOINT function status has been exited. After completing this step, the operator has a preliminary familiarity with the detector and can proceed to the next step of field operation. Field operation The metal detector is an instrument for outdoor use. - Page 19 with less waste metal, a PASTURE can be chosen.In places with more waste metals, you can choose PARK to judge the metal category with the help of its three-audio function.On wet sandy beaches, especially beaches, SAND is available.To exclude metals with low conductivity, select the DISC.
- Page 20 Also, push slowly forward with about half the search coil diameter each time to ensure that the search coil scanned the detected ground without any omissions. It was wrong to shake the search coil above the ground. (see graph 19) graph 19 Most valuable metals can produce reproducible signals.
- Page 21 detection, the number may vary somewhat, depending on the component of the target, size, shape, distance from the coil and the speed of the scan.The surrounding soil will significantly affect the values. Coins will also vary between years.The values in the table are for reference only.
- Page 22 is in the highest sensitivity state. b)Move the coil close to the ground and slowly within the area where the target is found. At a certain position, the single frequency sound rings, and the orchid color intensity LED lights up the first one. Continue to slowly move the search coil until the sound is louder, and all four intensity LED lights up with the lowest depth cursor.
- Page 23 discrimination display and the depth display are offset due to soil impacts during field detection.The composition, size, and oxidation of the underground metal will also affect the display results.When the operator chooses to exclude a certain metal or judge whether there is a valuable metal, to fully consider these factors, do not "exclude"...
- Page 24 the search coil is distant from the ground, and then turn on the unit again. Make irregular sound or target 1. Do not use it indoors, because recognition cursor jump there is more metal indoors. 2. Whether there are electromagnetic interference sources nearby, such as power lines, cables, electronic walls, projectors, routers, etc.
-
Page 25: False Signals And Reasons
WARRANTY 1. DR.ÖTEK offers a 24-month warranty from the date of the original purchase of the MT-XE Metal Detector. If for any reason you are not 100% satisfied, please contact us by email with your purchase order ID and details of the issue. We will reply to you within 24 hours.
Need help?
Do you have a question about the MT-XE and is the answer not in the manual?
Questions and answers