Ltl Acorn Ltl-5210 Series User Manual
1080p hd video product ultra low standby current infrared digital camera less than 0.2s trigger time in actual application
Hide thumbs
Also See for Ltl-5210 Series:
- Operation manual (24 pages) ,
- User manual (33 pages) ,
- User manual (21 pages)

Subscribe to Our Youtube Channel
Related Manuals for Ltl Acorn Ltl-5210 Series


Summary of Contents for Ltl Acorn Ltl-5210 Series
- Page 1 ® LTL ACORN Ltl-5210 Series 1080P HD Video Product Ultra Low Standby Current Infrared Digital Camera Less Than 0.2S Trigger Time in Actual Application USER’S MANUAL...
-
Page 2: Table Of Contents
Advanced Settings ................... 25 3.1 Parameter Settings................ 25 3.2 File Format ..................29 Ltl-5210 Series Products ................30 4.1 Ltl-5210 series model: ..............30 IMPORTANT INFORMATION ..............31 5.1 Power Supply ................31 5.2 SD Card ..................31 5.3 Auto Adjustment on Video Length ..........31 5.4 850nm and 940nm IR LED ............ -
Page 3: Ceneral Information
1920 x 1080 / 1280 x 720 / 640x480 / 320x240 MJPEG format real HD video with audio record. Ltl-5210 series Infrared night vision LEDs 850nm flash range as far as 75 feet / 25 m, Low-grow 940nm 39 feet / 13 m. ... - Page 4 Low power double PIR(Passive Infrared) induction technology, detect the animal in advance with wide angle in 2 stages, ultra fast trigger to take photos, camera standby time current is about 60~180uA which makes us stand on the top in the industry. ...
-
Page 5: Application
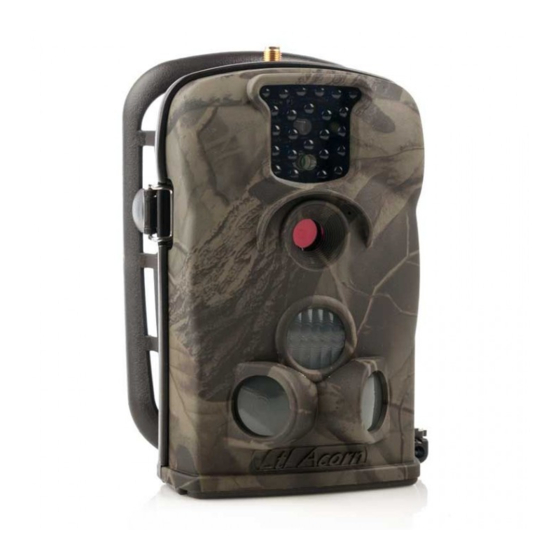
Get SMS Text alert when battery power level goes low. The local mobile signal can be checked in field. Operates globally via 2G GSM/GPRS network. Supports four bands: 850 / 900 / 1800 / 1900MHz. 1.2 Application ... - Page 6 Light Sensor IR LED Light Motion Indicator Lens Low Power Main PIR Pyroelectric Low Power Prep Infrared Sensor PIR Pyroelectric Infrared Sensor Lock Hole Figure 1.1: Front View of Ltl-5210M Battery door USB Port TV out jack SD card slot External DC Power/Mode switch Power in jack...
- Page 7 rechargeable battery are recommended to use. To achieve longer in-field life, always install 8 AA batteries. Antenna LCD display Lock Buckle Additional Keypad Battery Box Hand Screw Hand Screw Figure 1.3: Back View of Ltl-5210M CAUTION: If you are not using the camera for an extended period of time, it is highly recommended that you remove the batteries from the camera to avoid possible acid leak that may damage the camera and void the warranty.
-
Page 8: Getting Started
Getting Started 2.1 Insert SIM Card (Only for Model Ltl-5210MG) Please buy the SIM card from the local mobile operator, make sure they can provide the MMS of GSM 2G network and data service. Ask them for data information of MMS configuration. SIM card slot Figure 2.1 Wireless module battery box Open standby battery compartment, you can see the SIM card slot, insert... -
Page 9: Insert Sd Card
As a choice, the external DC power supply (optional) of 6V~12V with output current higher than 2A can be used in camera. The camera will choose the external DC power supply as priority when the external power supply and battery are connected at the same time. Our Ltl-SUN external solar panel(optional for purchase)is recommended, the camera may work for more than 1 years in the wild without changing batteries. - Page 10 (If your PC does not have a disc drive then you would need an external disc drive.) Run the Setup.exe file. You can also access the same setup file by visiting the LTL ACORN national distributor’s website to download and following the link http://www.ltlacorn.cn/about/downloaden.html...
- Page 11 Set up the camera based on your own need. Please reference Section 3.1 Parameter Settings in Advanced Settings to find detailed explanations for each setting. Click on to retrieve the computer time. Click on to find and choose the drive where the SD card is placed, usually denoted by a letter after E (F drive or G drive).
-
Page 12: Set Up Mms Function On Pc
card is inserted into the F drive, then you should click on “F:\”. DO NOT choose any folder under F:\. If you like, you can use the manufacturer default settings by clicking Click on . A message window will pop out as below. Click OK. - Page 13 Display below: An important first step is to determine the format of the files that the camera will send you. On the right of the first row where it says MMS Status, choose...
- Page 14 among three options: “VGA”, “SMS”, and “OFF”. VGA: the camera will send 640X480 pictures to your phone or e-mail account SMS: the camera will send only texts to you OFF: the camera will not send anything Then you need to choose how you like to set up the MMS Mode --Auto or Manual.
-
Page 15: Set Up Smtp Function On Pc
Click on to find and choose the drive where the SD card is placed. For example, the SD card is inserted on Drive F:\. Then you select only F:\. DO NOT choose any folder under F:\. Click on . A message window pops out as below. Click OK. A file named setup.dat has been created and saved in the root directory of the SD card. - Page 16 For the camera to send pictures, SMTP status must be set to “VGA”. “SMS” indicates sending texts and “OFF” means nothing will be sent. In Auto mode, first select country and operator. In Manual mode, you fill in APN / Account / Password.
- Page 17 and SMS Phone NO. Under SMS remote control, the value ranges from “0”to “off” and denotes the frequency the camera wakes up to either receive or execute the commands. “0” indicates that the camera will wake up and search for commands automatically every 10 minutes, and send feedback once it receives them.
-
Page 18: Sms Remote Control & Table Of Command Code
Retrieve the SD card and insert it in the camera. Switch to the TEST position to enter the TEST mode. Message“Updated smtp.dat Successfully” show up on the TFT display, indicating the setup file has been successfully installed on the camera. 2.7 SMS Remote Control &... - Page 19 Note : When using order code 12 and13 to set additional phone numbers or email addresses, make sure to fill in code 12 first before 13. The number or e-mail added by using code 13 will not be accepted if the code 12 slot is empty. Command Code Value Example...
- Page 20 Phone No 2 or Email: 12*1988888 Phone number 8888# 19888888888 Maximum 48 symbols Phone No 3 or Email: 13*info@ltla Email corn.cn# info@ltlacorn.cn Maximum 48 symbols 14*info@ltla Email Additional Email: corn.cn# info@ltlacorn.cn Maximum 48 symbols Maximum number of Camera sends as photos sent by camera 15*0# many pictures as it...
- Page 21 View Local MPNO name and Signal Strength on TFT Screen You can find your local Mobile Phone Network Operator’s name and the signal strength on the TFT display screen on the camera, just like you can see the reception on a regular cell phone. Install the SIM card and 8 AA batteries.
-
Page 22: Camera Working With Mms
CREG: SIM card is password-protected, or deactivated due to low balance in the account, or not able to register with the GSM system. CGREG: Not able to register with GPRS network. COPS: Searching for the MPNO of the SIM card. Once found, the operator’s symbol and the signal strength will show on the display. -
Page 23: Enter Test Mode
PIR sensor. By conducting this test, you can identify the best placement when mounting and aiming the LTL ACORN camera. In general, we recommend placing the camera 3 to 6 feet (1 to 2 meters) above the ground. -
Page 24: Advantages Of Prep Sensors
5 plus seconds, but they may claim only 0.3 seconds. The shorter of the trigger time, the higher of the possibility to capture the animal. With the unique side prep PIR sensors design, our LTL ACORN cameras reduce the trigger time greatly. The combination of the two... -
Page 25: Brightness Adjustment Of Night Picture
side prep sensors and the middle main PIR sensor comes up with a 100 degrees induction range, usually the animal will enter this large induction range from the two sides of camera, then camera will start immediately. The induction angle of middle PIR sensor almost equals to the shooting angle of the lens, if the animal continue to enter to the induction scope of middle PIR sensor, camera would take photos immediately, which trigger time is less than 0.2 seconds, and it is the... -
Page 26: Connect To Pc
Low: the lowest brightness of night picture between three settings. Default setting of the brightness of night picture is High. When adjust brightness in the TEST mode, first press key to check the present status of the night picture brightness, press again to adjust the brightness to High, Medium or Low, the camera will automatically save the brightness setting you selected, exit the brightness setting in 4 seconds if no operation. -
Page 27: Advanced Settings
Advanced Settings The LTL ACORN trail camera comes with preset manufacturer settings. You can change the settings to meet your requirements, by manually operating on the camera or programming on your computer. 3.1 Parameter Settings Switch to the TEST position to enter the Test mode. In this mode you can take pictures or video clips like using a regular digital camera, or enter the Menu to set up parameters. - Page 28 Press key to toggle the language. List of Parameters Parameter Settings Description Select to take photo or video clips. In Camera, Mode Cam+Video mode, camera takes Video, Cam+Video photos first then video. All files will be deleted after formatting the SD card.
- Page 29 Select the sensitivity of the PIR sensor. The PIR would stop sensing with Off setting (usually used in time lapse mode when sensing Sense High, Normal, Low, shooting is not needed). Higher Level sense level with longer sensing (Sensitivity) distance, but easier to be interfered. Normal/Low setting suits...
- Page 30 Set up a password with 4 digits to protect your camera from unauthorized users with On setting. Password Off, On Notice: Please take note remember the password well, or the camera should be returned to factory to unlock. Select On to assign an ID for the camera with digits...
-
Page 31: File Format
is max limitation for mobile number. The daily max limitation of sending MMS could be set on menu too, 00 stands limited, 1~99/Day stands 1~99 photo(s) could be sent daily. Choosing On enables the SD card overwrites function, which automatically deletes the oldest files Off ,On Recycle when the SD card becomes full to... -
Page 32: Ltl-5210 Series Products
Ltl-5210 Series Products Ltl-5210 series cameras contain Ltl-5210MG and Ltl-5210A. 4.1 Ltl-5210 series model: Ltl-5210MG (Ltl-MM1 MMS-module battery box) Ltl-5210MC (Standard battery box) Ltl-5210A (Standard battery box) Ltl-5210MG Ltl-5210MC Ltl-5210A Ltl-MM1 MMS-module battery box Standard battery box... -
Page 33: Important Information
IMPORTANT INFORMATION 5.1 Power Supply The working voltage of Ltl-5210 Series is up to 12V. The 4 AA batteries in the camera main unit, 4 or 8 AA batteries in the battery box and the external power source form a four-path parallel circuit. Each path is isolated and does not charge or discharge each others. -
Page 34: 850Nm And 940Nm Ir Led
5.4 850nm and 940nm IR LED There are two types of IR LED on the Ltl-5210 series camera: 850nm and 940nm. For Ltl-5210 series camera,the former provides up to 75 feet/ 25m flash range whereas the latter up to 39 feet / 13m flash range. - Page 35 I programmed the camera to constantly take pictures. But some pictures were not sent to my phone. How? The Ltl-5210 series camera is designed to constantly send MMS pictures to the recipient’s phone. However, if the signal is too weak, it may not work stably.
-
Page 36: Battery Level Indication
Yes. After you upgrade the camera, all previous settings of the camera and the MMS are gone. You need to run the setup.exe file on the enclosed CD or visiting the LTL ACORN national distributor’s website to download to set up the camera again. -
Page 37: Firmware Upgrades
• Insert SD card into the camera and load batteries. • Format the SD card. • Obtain the firmware from LTL ACORN’s website http://www.ltlacorn.cn/about/downloaden.html (Download→Classification→Software→Ltl-5210), or from authorized distributor. • Retrieve the SD card and insert it into the computer (SD card reader may be needed). -
Page 38: Limited Warranty
It does not cover normal wear of the product. Please contact our tech support department to determine the nature of the problem before you return a LTL ACORN product under this warranty for repair or exchange. -
Page 39: Appendix I: Technical Specification
Appendix I: TECHNICAL SPECIFICATION Ltl-5210M Model Parameters Ltl-5210A Ltl-5210MG 5 Mega Pixels Color Image Sensor CMOS F=2.2; FOV=55° ; Auto Lens IR-Cut 25meters / 25meters / 25meters 850nm 75 feet 75 feet / 75 feet IR Flash 13meters 13meter 13meters / 940nm 39feet 39feet... - Page 40 Operation Day/Night Mode Trigger Time 0.8 Seconds Trigger 0sec. - 60min; Interval Programmable Shooting Numbers Video Length 1-60sec.; Programmable Camera + First take Picture then Video Video Playback 1~16 Times Zoom In On/Off; Include serial No., temperature and Time Stamp moon phase, date and time.
- Page 41 MMS Phone Upgradeab 1 ~ 3 Phone Numbers Upgradeab MMS E-mail 1 ~ 3 E-mail addresses Sender :1 E-mail address Upgradeab SMTP E-mail Recipient :1 E-mail address Low-Battery “Low battery ” text alert Upgradeab SMS Alert sent language Change Country Can setting Setting Language Power Supply...
-
Page 42: Appendix Ii: Package Contents
Operation -45 ~ +70° C Temperature Operation 5% ~ 95% Humidity Certificate FCC & CE & RoHS Appendix II: PACKAGE CONTENTS Quantity Quantity Quantity Part name Ltl-5210A Ltl-5210MC Ltl-5210MG Digital camera Standard battery box Ltl-MM1 MMS-module battery TV AV IN cable USB cable Strap External DC cable (optional) -
Page 43: Appendix Iii: Install Battery Box
Appendix III: Install Battery Box Load 4xAA battery in battery box. Install the battery box to camera unit as below:... - Page 44 Unload the batteries as below: 1. Pull the drawstring to unload batteries.
Need help?
Do you have a question about the Ltl-5210 Series and is the answer not in the manual?
Questions and answers