
Related Manuals for Mindray ePM 10M


Summary of Contents for Mindray ePM 10M
- Page 1 10M/ePM 10MA/ePM 10MC ePM 12M/ePM 12MA/ePM 12MC Patient Monitor Operator’s Manual...
- Page 3 © Copyright 2018-2020 Shenzhen Mindray Bio-Medical Electronics Co., Ltd. All rights reserved. Release time: 2020-07 Revision: 6.0...
- Page 4 SHENZHEN MINDRAY BIO-MEDICAL ELECTRONICS CO., LTD. (hereinafter called Mindray) owns the intellectual property rights to this Mindray product and this manual. This manual may refer to information protected by copyrights or patents and does not convey any license under the patent rights of Mindray, nor the rights of others.
- Page 5 Mindray's obligation or liability under this warranty does not include any transportation or other charges or liability for direct, indirect or consequential damages or delay resulting from the improper use or application of the product or the use of parts or accessories not approved by Mindray or repairs by people other than Mindray authorized personnel.
- Page 6 Preface Manual Purpose This manual contains the instructions necessary to operate the product safely and in accordance with its function and intended use. Observance of this manual is a prerequisite for proper product performance and correct operation and ensures patient and operator safety. This manual is based on the maximum configuration and therefore some contents may not apply to your product.
-
Page 7: Table Of Contents
Contents 1 Safety ....................................1 - 1 1.1 Safety Information ......................................1 - 1 1.1.1 Warnings ......................................1 - 1 1.1.2 Cautions ........................................1 - 2 1.1.3 Notes ........................................1 - 2 1.2 Equipment Symbols .......................................1 - 3 2 Equipment Introduction ..............................2 - 1 2.1 Intended Use ........................................2 - 1 2.2 Applied Parts ........................................2 - 1 2.3 System Components ......................................2 - 2... - Page 8 3.9 Starting Monitoring a Patient .................................. 3 - 13 3.10 Stopping a Parameter Measurement ..............................3 - 14 3.11 General Operation ..................................... 3 - 14 3.11.1 Switching On or Off a Parameter ............................3 - 14 3.11.2 Displaying Parameter Numerics and Waveforms ......................3 - 14 3.11.3 Displaying the Parameter List ..............................
- Page 9 5.1 Discharging a Patient .....................................5 - 1 5.1.1 Manually Discharging a Patient ..............................5 - 1 5.2 Admitting a Patient ......................................5 - 1 5.3 Managing Patient Information ...................................5 - 2 5.3.1 Entering the Patient Management Menu ..........................5 - 2 5.3.2 Editing Patient Information ................................5 - 2 5.3.3 Loading Patient Information from the CMS ..........................5 - 2 5.3.4 Loading Patient Information from the ADT Server .......................5 - 3 5.4 Exporting Patient Data ....................................5 - 3...
- Page 10 8.6.2 Setting Alarms from External Devices ............................8 - 3 8.6.3 Setting Parameters from External Devices for Display ......................8 - 3 8.6.4 Setting Units for Parameters from External Devices ......................8 - 4 8.6.5 Accessing the Loops Screen ................................8 - 4 8.7 Viewing Alarms from External Devices ..............................8 - 4 8.8 Viewing Parameter Trends from External Devices ..........................8 - 4 8.9 Recording and Printing Parameter Trends from External Devices ....................8 - 4 9 Alarms ....................................9 - 1...
- Page 11 10 Monitoring ECG, Arrhythmia, ST and QT ........................10 - 1 10.1 ECG Introduction ......................................10 - 1 10.2 ECG Safety Information .................................... 10 - 1 10.3 ECG Display ........................................10 - 1 10.4 Preparing for ECG Monitoring ................................10 - 3 10.4.1 Preparing the Patient Skin ................................
- Page 12 10.11 Calibrating ECG ......................................10 - 25 10.12 Defibrillation Synchronization Pulse Output ..........................10 - 25 10.13 ECG Troubleshooting ..................................10 - 26 11 Resting 12-Lead ECG Analysis ............................11 - 1 11.1 Resting 12-Lead ECG Analysis Introduction ............................. 11 - 1 11.2 Entering the 12-Lead Screen ................................. 11 - 1 11.3 Initiating Resting 12-Lead ECG Analysis ............................
- Page 13 13.6.6 Displaying SIQ (for Masimo SpO ) ............................13 - 6 13.6.7 Changing Averaging Time (for Masimo SpO ) ........................13 - 6 13.6.8 Changing Sensitivity (for Mindray SpO ) ..........................13 - 7 13.6.9 Showing/Hiding PI ..................................13 - 7 13.6.10 Monitoring SpO and NIBP Simultaneously ........................
- Page 14 15.9.5 Enabling the NIBP End Tone ..............................15 - 5 15.9.6 Setting NIBP Sequence ................................15 - 6 15.9.7 Setting the NIBP Display Format ............................15 - 6 15.9.8 Setting the NIBP Alarm Limits Display Switch ........................15 - 6 15.9.9 Showing/Hiding PR ..................................
- Page 15 17.5 C.O. Equipment to Patient Connection .............................. 17 - 3 17.6 Performing C.O. Measurement ................................17 - 3 17.6.1 Preparing for C.O. Measurement ............................17 - 3 17.6.2 Setting C.O. Measurement ............................... 17 - 3 17.6.3 Performing C.O. Measurement ............................... 17 - 4 17.7 Changing C.O.
- Page 16 19.2 AG Safety Information ..................................... 19 - 2 19.3 AG Measurement Limitations ................................19 - 2 19.4 AG Display ........................................19 - 2 19.5 AG Equipment to Patient Connection ............................... 19 - 3 19.6 Preparing for AG Monitoring ................................. 19 - 3 19.7 Zeroing the AG Module ...................................
- Page 17 21.2.1 Accessing the Review Page ..............................21 - 1 21.2.2 Example Review Page ................................21 - 1 21.2.3 Symbols on Review Pages ................................ 21 - 2 21.2.4 Common Operations .................................. 21 - 2 21.2.5 Tabular Trends Review Page ..............................21 - 3 21.2.6 Graphics Trends Review Page ..............................
- Page 18 23.5.2 Input Parameters for Oxygenation Calculations ......................23 - 5 23.5.3 Calculated Parameters and Formulas for Oxygenation Calculations ............... 23 - 5 23.6 Ventilation Calculations ..................................23 - 6 23.6.1 Performing Ventilation Calculations ............................ 23 - 6 23.6.2 Input Parameters for Ventilation Calculations ........................23 - 6 23.6.3 Calculated Parameters and Formulas for Ventilation Calculations ................
- Page 19 26 Using the On-Screen Timers ............................26 - 1 26.1 Displaying Timers ...................................... 26 - 1 26.2 Controlling the Timer ....................................26 - 1 26.3 Setting the Timer ....................................... 26 - 1 27 User Maintenance Settings ............................27 - 1 27.1 Accessing the Maintenance Menu ..............................27 - 1 27.2 The Device Location Settings ................................
- Page 20 27.15 The Scanner Settings ...................................27 - 15 27.15.1 The 2D Barcode Tab (for the Mindray Custom 2D Barcode Reader) ..............27 - 15 27.15.2 The 1D Barcode Tab ................................27 - 16 27.15.3 The Scanner Information Tab .............................27 - 16 27.15.4 The Identify Scanner Tab (for the non-Mindray Custom 2D Barcode Reader) ..........27 - 16 27.15.5 The Field Tab (for the Mindray Custom 2D Barcode Reader) ..................27 - 16...
- Page 21 31.1.7 12-lead ECG Leadwires ................................31 - 3 31.2 SpO Accessories ......................................31 - 4 31.2.1 Extension Cables ..................................31 - 4 31.2.2 Mindray SpO Sensors ................................31 - 4 31.2.3 Nellcor SpO Sensors .................................. 31 - 5 31.3 Temp Accessories ..................................... 31 - 5 31.3.1 Temp Cable ....................................
- Page 22 A.2 Physical Specifications ....................................A - 1 A.3 Environmental Specifications ................................... A - 2 A.4 Power Supply Specifications ..................................A - 3 A.4.1 External Power Supply Specifications ............................A - 3 A.4.2 Battery Specifications ..................................A - 3 A.5 Display Specifications ....................................A - 4 A.6 Recorder Specifications ....................................
- Page 23 C.2.3 Minitrends Default Settings ...............................C - 17 C.2.4 OxyCRG Default Settings ................................C - 18 C.2.5 Remote View Default Settings ..............................C - 18 C.2.6 Display Default Settings ................................C - 18 C.2.7 Report Default Settings ................................C - 19 C.2.8 Calculations Default Settings ..............................C - 20 C.2.9 System Time Default Settings ..............................C - 20 D Alarm Messages ................................
- Page 24 E.8 Patient Auxiliary Current ....................................E - 3 F A ECG Wave Recognition Method for Mindray Resting 12-lead ECG Analysis Algorithm ..........F - 1 F.1 Preprocessing ........................................F - 1 F.2 QRS typing .........................................F - 1 F.3 Selection of required QRS class .................................. F - 1 F.4 Averaging ...........................................F - 1...
-
Page 25: Safety
Safety Safety Information WARNING • Indicates a potential hazard or unsafe practice that, if not avoided, could result in death or serious injury. CAUTION • Indicates a potential hazard or unsafe practice that, if not avoided, could result in minor personal injury or product/property damage. -
Page 26: Cautions
Misinterpretation of the measured values or other parameters can endanger the patient. • The software equipment copyright is solely owned by Mindray. No organization or individual shall resort to modifying, copying, or exchanging it or to any other infringement on it in any form or by any means without due permission. -
Page 27: Equipment Symbols
Equipment Symbols Symbol Description Symbol Description General warning sign Refer to instruction manual/booklet Serial number Catalogue number Date of manufacture Manufacturer USB connector Unlocking Battery indicator Computer network Equipotentiality Alternating current DEFIBRILLATION-PROOF TYPE CF APPLIED DEFIBRILLATION-PROOF TYPE BF APPLIED PART PART Stop USB Zero key... - Page 28 Symbol Description Symbol Description Output Input/output Humidity limitations Atmospheric pressure limitations Temperature limitations Pushing prohibited (wheels locked, no pushing) Stacking limit by number Keep dry This way up Fragile; handle with care Authorised representative in the European Dispose of in accordance to your country’s Community requirements The product bears CE mark indicating its conformity with the provisions of the Council Directive 93/42/EEC...
-
Page 29: Equipment Introduction
Equipment Introduction Intended Use The ePM 10M/ePM 10MA/ePM 10MC/ePM 12M/ePM 12MA/ePM 12MC patient monitor, hereafter called the monitor, is intended to be used for monitoring, displaying, reviewing, storing, alarming and transferring of multiple physiological parameters including ECG (3-lead, 5-lead, 6-lead, and 12-lead selectable, arrhythmia... -
Page 30: System Components
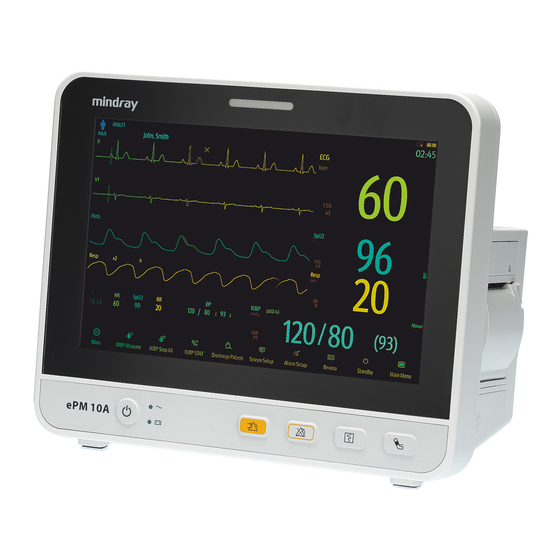
System Components The monitor consists of the main unit, display, external modules, input devices, and output devices. NOTE • Your monitor may not include all these components. Contact your local service personnel for the available components. 2.3.1 Main Unit The main unit processes data from modules. 2.3.1.1 Front View (9) (8) (7) - Page 31 ◆ On: when the power is connected. ◆ Off: when the power is not connected. Battery indicator ◆ Yellow: the battery is being charged. ◆ Green: the battery is fully charged. ◆ Flashing green: the monitor operates on battery power. ◆...
- Page 32 2.3.1.3 Right View (1) Handle (2) Recorder 2.3.1.4 Rear View Alarm lamp When a physiological alarm or technical alarm occurs, this lamp lights and flashes corresponding with the alarm priority: ◆ High priority alarms: the lamp quickly flashes red. ◆ Medium priority alarms: the lamp slowly flashes yellow.
-
Page 33: External Modules
Network Connector It is a standard RJ45 connector which connects the monitor to the central monitoring system (CMS) or other network devices. USB connectors It connects USB devices, for example the barcode reader. VGA Connector It connects an external display, which extends the display capability of your monitor. The contents displayed on the external display screen accords with those displayed on the monitor screen. -
Page 34: Input Devices
2.3.4 Printing Devices You can use Mindray specified printer and/or recorder to output patient information and data. The monitor is configured with a build-in recorder. The printer can be connected to the monitor through the network to output patient reports. -
Page 35: Getting Started
Use only installation accessories specified by Mindray. • The equipment software copyright is solely owned by Mindray. No organization or individual shall resort to modifying, copying, or exchanging it or to any other infringement on it in any form or by any means without due permission. -
Page 36: Monitor Installation
Monitor Installation The monitor can be installed in various ways as required. Wall mount ■ ■ Placed on desk ■ Trolley tray Bedrail clamp ■ ■ Bedrail hook 3.2.1 Unpacking and Checking Before unpacking, examine the packing case carefully for signs of damage. If any damage is detected, contact the carrier or us. -
Page 37: Connecting The Input Devices
3.3.2 Connecting the Input Devices Connect the barcode reader if necessary. 3.3.3 Connecting the Parameter Module To connect the parameter module, follow this procedure: Push the module rack door open, and then push it until you hear a click. With the module properly oriented, align the module insertion guide slot with the module rack insertion guide. -
Page 38: Turning On The Monitor
• Do not use the monitor on a patient if you suspect it is not working properly, or if it is mechanically damaged. Contact the service personnel or Mindray. Operation and Navigation Everything you need to operate the monitor is on its screen. Almost every element on the screen is interactive. -
Page 39: Using The On-Screen Keyboard
Clearing Old Data Formats (for the Mindray Custom 2D Barcode Reader) If you are using the Mindray custom 2D barcode reader (Model HS-1R or HS-1M), before using it for the first time, clear old data formats and configure the barcode reader. -
Page 40: Screen Display
Screen Display The following figure shows the normal screen: Patient information area: displays patient information, including patient category, gender, department, room number, bed number, and so on. The displayed patient information is configurable. Selecting this area enters the Patient Management menu. For more information, see 5.3 Managing Patient Information. The current configuration Technical alarm information area: displays prompt messages on the above;... -
Page 41: On-Screen Symbols
3.6.1 On-screen Symbols The following table lists the on-screen symbols displayed on the system status information area: Symbol Description Symbol Description Adult, male Adult, female Pediatric, male Pediatric, female Neonate, male Neonate, female Wireless network is connected. The solid part Wireless network is not connected. -
Page 42: Menus
3.6.2 Menus All menus have similar style and structure, see the figure below: Menu heading Submenu tabs Operation buttons Exit button: closes the current menu page. Main body area: includes menu items and options. Switch: ◆ Green: the switch is on. ◆... - Page 43 3.6.3.1 Available Quick Keys The following table shows available quick keys. Symbol Label Function Symbol Label Function Main Menu Enters the main menu. More Shows more quick keys. Enters the Alarm menu. Alarm Setup Alarm Reset Resets the alarm system. Audio Pause Pauses alarm tone.
-
Page 44: Operating Modes
Symbol Label Function Symbol Label Function End Case Prints the selected end Intubation Enters the intubation Report case reports. Mode mode. Enters the Volume menu. Volume Freeze Freezes waveforms. Enters the Calculations Enters the Load Config Calculations Load Config menu. menu. -
Page 45: Privacy Mode
3.7.2 Privacy Mode The privacy mode is a special clinical monitoring mode. In the privacy mode, the monitor does not display patient information and monitoring data. This provides controlled access to patient data and ensures confidentiality. The privacy mode is only available when the patient admitted by the monitor is also monitored by the CMS. The monitor continues monitoring the patient, but patient data is only visible at the CMS. -
Page 46: Standby Mode
Stop NIBP: Off ■ CAUTION • Verify the night mode settings before entering the night mode. Pay attention to the potential risk if the setting value is low. 3.7.3.2 Exiting the Night Mode To cancel the night mode, follow this procedure: Select the Night Mode quick key, or select the Main Menu quick key →... -
Page 47: Configuring Your Monitor
When the monitor is turned on, the alarms are paused for two minutes. Then the alarm system is activated. Configuring Your Monitor Configure your monitor before putting it in use. 3.8.1 Setting the Date and Time To set the system time, follow this procedure: Select the Main Menu quick key →... -
Page 48: Stopping A Parameter Measurement
3.10 Stopping a Parameter Measurement To stop monitoring a parameter, follow this procedure: Remove the corresponding sensor from the patient. Disconnect the sensor from the patient cable. Disconnect the patient cable from the parameter module. If you are using the disposable sensor, discard it. 3.11 General Operation This section describes the operations that are generally used when monitoring a patient. -
Page 49: Accessing Parameter Setup Menus
3.11.4 Accessing Parameter Setup Menus Each parameter has a setup menu in which you can adjust the alarm and parameter settings. You can enter a parameter setup menu by using any of the following methods: Select the parameter numeric area or waveform area. ■... -
Page 50: Printing Frozen Waveforms
3.12.4 Printing Frozen Waveforms Freeze button at the upper left corner of the window. To print the frozen waveforms, select the 3.13 Capturing the Screen The monitor provides the function of screen capture. To capture the current screen display, follow this procedure: Connect the USB drive to the monitor’s USB connector. -
Page 51: User Screens
User Screens The monitor provides different user screens to facilitate patient monitoring in different departments and clinical applications. Choosing a Screen To choose a screen, follow this procedure: Access the Choose Screen page in either of the following ways: Select the Screen Setup quick key. ◆... -
Page 52: The Big Numerics Screen
The Big Numerics Screen The big numerics screen displays parameter numerics in big font size. 4.3.1 Entering the Big Numerics Screen To enter the big numerics screen, choose any of the following ways: Swipe left or right across the touchscreen with two fingers until you switch to the big numerics screen. ■... -
Page 53: The Display Of Minitrends Screen
4.4.2 The Display of Minitrends Screen The following figure shows the Minitrends screen. Your display may be configured to look slightly different Scale Routine Vital/Baseline button. If the department is set to OR, then the Baseline button is available. For other departments, the Routine Vital button is available. Routine Vital/Baseline Select this button to view the long trends, or contract the long trends screen to the Minitrends screen. -
Page 54: Setting The Minitrend Length
4.4.5 Setting the Minitrend Length To set the Minitrend length, follow this procedure: Enter the Minitrends screen. Select the Setup button. Set the Minitrend Length. 4.4.6 Setting the Alarm Statistics Switch The Minitrends screen can be configured to display the statistic number of physiological alarms in its lower half screen. -
Page 55: Aldrete Score
4.4.9 Aldrete Score Select Aldrete Score to show the latest score and scoring time. To understand the current patient status, select a score for each item and then select OK to get a new score. WARNING • The Aldrete score and recommendation is for reference only. Clinicians must make the decision of discharging the patient from recovery according to the patient’s actual condition. -
Page 56: Setting Oxycrg Parameters
4.5.4 Setting OxyCRG Parameters Select parameter trends or compressed waveform to set parameters and the compressed waveform you want to display. The selected parameters will be used for ABD event calculation. 4.5.5 Setting the Threshold of ABD Events Select any parameter trend or the compressed waveform to perform the following setup: Set the threshold of ABD events. -
Page 57: The Display Of The Targeted Goal Screen
4.6.2 The Display of the Targeted Goal Screen The following figure shows the Targeted Goal screen. Your display may be configured to look slightly different. Parameter trends area: displays trends of the target parameter and secondary parameters. If the target parameter is Art, this area only lists the trend of arterial pressure. - Page 58 This page intentionally left blank. 4 - 8...
-
Page 59: Managing Patients
Managing Patients Discharging a Patient Before monitoring a new patient, discharge the previous patient. After the patient is discharged, the technical alarms is reset, and monitor settings return to their defaults. For more information, see 6.4 Setting Default Configuration. After a patient is discharged, the monitor automatically admits a new patient. WARNING •... -
Page 60: Managing Patient Information
WARNING • The settings of patient category and paced status always contain a default value, regardless of whether the patient is admitted or not. Check if the setting is correct for your patient. • For paced patients, you must set Paced to Yes. If it is incorrectly set to No, the monitor could mistake a pace pulse for a QRS and fail to alarm when the ECG signal is too weak. -
Page 61: Loading Patient Information From The Adt Server
5.3.4 Loading Patient Information from the ADT Server If the monitor is connected with the Admit-Discharge-Transfer (ADT) server through the eGateway. You can load patient information from ADT server to the monitor. To do so, follow this procedure: Enter the Find Patient menu in either of the following ways: Select the Main Menu quick key →... - Page 62 This page intentionally left blank. 5 - 4...
-
Page 63: Managing Configurations
Managing Configurations Configuration Introduction When continuously monitoring a patient, the clinical professional often needs to adjust the monitor’s settings according to the patient’s condition. The collection of all these settings is called a configuration. System configuration items can be classified as: parameter configuration, alarm configuration, and user maintenance. Allowing you to configure the monitor more efficiently, the monitor provides different sets of configurations to accommodate various patient categories and departments. -
Page 64: Setting Default Configuration
Setting Default Configuration The monitor will load the pre-set default configuration in the following cases: A patient is admitted. ■ ■ A patient is discharged. ■ Patient data is cleared. Patient category is changed. ■ To set the default configuration, follow this procedure: Select the Main Menu quick key →... -
Page 65: Transferring A Configuration
Transferring a Configuration When installing several monitors with identical user configurations, it is not necessary to set each unit separately. Use a USB drive to transfer the configuration from monitor to monitor. 6.7.1 Exporting a Configuration To export the current monitor’s configuration, follow this procedure: connect the USB drive to the monitor’s USB connector. -
Page 66: Modifying Configuration Password
6.10 Modifying Configuration Password To modify the configuration password, follow this procedure: Select the Main Menu quick key → from the Configuration column select Manage → input the required password → select Select Modify Password. Respectively input the old password and new password. Select OK. -
Page 67: Networked Monitoring
Network Safety Information CAUTION • Wireless network designing, deploying, debugging, and maintenance should be executed by Mindray service personnel or authorized technicians. • Always set the wireless network according to local wireless regulations. • Data communication must be performed within a closed network or within a virtually isolated network provided by a hospital for all network functions. -
Page 68: Connecting The Egateway
Connecting the eGateway You can connect the monitor to the eGateway through wired LAN or wireless LAN. When connected to the eGateway, the system provides the following functions: The monitor can transmit parameter values, waveforms, alarm settings, and events to the eGateway. ■... - Page 69 7.5.1.2 About the Remote View The following figure shows the Remote View window. Alarm watch area ◆ Display all the monitored remote beds. ◆ Each bed displays the room number, bed number, connection status and alarm status. The background color indicates the alarm status on the corresponding bed. Background Color Description Green...
-
Page 70: Alarm Watch
Select a desired tile at the A-W1 or A-W2 areas and then select a bed from the bed list. The selected bed will appear in the tile. NOTE • The added bed is indicated by a √ check mark at the left of the bed list. 7.5.1.4 Removing a Bed If you do not want to monitor a remote device any longer, you can remove it. -
Page 71: Auto Displaying The New Alarm Bed
7.5.2.1 About Alarm Watch Tile The main screen can display up to three alarm watch tiles, namely A-W1 and A-W2. Each tile can accommodate up to six beds. The following figure shows the alarm watch tiles. Alarm watch tile label Disconnection icon: when the remote device is disconnected, this icon displays at the tile, and the tile background color is red. -
Page 72: Mldap
MLDAP MLDAP refers to Mindray LDAP (Lightweight Directory Access Protocol). It is an independent process which can be installed on eGateway or other application server (Windows). MLDAP provides user identity and authentication. -
Page 73: Interfacing With External Devices
Interfacing with External Devices Introduction to Interfacing with External Devices External devices, including Draeger Apollo Anesthesia Machine, Masimo Rainbow SET Intellivue Module Pulse CO-Oximeter, Hamilton G5 Ventilator, Radiometer TCM4 Gas Monitor, TOF-Watch SX NMT Monitor, B Braun Perfusor Space Infusion Pump, etc. can be connected to the monitor through the multifunctional connector. Information (patient data, alarms, etc.) from external devices can be displayed, saved, recorded, or printed through the monitor. -
Page 74: Connecting An External Device
Switch on the external device. CAUTION • First installation and debugging should be executed by Mindray service personnel or authorized technician. Accessing the Integrated Devices Screen You can view the information of external devices in the Integrated Devices screen of the monitor. To access the Integrated Devices screen, follow this procedure: Select the Integrated Devices quick key. -
Page 75: Displaying Parameters From External Devices
NOTE • Parameters in the Integrated Devices screen are displayed in the order of priorities. If the screen cannot display all the selected parameters, only parameters with higher priorities are displayed. Displaying Parameters from External Devices This monitor can display parameters from external devices in the main screen: ■... -
Page 76: Setting Units For Parameters From External Devices
8.6.4 Setting Units for Parameters from External Devices To set units for parameters from external devices, follow this procedure: Select the numeric area of any parameter from the external device. Selectthe Unit tab. Set the unit as desired. 8.6.5 Accessing the Loops Screen To access the Loops screen, follow this procedure: Select Setup from the Integrated Devices screen, or select the numeric area of +Paw, +Flow, or +Vol to enter the corresponding setup menu. -
Page 77: Alarms
Alarms Alarm Introduction This chapter describes alarm functions and alarm settings. Alarm Safety Information WARNING • A potential hazard can exist if different alarm presets and default configuration settings are used for the same or similar equipment in the same care area, for example an intensive care unit or cardiac operating room. -
Page 78: Alarm Priorities
9.3.2 Alarm Priorities By severity, the alarms are classified into the following priority levels: ■ High priority alarms: indicate a life threatening situation or a severe device malfunction. High priority alarms require an immediate response. ■ Medium priority alarms: indicate abnormal vital signs or a device malfunction. Medium priority alarms require a prompt response. -
Page 79: Alarm Status Symbols
• Lethal arrhythmia alarms, apnea, and SpO Desat are exclusive high priority alarms. When these alarms occur, the monitor only displays messages of exclusive alarms. Other high priority alarms will not be displayed. When multiple exclusive alarms occur simultaneously, alarm messages are displayed circularly. -
Page 80: Setting Alarm Tone Properties
9.6.2 Setting Alarm Tone Properties 9.6.2.1 Changing the Alarm Volume To change the alarm volume, follow this procedure: Access the Setup page in either of the following ways: Select the Alarm Setup quick key → select the Setup tab. ◆ Select the Main Menu quick key →... -
Page 81: Initiating Auto Alarm Limits
NOTE • The Auto Limits for New Patient function is intended for newly admitted patients only. • The automatically set alarm limits take effect only after being confirmed. 9.6.4 Initiating Auto Alarm Limits The monitor provides the auto alarm limits function to automatically adjust alarm limits according to the patient’s vital signs using. - Page 82 Module Parameter Lower Limit Upper Limit Auto Limit Range Adult/ Neonate Adult/ Neonate Pediatric Pediatric IBP: ART/ IBP-S SYS × 0.68 + (SYS - 15) or SYS × 0.86 + (SYS + 15) or Adult: 45 to 270 Ao/UAP/ (mmHg) 45 (whichever Pediatric: 45 to 185 BAP/FAP/...
-
Page 83: Setting The Alarm Delay Time
Module Parameter Lower Limit Upper Limit Auto Limit Range Adult/ Neonate Adult/ Neonate Pediatric Pediatric EtCO Same as the CO module FiCO Same as the CO module awRR awRR × 0.5 or (awRR - 10) or awRR × 1.5 or awRR+25 or Adult/Pediatric: 6 to 55 (rmp) -
Page 84: Setting The Length Of Printed Waveforms
9.6.7 Setting the Length of Printed Waveforms You can define the length of printed waveforms when an alarm is triggered. To do so, follow this procedure: Access the Setup page in either of the following ways: Select the Alarm Setup quick key → select the Setup tab. ◆... -
Page 85: Pausing Alarm Sound
Priorities of paused alarms ■ ■ Alarm reset setting Reminder tone settings ■ For more information, see 27.4.2 The Pause/Reset Tab. 9.7.2.1 Switching Off All Alarms If Pause Time is set to Permanent (see 27.4.2 The Pause/Reset Tab), pressing the Alarm Pause quick key permanently switches off all alarms. -
Page 86: Resetting Alarms
To exit the audio off status, press the Audio Pause quick key again. WARNING • Pausing or switching off alarm sound may result in a hazard to the patient. Resetting Alarms Pressing the Alarm Reset quick key to reset the alarm system. When the alarm system is reset, the alarm reset symbol displays in the system status information area for alarm symbols. -
Page 87: Nurse Call
9.10 Nurse Call The monitor provides a nurse call connector to output nurse call signal when a user-defined alarm occurs. To obtain nurse call signal, use the nurse call cable to connect the hospital nurse call system with the monitor’s nurse call connector. -
Page 88: Exiting The Cpb Mode
9.12.2 Exiting the CPB Mode To exit the CPB mode, choose either of the following ways: Select the CPB Mode quick key. ■ Select the Main Menu quick key → from the Alarm column select Exit CPB Mode. ■ 9.13 Intubation Mode Intubation mode is available for Resp, CO and AG monitoring. -
Page 89: Monitoring Ecg, Arrhythmia, St And Qt
Monitoring ECG, Arrhythmia, ST and QT 10.1 ECG Introduction The electrocardiogram (ECG) measures the electrical activity of the heart and displays it on the monitor as waveforms and numerics. ECG monitoring provides 3-, 5-, 6-, and 12-lead ECG monitoring, ST-segment analysis, arrhythmia analysis, and QT/QTc measurements. - Page 90 (1) ECG lead label of the displayed waveform. When 6-lead placement is used to derive 12-lead ECG (D12L), all derived leads are marked with a “d” in front of the lead label, for example “dV1”. (2) ECG waveform gain (3) ECG filter mode (4) Notch filter status (5) Paced status: If Paced is set to Yes, is displayed.
-
Page 91: Preparing For Ecg Monitoring
10.4 Preparing for ECG Monitoring 10.4.1 Preparing the Patient Skin Proper skin preparation is necessary to ensure good signal quality at the electrode sites, as the skin is a poor conductor of electricity. To properly prepare the skin, choose flat areas and then follow this procedure: Shave hair from skin at chosen electrode sites. -
Page 92: Ecg Electrode Placements
10.4.4 ECG Electrode Placements In this section, electrode placement is illustrated using the AHA naming convention. 10.4.4.1 3-leadwire Electrode Placement The following is an electrode configuration when a 3-leadwire cable is used: RA placement: directly below the clavicle and near the right shoulder. ■... - Page 93 NOTE • For the 5-leadwire and 6-leadwire placement, place the precordial electrode according to the physician's preference. 10.4.4.5 10-leadwire Electrode Placement 12-lead ECG uses 10 electrodes, which are placed on the patient’s four limbs and chest. The limb electrodes should be placed on the limb extremities and the chest electrodes placed according to the physician’s preference.
-
Page 94: Choosing The Ecg Lead Type
10.4.4.7 Lead Placement for Surgical Patients The surgical site should be taken into consideration when placing electrodes on a surgical patient. For example, for open-chest surgery, the chest electrodes can be placed on the lateral chest or back. To reduce artifacts and interference from electrosurgical units, you can place the limb electrodes close to the shoulders and lower abdomen and the chest electrodes on the left side of the mid-chest. -
Page 95: Enabling Pacer Rejection
10.4.7 Enabling Pacer Rejection The pace pulse rejection function is disabled by default. To enable this function, follow this procedure: Select the ECG numeric area or waveform area to enter the ECG menu. Select the Pacer tab. Switch on Pacer Reject. NOTE •... -
Page 96: Setting Ecg Alarm Properties
For 6-lead ECG monitoring, besides the normal screen, you can also choose 8-lead full screen or 8-lead half ■ screen. For 12-lead ECG monitoring, besides the normal screen, you can also choose 7-lead full screen, 7-lead half ■ screen, and 12-lead full screen. To choose the desired screen configuration, follow this procedure: Select the ECG numeric area or waveform area to enter the ECG menu. - Page 97 NOTE • If D12L is enabled, you cannot select the derived leads as ECG1 or ECG2. 10.6.4.2 Setting the ECG Waveform Layout To set the ECG waveform layout, follow this procedure: Select the ECG numeric area or waveform area to enter the ECG menu. Select the Setup tab.
-
Page 98: Disabling The Smart Lead Off Function
Surgery: use when the signal is distorted by high frequency or low frequency interference. High ◆ frequency interference usually results in large amplitude spikes making the ECG signal look irregular. Low frequency interference usually leads to wandering or rough baseline. The surgery filter reduces artifacts and interference from electrosurgical units. -
Page 99: Adjusting The Qrs Volume
10.6.7 Adjusting the QRS Volume To adjust the QRS volume, follow this procedure: Select the ECG numeric area or waveform area to enter the ECG menu. Select the Setup tab. Set QRS Volume. When valid SpO measurements are available, the monitor adjusts the pitch of QRS tone based on the SpO value. -
Page 100: Arrhythmia Events
So you should closely monitor patient condition during and for several minutes after the learning phase to allow the algorithm to reach optimal detection performance. 10.7.2 Arrhythmia Events This section lists all arrhythmia events and their criteria. 10.7.2.1 Lethal Arrhythmia Events Arrhythmia message Description Asystole... -
Page 101: Displaying Arrhythmia Information
Arrhythmia message Description Pause No QRS complex is detected within the set time threshold of pause. Irr Rhythm Consistently irregular rhythm (N, irregular RR interval change is greater than 12.5%) A-Fib P wave is absent and normal beat RR intervals are irregular. PVCs/min PVCs/min exceeds high limit. - Page 102 10.7.4.3 Changing Arrhythmia Alarm Threshold Settings You can change threshold settings for some arrhythmia alarms. When an arrhythmia violates its threshold, an alarm will be triggered. To do so, follow this procedure: Select the ECG numeric area or waveform area to enter the ECG menu. Select the Arrhythmia tab →...
-
Page 103: Arrhythmia Alarms
■ If the number of consecutive PVCs is greater than or equal to the V-Tach PVCs limit (6), and the ventricular rate (Vent Rate) is greater than or equal to the V-Tach Rate limit (130), a V-Tach alarm is generated. ■... - Page 104 Asystole V Fib/V Tach V Tach / Vent Brady Extreme Tachy/ Extreme Brady Beat Detection PVC Alarm Chain Rate Alarm Chain A Fib Alarm Chain Alarm Chain Nonsus V Tach / A Fib/ Pauses/min Tachy/Brady Vent Rhythm A Fib End HR High / Irr.
-
Page 105: St Segment Monitoring
10.7.5.3 Arrhythmia Alarm Shielding Rules The following table explains how auidble and visual alarm indicate during arrhythmia alarm shielding period. Previous alarm Current alarm Alarm indication Alarm in high priority Alarm in high priority chain Alarm light and alarm tone chain Alarm in medium priority chain During the shielding period, alarm light and alarm... -
Page 106: Displaying St Numerics
10.8.3 Displaying ST Numerics To display ST numerics and Segments, follow this procedure: Access Tile Layout by either of the following ways: Select the Screen Setup quick key → select the Tile Layout tab. ◆ Select Main Menu quick key → from the Display column select Tile Layout. ◆... -
Page 107: Entering The St View
(1) ST lead (2) Current ST value (3) Baseline ST value (4) 1 mV scale (5) Current ST segment (green) and baseline ST segment (white) 10.8.5 Entering the ST View The ST View shows a complete QRS segment for each ST lead. The color of current ST segments and ST values is consistent with the color of ECG waveforms, normally green. -
Page 108: Entering The St Graphic Window
10.8.7 Entering the ST Graphic Window To display ST Graphic window, follow this procedure: Select ST numeric area, ECG numeric area, or ECG waveform area to enter the ECG menu. Select the ST tab. From the bottom of the menu, select ST Graphic. The following figure shows the ST Graphic when ST Alarm Mode is set to Absolute. -
Page 109: Adjusting St Measurement Points
Absolute: you can separately set the alarm properties for each ST alarm. ◆ Relative: you can set the alarm properties for ST Single and ST Dual alarms. ◆ Set ST alarm properties. 10.8.8.2 Changing Leads for ST Display The monitor automatically selects the three most deviated leads for ST display. You can also manually select the leads. -
Page 110: Qt/Qtc Interval Monitoring
To set ST point, ISO point, and J point, follow this procedure: Select the ST numeric area, ECG numeric area, or ECG waveform area to enter the ECG menu. Select the ST tab→ select the Adjust tab. Set ST Point. The setting of Auto Adjust defines the method of adjusting the ISO point and J point. -
Page 111: Enabling Qt/Qtc Monitoring
10.9.2 Enabling QT/QTc Monitoring The QT monitoring function is disabled by default. Before you start QT monitoring, enable the QT function. To do so, follow this procedure: Select the QT numerics area, ECG numeric area, or waveform area to enter the ECG menu. Select the QT tab→... -
Page 112: Saving The Current Qtc As Baseline
The following picture shows the QT view. The current waveform is shown in the upper half in green. ■ ■ The baseline waveform is shown below in white. The start of QRS complex and the end of the T wave are marked with a vertical line. ■... -
Page 113: Ecg Relearning
10.9.6.2 Selecting Leads for QT Calculation You can select one lead or all leads for QT calculation. To do so, follow this procedure: Select the QT numerics area, ECG numeric area, or ECG waveform area to enter the ECG menu. Select the QT tab→... -
Page 114: Ecg Troubleshooting
• Before defibrillation, the user must ensure both defibrillator and monitor have passed the system test and can be safely used together. 10.13 ECG Troubleshooting This section lists the problems that might occur. If you encounter problems when using the monitor or accessories, check the table below before requesting for services. -
Page 115: Resting 12-Lead Ecg Analysis
11.1 Resting 12-Lead ECG Analysis Introduction The monitor can be configured with either Glasgow 12-lead ECG analysis algorithm or Mindray 12-lead ECG analysis algorithm. The Glasgow algorithm is intended for adult, pediatric and neonatal patients. The Mindray algorithm is intended for adult patients only. -
Page 116: Setting The Baseline Drift Removal
11.4.2 Setting the Baseline Drift Removal The baseline drift removal (BDR) suppresses most baseline drift interference and also is able to preserve the fidelity of the ST-segment level. BDR is switched on by default. To set the BDR, follow this procedure: On the ECG 12-Lead screen, select the ECG numeric area or waveform area to enter the ECG menu. -
Page 117: Setting The 12-Lead Interpretation Report (For Glasgow Algorithms)
11.5.3 Setting the 12-Lead Interpretation Report (for Glasgow Algorithms) To set the 12-lead interpretation report, follow this procedure: On the ECG 12-Lead screen, select Setup to enter the 12-Lead Setup menu. Select the Report tab. Set the format and items included in the 12-lead interpretation report. 11.6 Saving the 12-Lead Interpretation Report At the completion of 12-lead ECG interpretation, select Save to save the report. - Page 118 This page intentionally left blank. 11 - 4...
-
Page 119: Monitoring Respiration (Resp)
Monitoring Respiration (Resp) 12.1 Resp Introduction Impedance respiration is measured across the thorax. When the patient is breathing or ventilated, the volume of air changes in the lungs, resulting in impedance changes between the electrodes. Respiration rate (RR) is calculated from these impedance changes, and a respiration waveform appears on the patient monitor screen. Respiration monitoring is intended for adult, pediatric and neonatal patients. -
Page 120: Preparing For Resp Monitoring
NOTE • If ESU-proof ECG cables are used, the Resp waveform area will display the message “Check Leads” . Replace the ECG cable if necessary. 12.4 Preparing for Resp Monitoring 12.4.1 Preparing the Patient Follow this procedure to prepare the patient: Shave hair from skin at chosen sites. -
Page 121: Changing Resp Settings
CAUTION • Correct electrodes placement can help to reduce cardiac overlay: avoid the liver area and the ventricles of the heart in the line between the respiratory electrodes. This is particularly important for neonates. • Some patients with restricted movements breathe mainly abdominally. In these cases, you may need to place the left leg electrode on the left abdomen at the point of maximum abdominal expansion to optimize the respiratory wave. -
Page 122: Setting The Resp Waveform Size
If you cannot get optimal Resp waveform or you suspect the Resp value after choosing the Resp lead, you may need to optimize the electrode placement. 12.5.4 Setting the Resp Waveform Size To set the Resp waveform size, follow this procedure: Select the Resp numeric area or waveform area to enter the Resp menu. -
Page 123: Monitoring Pulse Oxygen Saturation (Spo )
The SpO extension cable should be compatible with the SpO connectors. For example, you can only connect the Mindray SpO extension cable to the Mindray SpO connectors. • Measurement accuracy verification: The SpO accuracy has been verified in human experiments by comparing with arterial blood sample reference measured with a CO-oximeter. -
Page 124: Spo Measurement Limitations
• is empirically calibrated in healthy adult volunteers with normal levels of carboxyhemoglobin (COHb) and methemoglobin (MetHb). • To protect from electric shock, always remove the sensor and completely disconnect the pulse oximeter before bathing the patient. • The pulse oximeter is not an apnea monitor. •... -
Page 125: Spo Display
Below 0.3 indicates low perfusion. Reposition the SpO sensor or find a better site. If low perfusion persists, choose another method to measure oxygen saturation if possible. NOTE • PI is only available for Mindray SpO and Masimo SpO 13 - 3... -
Page 126: Preparing For Spo Monitoring
13.5 Preparing for SpO Monitoring To prepare to monitor SpO , follow this procedure: Select an appropriate sensor according to the module type, patient category and weight. Clean the contact surface of the reusable sensor. Remove colored nail polish from the application site. Apply the sensor to the patient according to the instruction for use of the sensor. -
Page 127: Setting The Nellcor Spo
% SpO Seconds Sat-Seconds 2× 4× 6× Total Sat-Seconds= After approximately 10.9 seconds, a Sat-Second alarm would sound, because the limit of 50 Sat-Seconds would have been exceeded. %SpO Seconds Saturation levels may fluctuate rather than remaining steady for a period of several seconds. Often, the patient may fluctuate above and below an alarm limit, re-entering the non-alarm range several times. -
Page 128: Enabling Fastsat (For Masimo Spo )
Maximum sensitivity is recommended for use on patients with weak signals (e.g. high ambient noise and/or patients with very low perfusion) and for use during procedures or when clinician and patient contact is continuous such as in higher acuity settings. To set SpO sensitivity, follow this procedure: numeric area or waveform area to enter the SpO2 menu. -
Page 129: Changing Sensitivity (For Mindray Spo )
Select the SpO2 Setup tab. Set Averaging. 13.6.8 Changing Sensitivity (for Mindray SpO The SpO value displayed on the monitor screen is the average of data collected within a specific time. The shorter the averaging time is, the quicker the monitor responds to changes in the patient’s oxygen saturation level. -
Page 130: Changing The Qrs Volume
Set the alarm properties as desired. 13.7.2 Changing the QRS Volume If the Alarm Source is set to PR, the QRS tone is derived from PR measurements. To set the QRS volume, follow this procedure: numeric area or waveform area to enter the SpO2 menu. Select the SpO Select the PR tab. -
Page 131: Selecting The Range Of Each Spo
The following figure shows the SpO statistics area. Duration of SpO statistics Results of SpO statistics Sections for statistics: The section in green indicates the target range. 13.8.1 Selecting the Range of each SpO Section and the Target Section To define the SpO range of each section, follow this procedure: Select the SpO statistics area. -
Page 132: Nellcor Information
Shenzhen Mindray grants to Purchaser a nonexclusive, nontransferable license, without right to sublicense, to use the copy of the incorporated software/firmware, and documentation in connection with Purchaser's use of the Masimo Products for their labeled purpose. Shenzhen Mindray reserves all rights not expressly granted to Purchaser. - Page 133 Transfer Restrictions. The software/firmware is licensed to the Purchaser, and may not be transferred to anyone, except other end-users, without the prior written consent of Shenzhen Mindray. In no event may you transfer, assign, rent, lease, sell, or otherwise dispose of the software/firmware or the products on a temporary basis.
- Page 134 This page intentionally left blank. 13 - 12...
-
Page 135: Monitoring Temperature (Temp)
Monitoring Temperature (Temp) 14.1 Temperature Introduction You can continuously monitor the patient’s skin temperature and core temperature. Thermally sensitive resistors (thermistors) are used. They are based on the principle that electrical resistance of the thermistor changes as temperature changes. Thermistors measure the resistance change and use it to calculate the temperature. You can simultaneously monitor up to two temperature sites and calculate the difference between two measured sites. -
Page 136: Changing Temperature Settings
14.5 Changing Temperature Settings 14.5.1 Setting the Temperature Alarm Properties To set the temperature alarm properties, follow this procedure: Select the temperature numeric area to enter the Temp menu. Select the Alarm tab. Enter the password if required. Set the alarm properties。 14.5.2 Selecting the Temperature Label Select the temperature label according to the measurement site. -
Page 137: Monitoring Noninvasive Blood Pressure (Nibp)
Monitoring Noninvasive Blood Pressure (NIBP) 15.1 NIBP Introduction The monitor uses the oscillometric method for measuring the non-invasive blood pressure (NIBP). NIBP measurement is based on the principle that pulsatile blood flow through an artery creates oscillations of the arterial wall. The oscillometric device uses a blood pressure cuff to sense these oscillations that appear as tiny pulsations in cuff pressure. -
Page 138: Nibp Measurement Limitations
CAUTION • Using IABP may cause NIBP, including PR, measurements inaccurate or failed. • Only use parts and accessories specified in this manual. Follow the instructions for use and adhere to all warnings and cautions. • Accuracy of NIBP measurement depends on using a cuff of proper size. It is essential to measure limb circumference and choose a cuff with proper size. -
Page 139: Preparing For Nibp Measurements
(5) Measurement mode: for Auto NIBP, interval is displayed; for Sequence mode, the current phase and interval are displayed (6) Diastolic pressure (7) Diastolic pressure alarm limits (8) Mean pressure alarm limits (9) Mean pressure (displayed after measurement completed) or cuff pressure (displayed during the measurement) (10) Systolic pressure (11) Pulse Rate NOTE... -
Page 140: Starting And Stopping Nibp Measurements
Middle of the cuff should be at the level of the right atrium of the heart. If it is not, you must use the measurement correction formula to correct the measurement. For more information, see 15.9.10 Correcting the NIBP Measurements. Connect the cuff to the air tubing. Avoid compression or restriction of pressure tubes. Air must pass unrestricted through the tubing. -
Page 141: Changing Nibp Settings
15.9 Changing NIBP Settings 15.9.1 Setting the NIBP Alarm Properties To set the NIBP alarm properties, follow this procedure: Select the NIBP numeric area to enter the NIBP menu. Select the Alarm tab. Enter the password if required. Set alarm properties as desired. 15.9.2 Setting the Initial Cuff Inflation Pressure To set initial cuff inflation pressure, follow this procedure:... -
Page 142: Setting Nibp Sequence
15.9.6 Setting NIBP Sequence NIBP sequence measurement can have up to five phases: A, B, C, D, and E. You can individually set the duration and interval of each phase. To set NIBP sequence, follow this procedure: Select the NIBP numeric area to enter the NIBP menu. Select the Sequence tab. -
Page 143: Nibp Maintenance
Mindray-qualified service personnel only. 15.11.2 NIBP Accuracy Test The NIBP accuracy test should be performed once every two years or when you doubt the NIBP measurements. The NIBP accuracy test should be performed by Mindray-qualified service personnel only. 15.12 NIBP Troubleshooting For more information, see D Alarm Messages. - Page 144 This page intentionally left blank. 15 - 8...
-
Page 145: Monitoring Invasive Blood Pressure (Ibp)
Monitoring Invasive Blood Pressure (IBP) 16.1 IBP Introduction IBP monitoring is intended for adult, pediatric and neonatal patients. PAWP monitoring is only intended for adult and pediatric patients. You can monitor up to 4 (using the built-in IBP module and the external IBP module together) invasive blood pressures. -
Page 146: Preparing For Ibp Monitoring
16.3 Preparing for IBP Monitoring 16.3.1 IBP Equipment to Patient Connection m m H g (1) Pressure bag/Infusion pump (2) IBP connector (3) IBP cable (4) IBP transducer (5) Three-way valve 16.3.2 Measuring an Invasive Blood Pressure To monitor IBP, follow this procedure: Connect one end of the IBP cable to the IBP cable connector, and the other end to the IBP transducer. -
Page 147: Zeroing The Ibp Transducer
16.3.3 Zeroing the IBP transducer To avoid inaccurate pressure readings, the monitor requires a valid zero. Zero the transducer in accordance with your hospital policy. The IBP transducer should be zeroed in the following conditions: The IBP transducer, adapter cable or module is reconnected. ■... -
Page 148: Ibp Display
If monitors of different brands are used to zero the Codman ICP transducer, the zero reference values can be different. Use a Mindray monitor to Zero the Codman ICP transducer if you will take ICP measurement using a Mindray monitor. Otherwise the ICP measurement can be inaccurate. -
Page 149: Changing The Pressure Label
16.6.2 Changing the Pressure Label The pressure label is a unique identifier for each type of pressure. Therefore, you should select a proper pressure label for the source of the pressure you want to monitor. To select the pressure label, follow this procedure: Select the IBP numeric area or waveform area to enter the corresponding pressure menu. -
Page 150: Setting The Ibp Waveform
16.6.5 Setting the IBP Waveform To set the IBP waveform, follow this procedure: Select the IBP numeric area or waveform area to enter the corresponding pressure menu. Select the Setup tab. Set the following properties of the IBP waveform: Speed ◆... -
Page 151: 16.6.10 Overlapping Ibp Waveforms
at respiration rates below 8 rpm ◆ during ventilation with tidal volumes lower than 8 ml/kg ◆ • for patients with acute right ventricular dysfunction (“corpulmonale”). 16.6.10 Overlapping IBP Waveforms The IBP waveforms can be displayed together. To combine IBP waveforms, follow this procedure: Access Tile Layout by either of the following ways: Select the Screen Setup quick key →... -
Page 152: Pawp Equipment To Patient Connection
16.7.1 PAWP Equipment to Patient Connection (1) IBP connector (2) Flush bag (3) IBP transducer (4) Three-way valve (5) PA distal port (6) Balloon inflation valve (7) Thermodilution catheter (8) Balloon 16.7.2 Preparing to Measure PAWP To prepare to monitor PAWP, follow this procedure: Connect the IBP transducer, the IBP cable and the monitor. -
Page 153: Setting The Waveforms Of The Pawp Screen
Select Start. Inflate the balloon and pay attention to PA waveform changes on the screen when the prompt message Ready For Balloon Deflation appears. Deflate the balloon when the prompt message Ready For Balloon Deflation appears. If the PA waveform is stable yet the monitor still not show the prompt message Ready For Balloon Deflation, select the Freeze to freeze the waveform, and deflate the balloon. -
Page 154: Performing Hemodynamic Calculation
16.7.5 Performing Hemodynamic Calculation On the PAWP screen, select Hemo Calcs to enter the Hemo Calcs menu. For more information, see 23.4 Hemodynamic Calculations. 16.8 Connecting a Camino Device The monitor can interface with the Camino multi-parameter monitor (Model: MPM1) to measure intracranial pressure (ICP). - Page 155 NOTE • For the physiological and technical alarm messages, see D Alarm Messages. Problem Solution 1. Check that the IBP is set to display in the Screen Setup menu. For more Cannot see IBP numeric area or waveform area on the main screen information, see 27.12 The Authorization Setup Settings 2.
- Page 156 This page intentionally left blank. 16 - 12...
-
Page 157: Monitoring Cardiac Output (C.o.)
Monitoring Cardiac Output (C.O.) 17.1 C.O. Introduction The cardiac output (C.O.) measurement invasively measures cardiac output and other hemodynamic parameters using the right heart (atria) thermodilution method. A cold solution of known volume and temperature is injected into the right atrium through the proximal port of a pulmonary artery (PA) catheter. The cold solution mixes with the blood in the right ventricle and the change in blood temperature is measured with a thermistor at the distal end of the catheter in the pulmonary artery. -
Page 158: C.o. Measurement Limitations
17.3 C.O. Measurement Limitations The following factors may influence the accuracy of C.O. measurement: temperature of injectate solution ■ volume of injectate solution ■ baseline of patient’s blood temperature ■ patient’s inspiratory/expiratory cycle ■ placement of catheter with relation to proximity of lung field ■... -
Page 159: C.o. Equipment To Patient Connection
17.5 C.O. Equipment to Patient Connection (12) (10) (11) (1) C.O. module (2) 12-pin C.O. cable (Model: CO7702) (3) TI cable connector (4) Temperature probe (5) Injectate solution (6) Injectate syringe (7) Three-way valve (8) Proximal injectate port (9) Balloon inflation valve (10) Thermistor connector (11) PA distal port (12) TB cable connector... -
Page 160: Performing C.o. Measurement
◆ Check if the height and weight are appropriate for your patient. Change if necessary. The patient's height and weight values are required for determining cardiac index (C.I.). ◆ Check that the correct computation constant is entered. The computation constant has a close relationship with the entered injectate volume, injectate probe type (in-line probe or bath probe) and temperature. -
Page 161: Changing C.o. Settings
Acquire the average value of C.O. and C.I. A maximum of 6 measurements can be stored. If you perform more than six measurements without rejecting any, the oldest will automatically be deleted when a seventh curve is stored. Select from the 6 measurement curves and the system will automatically calculate and display the averaged C.O. - Page 162 Problem Solution 1. Check that the C.O. is set to display in the Screen Setup menu. For Do not see C.O. numeric area on the main screen more information, see 27.11 The Other Settings . 2. Check that if the C.O. parameter switch is enabled. If not, enable the C.O.
-
Page 163: Monitoring Carbon Dioxide (Co )
For ePM 12M/ePM 12MA/ePM 12MC, you can monitor CO using the built-in CO module or the external CO module. For ePM 10M/ePM 10MA/ePM 10MC, you can monitor CO using the external CO module only. The following external modules are sidestream CO... -
Page 164: Co Safety Information
18.2 Safety Information WARNING • Route all tubing away from the patient’s throat to avoid strangulation. CAUTION • Avoid mechanical shock to the sidestream CO module configuring the paramagnetic oxygen sensor. • Remove the airway sample line from the patient’s airway while nebulized medications are being delivered. -
Page 165: Measuring Co
If your sidestream CO module is configured with the oxygen sensor, O waveform and parameters can be displayed as follows: (1) O waveform (2) FiO measurement (3)EtO measurement 18.5 Measuring CO Using Sidestream/Microstream CO Module 18.5.1 Preparing to Measure CO Using Sidestream CO Module To prepare the CO... - Page 166 ◆ For non-intubated patients, place the nasal cannula onto the patient. Connect the gas outlet to the scavenging system using an exhaust tube. module is connected, it enters measure mode by default and the monitor displays CO2 Starting. After the CO can be measured after the start-up is complete.
-
Page 167: Zeroing The Sidestream/Microstream Co
18.5.2 Preparing to Measure CO Using Microstream CO Module To prepare the CO module for measurement, follow this procedure: Connect one end of the sample line to the microstream CO module. (1) Sample line connector (2) Sample line Connect the other end of the sample line to the patient. ◆... -
Page 168: Measuring Co Using Mainstream Co Module
18.6 Measuring CO Using Mainstream CO Module 18.6.1 Preparing to Measure CO Using Mainstream CO Module To prepare the CO module for measurement, follow this procedure: Connect the airway adapter to the sensor head. (1) Sensor (2) Connect to module (3) Airway adapter Attach the sensor connector to the CO connector on the mainstream CO... -
Page 169: Zeroing The Mainstream Co Sensor
18.6.2 Zeroing the Mainstream CO sensor For mainstream CO modules, the sensor should be zeroed in the following conditions: Before each measurement. ■ ■ A new adapter is used. ■ Reconnect the sensor to the module. The message CO2 Zero Required displays. In this case, check the airway adapter for any blockage, e.g. ■... -
Page 170: Entering The Standby Mode
18.7.4 Entering the Standby Mode You can set the CO module to one of the following modes according to the module status: Select Measure mode when you use the CO ■ module for monitoring. Select Standby mode when you do not use the CO module to prolong the serviec life of the CO module. -
Page 171: Changing O Settings (For Sidestream Co Module Integrating O )
18.9 Changing O Settings (for Sidestream CO Module Integrating O 18.9.1 Changing O Alarm Settings To change the O alarm settings, follow this procedure: numeric area or waveform area to enter the CO2 menu. Select the CO Select the Alarm tab. Enter the password if required. -
Page 172: Choosing A Time Interval For Peak-Picking
18.11 Choosing a Time Interval for Peak-Picking For microstream and mainstream CO modules, you can select a time interval for picking the highest CO as the EtCO and the lowest as the FiCO To set the time interval, follow this procedure: numeric area or waveform area to enter the CO2 menu. -
Page 173: 18.15.1 Troubleshooting The Sidestream/Microstream Co
NOTE • For the physiological and technical alarm messages, see D Alarm Messages. 18.15.1 Troubleshooting the Sidestream/Microstream CO Module Problem Solution EtCO measurements too low 1. Ventilate the room if the environmental CO concentration is too high. 2. Check the sample line and connectors for leakage. 3. - Page 174 This page intentionally left blank. 18 - 12...
-
Page 175: Monitoring Anesthetic Gas (Ag)
Monitoring Anesthetic Gas (AG) 19.1 AG Introduction The anesthetic gas (AG) module measures the patient’s anesthetic and respiratory gases by connecting to the airway of intubated patients or collecting the gases with specified accessories. It also incorporates the features of the O module and BIS module. -
Page 176: Ag Safety Information
19.2 AG Safety Information WARNING • To avoid explosion hazard, do not use flammable anesthetic agent such as ether and cyclopropane for this equipment. • The presence of other substances in the patient’s breathing circuit, such as ethanol, acetone, methanol, isopropanol, freon, asthma medication carrier gases, and other infrared absorbing gases, can influence the anesthesia agent identification and lead to incorrect measurements and identification. -
Page 177: Ag Equipment To Patient Connection
AA represents one of the following agents: Des (desflurane), Iso (isoflurane), Enf (enflurane), Sev (sevoflurane), or Hal (halothane). If only one anesthetic agent is used, the AA waveform area displays the waveform of this anesthetic agent. If several anesthetic agents are used, the AA waveform area displays the waveform of the primary anesthetic agent. -
Page 178: Zeroing The Ag Module
• The watertrap collects water drops condensed in the sample line and therefore prevents them from entering the module. To avoid blocking the airway, empty the watertrap container whenever half full. Dispose of accumulated fluids in accordance with hospital policy or your local regulations. •... -
Page 179: Changing Ag Settings
× – ( 0.00269 age 40 – × For example, the Des concentration at 1 MAC of a 60-year old patient is. – ( × 0.00269 60 40 – × × 6% 10 6% 0.88 The AG module measures 4% of Des, 0.5% of Hal and 50% of N O in the patient’s end-tidal gas: 4.0% 0.5%... -
Page 180: Setting Auto Standby
19.9.4 Setting Auto Standby The monitor enters the standby mode automatically after the configured period of time if no breath is detected since the last detected breath. To set the auto standby, follow this procedure: Select the AG numeric area or waveform area to enter the Gas menu. Select the desired gas tab. -
Page 181: Performing Ag Leakage Test
The AG module can identify two anesthetic agents automatically. When the proportion of primary and secondary anesthetic agents in the mixture changes, the AG module can distinguish between them according to their contributions to the MAC value. Then primary and secondary anesthetic agents will be exchanged for display. - Page 182 This page intentionally left blank. 19 - 8...
-
Page 183: Monitoring Bispectral Index (Bis)
Monitoring Bispectral Index (BIS) 20.1 BIS Introduction Bispectral Index (BIS) monitoring helps to monitor the level of consciousness of a patient under general anesthesia or sedation in OR and ICU. It is designed to monitor the hypnotic state of the brain based on acquisition and processing of EEG signals. -
Page 184: Bis Safety Information
20.2 BIS Safety Information WARNING • BIS monitoring is not intended for neonatal patients. • The conductive parts of sensors and connectors should not come into contact with other conductive parts, including earth. • To reduce the hazard of burns in the high-frequency surgical neutral electrode connection, the BIS sensor should not be located between the surgical site and the electrosurgical unit return electrode. -
Page 185: Bis Parameters
20.3 BIS Parameters Single side BIS monitoring provides the following parameters: Parameter Description The BIS numeric reflects the patient’s level of consciousness. It ranges from 100 for wide awake to 0 in the absence of brain activity. (Bispectral Index) 100: the patient is wide awake. 70: the patient is underdosed but still unlikely to become aware. -
Page 186: Accessing The On-Screen Bis Guide
BIS waveform The display of BIS waveform area depends on the setting of Display from the BIS menu. For more information, see 20.7.3 Setting the Display of BIS Waveform Area . BIS value SQI indicator ◆ Empty: SQI < 15%, unable to calculate BIS and secondary parameter values. BIS and secondary parameter values are displayed as “---”. -
Page 187: Changing Bis Settings
To perform BIS monitoring, follow this procedure: Connect the BISx or BISx4 to the BIS module. Use the attachment clip to secure the BISx or BISx4 to a convenient location near the patient’s head. Connect the BISx or BISx4 to the patient cable. Attach the BIS sensor to the patient following the instructions supplied with the sensor. -
Page 188: Switching Off The Filter
If you set Display to EEG waveforms (EEG LT or EEG LE), set Scale and Speed for EEG waveforms. ◆ If you set Display to BIS parameter trends, set Trend Length. ◆ 20.7.4 Switching Off the Filter The filter can filter EEG interference. It is switched on by default. To disable the filter, follow this procedure: Select the BIS numeric area or waveform area to enter the BIS menu. -
Page 189: Manual Sensor Check
• Switching the auto impedance check off will disable automatic prompt to the user of impedance value changes, which may lead to incorrect BIS values. Therefore, this should only be done if the check interferes with or disturbs other measurements. 20.8.3 Manual Sensor Check To manually start a sensor check, use either of the following method:... -
Page 190: Entering The Bis Expand View
20.9.1 Entering the BIS Expand View To enter the BIS expanded view, follow this procedure: Select the BIS numeric area or waveform area to enter the BIS menu. Select BIS Expand at the bottom left corner to enter the BIS Expand View. 20.9.2 Selecting BIS Expand View Display To select how the BIS Expand View display, follow this procedure:... -
Page 191: Bis Troubleshooting
ASYM graph: displays in the center of the DSA view. It shows the degree of asymmetry in EEG power ■ between the left and right hemispheres. The ASYM scale begins at 20% at the center line and runs left or right to 100%. - Page 192 This page intentionally left blank. 20 - 10...
-
Page 193: Review
Review 21.1 Review Overview Trends are patient data collected over time and displayed in graphic, tabular, or other forms to give you a picture of how your patient's condition is developing. 21.2 Review Page The Review page contains tabs to display trend data in tabular, graphic, or other forms. 21.2.1 Accessing the Review Page Choose one of the following methods to enter the review page:... -
Page 194: Symbols On Review
Event area: displays the event of the cursor time. Selecting the event accesses the event list. If there is no event at the cursor time, the cursor time is displayed. Cursor Numeric area: displays numeric values at the cursor indicated time. The background color of numeric values matches the alarm priority. -
Page 195: Tabular Trends Review Page
**: medium priority alarm ■ ■ *: low priority alarm 21.2.5 Tabular Trends Review Page The tabular trends review page displays trend data in a tabular form. 21.2.5.1 Entering the Tabular Trends Review Page Choose one of the following methods to enter the tabular trends review page: Select the Review quick key →... -
Page 196: Graphics Trends Review Page
21.2.5.5 Printing a Tabular Trends Report To print a tabular trends report, follow this procedure: Enter the tabular trends review page. at the upper left corner of the review page to enter the Print Setup menu. Select Set the tabular trends report as described in 25.6.3 Setting Tabular Trends Reports. in the Tabular Trends Report menu to print the report. -
Page 197: Events Review Page
21.2.7 Events Review Page The monitor stores events in real time, including technical alarm events, physiological alarm events, manual events, and operational events. When an event occurs, all the measurement numerics and three event-related waveforms 16 seconds before and after the event are stored. NOTE •... -
Page 198: Full Disclosure Review Page
21.2.7.4 Viewing Event Details To view waveforms and parameter values at the event time, follow this procedure: Enter the Events page. Select Overview. To display beat labels on the first ECG waveform, switch on Beat Annotation. The white beat labels indicate heart beats classification and may explain suspected, missed, or false arrhythmia calls. -
Page 199: Oxycrg Review Page
NOTE • The more waveforms selected in the Storage column, the shorter the waveform storage time. The waveforms may not be stored for 48 hours. Please exert caution when selecting waveforms. In case of alarms, the background of compressed waveform block at the alarm time is marked with a special color: ■... -
Page 200: 21.2.10 12-Lead Ecg Review Page
21.2.9.2 The Display of the OxyCRG Review Page The following figure shows the OxyCRG screen: Event title area: displays event type, event time, the value and time of TEMP/NIBP measurement. Event detail area: displays parameter trends, compressed waveform, and parameter values of selected event. -
Page 201: 21.2.11 St Review Page
21.2.10.2 Switching to Median Complex (for Glasgow Algorithm Only) The median complex template displays 12-lead ECG waveforms on one page in 4 columns, with 3 lines in each column, and one rhythm lead waveform at the bottom. Besides, a short vertical bar appears above each waveform, marking the start and end position of P-wave and QRS-wave and the end position of T-wave. -
Page 202: Reviewing Discharged Patients
21.2.11.5 Printing ST Data To print ST data, follow this procedure: Enter the ST review page. Select 21.3 Reviewing Discharged Patients For discharged patients, you can review the trend data in the review page. You can also review the events and 12-lead ECG analysis results. -
Page 203: Clinical Assistive Applications (Caa)
MEWS, NEWS and NEWS2 are intended for adult patients only. The patient category applied to the Custom Score is defined by Mindray Clinical Score Configuration Tool. For more information, see Mindray Clinical Scoring Config Tool Instruction for Use. WARNING •... -
Page 204: Displaying The Ews Numerics Area
22.1.1 Displaying the EWS Numerics Area To display the EWS numerics area, follow this procedure: Access Tile Layout in either of the following ways: Select the Screen Setup quick key → select the Tile Layout tab. ◆ Select the Main Menu quick key → from the Display column select Tile Layout. ◆... -
Page 205: Performing Ews Scoring
(12) (11) (10) (9) Total score. The color of the circle indicates the level of risk. For IPS, no numeric score is displayed. Only level of risk is shown: white means normal and red indicates alert by default. Risk level indicator. The level of risk increases from top down. The current level is enclosed by a white frame. For IPS, this indicator does not display. -
Page 206: Ews Alarm
Scale 2: f ◆ or patients with a prescribed oxygen saturation requirement of 88–92% (for example, in patients with hypercapnic respiratory failure). Measure or manually enter other required parameters and observations. the clinician ID is , and then enabled, input the clinician information by selecting manually entering the information, or by scanning the clinician’s barcode. -
Page 207: Changing Ews Settings
22.1.5 Changing EWS Settings 22.1.5.1 Changing the Scoring Protocol The monitor is configured with a default scoring protocol. To change the scoring protocol, follow this procedure: From the EWS page select Setup. Set Score. 22.1.5.2 Setting the Scoring Confirmation Switch To select if confirmation is required before saving score, follow this procedure: From the EWS page select Setup. -
Page 208: Viewing Parameter Trends
Refer to 22.1.2 Accessing the EWS Screen for the position of the history total score area. 22.1.7 Viewing Parameter Trends From the EWS screen, you can view the 24-hour graphic trends of each parameter used for scoring. To do so, choose either of the following ways: ■... -
Page 209: Accessing The Gcs Menu
Scoring countdown: time to the next scoring. Scoring interval Subscores ◆E: eye opening ◆V: verbal response ◆M: motor response 22.2.2 Accessing the GCS Menu Enter the GCS menu in any of the following ways: ■ Select the GCS parameter area Select the GCS quick key. -
Page 210: Reviewing Gcs Trend Data
22.2.5 Reviewing GCS Trend Data From the GCS menu, select Review to enter the Review menu and view the GCS trend data from the Tabular Trends. 22.3 ECG 24h Summary The ECG 24h Summary provides ECG statistics of the current patient over the latest 24 hours. You can view the following information through the ECG 24h Summary: Heart rate statistics ■... -
Page 211: Calculation
Calculation 23.1 Calculation Overview The monitor provides calculation functions. The calculated values, which are not directly measured, are computed based on the values you provide. The calculation feature is independent of other monitoring functions and can be therefore used for patients being monitored by other monitors. Any operation in a calculation window does not affect the patient monitored by the current monitor. -
Page 212: Checking The Titration Table
23.3.2 Checking the Titration Table The titration table shows information on the currently used drugs. Use the titration table to see what dose of a drug your patient will receive at different infusion rates. To access the titration table, follow this procedure: Access drug calculator by either of the following ways: Select the Calculations quick key. - Page 213 23.4 Hemodynamic Calculations The monitor provides the hemodynamic calculation function. The monitor can save the results of up to 10 calculations, which are displayed in groups. 23.4.1 Performing Hemodynamic Calculations To perform hemodynamic calculation, follow this procedure: Access hemodynamic calculation by either of the following ways: Select the Calculations quick key →...
- Page 214 Calculated Parameters Label Unit Formula pulmonary vascular DS/cm P VR (DS/cm ) = 79.96 × [PAMAP (mmHg) - PAWP resistance (mmHg)]/C.O. (L/min) pulmonary vascular PVRI DS•m PVRI (DS•m ) = PVR (DS/cm )× BSA (m resistance index left cardiac work kg•m LCW (kg•m) = 0.0136 ×...
- Page 215 23.5.2 Input Parameters for Oxygenation Calculations Input Parameter Label Unit cardiac output C.O. L/min percentage fraction of inspired oxygen partial pressure of oxygen in the arteries mmHg, kPa partial pressure of carbon dioxide in the arteries PaCO mmHg, kPa arterial oxygen saturation partial pressure of oxygen in venous blood mmHg, kPa venous oxygen saturation...
- Page 216 23.6 Ventilation Calculations The monitor provides the ventilation calculation function. The monitor can save the results of up to 10 calculations, which are displayed in groups. 23.6.1 Performing Ventilation Calculations To perform ventilation calculations, follow this procedure: Access ventilation calculation by either of the following ways: Select the Calculations quick key →...
-
Page 217: Renal Calculations
Calculated Parameters Label Unit Formula physiologic dead space in Vd/Vt Vd/Vt (%) = 100 × Vd (ml)/TV (ml) percent of tidal volume alveolar volume L/min VA (L/min) =[TV (ml) - Vd (ml)] × RR (rpm)/1000 23.7 Renal Calculations The monitor provides the renal calculation function. The monitor can save the results of up to 10 calculations, which are displayed in groups. - Page 218 23.7.3 Calculated Parameters and Formulas for Renal Calculations Calculated Parameters Label Unit Formula urine sodium excretion URNaEx mmol/24 hrs URNaEx (mmol/24 hrs) = Urine (ml/24 hrs) × URNa (mmol/L)/1000 urine potassium excretion URKEx mmol/24 hrs URKEx (mmol/24 hrs) = Urine (ml/24 hrs) × URK (mmol/L)/1000 sodium potassium ratio Na/K...
-
Page 219: Recording
Recording 24.1 Recorder The thermal recorder records patient information, measurement data, and up to three waveforms. The monitor is configured with a built-in recorder. Start/Stop key: press to start a recording or stop the current recording. Module status indicator ◆ On: when the recorder works correctly. -
Page 220: Stopping Recordings
24.3 Stopping Recordings Recordings can be stopped manually or automatically. 24.3.1 Stopping Recordings Manually To manually stop a recording, choose either of the following method: Press the hardkey again. ■ Select Clear All Record in the Record Setup menu. ■ 24.3.2 Stopping Recordings Automatically Recordings stop automatically in the following conditions:... -
Page 221: Clearing Recording Tasks
NOTE • Auto recording on alarm happens only when Print on Alarm is set to Recorder. For more information, see 27.4.6 The Other Tab. 24.7 Clearing Recording Tasks To clear recording tasks, follow this procedure: Select the Main Menu quick key → from the Report column select Record Setup. In the Record Setup menu, select Clear All Record. - Page 222 This page intentionally left blank. 24 - 4...
-
Page 223: Printing
For more details about the printer, see the document accompanying the printer. With product upgrades, the monitor may support more printers and no prior notice will be given. If you have any doubt about the printer you have purchased, contact Mindray. 25.2 End Case Reports 25.2.1... -
Page 224: Setting The End Case Report
25.2.3 Setting the End Case Report To set the end case report, follow this procedure: Select the Main Menu quick key → from the Report column select End Case Report. From the Report Setup page, set the following end case reports: Select the Tabular Trends Report, Graphic Trends Report, Realtime Report, and ECG Report tab, ◆... -
Page 225: Automatically Printing Reports
25.4 Automatically Printing Reports When a parameter alarm switch is set to on and an alarm is triggered for this parameter, you can set a printer to start alarm printing automatically. To do so, follow this procedure: Access alarm related tabs such as the Alarm tab for a parameter in one of the following ways: Select the Alarm Setup quick key at the bottom of the screen. -
Page 226: Setting Realtime Reports
Menu item Function Description Rhythm Lead 1 Select the lead that will I, II, III, aVR, aVL, aVF, V1, V2, V3, V4, V5, V6 be used as Rhythm Rhythm Lead 2 Lead 1, 2, or 3. Rhythm Lead 3 Note: This setting is only relevant when 6×2+1 , 3×4+1 , or 3×4+3 is selected for 12-Lead Format . -
Page 227: Setting Graphic Trends Reports
25.6.4 Setting Graphic Trends Reports To set graphic trends reports, follow this procedure: Select the Main Menu quick key → from the Report column select Report Setup. Select Graphic Trends Report. Set the desired options. 25.7 Viewing Printer Status You can view the status of the recent ten printing tasks in the Print Queue window. To view the status of printing tasks, select the Main Menu quick key, from the Report column select Print Queue. - Page 228 This page intentionally left blank. 25 - 6...
-
Page 229: Using The On-Screen Timers
Using the On-Screen Timers The monitor has a Timer function to notify you when a preset time period is expired. You can simultaneously display up to four timers. 26.1 Displaying Timers To display a timer, follow this procedure: Access Tile Layout in either of the following ways: Select the Screen Setup quick key →... - Page 230 NOTE • You cannot change timer settings when a timer is running. • You can set Direction, Run Time, and Reminder Volume only for normal, advanced, and cycled timers. 26 - 2...
-
Page 231: User Maintenance Settings
User Maintenance Settings User maintenance enables you to customize your equipment to best meet your needs. Accessing the Maintenance menu is password protected. This chapter describes the settings and functions in the Maintenance menu. CAUTION • The maintenance settings can only be changed by authorized personnel. Contact your department manager or biomedical engineering department for the passwords used at your facility. -
Page 232: The Patient Management Settings
27.3 The Patient Management Settings 27.3.1 The Field Tab Menu Item Default Setting Description Room No Unselected Selects which items can be displayed and edited from the Patient Management menu. Visit Number Unselected Patient ID Selected Middle Name Unselected Race Unselected Selected Custom Filed 1 -Custom Filed 4... -
Page 233: The Location Tab
27.3.4 The Location Tab Menu Item Default Setting Description Location 1 - Location 10 Selects where the patient goes after patient monitoring stops. 27.3.5 The Display Tab Menu Item Default Setting Description Primary Screen Display Full Name Selects whether patient name is displayed in the patient information area on the primary display. -
Page 234: The Pause/Reset Tab
27.4.2 The Pause/Reset Tab Section Menu Item Default Setting Description Pauses Pause Alarm Pause Selects the pause function. Alarm Pause : pauses alarms. • Audio Pause : pauses alarm tones. • Pause Time 2 min Selects the alarm pause time. The alarm pause time can be set to 1 min , 2 min , 3 min , or Permanent . -
Page 235: The Latching Tab
27.4.3 The Latching Tab Menu Item Default Setting Description Lethal Visible Unselected Selects alarm latching rules: If Visible is selected, you can separately latch • Audible visual alarm signal. • Latching audible alarm signal simultaneously High Visible latches visual signal. Audible •... -
Page 236: The Nurse Call Tab
27.4.5 The Nurse Call Tab Menu Item Default Setting Description Pulse : the nurse call signal is a pulse signal Signal Type Continuous • and each pulse lasts one second. When multiple alarms simultaneously occur, only one pulse signal is outputted. If an alarm occurs but the previous one is not cleared, a new pulse signal will also be outputted. -
Page 237: The Caa Settings
Section Menu Item Default Setting Description Other Lethal Arrhy Alarms Disable Selects whether lethal arrhythmia alarms can be switched off. Disable : lethal arrhythmia alarms cannot be • switched off. Enable : lethal arrhythmia alarms can be • switched off from the ECG menu. SpO2 Desat Alarm Disable Selects whether the SpO... -
Page 238: The Gcs Tab
27.5.2 The GCS Tab Menu Item Default Setting Description Mild High limit Selects the threshold and color of each consciousness level. Low limit Color White Moderate High limit Low limit Color Yellow Severe High limit Low limit Color 27.6 The Module Settings 27.6.1 The ECG Tab Menu Item... -
Page 239: The Ag Tab
Menu Item Default Setting Description Zero Select this button to start zeroing the CO module. 27.6.3 The AG Tab Menu Item Default Setting Description Zero Recovery for 30s After the zero calibration is completed, the AG module reacquires the AG readings. On : During the reacquisition period, “... -
Page 240: The Review Settings
27.7 The Review Settings 27.7.1 The Tabs Tab Menu Item Default Setting Description Tabular Trends Selected Hides the trends you do not need to review if deselected. Graphic Trends Events Full Disclosure OxyCRG 12-Lead ECG 27.7.2 The Event Tab Menu Item Default Setting Description Lethal... -
Page 241: The Report Layout Tab
Menu Item Default Setting Description General Report Print Action Paper Selects the media of the reports. (for print server only) Printer Selects the default printer (for paper report only). Printer Resolution Selects the resolution for the default printer (for paper report only). PDF Resolution 600 dpi Selects the resolution for the default printer (for... -
Page 242: The Ecg Report Tab
27.8.3 The ECG Report Tab Menu Item Default Setting Description Patient Name Selects the patient information you want to display on ECG reports. Gender Patient ID Selected Visit Number Unselected Race Medication Class Physician Technician Department Room No Bed No 12-Lead Order 27.8.4 The PDF File Name Tab... -
Page 243: The Unit Settings
27.9 The Unit Settings Menu Item Default Setting Description Height Unit Selects measurement unit for each parameter. Weight Unit ST Unit CVP Unit cmH2O ICP Unit mmHg CO2 Unit mmHg O2 Unit Temp Unit °C Pressure Unit mmHg 27.10 The Time Settings 27.10.1 The Time Synchronization Tab Section Menu Item... -
Page 244: The Authorization Setup Settings
Menu Item Default Setting Description Clear CMS IP at startup SpO2 Tone Mode 1 Selects the SpO tone mode. The monitor adjusts the QRS tone (pitch tone) according to the SpO2 values. Language Parameters On/Off Config Influenced Selects whether the settings of parameter switches are influenced by configuration Parameters On/Off Protected Selects whether setting parameter switches is... -
Page 245: The Version Settings
Default Setting Description Battery Displays battery information. 27.15 The Scanner Settings 27.15.1 The 2D Barcode Tab (for the Mindray Custom 2D Barcode Reader) Default Setting Description 2D Barcode Establishes the relationship between the monitor data and barcode data for selectable patient demographics. -
Page 246: 27.15.2 The 1D Barcode Tab
Data Parse Mode Local Type and Data Parse Mode . You do not need to change these settings. 27.15.4 The Identify Scanner Tab (for the non-Mindray Custom 2D Barcode Reader) Default Setting Description Identify Scanner When you are using barcode readers other than... -
Page 247: The Network Setup Settings
27.16 The Network Setup Settings 27.16.1 The Network Type Tab Menu Item Default Setting Description Monitor Auto Selects what kind of network your monitor will use. Auto : the monitor automatically identify your network type. 27.16.2 The LAN1 IP Tab Menu Item Default Setting Description... -
Page 248: 27.16.4 The Central Station Setup Tab
Menu Item Default Setting Description WLAN IP Obtain IP Address Selects whether to enable the function of Automatically automatically getting the IP address. Select whether inputting the IP Address , Subnet Use the Following Mask , and Gateway is required. Address IP Address 0.0.0.0... -
Page 249: 27.16.6 The Qos Tab
27.16.6 The QoS Tab Menu Item Default Setting Description QoS Level For Realtime Monitoring Selects the service quality of network connection for realtime monitoring, for example parameter measurements and waveforms, alarms, and so on QoS Level For Others Selects the service quality of network connection for non-realtime monitoring, for example history data, printing, and as on. -
Page 250: 27.16.9 The Information Security Tab
27.16.9 The Information Security Tab Menu Item Default Setting Description Only Private Encryption : Mindray private Encryption Connection Type Only Private • Encryption encryption is used to encrypt the transmitted data. You cannot connect devices supporting SSL (secure sockets layer) encryption. -
Page 251: Battery
Battery 28.1 Battery Introduction This monitor is designed to operate battery power when the external power supply is not available. The monitor uses mains power as primary power source. In case of mains power failure, the monitor automatically runs on the battery power. -
Page 252: Identifying The Battery Type
Installing the Battery in a Built-in Battery Compartment No battery is installed when the monitor leaves the factory. The battery must only be installed by service personnel trained and authorized by Mindray. To install the battery, contact your service personnel. To install the battery, follow this procedure: Turn off the monitor. -
Page 253: Installing The Battery In A External Battery Compartment
The external battery compartment must only be installed by service personnel trained and authorized by Mindray. To install the battery, contact your service personnel. To install the smart battery into the external battery compartment, follow this procedure: Turn off the monitor. -
Page 254: Battery-Related Alarms
28.4.3 Battery-related Alarms The capacity of the battery is limited. When the battery is low, the monitor presents the Low Battery alarm, the alarm lamp flashes, and the monitor produces an alarm sound. If the battery is almost depleted, the monitor presents the Critically Low Battery alarm. In this case, immediately connect the AC mains to power the monitor and charge the battery. -
Page 255: Recycling Batteries
NOTE • Remove the battery from the equipment if the equipment is not used for a prolonged time (for example, several weeks). Otherwise the battery may overdischarge. • Storing batteries at high temperature for an extended period of time will significantly shorten their life expectancy. - Page 256 This page intentionally left blank. 28 - 6...
-
Page 257: Care And Cleaning
29.2 Care and Cleaning Safety Information WARNING • Use only Mindray approved cleaners, disinfectants and methods listed in this chapter to clean or disinfect your equipment or accessories. Warranty does not cover damage caused by unapproved substances or methods. •... -
Page 258: Disinfecting The Monitor/Module
CAUTION • During the cleaning procedure, disable the touch operation by switching off the monitor or locking the touchscreen. • Any contact of cleaners or disinfectants with connectors or metal parts may cause corrosion. 29.4 Disinfecting the Monitor/Module Disinfect the equipment as required in your hospital’s servicing schedule. Cleaning the equipment before disinfecting is recommended. - Page 259 Product Name Product Type Manufacturer DIAN’ERKANG Wipes Shanghai Likang Disinfectant Hi-Tech Co., Ltd Surface Wipes DIAN’ERKANG Liquid Shanghai Likang Disinfectant Hi-Tech Co., Ltd Surface Disinfectant DIAN’ERKANG Liquid, spray Shanghai Likang Disinfectant Hi-Tech Co., Ltd Disinfectant Spray Clinell® Universal Wipes GAMA Healthcare Ltd Wipes Clinell ®...
-
Page 260: Cleaning And Disinfecting The Accessories
Never clean or disinfect the connectors and metal parts. • Use only Mindray approved cleaners and disinfectants and methods listed in this section to clean or disinfect the accessories. Warranty does not cover damage caused by unapproved substances or methods. - Page 261 Antec International Ltd High Level surface Disinfectant, 1% 1-Propanol, 50% Liquid 29.5.2.2 Disinfectants for the SpO Cable The following table lists approved disinfectants for the Mindray and Nellcor SpO cables: Product Name Product Type Manufacturer CIDEX® OPA Liquid Gilag GmbH International Advanced Sterilization products Clorox Dispatch®...
-
Page 262: Sterilization
Product Name Product Type Manufacturer Clorox Healthcare® Hydrogen Peroxide Wipes Clorox professional products company Cleaner Disinfectant Wipes Diversey Oxivir® TB Wipes Diversey Inc Wipes PDI Super Sani-Cloth® Wipes PDI Inc. Germicidal Disposable Wipe VIRAGUARD® Wipes VERIDIEN corporation Hospital Surface Disinfectant Towelettle Virex®... -
Page 263: Impact Of Improper Cleaning
CAUTION • Do not use anything that may destroy the thermal element. • Do not add unnecessary force to the thermal head. • The thermal print head gets hot when recording. Do not clean the print head immediately after recording. 29.8 Impact of Improper Cleaning Using cleaners other than those recommended may have the following impact:... - Page 264 This page intentionally left blank. 29 - 8...
-
Page 265: Maintenance
The equipment and accessories shall not be served or maintained while in use with a patient. • If you discover a problem with any of the equipment, contact your service personnel or Mindray. • Use and store the equipment within the specified temperature, humidity, and altitude ranges. -
Page 266: Maintenance And Testing Schedule
Every three months or if the battery runtime reduced significantly. 30.4 Testing Methods and Procedures Except the following maintenance tasks, all other test and maintenance tasks should be performed by Mindray- qualified service personnel only. ■ Regular check, including visual inspection and power-on test ■... -
Page 267: Performing Power-On Test
The monitor housing and display screen are free from cracks or other damages ■ ■ The power cord is not damaged and the insulation is in good condition. Connectors, plugs, and cables are not damaged and kinked. ■ Power cord and patient cables are securely connected with the equipment and modules. ■... - Page 268 This page intentionally left blank. 30 - 4...
-
Page 269: Accessories
Accessories The accessories listed in this chapter comply with the requirements of IEC 60601-1-2 when in use with the patient monitor. The accessory material that contacts the patients has undertaken the bio-compatibility test and is verified to be in compliance with ISO 10993-1. For details about the accessories, refer to the instructions for use provided with the accessory. -
Page 270: 12-Pin Separable Trunk Cables
31.1.2 12-Pin Separable Trunk Cables Model Description Applicable patient EV6201 0010-30-42719 ECG cable,12-pin, 3/5-lead, defibrillation-proof Adult, Pediatric AHA/IEC 009-004728-00 EV6202 0010-30-42720 ECG cable,12-pin, 3-lead, defibrillation-proof, Neonate, Infant AHA/IEC EV6203 0010-30-42721 ECG cable, 12-lead, defibrillation-proof, AHA Adult EV6204 0010-30-42722 ECG cable, 12-lead, defibrillation-proof, IEC Adult EV6211 0010-30-42723... -
Page 271: 5-Lead Ecg Leadwires
Model Description Length Applicable patient EL6312B 040-000147-00 ECG leadwires, 3-lead, IEC, snap, Neonate, Infant long, disposable EL6311A 040-000148-00 ECG leadwires, 3-lead, AHA, snap, Neonate, Infant long, disposable EL6312A 040-000149-00 ECG leadwires, 3-lead, IEC, snap, Neonate, Infant long, disposable 31.1.5 5-lead ECG Leadwires Model Description Length... -
Page 272: Spo Accessories
31.2.1 Extension Cables Model Part No. Description Applicable patient 562A 0010-20-42710 7-pin, Mindray 009-004600-00 572A 0010-20-42712 8-pin, Nellcor 582A 040-000332-00 8-pin, Masimo Note: If you need to purchase Masimo sensors, please contact Masimo. -
Page 273: Nellcor Spo Sensors
Model Description Applicable Application patient site 518C 040-000330-00 Reusable SpO2 Sensor Neonate Foot 518C 115-004895-00 Disposable bandage, for 518C Neonate Foot sensor 513A 115-033848-00 Reusable SpO2 sensor Adult, Pediatric 512FLH 115-012807-00 Reusable SpO2 sensor Adult Finger 518BLH 115-020887-00 Reusable SpO2 sensor Neonate Foot 31.2.3... -
Page 274: Nibp Accessories
31.4 NIBP Accessories 31.4.1 NIBP Hoses Model Part No. Description Applicable patient CM1901 6200-30-11560 Reusable NIBP hose Neonate CM1903 6200-30-09688 Reusable NIBP hose Adult, Pediatric 31.4.2 Cuffs Model Part No. Description Limb Circumference Bladder Applicable (cm) Width (cm) patient CM1200 115-002480-00 Reusable cuff 7 - 13... -
Page 275: Ibp Accessories
Model Part No. Description Limb Circumference Bladder Applicable (cm) Width (cm) patient CM1506 115-016969-00 NIBP cuff, single 25 to 35 13.1 Adult patient use, 10 pcs/ CM1507 115-016970-00 NIBP cuff, single 33 to 47 16.5 Adult patient use, 10 pcs/ CM1500A 001B-30-70692 NIBP cuff, single... -
Page 276: Icp Accessories
31.5.2 ICP Accessories Model Part No. Description Applicable patient 82-6653 040-002336-00 ICP sensor kit, disposable CP12601 009-005460-00 12-pin ICP cable CP12602 040-001368-00 Adapter for Camino cable 31.6 C.O. Accessories Model Part No. Description Applicable patient CO7702 0010-30-42743 12-pin C.O. cable 131HF7 6000-10-02183 Dilution hose, Edwards... -
Page 277: Mainstream Co Accessories
Model Part No. Description Applicable patient 009818 0010-10-42566 Disposable nasal sampling line Adult 007266 0010-10-42567 Disposable nasal sampling line Pediatric 009822 0010-10-42568 Disposable nasal sampling line, plus O Adult 007269 0010-10-42569 Disposable nasal sampling line, plus O Pediatric 009826 0010-10-42570 Disposable nasal sampling line, long, plus O Adult 007743... -
Page 278: Bis Accessories
Model Part No. Description Applicable patient 100-000081-00 115-043025-00 Watertrap, DRYLINE II, reusable Neonate 31.9 BIS Accessories Model Part No. Description Applicable patient 186-0195-MR 6800-30-50761 BIS Cable 186-0224-MR 115-005707-00 BISx4 Cable 186-0106 0010-10-42672 BISx sensor, Quatro Adult 186-0200 0010-10-42673 BISx sensor, Quatro Pediatric 186-0212 040-000392-00... -
Page 279: External Modules
Part No. Description 023-000218-00 USB flash drive, 8 GB, USB2.0 023-001523-00 HP LaserJet Printer 115-008393-00 1D Barcode reader 023-001286-00 2D Barcode reader, HS-1M, JADAK 023-001288-00 2D Barcode reader, HS-1R, JADAK 023-001393-00 Remote controller 6800-30-51213 Beneview data output package 115-030320-00 Clinical Scoring Custom CD 009-003116-00 Nurse call cable 009-003117-00... - Page 280 This page intentionally left blank. 31 - 12...
-
Page 281: A Product Specifications
Mode of operation Continuous Physical Specifications Item Maximum Weight (kg) W × H × D (mm) Comments ePM 10M/ePM 10MA/ePM 4.5(standard configuration and 269 × 252 × 159 4.0 kg (standard configuration, 10MC main unit recorder, excluding battery, excluding battery, accessories,... -
Page 282: Environmental Specifications
Environmental Specifications WARNING • The monitor may not meet the performance specifications if stored or used outside the specified temperature and humidity ranges. If the performance of the equipment is degraded due to aging or environmental conditions, contact your service personnel. •... -
Page 283: Power Supply Specifications
Voltage 10.8V Capacity 5600 mAh Maximum number of batteries configured ePM 10M/ePM only one battery can be connected. 10MA/ePM 10MC: ePM 12M/ePM at most two batteries can be connected at the same 12MA/ePM 12MC: time, including one battery built inside, the other one connected from an external battery compartment. -
Page 284: Display Specifications
Run time Model ePM 12M/ePM 12MA/ePM ePM 10M/ePM 10MA/ 12MC ePM 10MC Battery LI13I001A ≥ 2 hours ≥ 2 hours (one battery connected) Battery LI23S002A ≥ 4 hours ≥ 4 hours (one battery connected) Battery LI23I003A ≥ 4.5 hours ≥ 6 hours... -
Page 285: Audio Indicator
Paper width 50 mm±1mm Paper length 20 m Paper speed 25 mm/s, 50 mm/s Accuracy: ±5% Number of waveform channels A maximum of 3 LEDs Alarm lamp 1 or 2 (three color-coded: red, yellow, and cyan) Power-on LED 1 (green) AC power LED 1 (green) Battery LED... -
Page 286: Data Storage
IBP Analog Output Bandwidth (-3dB; reference 0 to 40 Hz frequency:1Hz) Maximum transmission delay 30 ms Gain (reference frequency 1 Hz) 1 V/100 mmHg, ±5% Nurse Call Signal Amplitude High level: 3.5 to 5 V, ±5%, providing a minimum of 10 mA output current; Low level: <... -
Page 287: Wi-Fi Specifications
A.12 Wi-Fi Specifications A.12.1 Wi-Fi Technical Specifications (MSD45N) Protocol IEEE 802.11a/b/g/n Modulation mode BPSK, QPSK, 16QAM, 64QAM Operating frequency 2.4 GHz to 2.495GHz 5.15 GHz to 5.25 GHz, 5.725 GHz to 5.85 GHz Channel spacing IEEE 802.11b/g: 5 MHz IEEE 802.11n (at 2.4 G): 5 MHz IEEE802.11a: 20 MHz IEEE802.11n (at 5 G): 20 MHz Wireless baud rate... -
Page 288: Wi-Fi Performance Specifications
A.12.3 Wi-Fi Performance Specifications WARNING • Do perform all network functions of data communication within an enclosed network. A.12.3.1 System Capacity and Resistance to Wireless Interference Meets the following requirements: All the monitors do not encounter communication loss. ■ ■ The total delay of data transmission from the monitor to the CMS: ≤... -
Page 289: Measurement Specifications
A.13 Measurement Specifications The adjustable range of alarm limits is the same with the measurement range of signals unless otherwise specified. A.13.1 ECG Specifications Standards Meet standards of IEC 60601-2-27 and IEC 60601-2-25 Lead set 3-lead: I, II, III 5-lead: I, II, III, aVR, aVL, aVF, V 6-lead: I, II, III, aVR, aVL, aVF, Va, Vb... - Page 290 Pace pulse markers Pace pulses meeting the following conditions are labelled with a PACE marker: Amplitude: ±2 to ±700 mV Width: 0.1 to 2 ms Rise time: 10 to 100 μs (no greater than 10% of pulse width) No overshoot Pace pulse rejection When tested in accordance with the IEC 60601-2-27: 201.12.1.101.13, the heart rate meter rejects all pulses meeting the following conditions.
-
Page 291: Resp Specifications
ST Segment Analysis Measurement range -2.5 to 2.5 mV RTI Accuracy -0.8 to 0.8 mV: ±0.02 mV or ±10%, whichever is greater. Beyond this range: Not specified. Resolution 0.01mV QT/QTc Analysis Measurement range QT: 200 to 800 ms QTc: 200 to 800 ms QT-HR: 15 to 150 bpm for adult, 15 to 180 bpm for pediatric and neonate Accuracy QT: ±30 ms... -
Page 292: Spo Specifications
Alarm limit Range (%) Step (%) High (low limit + 2) to 100 Mindray, Masimo: (Desat+1) to (high limit - 2) Nellcor: (Desat+1) or 20 (whichever is greater) to (high limit - 2) Desat Low 0 to (low limit - 1) - Page 293 Recovery time <15 s (after defibrillation) Measurement range 0.05 to 20% Resolution 0.05%~9.99%: 0.01% 10.0%~20.0%: 0.1% Nellcor SpO Module Measurement range 0 to 100% Resolution Refreshing rate ≤1 s Response time ≤30 s (normal perfusion, no disturbance, SpO2 value sudden change from 70% to 100%) Recovery time <15 s (after defibrillation)
-
Page 294: Pr Specifications
PR > 40 bpm: (low limit + 5 bpm) to 295 bpm PR>40: 5 PR Low PR≤40bpm: 16 bpm to (high limit - 2 bpm) PR > 40 bpm: 40 bpm to (high limit - 5 bpm) PR from Mindray SpO Module Measurement range 20 to 300 bpm Resolution... -
Page 295: Temp Specifications
A.13.5 Temp Specifications Standard Meet the standard of ISO 80601-2-56 Technique Thermal resistance Operating mode Direct mode Measurement range 0 to 50 °C (32 to 122 °F) Resolution 0.1°C Accuracy ±0.1 °C or ±0.2 °F (excluding probe error) Refreshing rate ≤1 s Minimum time for accurate measurement Body surface: <100 s... - Page 296 Static pressure measurement range 0 mmHg to 300 mmHg Static pressure measurement accuracy ±3 mmHg Recovery time <15 s (after defibrillation) Measurement range 30 to300 bpm Resolution 1 bpm Accuracy ±3bpm or ±3%, whichever is greater Step (mmHg) Alarm limit Range (mmHg) NIBP-S High Adult: (low limit + 5) to 285...
- Page 297 NIBP-D Extreme High NIBP-D high limit < 50 NIBP ≤ 50: 1 Adult: (NIBP-D high limit + 1) to 250 NIBP > 50: 5 Pediatric: (NIBP-D high limit + 1) to 200 Neonate: (NIBP-D high limit + 1) to 115 NIBP-D high limit ≥...
- Page 298 IBP ≤ 50: (low limit + 2) to 50 Sys High IBP ≤ 50: 1 IBP > 50: (low limit + 5) to 355 IBP > 50: 5 Mean High Dia High IBP ≤ 50: -49 to (high limit - 2) Sys Low IBP >...
-
Page 299: Co Specifications
A.13.9 Specifications Measurement mode Sidestream, microstream, mainstream Technique Infrared absorption Apnea time 10 s, 15 s, 20 s, 25 s, 30 s, 35 s, 40 s Alarm limit Range Step EtCO High (low limit + 2) to 99 mmHg 1 mmHg EtCO 1 to (high limit - 2)mmHg FiCO... - Page 300 Response time For CO measurement (without O measurement): Measured with a DRYLINE II neonatal watertrap and a 2.5-meter neonatal sampling line: ≤5.0 s @ 70 ml/min ≤4.5 s @ 90 ml/min Measured with a DRYLINE II adult watertrap and a 2.5-meter adult sampling line: ≤5.0 s @ 120 ml/min For CO...
- Page 301 ≤60 ±1 mmHg ≤4 ≤5 ≤5 ≤5 ≤15 ±2 mmHg *: means an extra error should be added in case of gas interference when CO measurements are performed between 0 to 40mmHg. Effect of interference gases on O measurements Quantitative effect 0.2% 0.2% Hal, Des, Sev, Iso, Enf...
-
Page 302: A.13.10 Ag Specifications
Mainstream CO Module Standard Meet the standard of ISO 80601-2-55 Measurement range 0 to 150 mmHg Accuracy 0 to 40 mmHg: ±2 mmHg 41 to 70 mmHg: ±5% of the reading 71 to 100 mmHg: ±8% of the reading 101 to 150 mmHg: ±10% of the reading Accuracy drift Meet the requirement for measurement accuracy within 6 hours... - Page 303 Full accuracy Gases Range (%REL)1 Accuracy (%ABS) 0≤CO ≤1 ±0.1 1<CO ≤5 ±0.2 5<CO ≤7 ±0.3 7<CO ≤10 ±0.5 >10 Not specified 0 - 20 ±2 20 - 100 (excluding 20) ±3 0 - 25 ±1 25 - 80 (excluding 25) ±2 80 - 100 (excluding 80) ±3...
- Page 304 Response time Measured with a DRYLINE II neonatal watertrap and a 2.5-meter neonatal sampling line: 120 ml/min: ≤4 s ≤4.2 s ≤4 s Hal, Iso, Sev, Des, Enf: ≤4.4 s Measured with a DRYLINE II adult watertrap and a 2.5-meter adult sampling line: 200 ml/min: ≤4.2s...
-
Page 305: A.13.11 Bis Specifications
EtCO High (low limit + 2) to 99 mmHg 1 mmHg EtCO 1 to (high limit - 2)mmHg FiCO High 1 to 99 mmHg High (low limit + 2%) to 100% 0% to (high limit - 2)% High (low limit + 2%) to 100% 18% to (high limit - 2)% O High (low limit + 2) to 100%... - Page 306 Patient leakage current <10 μA Recovery time <30 s (after defibrillation) Alarm limit Range Step BIS High (low limit + 5) to 100 BIS Low 0 to (high limit - 5) A - 26...
-
Page 307: B Emc And Radio Regulatory Compliance
EMC and Radio Regulatory Compliance The device meets the requirements of IEC 60601-1-2: 2014. WARNING • Use of accessories, transducers and cables other than those specified or provided by the manufacturer of this equipment could result in increased electromagnetic emissions or decreased electromagnetic immunity of this equipment and result in improper operation. - Page 308 NOTE • If the essential performance is lost or degraded, it may be necessary to take mitigation measures, such as re-orienting or relocating the ME EQUIPMENT or ME SYSTEM or shielding the location or stopping using the monitor and contact the service personnel. •...
- Page 309 Guidance and Declaration - Electromagnetic Immunity The device is intended for use in the specified electromagnetic environment. The customer or the user of the device should assure that it is used in such an environment as described below. Immunity test IEC60601 test level Compliance level Electromagnetic environment - guidance...
-
Page 310: Radio Regulatory Compliance
WARNING • The device is configured with a wireless network connector to receive wireless signal. Other devices may interfere with this device even though they meet the requirements of CISPR. Recommended separation distances between portable and mobile RF communications equipment and the device The device is intended for use in an electromagnetic environment in which radiated RF disturbances are controlled. -
Page 311: C Default Settings
Default Settings Parameters Default Settings C.1.1 ECG, Arrhythmia, ST and QT Default Settings C.1.1.1 ECG Default Settings Item Default Setting HR/PR Alarm switch High limit Adult: 120 bpm Pediatric: 160 bpm Neonate: 200 bpm Low limit Adult: 50 bpm Pediatric: 75 bpm Neonate: 100 bpm Priority Alarm Outputs... - Page 312 Item Default Setting Notch Filter Lead Set Auto D12L(for 6-lead only) Smart Lead Baseline Drift Removal (for 12-lead only) Waveform Layout (for 12-lead only) Standard CrozFusion Display CrozFusion QRS Volume General, OR: 2 Other department: 0 QRS Threshold 0.16 mV Paced Adult: Unspecified Pediatric/Neonate: No...
- Page 313 Item Alarm Switch Priority Alarm Outputs Pacer Not Pacing Prompt Missed Beat Prompt Nonsus V-Tach CCU: On Other departments: Off Vent Rhythm CCU: On Other departments: Off Pause Irr Rhythm Prompt A-Fib Prompt PVCs/min CCU: On Other departments: Off Pauses/min CCU: On Other departments: Off Arrhythmia Threshold Default Settings...
-
Page 314: Spo Default Settings
C.1.1.3 ST Default Settings Item Default Setting ST Alarm Mode Absolute ST-I, ST-II, ST-III, ST-aVR, ST-aVL, ST-aVF, ST-V1, ST- Alarm switch V2, ST-V3, ST-V4, ST-V5,ST-V6, ST-Va, ST-Vb (ST Absolute High limit 0.2 mV Alarm Mode set to Low limit -0.2 mV Priority Alarm Outputs ST Single,... - Page 315 C.1.1.5 Glasgow 12-lead ECG Algorithm Default Settings Item Default Setting Filter 35 Hz Baseline Drift Removal Tachy Brady Waveform Layout Standard Median Complex Measurements Interpretation Interpretation Summary Amplitude 10 mm/mV Speed 25 mm/sec Auto Interval 12-Lead Format 3×4+1 Rhythm Lead 1 Rhythm Lead 2 Rhythm Lead 3 Format Sequence...
- Page 316 FastSAT (for Masimo SpO Display SIQ (for Masimo SpO Sensitivity (for Mindray SpO Medium Sensitivity (for Masimo SpO APOD Averaging (for Masimo SpO Display PI (for Mindray SpO , Masimo SpO Speed 25 mm/s Alarm switch High limit Adult: 120...
-
Page 317: Temperature Default Settings
C.1.4 Temperature Default Settings Item Default Setting Alarm switch (XX refers to High limit 38.0 °C temperature site) Low limit 35.0 °C Priority Alarm Outputs ΔT Alarm switch High limit 2.0 °C Priority Alarm Outputs C.1.5 NIBP Default Settings Item Default Setting NIBP-S Alarm switch... - Page 318 Item Default Setting NIBP-S Extreme Alarm switch High limit Adult: 175 mmHg Pediatric: 130 mmHg Neonate: 95 mmHg Low limit Adult: 75 mmHg Pediatric: 60 mmHg Neonate: 35 mmHg Priority High Alarm Outputs NIBP-D Extreme Alarm switch High limit Adult: 105 mmHg Pediatric: 80 mmHg Neonate: 65 mmHg Low limit...
-
Page 319: Ibp Default Settings
C.1.6 IBP Default Settings Item Default Setting IBP-S Alarm switch ■ High limit Art/Ao/UAP/BAP/FAP/LV/P1/P2 arterial pressure Adult: 160 mmHg Pediatric: 120 mmHg Neonate: 90 mmHg ■ Adult: 35 mmHg Pediatric, Neonate: 60 mmHg ■ Low limit Art/Ao/UAP/BAP/FAP/LV/P1/P2 arterial pressure Adult: 90 mmHg Pediatric: 70 mmHg Neonate: 55 mmHg ■... - Page 320 Item Default Setting IBP-M Alarm switch ■ High limit Art/Ao/UAP/BAP/FAP/LV/P1/P2 arterial pressure Adult: 110 mmHg Pediatric: 90 mmHg Neonate: 70 mmHg ■ Adult: 20 mmHg Pediatric, Neonate: 26 mmHg ■ ICP/RAP/LAP/UVP/P3/P4 venous pressure Adult: 10 mmHg Pediatric, Neonate: 4 mmHg ■...
- Page 321 Item Default Setting Art-M Extreme Alarm switch High limit Adult: 125 mmHg Pediatric: 100 mmHg Neonate: 75 mmHg Low limit Adult: 55 mmHg Pediatric: 40 mmHg Neonate: 30 mmHg Priority High Alarm Outputs Alarm switch High limit Adult: 130 mmHg Pediatric: 100 mmHg Neonate: 90 mmHg Low limit...
-
Page 322: Co Default Settings
Item Default Setting Display Format Sys/Dia (Mean) Display Alarm Limit Use PA-D as PAWP C.1.7 C.O. Default Settings Item Default Setting Alarm switch High limit 39.0 °C Low limit 36.0 °C Priority Alarm Outputs Comp Const 0.542 Auto Start Auto TI C.1.8 Default Settings C.1.8.1... - Page 323 C.1.8.2 Sidestream CO Default Settings Item Default Setting EtO2 Alarm switch High limit Low limit Priority Alarm Outputs FiO2 Alarm switch High limit Adult, Pediatric: 100% Neonate: 90% Low limit Priority Alarm Outputs BTPS Compensation AG Compensation N2O Compenation Auto Standby 60 min Operating Mode Measure...
-
Page 324: Bis Default Settings
C.1.9 Gas Default Settings Item Default Setting EtCO2 Alarm switch High limit Adult, Pediatric: 50 mmHg Neonate: 45 mmHg Low limit Adult, Pediatric: 25mmHg Neonate: 30mmHg Priority Alarm Outputs FiCO2 Alarm switch High limit 4 mmHg Priority Alarm Outputs EtO2 Alarm switch High limit Low limit... - Page 325 Item Default Setting EtHal/EtEnf/EtIso Alarm switch High limit 3.0% Low limit 0.0% Priority Alarm Outputs FiHal/FiEnf/FiIso Alarm switch High limit 2.0% Low limit 0.0% Priority Alarm Outputs EtSev Alarm switch High limit 6.0% Low limit 0.0% Priority Alarm Outputs FiSev Alarm switch High limit 5.0%...
-
Page 326: Routine Default Settings
Item Default Setting Scale : 400 mmHg : 50 mmHg O: 50% Hal, Enf, and Iso: 2.5% Sev: 4.0% AA and Des: 9.0% only ) Waveform Type Draw (for CO O2 Compensation OR: 100% Other departments: Off C.1.10 BIS Default Settings Item Default Setting Alarm switch... -
Page 327: Review Default Settings
Item Default Setting Printing Duration 20 sec Auto Limits for New Patient C.2.2 Review Default Settings Item Default Setting Tabular Trends Trend Group Standard Interval OR: 5 min Other departments: 30 min Graphic Trends Trend Group Standard Zoom 8 hrs Trends Events Filter... -
Page 328: Oxycrg Default Settings
Item Default Setting Time (for Routine Vital set to Auto) 08:00 Interval (for Routine Vital set to Auto) 8 hrs C.2.4 OxyCRG Default Settings Item Default Setting Parameters Setup Trend1 btbHR Trend2 SpO2 Compressed Resp Apnea Event Threshold (HR) Duration (HR) Threshold (SpO Duration (SpO Apnea... -
Page 329: Report Default Settings
C.2.7 Report Default Settings C.2.7.1 Report Setup Item Default Setting ECG Report Amplitude 10 mm/mV Speed 25 mm/sec Auto Interval 12-Lead Format) 3×4+1 Rhythm Lead 1 Rhythm Lead 2 Rhythm Lead 3 Format Sequence Sequential Realtime Report Speed Auto Select Waveform Current Waveforms Tabular Trends Period... -
Page 330: Calculations Default Settings
C.2.8 Calculations Default Settings Item Default Setting Drug Calculator Weight Based Drug Amount Solution Volume Dose mcg/min Concentration mcg/ml Infusion Time Infusion Rate ml/hr Titration Table Dose Type Dose/hr Interval Oxygenation OxyCont Unit ml/L Hb Unit g/dl Pressure Unit mmHg Ventilation Pressure Unit mmHg... -
Page 331: D Alarm Messages
Alarm Messages Physiological Alarm Messages This section lists physiological alarms, their default priority, and the actions that can be taken when an alarm occurs. D.1.1 General Physiological Alarm Messages Alarm messages Default priority Cause and solution XX High XX value has risen above the high alarm limit or fallen below the low alarm limit. -
Page 332: St Physiological Alarm Messages
Alarm message Default priority Missed Beat Prompt A-Fib Prompt Note: When arrhythmia alarms occur, check the patient’s condition and the ECG connections. D.1.3 ST Physiological Alarm Messages ST alarm mode Alarm messages Default priority Cause and solution Absolute ST-XX High The ST value of respective ECG lead has risen above the high alarm limit or fallen below the low alarm limit. -
Page 333: Nibp Physiological Alarm Messages
D.1.7 NIBP Physiological Alarm Messages Alarm message Default priority Cause and solution NIBP-S Extremely High/ High The NIBP value is higher than the NIBP Extreme alarm high limit. Check NIBP-D Extremely High/ the patient’s condition and check if the alarm limit settings are correct. NIBP-M Extremely High NIBP-S/NIBP-D/NIBP-M High... -
Page 334: Technical Alarm Messages
Technical Alarm Messages This section lists technical alarms, their default priority, indication on alarm reset, and the actions that can be taken when an alarm occurs. Technical alarms give different alarm indicators when the alarm system is reset. In this section we classify the technical alarms into three categories for easy clarification: ■... -
Page 335: Resp Technical Alarm Messages
D.2.3 Resp Technical Alarm Messages Alarm message Default priority Indication on Cause and solution alarm reset Resp Interference Prompt The respiration circuit is disturbed. Check for any possible sources of signal noise. Electrode Poor Contact Prompt Check the electrode application. Reposition or replace the electrodes if necessary. -
Page 336: Nibp Technical Alarm Messages
D.2.6 NIBP Technical Alarm Messages Alarm message Default priority Indication on Cause and solution alarm reset NIBP Loose Cuff There is a leak in the cuff or air tubing. Use a cuff of correct type based on the patient size. Apply the cuff and connect the air tubing as instructed in the manual. -
Page 337: C.o. Technical Alarm Messages
D.2.8 C.O. Technical Alarm Messages Alarm message Default priority Indication on Cause and solution alarm reset TB Sensor Off Check the sensor connection and reconnect the sensor. TI Sensor Off Check the sensor connection and reconnect the sensor. D.2.9 Technical Alarm Messages Alarm message Default priority Indication on... - Page 338 Alarm message Default priority Indication on Cause and solution alarm reset CO2 Low Barometric The ambient pressure exceeds the operating pressure range or CO module fails. 1. Make sure that the ambient pressure meets the specifications, and check for sources that affect the ambient pressure.
-
Page 339: Bis Technical Alarm Messages
D.2.11 BIS Technical Alarm Messages Alarm message Default priority Indication on Cause and solution alarm reset BIS Sensor Off Check and reconnect the BIS sensor. If the alarm persists, replace the sensor. BIS Electrode XX Off Check the electrode connection, and re-attach the electrodes if necessary. -
Page 340: Power Supply Technical Alarm Messages
XX represents RR, SpO , Supp. O , Temp, BP, HR, Consciousness, Blood Sugar, Urine Output, Catheter, Pain Score, Pain, EtCO , FiO , Airway, or Customer defined parameter. D.2.13 Power Supply Technical Alarm Messages Alarm message Default priority Indication on Cause and solution alarm reset Low Battery... -
Page 341: Technical Alarm Messages Related To Networked Monitoring
Alarm message Default priority Indication on Cause and solution alarm reset PDF storage space is Prompt Delete the files saved under the PDF file path to nearly full release storage space. Otherwise you cannot save new PDF files. Error storing PDF file Prompt The PDF file path settings on the printer server and the PDFCreator are not consistent or the PDF... - Page 342 Alarm message Default priority Indication on Cause and solution alarm reset XX Conflicts Prompt The same type of corresponding module being used exceeds the supported number. Remove (XX refers to the module the conflict module. label) XX Measurement has Prompt The parameter module is disabled.
-
Page 343: E Electrical Safety Inspection
Electrical Safety Inspection The following electrical safety tests are recommended as part of a comprehensive preventive maintenance program. They are a proven means of detecting abnormalities that, if undetected, could prove dangerous to either the patient or the operator. Additional tests may be required according to local regulations. All tests can be performed using commercially available safety analyzer test equipment. -
Page 344: Device Labeling
Device Labeling Check the labels provided by the manufacturer or the healthcare facilities are present and legible. Main unit label ■ Integrated warning labels ■ Protective Earth Resistance Plug the probes of the analyzer into the device’s protective earth terminal and protective earth terminal of the AC power cord. -
Page 345: Mains On Applied Part Leakage
For BF applied parts ◆ 100 μA in Normal Condition ◆ 500 μA in Single Fault Condition Mains on Applied Part Leakage The Mains on Applied Part test applies a test voltage, which is 110% of the mains voltage, through a limiting resistance, to selected applied part terminals. - Page 346 This page intentionally left blank. E - 4...
-
Page 347: F A Ecg Wave Recognition Method For Mindray Resting 12-Lead Ecg Analysis Algorithm
A ECG Wave Recognition Method for Mindray Resting 12-lead ECG Analysis Algorithm Preprocessing Initially, a 50Hz or 60Hz notch filter should have been applied within the acquiring device. The ECG data is then filtered to minimize the effects of noise. The next step is to calculate a difference of each lead. And then choose the best 3 leads based on the amplitude of ECG. -
Page 348: Evaluation Results Of Absolute Interval And Wave Duration Measurements
P and T waves P wave is searched in the interval preceding the QRS complex. A P wave may not be found in certain arrhythmias. P onset and termination are determined basing on the amplitude and slope. The globe P onset and termination is used over all 12 leads because in many leads the p wave amplitude may be too low. - Page 349 Disclosed Differences Global Type of Added Noise Measurement Mean Difference (ms) Standard Deviation (ms) QT Interval Line Frequency (50Hz) -1.4 6.867 QT Interval Line Frequency (60Hz) 3.978 QT Interval Base-Line 3.134 F - 3...
- Page 350 This page intentionally left blank. F - 4...
-
Page 351: G Units, Symbols And Abbreviations
Units, Symbols and Abbreviations Units Abbreviation In Full μA microampere μV microvolt μs microsecond ampere ampere hour beat per minute bit per second °C centigrade cubic centimeter centimeter decibel dyne second °F Fahrenheit gram gigahertz gutta hour hertz inch kilo kilogram kilopascal litre... -
Page 352: Symbols
Abbreviation In Full mmHg millimeters of mercury cmH2O centimeters of water millisecond millivolt milliwatt MΩ megaohm nanometer breaths per minute second volt volt ampere Ω watt Symbols Symbol Explanation - minus – negative percent per; divide; or ~ + plus =... -
Page 353: Abbreviations
Abbreviations Abbreviation In Full AaDO alveolar-arterial oxygen gradient alternating current acceleration index adult anaesthesia gas American Heart Association aortic pressure arterial ATMP barometric pressure area under the curve average left foot augmented lead left arm augmented lead right arm augmented lead awRR airway respiratory rate brachial arterial pressure... - Page 354 Abbreviation In Full carbon dioxide COHb carboxyhemoglobin Compl compliance COPD chronic obstructive pulmonary disease cardiac power index CPR quality index cardiac power output central venous pressure direct current desflurane diastolic dot per inch dPmx left ventricular contractility digital video interface oxygen delivery oxygen delivery index electrocardiograph...
- Page 355 Abbreviation In Full Early Warning Score femoral arterial pressure Federal Communication Commission Food and Drug Administration FeCO Mixed Expired CO2 Concentration fraction of inspired FiAA inspired anesthetic agent FiDes inspired anesthetic agent FiEnf FiHal FiIso FiSev FiCO2 fraction of inspired carbon oxygen fraction of inspired nitrous oxide fraction of inspired oxygen FPGA...
- Page 356 Myoglobin MetHb methemoglobin MEWS Modified Early Warning Score MLDAP Mindray LDAP, Mindray Lightweight Directory Access Protocol magnetic resonance imaging minute volume MValv Alveolar Minute Volume MVCO minute production expiratory minute volume inspiratory minute volume...
- Page 357 Abbreviation In Full pArt artery pressure from the PiCCO module pArt-D diastolic artery pressure from the PiCCO module pArt-M mean artery pressure from the PiCCO module pArt-S systolic artery pressure from the PiCCO module airway pressure PAWP pulmonary artery wedge pressure pCVP central venous pressure pediatric...
- Page 358 Abbreviation In Full stroke index SlopeCO Slope of the alveolar plateau satellite module rack SOFA Sepsis-Related Organ Failure Assessment arterial oxygen saturation from pulse oximetry signal quality index suppression ratio Surviving Sepsis Campaign signal strength index systolic time ratio stroke volume stroke volume index systemic vascular resistance SVRI...
- Page 359 Abbreviation In Full Vdaw/Vt airway dead space to tidal volume ratio Vdalv alveolar dead space Vdalv/Vt alveolar dead space to tidal volume ratio Vdphy physiologic dead space Vd/Vt dead space to tidal volume ratio VEPT volume of electrically participating tissue velocity index consumption for one breath oxygen consumption index...
- Page 360 This page intentionally left blank. G - 10...
-
Page 361: H Declaration Of Conformity
Declaration of Conformity H - 1... - Page 362 This page intentionally left blank. H - 2...
- Page 364 P/N: 046-012607-00(6.0)
Need help?
Do you have a question about the ePM 10M and is the answer not in the manual?
Questions and answers