Flycam HD-3000 Assembly Manual
Camera stabilizer
Hide thumbs
Also See for HD-3000:
- Instruction manual (11 pages) ,
- Assembly manual (4 pages) ,
- Instruction manual (14 pages)
Advertisement
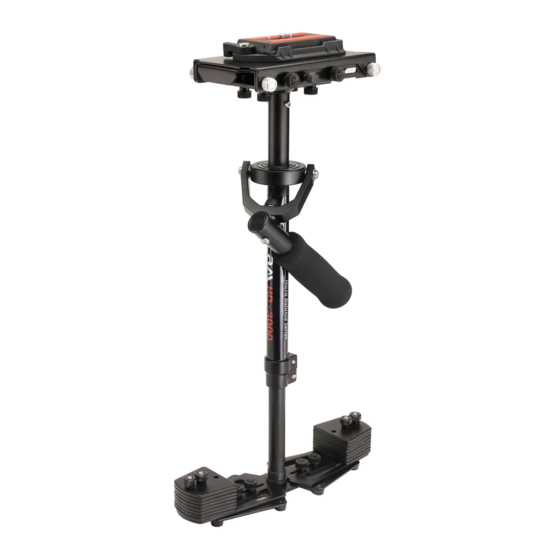
What's In The Box
Please inspect the contents of your shipped package to ensure you have received everything that
is listed below.
Camera Platform
Central Post
Base Platform with
16 weight discs
No part of this document may be reproduced, stored in a retrieval system, or transmitted by any form or by any means,
electronic, mechanical, photo-copying, recording, or otherwise, except as may be expressly permitted by the applicable copyright
HD-3000 Camera Stabilizer
A s s e m b l y M a n u a l
All rights reserved.
statutes or in writing by the Publisher.
Head Plate
Mid Plate
Quick release
V-shape Adapter
adpater
(FLCM-HD-3-QT)
Table Clamp
Bottom Plate
Accessories
Storage Bag
1
Advertisement
Table of Contents

Related Manuals for Flycam HD-3000


Summary of Contents for Flycam HD-3000
- Page 1 HD-3000 Camera Stabilizer (FLCM-HD-3-QT) A s s e m b l y M a n u a l What’s In The Box Please inspect the contents of your shipped package to ensure you have received everything that is listed below.
- Page 2 HD-3000 Stabilizer Setup Attach Central Post to the Base Platform by means of threaded stud in center. Rotate the Base Platform to properly secure with Central post. Loosen allen bolts at the bottom of Camera Platform, align its holes with top of Central Post &...
-
Page 3: Balancing The Horizontal Axis
& upright, with Central Post in a perfect vertical position. NOTE: If you do not have enough weight on Base Platform the entire Flycam could flip upside down. If this movement starts to happen, be ready to catch the sled before a complete 180° occurs. This type of unwanted movement requires more weight to be added to the base with additional weight discs. -
Page 4: Balancing The Vertical Axis
NOTE: The stability of Flycam Stabilizer depends on it being slightly bottom heavy. If it is top heavy, it will tilt more. If it is too bottom heavy, it will be sluggish and hard to aim. - Page 5 Count how many seconds it takes to fall to vertical. Try using a stopwatch. If the drop time is less than 2 seconds, it is too bottom heavy. You need to move the bottom mass closer to post. ...
-
Page 6: Maintenance
Holding your Flycam Stabilizer When handling your Flycam HD Stabilizer, one hand holds onto the handle while other is used to gently guide the camera in direction you wish to shoot and frame shot. For normal shooting, hold the handle in middle. - Page 7 Clamp. It helps achieving balance in just seconds and saves your valuable time. YOUR FLYCAM HD-3000 HANDHELD VIDEO STABILIZER ALL DRESSED UP AND READY TO GO! (SHOWN WITH OPTIONAL ACCESSORIES) Warranty: We offer one year warranty for our products from date of purchase. Within this period of time, we will repair it without charge for labor or parts.
-
Page 8: What's In The Box
Comfort Arm & Vest (CMFT-AV) A s s e m b l y M a n u a l What’s In The Box Please inspect the contents of your shipped package to ensure you have received everything that is listed below. Spool Adapter Soft Shoulder Locking Buckles... -
Page 9: Arm Adjustment
Stabilizer Arm & Vest Setup Attach back and front of Vest by clipping shoulder buckles. Then Put-on the Vest and attach chest buckles. Tighten the shoulder Velcro straps to a snug position. Tighten lower straps with help of Velcro on back for a comfortable fit and lock them with buckles. - Page 10 Rinse well. Storage If you are going to store Flycam Comfort Arm & Vest for a long period of time, then we recommend storing it up-right in a dry or low-to-normal humidity area.
- Page 11 Warranty: We offer one year warranty for our products from date of purchase. Within this period of time, we will repair it without charge for labor or parts. Warranty doesn’t cover transportation costs nor does it cover a product subjected to misuse or accidental damage. Warranty repairs are subjected to inspection and evaluation by us.
Need help?
Do you have a question about the HD-3000 and is the answer not in the manual?
Questions and answers