Table of Contents
Advertisement
Quick Links
Advertisement
Table of Contents

Summary of Contents for HSA SYSTEMS HSAJET MiniKey
- Page 1 Installation Manual HSAJET MiniKey MKHP4 Version 1.6 © 2020 HSA SYSTEMS...
-
Page 2: Table Of Contents
Table of Contents 1. Introduction ....................3 2. Safety instructions ..................4 3. Installation environment ................5 4. Dimensions....................6 5. Unpack the equipment ................7 6. Keyboard ....................10 7. Connect the MiniKey ................11 8. Multiple heads ................... 12 9. -
Page 3: Introduction
User manual Covers the usage of the controller. Quick guide Technician's guide to settings up this product. MiniDraw for HSAJET MiniKey Optional software for creating and uploading print jobs. Remote Communication for the Commands for ethernet and Rs232 connections Mini-series... -
Page 4: Safety Instructions
2. Safety instructions The MiniKey is a controller unit for inkjet printing. Only use this device for the intended use. Do not subject the controller to strong shocks or vibrations. Install the MiniKey in the recommended installation environment only. Only use the MiniKey with MK print heads. If the controller is used with a different type of print head, the print head will be destroyed. -
Page 5: Installation Environment
3. Installation environment Environment Condition Installation Area Indoors Ambient Temperature 10 - 40 degrees C Humidity 95 % RH or less and free of condensation Surrounding Area Install in an area free from: oil mist and dust metal shavings, oil, water or other foreign materials radioactive materials combustible materials... -
Page 6: Dimensions
4. Dimensions FIG 1 - Dimensions of a MiniKey... -
Page 7: Unpack The Equipment
5. Unpack the equipment If you have ordered a Minikey, you will receive the following parts. Controller unit Two 9 pen SUB D connectors USB Key with MiniDraw Software and manuals If you ordered extra head(s), you will receive the following parts. 1-pen head or 2-pen head (Example MK 1- p e n r em o t e ) Print cables (Cable 15 pin M-F, 2m) - Page 8 The following parts are optional Telescope mount kit Bridge for HP-printheads w/2 slides Head mount for HP-printhead (for bridge) Sensor mount for bridge Encoder mount for bridge and encoder bracket Encoder. For accurate measurement of speed. Encoder wheel...
- Page 9 Photo Sensor, fibre and optic transmitter Sensor mount for base Ink cartridge...
-
Page 10: Keyboard
6. Keyboard... -
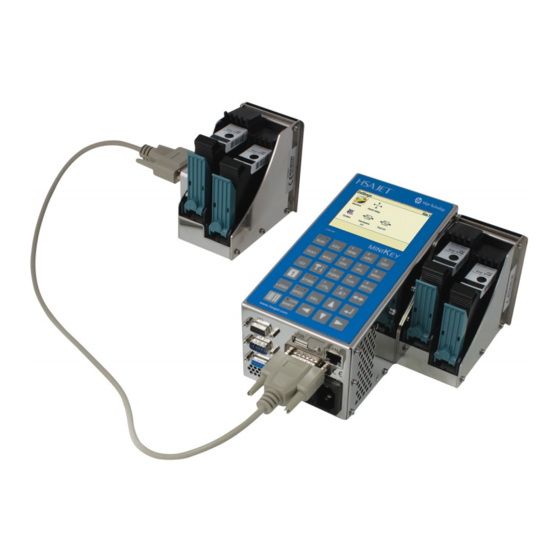
Page 11: Connect The Minikey
7. Connect the MiniKey FIG 3 - Illustration of MiniKey back panel I/O - sensor connection (SUBD 9p, F). USB connector. LAN network connection (RJ45). RS232 Serial connection (SUBD 9pF). Head 2 connector, support for extra head (2 pen). Encoder connection (SUBD 9p F). ON/OFF switch. -
Page 12: Multiple Heads
8. Multiple heads You can order a MiniKey with either 1, 2, 3 or 4 pen print capability with the following combination of heads: MiniKey with one or two remote heads 1 x 1-pen head 1 x 2-pen head 2 x 1-pen heads 1-pen + 2-pen heads 2 x 2-pen heads MiniKey with 1-pen integrated head... - Page 13 MiniKey with 1-pen integrated head and one remote head 1-pen head 2-pen head MiniKey with 2-pen integrated head and one remote head 1-pen head 2-pen head The remote head is connected to the MiniKey using a 15-pin cable, M-F. The MiniKey with integrated 1-pen or 2-pen head needs no additional cable connection.
-
Page 14: Mechanical Setup
9. Mechanical Setup Install controller near conveyor The controller must be installed at close proximity to the conveyor where it will be used. The controller and the stall must be connected with a cable no longer than 5 m. Place head on conveyor Install the head on the conveyor so that the "sole"... -
Page 15: Test Your Hardware
200mm. Encoder with shaft. Encoder directly connected to the shaft of the conveyor. The conveyors from HSA Systems have shaft encoders installed. Test your hardware When setting up the MiniKey printer, you can check that all the input/output channels and hardware connected to the controller is working as expected. - Page 16 In this screen you will find the start switch, the encoder plus the input and output channels. When the signal is ON, the small bulb will light up. Example: Activate your start switch. If the controller receives a signal from the start switch, the light bulb will light up.
-
Page 17: Support
Support For product support, please contact your local distributor. Manufacturer:...
Need help?
Do you have a question about the HSAJET MiniKey and is the answer not in the manual?
Questions and answers