Table of Contents
Advertisement
Quick Links
Advertisement
Table of Contents

Summary of Contents for EEVEE Cooking Master K1621
- Page 1 K1621 Cooking Master...
-
Page 2: General Safety Instructions
I- SECURITY INSTRUCTIONS Read these instructions thoroughly before using the appliance. Keep this instruction manual for future reference or new users. I.1 GENERAL SAFETY INSTRUCTIONS 1. Inspect the appliance for visible signs of damage before use. Do not use a damaged device. 2. - Page 3 7. When unplugging the power cord, always pull it at the plug; do not pull on the cord. 8. Do not run the appliance with an empty jug. 9. Do not use the appliance without the lid being securely clipped in place.
- Page 4 24. If the product is damaged, it must be repaired by the manufactur- er or by a third person with similar qualification, in order to avoid all risks. This particularly applies to replacing a damaged connection cable. Unqualified repairs can lead to considerable danger for the user.
- Page 5 36. Children must be kept under supervision to ensure that they do not play with the appliance. 37. Great care must be taken when handling the blades when empty- ing the bowl and during cleaning. 38. Switch off the appliance and unplug it from the power supply before changing the accessories or handling or getting near to any of the parts that move during operation.
-
Page 6: Special Safety Instructions
50. Regarding the instructions for the use of accessories, opera- tion times and speed settings, refer to the below paragraphs. 51. The appliance must not be immersed. 52. Warning: potential injury from misuse. 50. Regarding the instructions for the use of accessories, opera- tion times and speed settings, refer to the below paragraphs. - Page 7 steaming. 7. When using the steamer: make sure the steamer and the jar are properly fixed. 8. When use the machine at high speed, use it only with its lid in the correct place. 9. Do not expose any body part to the steam produced during op- eration.
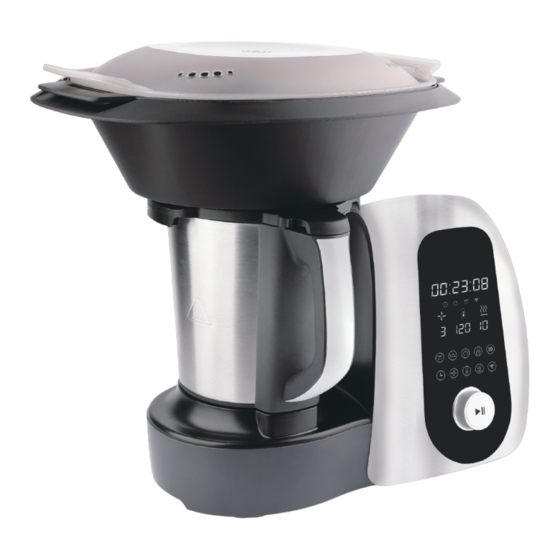
- Page 8 II-CHARACTERISTICS OF THE PRODUCT II.1 GLOBAL DESCRIPTION OF THE PRODUCT...
-
Page 9: 2Package Contents
1. Main body 2. Jar 4. LCD display 3. Jar lid 5. Start / pause / reset knob 6. Big steamer body 8. Big steamer cover 7. Big steamer rack 9. Spatula 10. Kneading blade 11. Mixing blade 12. Filter basket(small steamer) 14. - Page 10 ・1 Butterfly whisk ・2 Blades ・1 Spatula ・1 Instruction manual II.3 TECHNICAL CHARACTERISTICS OF THE PRODUCT ・The Robot will help you to create great recipes to share with your family and friends! ・Stainless steel jug with a capacity of 2L ・LCD screen with touch keys ・5 Automatic programs: steam, kneading, slow cook, soup, self-cleaning, and 13 sub programs...
- Page 11 5. Pulverize: pour sugar inside your machine and create your own icing sugar to decorate the most delicious desserts. 6. Grate: grates chocolate, chickpeas, cheese, tomato, butter, bread, coconut, nuts, peanuts, almonds and much more. 7. Beat: with the butterfly accessory, you will be able to beat easily eggs to prepare perfect omelette.
- Page 12 18. Warm: if you want any food you have prepared to stay warm, set the appliance until 100ºC and serve your meal whenever you desire. 19. Accurate cooking degree by degree: its degree-by-degree control, its adjust- able 12 hours and its 10 heating power levels make it a great-precision cooking tool. 20.
- Page 13 3. Place the jar on the main body making sure it fits properly in its correct position. If the jar is not properly placed, the product will not operate. Mixing blade and kneading blade assembly 1. Fix the sealing ring on the blades unit 2.
- Page 14 To remove the blade from its location : 1. Turn the jar over and turn the fixing support counterclockwise 2. Then remove the blade carefully. Make sure it does not fall suddenly. It may damage it. NB : •Use a cloth to cover the blades before handling to avoid injury. •If the blade is not properly attached, food or liquids during cooking may splash.
- Page 15 Measuring cup assembly The measuring cup is used as the product’s lid to prevent splashing and heat loss and is used to measure food quantity. Its maximum capacity is 100 ml. 1. Place the measuring cup on the cover’s gap. 2.
- Page 16 Warnings : It cannot be used while the product is operating with the blades or the butterfly whisk. Butterfly This accessory works installed on top of the blades unit, this way it helps mixing food. It helps food mixing and removes lumps. Install the butterfly on the blades unit by matching the shaft’s centre with the butterfly’s gap and push it down.
- Page 17 Warnings: •Do not touch or get close to the steamer to avoid scald. •Do not cover the steamer’s holes with any cloth or objects. The steam may come out from the edge or other parts which may cause risk of scald. •It is best to put foods difficult to cook on the bottom layer of the steam basket and foods easier to cook on the top layer of the steam basket.
-
Page 18: Before The Use
III.2 SUGGESTED SPEED AND CAPACITY FOR EACH ACCESSORY IV- USE OF THE PRODUCT IV.1 BEFORE THE USE Note: The product will produce a light smell when it is used for the first time and will disappear after a few minutes. This is due to the manufacturing rests and do -es not affect to it’s operating. -
Page 19: Practical Advice
liquid. Rinse with clear water and dry carefully with a soft cloth. Connect it to a power supply and press the power switch to turn it on. The machine will beep and the display will turn on. IV.2 PRACTICAL ADVICE •After use, the jar may be hot. -
Page 20: On/Off Switch
ON/OFF SWITCH The switch is on the back of appliance. Use this switch to switch the appliance on or off. Start/Pause knob and Reset function 1. Use the knob to adjust all settings: time, temperature etc. Turn it clockwise to increase the value and anticlockwise to decrease it. - Page 21 2. During operation, you can press the timer button to adjust the cooking time and the appliance will start counting down automatically. 3. If the timer has not been set, the product will operate with the preset times: -Heating (without blending): max. 12 hours -Blending (speed 1-4): max.
- Page 22 Warnings : When speed changes from 5 to 6 or when the appliance starts working, the appliance could emit some noise. This is completely normal and does not affect the appliance’s operation. To crush or chop hard or large quantities of food, select speed 5 at first and then switch it to 10 to ensure perfect performance.
-
Page 23: Automatic Programs
IV.3 AUTOMATIC PROGRAMS The appliances provides 5 auto-program buttons for SCALE, KNEAD, SLOW COOK and TURBO and 18 sub programs. Steam Scale Turbo Knead Slow cook Scale Scale function Knead The knead program has 3 sub programs: P1, P2 and P3 Steam The steam program has 3 sub programs: P1, P2 and P3 The slow cook program has 3 sub programs: P1, P2 and P3... - Page 24 Knead Recommended accessory : kneading blade Program Type Classic bread and pizza pastry Pastry Dessert Chocolate cake 200g flour Phase 2 chocolate 100g butter Phase 1 500g flour mousse Phase 1/2 spoon salt 2 coffee spoon salt 300g water vanilla 1 bag of vanilla 1 coffee spoon oil 25g fresh yeast...
- Page 25 •Speed: 3 •Time: 4 mins To meet individual needs, the program allows user to adjust some temperature and cooking time in a certain range. For example, cooking time of P3, default time is 15 minutes, but you can adjust from 5 to 30 minutes as you want. Warning : For P1, when machine finish program, remember to take out the ferm -ented flour from Jar.
- Page 26 Steam Recommended accessories : big steam basket and small steam basket Program Type 2 pers : 1L 4/6 pers : 1L Defrost: 200 m Temperature: 80°C 120°C 120°C adjustable (70°C to 90°C) Power heat Speed 30 min 20 min 50min Time:adjustable (10 min to 60min) (5 min to 60 min)
- Page 27 Slow cook Recommended accessories : mixing blade for P1, kneading blade for P2 and P3 Program Type Stir fry:onions Slow cook Slow cook 95°C 95°C Temperature: 120°C (90°C to 100°C) (90°C to 100°C) adjustable Power heat Speed 5 min 45 min Time:adjustable 45min (2 min to 5min)
-
Page 28: V- Cleaning And Maintenance
Turbo 1. This function is to let machine work at highest speed. During standby model, you can press this button for the appliance to operate at maximum speed. 2. Stop pressing the button, the machine will stop immediately. 3. This function can only operate for 1 minute maximum each time. Warning: when the TURBO function is activated, the appliance could emit some big noise as it is working at highest speed. - Page 29 VI- TROUBLESHOOTING The display on the screen of the following error codes is normal. If the problem per- sists after you have made the solution listed below, contact our Customer Service Center. Description Error code Possible reasons Solution Re-assemble the jar and jar lid, Safety switch not fixed make sure all the parts are asse Jar or jar lid is not fixed properly.
- Page 30 The product has been disassembled, modified, or repaired by persons, not autho- rized by the official Technical Support Service of EEVEE.
- Page 31 2 years, based on current legislation, except consumable parts. In the event of misuse, the warranty will not apply. If at any moment you detect any problem with your product or have any doubt, do not hesitate to contact EEVEE Technical Support Service.
- Page 32 Wifi Connection Steps 1. Download APP “TuyaSmart” 2. Open App, select “+” on the upper right corner, select “Kitchen Appliances”, then “Cooker”, input Wifi account and password.
- Page 33 3. Press Wifi button on the machine around 3 seconds, Wifi indicator will rapidly blink. 4. Select “ Confirm indicator rapidly blink”, then select “Next”. 5. Waiting for connecting between App and machine , App will show machine’s model after successful connection.
- Page 34 Skilled user to setup everything Cloud Recipes Simple Chef Collecting delicious recipes Useful pre-installed from worldwide instant programs Explore the wonderful cooking world from EEVEE! Thanks for choosing EEVEE robot. EEVEE Technology Co., Ltd. All rights reserved...
Need help?
Do you have a question about the Cooking Master K1621 and is the answer not in the manual?
Questions and answers