Table of Contents
Advertisement
Quick Links
Advertisement
Table of Contents

Related Manuals for Vivint Smart Hub Lite

Summary of Contents for Vivint Smart Hub Lite
- Page 1 Getting Started User Guide Smart Hub Lite ...
- Page 2 Copyright © 2022 Vivint, Inc. All rights reserved. 4931 N 300 W Provo, UT 84604 Vivint and its respective logos are registered trademarks or trademarks of Vivint, Inc. in the United States and other countries. All other trademarks are the property of their respective owners.
- Page 3 ...
-
Page 4: Table Of Contents
Getting Started User Guide Welcome to Vivint Smart Home Get Support Stay Connected Your Smart Hub Lite About the Keypad Interface Using the Vivint App Set Up the Hub Add Devices to the Hub What's Next Arm the Security System... - Page 5 Regulatory Compliance Declarations Additional Information: Regulatory Compliance Wireless Product Notice Environmental (Operating Humidity and Temperature Ranges) Notice Power Supply Notice Internal Backup Battery Notice Applicable Warnings General Regulatory Compliance Notes Default Settings Documented for SIA CP-01-2019 Compliance Important Fire Protection and Safety Guidelines Service and Warranty Information Technical / Hardware Specifications...
-
Page 6: Welcome To Vivint Smart Home
Welcome to Vivint Smart Home Thank you for your purchase and welcome to your new Vivint Smart Hub Lite™ , our latest innovation in DIY smart home security and automation technology. This guide will help you quickly get to know and start using your "hub" as well as introduce you to many of the exciting state-of-the-art features and services offered by an integrated, intelligent Vivint Smart Home™... -
Page 7: Your Smart Hub Lite
Your Smart Hub Lite The Vivint Smart Hub Lite is a user-installable control hub that acts as the central component of the DIY Vivint Smart Home — a fully supervised, integrated, and intelligent home security and automation ecosystem. The screenless "hub" monitors and manages all aspects of your system, including security sensors (door and window, motion, glass break, etc.), life... -
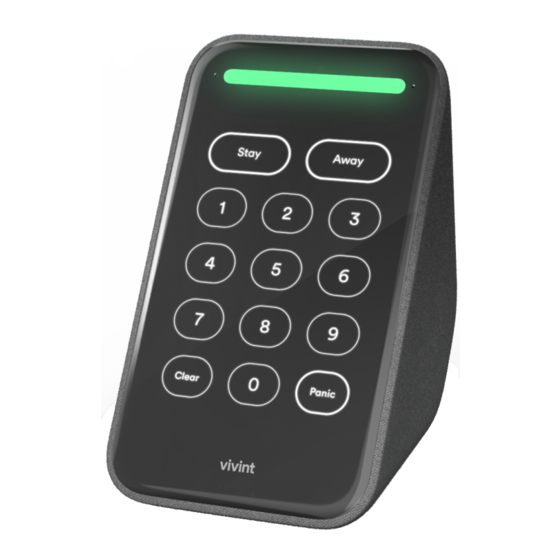
Page 8: About The Keypad Interface
About the Keypad Interface The Smart Hub Lite itself provides user interaction with a numeric keypad for PIN entry; Arm Away and Arm Stay buttons to control and customize home protection (i.e., supervised security via the Vivint Monitoring Center); a Clear button to re-enter a PIN code;... - Page 9 Back v iew Bottom v iew ...
-
Page 10: Using The Vivint App
Vivint Smart Home tasks. You can download the Vivint app to your mobile device and access the main menu in the upper left corner to explore all of the available tools and features. See the specific "How To"... -
Page 11: Set Up The Hub
Set Up the Hub This outline provides a summary of the installation of a Vivint Smart Hub Lite and the sensors and devices that make up your system. Setup and configuration, as well as subsequent control and usage of the system, is done via the Vivint app. - Page 12 Sample DIY hub setup screens ...
- Page 13 ...
- Page 14 ...
-
Page 15: Add Devices To The Hub
Doorbell Camera Pro NOTE: Additional sensors and devices that are compatible with the Vivint Smart Hub Lite will be available in future releases. See the Vivint Support site, or contact a Vivint Smart Home specialist, for more information. ... - Page 16 Sample DIY add dev ice screens ...
-
Page 17: What's Next
What's Next With your sensors and devices added to the Vivint Smart Hub Lite system, you can begin using all of its features. The following sections describe how to use your smart home system at the hub with the keypad as well as via the app in order to perform basic home security and system management tasks. -
Page 18: Arm The Security System
If a sensor is triggered when the system is armed (in either Stay or Away mode), an alarm results and the Monitoring Center contacts you through Vivint Live™ two-way voice communication via the hub or the mobile app. To arm the security system in either Stay or Away mode: At the hub keypad, press the Stay or Away button. - Page 19 Silent Exit—Use this option to mute sounds during your exit this time. Turn off Entry Delay—Use this option to turn off the delay timer, so the system arms immediately rather than counting down. *Some 24-hour sensors such as smoke and CO detectors, panic pendants, and flood sensors are always active and can trigger an alarm 24x7x365.
-
Page 20: Arm To Stay Mode
Arm to Stay Mode Arming to Stay Mode is for arming the home security service when people are staying in the house. Stay Mode arms the sensor‐ protected perimeter doors and windows while not arming the interior motion sensors or other interior doors. This allows your home to be occupied while the system is partially armed. -
Page 21: Arm To Away Mode
Arm to Away Mode Arming to Away Mode is for arming the system when everyone is leaving the house. Away Mode arms all sensor-protected perimeter doors and windows, interior motion sensors, interior glass break sensors, and any other sensor-protected interior doors. Your home must be unoccupied while the system is armed in Away Mode. - Page 22 Silent Exit in Away M ode Three options for silencing the beeps and announcements are available when arming or disarming the system in Away Mode. On the Home screen, a Silent Exit option is displayed. On the Arming screen, a Silent Exit option is displayed. ...
-
Page 23: Disarm The Security System
Disarming also shuts off any alarm currently in process. To disarm the security system: At the hub keypad, use the numeric buttons to enter you personal code (PIN). Or, using the Vivint app... Press the Security icon and disarm the system by dragging down and entering your personal code (PIN). -
Page 24: Additional Information: Disarming
When the timer runs out, the system returns to the normal Stay Mode. The Quick Exit option is on by default, and can be turned on or off by your Vivint Field Service Professional. -
Page 25: If A Security Alarm Occurs
If a Security Alarm Occurs If an armed sensor is tripped while the system is armed in either Stay or Away Mode, an alarm occurs and the siren sounds. Delayed sensors start the Entry Delay to allow time to disarm the system. Instant sensors trigger the alarm right away. Most sensors trigger the alarm siren while some sensors may be set to trigger a silent alarm without sounding the siren. -
Page 26: Emergency And Fire Protection
2. The panel will send a signal immediately and a Monitoring Center representative will confirm the emergency through Vivint Live, which is the two-way voice communication at the panel. If no one at your home responds, the representative will call your emergency contacts. -
Page 27: Additional Information: Fire Safety
The fire alarm sound continues for four minutes or until you enter a User PIN at the hub. Your Vivint Field Service Professional can increase the amount of time the fire alarm sounds before automatically turning off. - Page 28 1. Yell "FIRE!" to alert everyone else. 2. If the panel is easily accessible and the alarm has not activated, go to the panel and press the white lighted button, then press and hold down the Fire button on the touchscreen for at least 2 seconds. This action triggers the panel fire alarm. 3.
-
Page 29: Smart Home Automation And Control
Smart Home Automation and Control The Smart Hub Lite offers integrated, intelligent home automation and communication with smart connected devices* that can be accessed and controlled remotely with the Vivint app on your laptop, tablet, or smartphone. With the app, access your connected devices via the menu icon. -
Page 30: Add Users And Configure System Access
Add Users and Configure System Access As the primary admin user, you can add other users to your Vivint Smart Home system like family members and trusted friends, give them admin rights, and specify their access. Be aware that users with admin rights can change system settings. -
Page 31: Duress User
Duress User The Duress User Code initiates a silent alarm for help by secretly sending a Duress report to the Vivint Central Station (i.e., Monitoring Center). IMPORTANT: Use the Duress Code only if someone is forcing you to operate your security system against your will. -
Page 32: Remote Access And Control Via The Mobile App
Remote Access and Control via the Mobile App You, and your invited users, can access and control your Vivint system from anywhere and anytime with a smartphone or other mobile device using the Vivint app The app interface closely resembles the panel display making it familiar and easy to use. - Page 33 Download and install the mobile app Go to the App Store (iOS) or Google Play (Android), search for the Vivint Smart Home app, and install it. You can also go to vivint.com/mobile to learn more. Sign in to the mobile app On your mobile device, open the app and enter your email and password.
-
Page 34: Acknowledge And Clear Alert Notifications
Acknowledge and Clear Alert Notifications Vivint continually monitors security sensors, smart home devices, and the hub itself to ensure optimal performance and communicate timely status information via the panel and apps. Whenever events or conditions are detected that require your attention, the hub displays an Alert notification (in the case of emergency alerts it also beeps) until the alert is acknowledged. -
Page 35: Additional Information: System Trouble Alerts
A low battery alert means that the sensor / device that is identified in the alert has a low battery, so you must replace it. Replacing the batteries for each device is relatively simple. The Vivint Support website provides detailed tutorials for each device to teach you how to change its batteries. - Page 36 Tamper A Hub tamper alert occurs when the Hub battery cover is not completely secured. To fix the issue, you will need to perform a visual inspection of the Hub to check for any obvious signs of what might be causing the Hub to set off the tamper alert. Please note, if the tamper alert continues and you Arm your system, there is the chance that the alarm will sound.
-
Page 37: System Test
System Test Although your Vivint Smart Hub Lite is a fully supervised (monitored) and integrated security system, it is still important to regularly test the hub and its connected devices in order to ensure proper functionality, optimal performance, and continued protection. - Page 38 If a sensor, detector, or the hub does not successfully pass its test, first try repeating the System Test. If it continues to fail, please contact Customer Care to resolve any issues. NOTE: System Test start and stop reports are sent to the Vivint Monitoring Center.
-
Page 39: System Settings
System Settings Once the system is installed, various system settings can be configured in order to customize the installation. This section describes each of those settings, their pre-set default value, and their available optional values. System Settings List ... - Page 40 Swinger Shutdown Count DEFAULT: 2 trips (NOTE: Default Setting Required for SIA C P-01 C ompliance) An unwanted series of multiple faults (usually caused by a bad contact or sensor) is called a "swinger." The swinger shutdown count option sets the maximum number of alarms that any sensor or hardwire loop can trigger during a single arming period.
- Page 41 Exit Delay (in seconds 45-120) DEFAULT: 60 seconds (NOTE: Default Setting Required for SIA C P-01 C ompliance) The Exit Delay can be set from 45 to 120 seconds. NOTE: This default can be changed without affecting SIA CP-01 compliance. ...
- Page 42 Entry Delay 1 (in seconds 30-240) DEFAULT: 30 seconds (NOTE: Default Setting Required for SIA C P-01 C ompliance) The Entry Delay 1 can be set from 30 to 240 seconds. The default sets the Entry Delay 1 to 30 seconds. ...
- Page 43 The dialer delay reduces nuisance traffic to the Vivint Monitoring Center and can prevent receiving fines that many cities impose when police respond to a false alarm. Your installer also can program the system for no dialer delay.
- Page 44 manually activate an Emergency alarm at the panel, the user must first press the Emergency button on the status bar, and then press the appropriate button (Panic, Emergency, or Fire). NOTE: If all three emergency buttons are disabled, pressing the hub’s Emergency button displays a message that says the emergency buttons are disabled.
- Page 45 (09) 24-hour Fire This sensor type is continuously armed 24-hours a day. A sensor configured to this type will trigger the local alarm fire sounder and the external siren regardless of the mode the system is in. Typical use would be for wireless smoke detectors. This sensor type is always active and cannot be bypassed.
- Page 46 required to bypass open sensors when the system is armed. The default setting is Off. Quick Exit The Quick Exit option allows you to start the Exit Delay while the system is armed. This allows you to exit the home without having to disarm and rearm the system. When the Quick Exit option is on, a Quick Exit button will display on the security screen.
- Page 47 NOTE: The auto stay feature does not switch the system to Stay Mode if the system is armed to Away Mode using a key fob remote or remotely armed via telephone or computer. Key Fob Settings Key Fob Arm/Disarm Sound The system can be set so when it’s armed or disarmed by a wireless key fob, a beep will sound through the internal and external sounders to indicate that the key fob’s signal was received.
- Page 48 To turn off the Exit Delay restart feature, select disabled. Cancel Time To limit responses to false alarms, a "cancel" message will be sent to the Vivint Monitoring Center if the system is disarmed within a preset period of time after an alarm is triggered.
- Page 49 Cancel Display A "cancel" message will be sent to the Vivint Monitoring Center if the system is disarmed within a preset period of time after an alarm is triggered. The system can be set to display that a cancel report was sent, or for higher security, the system can be set to not display the cancel message.
- Page 50 Two-way Voice The system can connect with a Central Station operator so they can converse with people after an alarm. The two-way voice option allows communication to and from the panel and the Central Station. Two‐ way voice communications will occur after the system has made its alarm report.
- Page 51 The default setting sets the cross sensor timeout at 10 seconds. To change the cross sensor timeout duration, select (10-120) seconds. ...
-
Page 52: Frequently Asked Questions (Faq)
What happens when the hub loses AC power? The Vivint Smart Hub Lite runs on AC power, but is also equipped with an internal backup battery in case the AC power supply becomes disconnected or is interrupted (e.g., during a power outage or if the AC adapter is accidentally unplugged from the outlet). - Page 53 Vivint. When Vivint receives a duress code, we will immediately dispatch the police without attempting to contact you.
-
Page 54: Regulatory Compliance Declarations
FCC and ISED Canada Regulatory Compliance Declarations The complete FCC and ISED Canada (Innovation, Science and Economic Development) Regulatory Compliance Declarations are posted online at the Vivint website. The full text of these notices is also provided below, as a convenient reference for anyone who installs, configures, or uses the system. - Page 55 This product complies with FCC and ISED radiation exposure limits for an uncontrolled environment. Avoid operating this product at a distance less than 20 cm (7.9 in) from the user. CAUTION: The device for operation in the band 5150–5250 MHz is only for indoor use to reduce the potential for harmful interference to co-channel mobile satellite systems.
- Page 56 ISED C anada Notice (Av is D'Innov ation, Sciences et Dév eloppement économique C anada) PRUDENCE: Changements ou modifications pourraient annuler le droit de l'utilisateur à utiliser l'équipement non autorisées. Conformément à la réglementation d'Industrie Canada, le présent émetteur radio peut fonctionner avec une antenne d'un type et d'un gain maximal (ou inférieur) approuvé...
- Page 57 FCC ID: 2AAAS-CP06 IC: 10941A-CP06 Contains FCC ID: 2AAAS-CC06 Contains IC: 10941A-CC06...
-
Page 58: Additional Information: Regulatory Compliance
IMPORTANT: In case the power supply becomes unplugged, be sure to plug it back into an unswitched outlet. Do NOT connect the power supply to a receptacle controlled by a switch. For power supply replacement information and instructions, contact Vivint Customer Care. ... -
Page 59: Applicable Warnings
/ Security Industry Association Security System Standard: ANSI/SIA CP-01-2019. The notes below — consolidated here as a convenient single reference — describe unique technological and/or functional aspects of the Vivint system related to that particular feature, and are applicable to specific regulatory standards as cited. - Page 60 NOTES NOTE: For information about the licensing of third-party software used on this hub device, go to: vivint.com/legal/fcc and click on the link at the bottom of the page. NOTE: Some cities and municipalities may require an alarm system permit. The person who installs the system is responsible to know these requirements OR to check with the local authorities before installing the system.
- Page 61 IMPORTANT: UL Recognized Internal battery pack – EVE, model HB1021 – shall be employed, providing 24 hours of battery backup. IMPORTANT: For UL 1023 and CAN/ULC-S304 (Standard for Household Burglar Alarm System Units) compliance, make sure the following requirements are met: 1.
-
Page 62: Default Settings Documented For Sia Cp-01-2019 Compliance
SIA CP-01-2019 Compliance Several of the Vivint system's security-related feature settings are configurable (i.e., programmable) — by either the home owner or the Vivint technician — and their default value is pre-set in order to ensure compliance with the security industry standard:... - Page 63 Standard Vivint Feature Default Value Range Vivint Documentation Section # (SIA name) Value (if configurable) (if required) "Exit Delay Restart" Exit Delay Restart Enabled or page 16. Also, see 4.2.2.3 Enabled (Exit Time Restart) Disabled "Exit Delay Restart" on page 43. 4.2.2.4 Enabled Not required.
- Page 64 Standard Vivint Feature Default Value Range Vivint Documentation Section # (SIA name) Value (if configurable) (if required) "Emergency 4.2.4.2 Enabled Buttons Settings" on Manual Alarms ‡ page 38. System "Key Fob Settings" 4.2.4.3 Enabled page 42. Acknowledg. ‡ Remote Arming - Exit Time &...
- Page 65 Standard Vivint Feature Default Value Range Vivint Documentation Section # (SIA name) Value (if configurable) (if required) "Add Users and Use of Duress Disabled or 4.2.6.1 Disabled Configure System Feature Enabled Access" on page 25. User Unique 4-digit "Duress User" on 4.2.6.2...
- Page 66 Standard Vivint Feature Default Value Range Vivint Documentation Section # (SIA name) Value (if configurable) (if required) 4.6.4 Enabled Not required. Initiation of Test ‡ "System Test" on 4.6.5 Enabled Communication ‡ page 32. "System Test" on 4.6.6 Enabled Test in Progress ‡...
-
Page 67: Important Fire Protection And Safety Guidelines
Fire Alarm System The Vivint system may be installed with smoke detectors as part of an overall fire and gas protection system. The fire protection part of the security system is active 24 hours a day, offering continuous protection. - Page 68 Automatic Fire Alarm If your detectors trigger a fire emergency alarm before you sense a problem AND the fire alarm is already sounding, follow these steps: 1. If flames and/or smoke are present, yell FIRE! to alert anyone else around. 2.
- Page 69 Installing Smoke Detectors Follow the guidelines below when installing smoke alarms/detectors. Keep in mind these specific guidelines are from the National Fire Protection Association website: nfpa.org. Choose smoke alarms that have the label of a recognized testing laboratory. Install smoke alarms inside each bedroom, outside each sleeping area and on every level of the home, including the basement.
- Page 70 of the dwelling unit, including the basement. The living area smoke alarm should be installed in the living room or near the stairway to the upper level, or in both locations. The basement smoke alarm should be installed in close proximity to the stairway leading to the floor above.
- Page 71 Emergency Evacuation Plan To establish and regularly practice a plan of escape in the event of fire, the following steps are recommended by the National Fire Protection Association: 1. Position your detector or your interior and/or exterior sounders so that they can be heard by all occupants in your home.
-
Page 72: Service And Warranty Information
Service Information Your local Vivint Smart Home Pro technician is the person best qualified to service your system. Should your system require service due to ordinary wear and tear while under contract, we will repair or replace the equipment for free. Note that trip fees may apply. -
Page 73: Technical / Hardware Specifications
Technical / Hardware Specifications This section provides a comprehensive list of technical hardware specifications and standards certifications and listings for the: Vivint Smart Hub Lite. V iv int Part Number (P/N) VS-HP2000-000 C ompliance M odel Number (M /N) ... - Page 74 Toggle function to enable/disable audio feedback Key include: 0-9 numbers, panic, clear, arm stay, arm away Audio Speaker: max 85dB SPL at 10 feet (3 meters) Dual microphones LEDs (v isual status indicators) LEDs: Provide visual feedback of keys pressed, security status, errors with the hub and system, and lighting for interaction in the dark ...
- Page 75 Env ironmental (Operating H umidity and Temperature Range) The hub will operate normally at humidity levels of 0 – 90% non-condensing. The hub will operate normally at temperatures between 0°C to 49°C (32°F to 120°F). For optimal battery operation, the recommended temperature range is 0°C to 35°C (32°F to 95°F).
- Page 76 ...
Need help?
Do you have a question about the Smart Hub Lite and is the answer not in the manual?
Questions and answers