Table of Contents
Advertisement
Quick Links
CITY MULTI Control System
and Mitsubishi Mr. SLIM Air Conditioners
MA Remote Controller
PAR-40MAA
Instruction Book
Prior to use, thoroughly read the instructions in this manual to use the product correctly.
Retain for future reference.
Make sure that all the included manuals are passed on to any future users.
To ensure safety and proper operation of the remote controller, the remote controller should
only be installed by qualified personnel.
<ORIGINAL>
WT09014X01
en
Advertisement
Table of Contents

Related Manuals for Mitsubishi Electric CITY MULTI PAR-40MAA


Summary of Contents for Mitsubishi Electric CITY MULTI PAR-40MAA
- Page 1 <ORIGINAL> WT09014X01 CITY MULTI Control System and Mitsubishi Mr. SLIM Air Conditioners MA Remote Controller PAR-40MAA Instruction Book Prior to use, thoroughly read the instructions in this manual to use the product correctly. Retain for future reference. Make sure that all the included manuals are passed on to any future users. To ensure safety and proper operation of the remote controller, the remote controller should only be installed by qualified personnel.
-
Page 2: Safety Precautions
Safety precautions • Thoroughly read the following safety precautions before using the unit. • Observe these precautions carefully to ensure safety. WARNING Indicates a risk of death or serious injury. CAUTION Indicates a risk of serious injury or structural damage. •... -
Page 3: Additional Precautions
This controller is designed for exclusive use with the a dry cloth. Do not use the detergent straight. Building Management System by Mitsubishi Electric. The use of this controller for with other systems or for other purposes may cause malfunctions. -
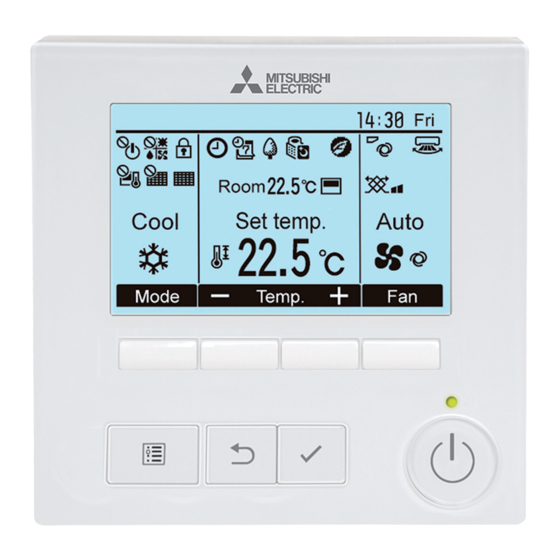
Page 4: Controller Components
Controller components Controller interface ⑤ ⑥ ④ ③ ② ① Function buttons ⑨ ⑦ ⑧ ⑩... - Page 5 The functions of the function buttons ① ON/OFF button change depending on the screen. Refer Press to turn ON/OFF the indoor unit. to the button function guide that appears at the bottom of the LCD for ② SELECT button the functions they serve on a given Press to save the setting.
- Page 6 Controller components Display The main display can be displayed in two different modes: “Full” and “Basic.” The factory setting is “Full.” To switch to the “Basic” mode, change the setting on the Main display setting. Full mode * All icons are displayed for cde f g h explanation.
- Page 7 ① Operation mode ⑮ Appears while the units are operated in the ② Preset temperature energy-save mode. (Will not appear on some models of indoor units) ③ Clock ⑯ See the Installation Manual. Appears while the outdoor units are operated in ④...
-
Page 8: Icon Explanations
Icon explanations Controller operation The table below Timer summarizes the square icons used in this manual. The administrator or maintenance user password must be entered Main on the password input screen to change settings. There is no settings that can skip this process. Indicates settings that : Press to move the cursor left. -
Page 9: Basic Operations
Basic operations Power ON/OFF Button operation Press the button. ON/OFF The ON/OFF lamp will light up in green, and the operation will start. When “LED lighting” is set to “No,” the ON/OFF lamp will not light up. Press the button again. ON/OFF The ON/OFF lamp will come off, and the operation will stop. -
Page 10: Operation Mode
Operation mode, temperature, and fan speed settings Button operation Operation mode Each pressing of the F1 button cycles through the following operation modes. Select the desired operation mode. Cool Auto Heat • Operation modes that are not available to the connected indoor unit models will not appear on the display. -
Page 11: Preset Temperature
Basic operations Preset temperature <Cool, Dry, Heat, and Auto (single set point)> Press the F2 button to decrease the preset Operation mode temperature, and press the F3 button to increase. Room • Preset temperature range cannot be set for Fan/ temperature Ventilation operation. -
Page 12: Fan Speed
Press the F1 or F2 button to move the cursor to the desired temperature setting (cooling or heating). Press the F3 button to decrease the selected Preset temperature temperature, and press the F4 button to increase. for cooling • Refer to the table below for the settable temperature Preset range for different operation modes. -
Page 13: Navigating Through The Menu
Navigating through the menu Main menu list Main menu Setting items Setting details Operation Vane•Louver•Vent. Use to set the vane angle. (Lossnay) • Select a desired vane setting from five different settings. Use to turn ON/OFF the louver. • Select a desired setting from “ON” and “OFF.” Use to set the amount of ventilation. - Page 14 Main menu Setting items Setting details Energy Energy Schedule Set the start/stop times to operate the units in the energy-save saving saving mode for each day of the week, and set the energy-saving rate. • Up to four energy-save operation patterns can be set for each day. •...
- Page 15 Navigating through the menu Navigating through the Main menu Button operation Accessing the Main menu Press the button on the Main display. Menu The Main menu will appear. Item selection Press to move the cursor left. Press to move the cursor right. Cursor...
- Page 16 Clock Button operation Select “Initial setting” from the Main menu and press the button. SELECT Clock setting is required before making the following settings. • On/Off timer • Weekly timer • OU silent mode • Energy saving • Night setback If a given system has no system controllers, the clock time will not automatically be corrected.
-
Page 17: Function Settings
Function settings Move the cursor to “Clock” with the button, and press the button. SELECT Move the cursor to the desired item with the button out of year, month, date, hour, or minute. Increase or decrease the value for the selected item with the button, and press the SELECT... -
Page 18: Daylight Saving Time
Daylight saving time Function description The start/end time for daylight saving time can be set. The daylight saving time function will be activated based on the setting contents. • If a given system has a system controller, disable this setting to keep the correct time. •... - Page 19 Function settings Move the cursor to the following items with the button to make the settings. • Select “No” (disable) or “Yes” (enable) with the button. The default setting is “No.” • Date(Start) Set the day of the week, week number, and month with the button.
-
Page 20: Language Selection
Language selection Function description The desired language can be set. The language options are English, French, German, Spanish, Italian, Portuguese, Swedish, Russian, Greek, Turkish, Dutch, Czech, Hungarian, and Polish. Button operation Select “Display setting” from the Initial setting menu, and press the button. - Page 21 Function settings Move the cursor to the language you desire with the through buttons, and press the button SELECT to save the setting. When the power is on for the first time, the Language selection screen will be displayed. Select a desired language.
-
Page 22: Troubleshooting
Troubleshooting Error information When an error occurs, the following screen will appear and the operation LED will blink. Check the error status, stop the operation, and consult your dealer. Button operation Error code, error unit, refrigerant address, unit model name, date and time on which an error occurred, and serial number will appear. - Page 23 Press the button or the button to reset ON/OFF the error that is occurring. Errors cannot be reset while the ON/OFF operation is prohibited. Select “OK” with the button. A confirmation screen will appear. Navigating through the screens • To go back to the Main menu ..button MENU...
- Page 24 Troubleshooting Checking the error information While no errors are occurring, page 2/2 of the error information can be viewed from the menu operation. Select “Maintenance” menu from the Main menu, and press the button. SELECT To display the error information screen, select “Error information”...
-
Page 25: Maintenance
Maintenance Filter information will appear on the Main display in the Full mode when it is time to clean the filters. Wash, clean, or replace the filters when this sign appears. Refer to the indoor unit Instructions Manual for details. Button operation Select “Filter information”... - Page 26 Select “OK” with the button. A confirmation screen will appear. Navigating through the screens • To go back to the Main menu ..button MENU • To return to the previous screen ..button RETURN When the is displayed on the Main display in the Full mode, the system is centrally controlled and the filter sign cannot be reset.
- Page 27 The product at hand is based on the following EU regulations: • Electromagnetic Compatibility Directive 2014/30/EU HEAD OFFICE: TOKYO BLDG. , 2-7-3, MARUNOUCHI, CHIYODA-KU, TOKYO 100-8310, JAPAN MANUFACTURER: MITSUBISHI ELECTRIC CORPORATION Air-conditioning & Refrigeration Systems Works 5-66, Tebira 6 Chome, Wakayama-city, 640-8686, Japan WT09014X01_en...