Advertisement
- 1 CONTENTS
- 2 SAFETY AND WARNINGS
- 3 SPECIFICATIONS
- 4 OPERATING CONDITIONS
- 5 ASSEMBLY
- 6 DISASSEMBLY FOR STORAGE
- 7 CHARGING THE BATTERY
- 8 OPERATION
- 9 READING THE DISPLAY
- 10 SMART PHONE CONNECTION
- 11 TIPS
- 12 AC ADAPTER
- 13 BATTERIES
- 14 ENVIRONMENTALLY SAFE BATTERY DISPOSAL
- 15 Videos
- 16 Documents / Resources
STOP! If you have a problem with this product, DON'T RETURN IT TO THE STORE WHERE YOU PURCHASED IT. Contact customer service at...

2501 LeMone Industrial Blvd. / Columbia, MO 65201
573-445-9200 / Email: sales@btibrands.com
Or visit our website @ www.BTIbrands.com
NOT WARRANTED AGAINST MISUSE, ABUSE, OR COMMERCIAL USE.
Limited Warranty
Every Caldwell product is warranted to be free of defects in materials and workmanship for a period of one (1) year from the date of original purchase. Caldwell will, at its option, repair or replace without charge, except for transportation costs, parts that fail under normal use and service when operated and maintained in accordance with out Instructions. This warranty does not apply to normal wear or to items whose life is dependent upon their use and care. This warranty is in lieu of all other warranties, expressed or implied and releases Caldwell, its affiliates, and its vendors from all other obligations and liabilities.
CONTENTS
CHRONOGRAPH CONTENTS:
- Chronograph

- 2 Ground-Screen Assembly

- Ground-Screen Connector

- Charging Cable

- USB Wall Adapter

- Tripod

- Carrying Case

- European Plug Adapter


SAFETY AND WARNINGS
READ THOROUGHLY ALL DIRECTIONS AND SAFETY INSTRUCTIONS INCLUDED IN THE PACKAGE. FAILURE TO COMPLY MAY RESULT IN AN UNSAFE FIREARM CONDITION THAT MAY CAUSE PROPERTY DAMAGE, PERSONAL INJURY OR DEATH.

Target must have a safe backstop. Always follow all applicable safety rules while using the chronograph, including but not limited to:
- Firearm and shooting safety rules
- Airgun, paintball gun safety rules
- Ammunition reloading safety rules
- Archery safety rules
If you are not familiar with applicable rules for your application consult the manufacturer(s) of the firearm, airgun, paintball gun, bow or reloading equipment/component...
Velocity measurements should not be used to calculate combustion pressures in your cartridge or chamber. Again, do not exceed published maximum powder levels in your ammunition.
Do not try to protect your chronograph with armor plating. Bullet ricochet from hitting this plating could cause property damage, personal injury or death. Intentional or unintentional shooting of the chronograph will void factory warranty.
All chronograph units have inherent uncertainty when recording velocity measurements. Several uncontrollable variables can affect each measurement and contribute to this uncertainty, including sunlight intensity, sunlight orientation, cloud cover, wind, shadows, and ground reflectivity of cement, water, or snow, etc. When collecting data, be suspicious of any data points that have greater than 4% difference from that ammo's average string velocity.
Special care should be taken when shooting certain types of ammunition. Gas checks, wads, sabots, etc. Can separate and impact your chronograph causing damage to the device.
As with any electronic device, water can damage certain components. To prevent damage, do not use chronograph outside when it is raining without being protected.
SPECIFICATIONS
- Velocity range 1 to 9000 FPS (2743 MPS)
- Operating temperature: 20 – 140 degrees F (-6° - +60°C)
- Bluetooth® 4.0 (Requires use of the Caldwell® App)
OPERATING CONDITIONS
This chronograph is a highly sensitive measurement instrument and has a built-in lithium-ion rechargeable battery. To prevent damage to the internal components, the following conditions must be met.
Moisture: Keep the Chronograph dry at all times. Do not use this device in the rain.
Temperature: Operating Range: 0-140°F (60°C). Do not leave your chronograph in a hot car.
NOTE: When using the chronograph in temperatures below 50°F (10°C)., the battery life will be reduced.
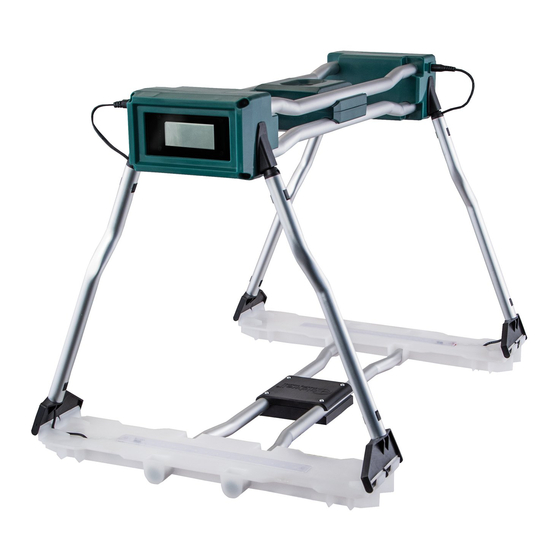
ASSEMBLY
- Connect one of the Ground Screen assemblies to the Ground Screen Connector by sliding the tubes into the notches. (PHOTO 1)
NOTE: Make sure the tubes are fully inserted so the tubes are fully seated against the back wall & the screen (PHOTO 1)

- Connect the second Ground Screen assembly on the other side
- Place the Ground Screen Assembly onto the tripod and turn the thread wheel until it is firmly tightened.
- Slide each of the four support bars to the connectors on the sides of the chronograph (PHOTO 2)

- Connect the two wires to the plugs in the side of the housing. (This is only necessary if the light kit is being used)


DISASSEMBLY FOR STORAGE
The chronograph comes with a zippered case for transportation and storage. As this is a highly sensitive measurement instrument, care should be taken at all times to keep the Chronograph free from dirt, dust and moisture.

To disassemble the chronograph for transportation or storage, follow these steps:
- Unplug the two wires from the side of the housing for the LED lights
- Lift the chronograph off of the four support rods and place it in the center pocket of the carry case.
- Fold the support rods down onto the Ground Screens as shown
- Remove the Ground Screens from the Ground Screen Connector and place all three pieces in one of the pockets of the case.
- Fold up the tripod and place it in the third pocket of the case.
CHARGING THE BATTERY
The Chronograph has a built-in Lithium-Ion rechargeable battery. Battery life can depend on many factors so run times are approximate. This battery will power the chronograph for approximately 12 hours under normal conditions, and for 2.0 hours when the lights are used. To charge the battery, follow these steps:
- Plug in the included USB wall adapter.
- Connect the chronograph by plugging the provided USB-Micro USB cord into the Chronograph housing.
- Connect the provided cord into the wall adapter.
NOTE: A GREEN LED light near the charging port will flash when the battery is charging, and will stay on steadily once it is fully charged.
The battery will take approximately 2.5 hours to fully charge.
NOTE: Make sure to use the correct prongs on your wall mount. Below are instructions on how to switch out your prongs.

On the underside of the wall charger plug is a button. Push it to release the Prong plate from the charger.

Slide the prong plate up out of the wall mount.
Then slide the other prong plate down into the wall mount until it "CLICKS" into place.


Make sure the prong plate is fully seated into the wall mount BEFORE plugging it into the outlet.
OPERATION

- Place Chronograph on the tripod or a stable surface at the appropriate height for firing projectile through the shooting window. Be sure the LCD screen is facing towards the shooter.
- Position the unit 10 to 15 feet (3-5m) in front of the muzzle of a firearm or if using with a bow, at least one full arrow length in front
- Align the Chronograph:
- Height, so that the projectile travels through the center of the shooting window
- Tilt Angle, so projectile travels parallel to the top surface of the housing
- Left/Right, so that projectile is in line with housing
- Turn the unit on by pressing the
![]() button on top of the unit
button on top of the unit - Select the units by pressing the "Unit" button. The selected unit will flash on the LCD screen
- If lights are needed, press the
![]() to turn them on.
to turn them on.
NOTE: The lights use batter power quickly. Only use them when shooting indoors or in low light conditions such as sunrise and sunset.
NOTE: For continuous use, the Chronograph can be powered directly by the USB cord. This allows the lights to be used for extended times.
 to turn them on.
READING THE DISPLAY

![]() Initial "ready" screen after startup sequence 3014
Initial "ready" screen after startup sequence 3014

![]() Projectile velocity reading – ready for next shot
Projectile velocity reading – ready for next shot

![]() Duplicate reading alert (alternate flashing with shot velocity – ready for next shot
Duplicate reading alert (alternate flashing with shot velocity – ready for next shot

![]() Error Alert.
Error Alert.
Err2: Projectile not recorded by rear sensor
Err3: Projectile not recorded by front sensor
– ready for next shot
(Check alignment to be sure you are shooting directly under both sensors)

![]() Low battery alert – charge battery
Low battery alert – charge battery
SMART PHONE CONNECTION
- Go to the appropriate application marketplace for your smartphone/mobile device and search for "Caldwell® Ballistic Precision Chronograph".
- Alternatively, http://www.btibrands.com/ provides direct links to the appropriate APPs for the different mobile platforms supported by Caldwell®.
- Once the app is installed you will see the Caldwell® Ballistic Precision APP icon in your smartphone home screen.
iOS Pairing:
- Turn the Chronograph On
- Open the Caldwell® APP
- Go to APP Setting and select "Bluetooth Enabled"
- The chronograph will pair and a green Bluetooth® icon will be shown in the upper right corner of the device screen
The Chronograph will now automatically pair whenever power is on and the APP is opened.
Android Pairing:
- Turn the Chronograph on
- On your mobile device, go to device settings > Bluetooth®
- Update/Scan and select "Caldwell® Chrono" once it appears
- Open the Caldwell® APP
- Go to APP Settings and select "Bluetooth Enabled"
- The chronograph will pair and a green Bluetooth® icon will be shown in the upper right corner of your device screen
The Chronograph will now automatically pair whenever power is on and the APP is opened.
APP FUNCTIONS
- Instant read out
- Note Log
- Temp, BP, Avg, SD, Min, Max, Spread, Shot/sec
- Save, email and text Shot Groups
- Imperial/Metric Units
- For more functions and information go to www.btibrands.com
TIPS
- Understand the flight of your bullet will be lower than your sight picture. Most scopes are mounted 1.5" higher than the centerline of the barrel. Always aim higher than the middle of the shooting area.
- Clean Lenses. Remove build-up of dust on the sensors. Use a Q-tip or canned air to clean the lenses, being especially careful not to scratch them.
- Ensure chronograph is level. This will make sure that the projectile height as it passes over each sensor opening is the same.
- Use a stable platform for the chronograph. A table will also work and so will a dedicated metal stand. A tripod works well to position and align the chronograph.
- Avoid shooting over reflective surfaces like snow or some types of sand. In some instances you may be able to reduce reflection by placing a large dark colored tarp under the chronograph set up.
- In florescent lighting. Use the built in lights.
- BOWS and CROSSBOWS: Stand at least one full arrow length away when you shoot. Shoot arrows over the projectile sensors evenly so the arrow passes at the same height over both sensors. Blunt arrow tips work best.
- Use a laser bore sigher to help align and set up the Chronograph
Visit www.btibrands.com for more tips

INTENTIONAL OR UNINTENTIONAL SHOOTING OF THE CHRONOGRAPH WILL VOID FACTORY WARRANTY.
This equipment has been tested and found to comply with the limits for a Class B digital device, pursuant to part 15 of the FCC Rules. These limits are designed to provide reasonable protection against harmful interference in a residential installation. This equipment generates, uses and can radiate radio frequency energy, and if not installed and used in accordance with the instructions, may cause harmful interference to radio communications. However, there is no guarantee that interference will not occur in a particular installation. If this equipment does cause harmful interference to radio or television reception, which can be determined by turning the equipment off and on, the user is encouraged to try to correct the interference by one or more of the following measures:
- Reorient or relocate the receiver antenna.
- Increase the separation between the equipment and receiver.
- Connect the equipment into an outlet on a circuit different from that to which the receiver is connected.
- Consult the dealer or an experience radio/TV technician for help.
This device complies with Industry Canada license-exempt RSS standard(s). Operation is subject to the following two conditions: (1) this device may not cause interference, and (2) this device must accept any interference, including interference that may cause undesired operation of the device.
AC ADAPTER
Use only the supplied AC adapter (I.T.E Switching Power Supply)
Input: 100-240 V, 50/60 Hz, 0.2 A
Output: 5.0V, 1.0 A
BATTERIES
This product uses lithium Ion batteries. Misuse of batteries could cause a leak, rupture or other trouble.
When throwing used batteries away, follow the disposal instructions indicated on the batteries and the local disposal laws.
Do not heat or disassemble batteries. Do not put them in fire or water. Batteries could rupture or leak, causing fire, injury or stains around them.
ENVIRONMENTALLY SAFE BATTERY DISPOSAL

The batteries used in the Chronograph's battery pack contain the following toxic and corrosive material: LITHIUM-ION.
Toxic materials must be disposed of in a specified manner in order to prevent contamination of the environment. Before disposing of damaged or worn out Lithium-Ion battery packs, contact your local waste disposal agency or the local Environmental Protection Agency for information and specific instructions. Take the batteries to a local recycling and/or disposal center that is certified for disposal. If the battery pack cracks or breaks, whether it leaks or not, do not recharge it and do not use it. Dispose of it and replace it with a new battery pack. DO NOT ATTEMPT TO REPAIR IT!
Follow these instructions in order to avoid injury and the risk of fire, explosion, or electric shock, and to avoid damage to the environment:
- Cover the battery's terminals with heavy-duty adhesive tape.
- Do not attempt to remove or destroy and of the components of the battery pack.
- Do not attempt to open the battery pack.
- If a leak develops, the electrolytes that are released are corrosive and toxic. Do not get the solution in the eyes or on the skin, and do not swallow it.
- Do not place batteries in regular household trash.
- DO NOT incinerate batteries.
- DO NOT place batteries where they will become part of any waste landfill or municipal solid waste stream.
- Dispose of batteries at a certified recycling or disposal center.

VideosCaldwell G2 Chronograph: Unboxing, Setup, Shooting Video
Documents / Resources
References
Download manual
Here you can download full pdf version of manual, it may contain additional safety instructions, warranty information, FCC rules, etc.
Advertisement


Need help?
Do you have a question about the G2 Chronograph and is the answer not in the manual?
Questions and answers