Table of Contents
Advertisement
Advertisement
Table of Contents

Related Manuals for PowerXL SMART MICROWAVE AIR FRYER PLUS


Summary of Contents for PowerXL SMART MICROWAVE AIR FRYER PLUS
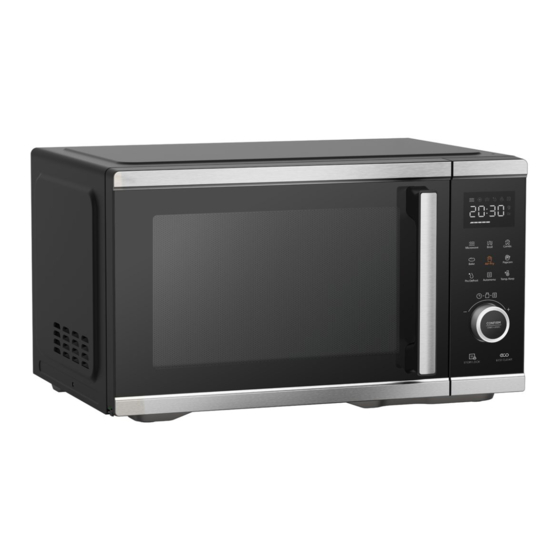
- Page 1 SMART MICROWAVE AIR FRYER PLUS ERA-READY LOGOTYPE – UL MARK arks are registered by Underwriters Laboratories Inc. Owner’s Manual Save These Instructions – For Household Use Only MODEL: BDK04 When using electrical appliances, basic safety precautions should always be followed. Do not use this appliance until you have read this manual thoroughly.
-
Page 2: Table Of Contents
Table of Contents IMPORTANT SAFEGUARDS Parts & Accessories The Control Panel Programming Microwave Air Fry Instructions for Use Cooking Function Information Using the Wi-Fi Features Cooking Guidelines & Tips Recipes Troubleshooting Cleaning & Storage Money-Back Guarantee... -
Page 3: Important Safeguards
IMPORTANT SAFEGUARDS WARNING • Do not use this product near water, such as near a kitchen sink, in a wet basement, near a swimming pool, PREVENT INJURIES! CAREFULLY READ ALL or similar locations. INSTRUCTIONS BEFORE USE! • Do not immerse cord or plug in water. When using electrical appliances basic safety precautions should be followed, •... - Page 4 IMPORTANT SAFEGUARDS d. Do not use the interior for storage purposes. Do not • Make sure all cookware used with the microwave leave paper products, cooking utensils, or food in the function in this appliance is suitable for microwaving appliance when not in use. (see the “Materials to Avoid with the Microwave e.
- Page 5 IMPORTANT SAFEGUARDS Using the Power Cord GROUNDING INSTRUCTIONS This appliance must be grounded. In the event of an electrical • A short power-supply cord is provided to reduce the short circuit, grounding reduces the risk of electric shock by risk of becoming entangled or tripping over a longer cord. providing an escape wire for the electric current.
- Page 6 IMPORTANT SAFEGUARDS Countertop Use Remove all packing material and accessories. Examine • Blocking the intake and/or outlet openings can the oven for any damage, such as dents or a broken door. damage the appliance. Do not install if the appliance is damaged. •...
-
Page 7: Parts & Accessories
Parts & Accessories Crisper Tray Glass Tray Baking Pan Glass Tray Installation When microwaving in this appliance, all food and food containers should be placed on the Glass Tray when cooked. If the Glass Tray is damaged, contact Customer Service using the contact information located on the back of this manual. - Page 8 Parts & Accessories Using the Crisper Tray 1. Ensure the Glass Tray is not placed inside the appliance. 2. Slide the Baking Pan into the appliance. 3. Place food on the Crisper Tray. Place the Crisper Tray on the Baking Pan (see Fig. B). 4.
-
Page 9: The Control Panel
May 15, 2020 May 15, 2020 May 15, 2020 The Control Panel Panel Panel Panel May 15, 2020 May 15, 2020 Panel Panel A. INDICATORS Heating Element Microwave (used with the Air Fry, Bake, or Broil settings) Wi-Fi Lock Menu B. -
Page 10: Microwave
Microwave Programming Default Power Weight/ Default Time Display Function Preset Power Range Quantity Time Range Code Power 100% 10–100% 5 secs.–95 mins. Microwave 3.2 oz Popcorn 100% 100% 2 mins. 5 secs. Microwave 3.5 oz Defrost Varies (see chart) Varies (see chart) Varies (see chart) Varies (see chart) dEF1–dEF6... -
Page 11: Air Fry
Air Fry Programming Default Temperature Weight/ Default Time Display Function Preset Temperature Options Quantity Time Range on Panel 150° F, 250° F, 275° F, 300° F, Air Fry 400° F 325° F, 350° F, 375° F, 400° F, 20 mins. 1–95 mins. -
Page 12: Instructions For Use
Instructions for Use Before First Use 1. Read all material, warning stickers, and labels. cloth. Never wash or submerge the cooking appliance in water. 2. Remove all packing materials. 5. Install the turntable (see the “Glass Tray 3. Wash all parts and accessories used in the cooking Installation”... - Page 13 Instructions for Use Cookware in the Microwave It is not necessary to buy new cookware. Many pieces which cookware and coverings should be used with each already in your kitchen can be used successfully in your feature. Make sure the utensil does not touch the interior new appliance.
- Page 14 Instructions for Use Containers Preventing Arcing CAUTION PERSONAL INJURY HAZARD Arcing is sparks or electric flashes that crackle or pop. Tightly closed containers could explode. Closed containers Arcing can produce heat that is quite intense and can should be opened and plastic pouches should be pierced damage the interior of the microwave or containers being before cooking.
-
Page 15: Cooking Function Information
Cooking Function Information Microwave Function Display Level Power 1. Press the Power Level Button and then turn the Control Knob to select a microwave power level (see P100 100% Fig. D). Press the Control Knob to select the power level setting. 2. - Page 16 Cooking Function Information Using the Micro Menu Function 1. Turn the Control Knob counterclockwise () to 3. When the cooking timer is complete, the appliance will select one of the Micro Menu settings (A1–A7; see beep five times and display “0:00.” the “Microwave Programming”...
- Page 17 Cooking Function Information Air Fry Function 1. Press the Air Fry Button to set the appliance to air fry 3. Turn the Control Knob to adjust the cooking time. mode. “400” will flash on the LED Display. Press the Control Knob to confirm the cooking time and start the timer.
-
Page 18: Using The Wi-Fi Features
Using The Wi-Fi Features Download the PowerXL App and Create an Account 1. Download the PowerXL app from the Google Play store or App Store. 2. Select “Sign Up” and enter your email to create an account (see Fig. D). Your email will be sent a verification code. - Page 19 Using The Wi-Fi Features Controlling Your Appliance Through the App You can use the PowerXL app to set cooking presets and set the cooking time and temperature on your appliance (see Fig. I). Power Button: Select to light up the appliance s control panel.
-
Page 20: Cooking Guidelines & Tips
Cooking Guidelines & Tips Internal Food Type Internal Temp.* Ground 140° F Temperature Beef & Veal Steaks, roasts: medium 145° F Meat Chart Steaks, roasts: rare 135° F Breasts 165° F Chicken & Turkey Ground, stuffed 165° F Use this chart and a food thermometer to ensure that meat, poultry, seafood, Whole bird, legs, thighs, wings 165°... -
Page 21: Recipes
Recipes HASH BROWN CASSEROLE HONEY-ROASTED SALMON 1 lb frozen hash browns 2 4-oz salmon fillets 3 tbsp. butter ¾ cup honey ¾ cup sour cream ½ cup sweet soy sauce ¾ cup mayonnaise 2 tbsp. light brown sugar 1 ½ cups shredded cheddar cheese, plus more for topping ¼... - Page 22 Recipes 1. In a bowl, mix the pecans, cinnamon, nutmeg, salt, and black pepper together. Reserve the mixture. 2. Use a fork to poke holes in each sweet potato several times to allow steam to escape. Place the potatoes in a microwave-safe dish on the Glass Tray in the appliance.
- Page 23 Recipes the Control Knob to 24 oz and press the Control Knob thermometer to measure the internal temperature): to confirm. Transfer the wings to a clean bowl. Toss the • Rare: 125° F wings with the onion powder and black pepper. •...
-
Page 24: Troubleshooting
Troubleshooting Problem Possible Cause Solution The appliance will not start. The power cord is not plugged in. Plug the power cord into a dedicated electrical outlet. The door is open. Close the door and try again. The wrong operation is set. Check the instructions. - Page 25 Troubleshooting Problem Possible Cause Solution The appliance does not work. The appliance is not plugged in. Plug the power cord into an electrical outlet. The appliance has not been turned on by setting the preparation time Set the temperature and time. and temperature.
-
Page 26: Cleaning & Storage
Cleaning & Storage Cleaning Clean the appliance after each use. Remove the power may break. Then, rinse the appliance thoroughly cord from the electrical outlet and be certain the with a clean, damp cloth. Do not leave standing appliance is thoroughly cooled before cleaning. water inside the appliance. -
Page 27: Money-Back Guarantee
90-Day Money-Back Guarantee The PowerXL® Microwave Air Fryer Plus™ is covered by a 90-day money-back guarantee. If you are not 100% satisfied with your product, return the product and request a replacement product or refund. Proof of purchase is required. Refunds will include the purchase price, less processing and handling. - Page 28 SMART MICROWAVE AIR FRYER PLUS We are very proud of the design and quality of our MERA-READY LOGOTYPE – UL MARK PowerXL® Smart Microwave Air Fryer Plus Marks are registered by Underwriters Laboratories Inc. This product has been manufactured to the highest standards.