
Related Manuals for Road Angel Professional


Summary of Contents for Road Angel Professional
- Page 1 USER GUIDE Road Angel Group Ltd Email: info@roadangelgroup.com Web: www.roadangelgroup.com Clark House Silverstone Technology Park Silverstone Circuit Northants NN12 8GX Rev 4...
- Page 2 The safety of you and your passengers is our prime consideration, and we trust that for all the miles you drive, your ROAD ANGEL Professional will enhance the safety and enjoyment of your journey. Join other ROAD ANGEL Professional users in guarding your life and livelihood.
-
Page 3: Table Of Contents
Security ......................9 Assembling the Windscreen Mounting Bracket ........10 Fitting the ROAD ANGEL Professional ............ 12 Using the Dashboard Pad ................. 13 Getting Started ............. 15 Switching On for the First Time ............... 15 Hazard Warnings ............ - Page 4 Long range targeting ................31 Following a vehicle being targeted ............31 Rear detection of laser ................32 ROAD ANGEL Professional and the Law ..........32 Speed Cameras and Hazards ..............33 Accessories ..............36 ...
-
Page 5: Introduction
Primary schools, congestion charging zones and unprotected level crossings ROAD ANGEL Professional also displays a constantly updated and accurate speed reading. Should you break down, ROAD ANGEL Professional allows you to pinpoint your location and direct rescue services to your vehicle. - Page 6 Professional for purposes other than those stipulated. Placement Position your ROAD ANGEL Professional as low as possible on the screen so that it does not impair your all-round visibility: we recommend you use either a central position or by the A-post. The device should be mounted securely and all cables must be trained via locations that do not impact any vehicle controls and importantly do not impede the intended operation of any Air Bag zones.
-
Page 7: Unpacking The Box
Connects unit to cigar socket for Mounting bracket adapter (spare) in-car power and trickle charge. Anti-vibration Remote controls PC USB cable Mains dampers (x6) (x2) (with two Connects unit to PC charger for manual updating. and suction velcro stickers) cups (x2) ROAD ANGEL Professional unit... -
Page 8: Subscriptions
Subscriptions Your ROAD ANGEL Professional comes with a free subscription for six months to the award-winning Road Angel camera and accident black spot database. It is critical to the operation of your ROAD ANGEL Professional that you update the unit regularly and so continued subscription is essential. -
Page 9: Warranty
Warranty Your ROAD ANGEL Professional is guaranteed for one year from the date of purchase from all manufacturing defects that occur with normal use. If your unit fails to perform as specified in these instructions, please visit: http://www.roadangelgroup.com/warranty You can also purchase theft-loss insurance. Visit http://www.roadangelgroup.com/... -
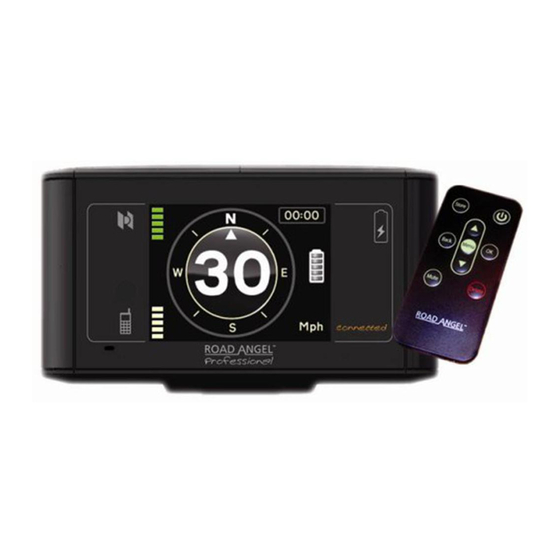
Page 10: Controls And Connectors
Controls and Connectors These are the main featur es of your ROAD ANGEL Professional: Speed/compass head ing/ Clock Charging indicator LED hazard warning display Static Red: charging in signal progress strength No LED: Unit fully charged or not charging Flashing Red:... -
Page 11: Remote Control
To control your ROAD ANGEL Professional, the remote needs to be in direct line of sight with the unit. Do not attach the remote to your vehicle’s steering wheel, over an air bag or in any other location that impedes the safe operation of your vehicle and its controls. -
Page 12: Registration
Registration You can use your ROAD ANGEL Professional straight out of the box but to get the full benefit of up-to-the-minute hazard information you should put the unit on charge, register online and then update the database. Charge the unit: With the unit switched off, connect it to the mains charger and charge the internal battery for about 6 hours. -
Page 13: Putting It All Together
ROAD ANGEL Professional has an internal high sensitivity GPS antenna and requires a clear view of the sky to communicate with GPS satellites. If you want to install ROAD ANGEL Professional anywhere else within your vehicle, you may require an external GPS antenna. Please visit www.roadangelgroup.com... -
Page 14: Assembling The Windscreen Mounting Bracket
Assembling the Windscreen Mounting Bracket 1. Locate the six anti-vibration dampers: 2. Select a pair of dampers according to the pitch of your vehicle’s windscreen: Windscreen pitch Damper type Standard e.g. Saloon style short Upright e.g. 4X4 style long 3. Insert the selected pair of dampers into the two central holes and slide them towards the back edge to lock them in place. - Page 15 4. Slide one of the large dampers into the slot at the front of the mounting bracket. This damper stabilises the unit within the bracket. The damper should face into the bracket as shown below. 5. Attach the two clear suction cups. Push the cups into the large holes on the top of the bracket.
-
Page 16: Fitting The Road Angel Professional
Alternatively, charge the internal battery using the mains charger (see page Error! Bookmark not defined.) before you install your ROAD ANGEL Professional. With a full charge, you can use the unit cable-free for up to 8 hours. 3. Ensure that the cable does not interfere with any of the vehicle’s controls or airbag modules. -
Page 17: Using The Dashboard Pad
Remove the backing from the other side of the dashboard pad and fix it to the dashboard. Place your ROAD ANGEL Professional directly onto the interfacing adapter where it will be held firmly. - Page 18 Where should I put my ROAD ANGEL Professional? ROAD ANGEL Professional has a high sensitivity GPS antenna and requires a clear view of the sky to receive information from GPS satellites. We highly recommend that ROAD ANGEL Professional is positioned in the centre of the front windscreen, low down, just above the dashboard (see page 2).
-
Page 19: Getting Started
1. Find a location outside with a clear view of the sky (away from obstacles such as tall buildings and overhanging trees – these may delay or prevent satellite acquisition). 2. Switch on the ROAD ANGEL Professional by pressing the button on the top of the unit for about two seconds. -
Page 20: Hazard Warnings
Alert type Vehicle heading Vehicle speed Compass ring Alert type icon Camera warnings only: Advisory speed alternates with Alert type display Mute icon You can customize the way your ROAD ANGEL Professional alerts you to road dangers: see page 19. -
Page 21: Advisory Colour Coding
Speed limits may vary according to vehicle type and class. All Road Angel products are designed to provide the driver with a high visibility speedometer reading within your field of vision. Although GPS speedometers are known to be highly accurate at steady speed, atmospheric conditions and hindered skyward visibility (e.g. -
Page 22: Audio And Speech Warnings
Note: If you hold the button down for two seconds the unit will switch off. When you have passed out of the danger zone, ROAD ANGEL Professional restores audio output. If you want to restore audio output during the alert, press the Mute or On/Off button again. -
Page 23: Customising Your Road Angel Professional
Customising your ROAD ANGEL Professional You can change the way ROAD ANGEL Professional works by adjusting its menu settings. Press the Up and Down arrow buttons on the remote control to view the menus and cycle through them: Audio Choose how ROAD... -
Page 24: Menu Settings
Menu Settings Audio Settings in the Audio menu determine how ROAD ANGEL Professional uses audio prompts to warn you about road hazards. Options Property Details (factory setting in bold) Change the sound level of safety camera related Camera Alert 100% (80%) …... -
Page 25: Alerts
… No Satellites Enable or disable message alert when GPS … Tone coverage is lost. Alerts Settings in the Alerts menu determine how ROAD ANGEL Professional warns you about road hazards. Options Property Details (factory setting in bold) Blackspots Switch Blackspot alerts on or off. -
Page 26: Distances
Distances Mobile Van alerts are triggered when you are 500m from their location. For other hazards, the unit alerts you when you are within 250m, although you can change this setting to 500m or 1000m. In addition, you can double the alert distance for all hazards (except Mobile Van locations) when you are travelling over 50mph. - Page 27 Property Details Chart display showing GPS satellite signal reception. Satellite visibility and signal lock indicated by up to 12 green bars (up to 12 satellites may be visible Signal Strength at any one time; the unit requires a signal from at least 4 to achieve a GPS fix).
-
Page 28: Unit Data
Unit Data This menu provides technical information about your ROAD ANGEL Professional: its serial number and firmware version, the expiry date of your subscription and the date of the most recent database update. Options Property Details (factory setting shown in bold) -
Page 29: Display
Details (factory setting shown in bold) Adjust the contrast of the ROAD Backlight Level 100% (100%) … ANGEL Professional display. Display speed as miles per hour or Speed units … kilometres per hour. Change time offset to account for ± 19½ hours in ½ hour Clock Adjust daylight saving time. -
Page 30: Adding And Deleting Danger Zones
Setting a Live Van Alert When you receive a MOBILE VAN alert, press the Store button if a mobile van is present at the location. When you do so, the location is ‘set live’ in your unit’s ROAD ANGEL database for two hours. -
Page 31: Adding New Locations
You may add new FIXED, MOBILE, AVERAGE, MOBILE VAN, BLACKSPOT and SCHOOL locations to your ROAD ANGEL Professional database. When you update your ROAD ANGEL Professional, these new locations will also be downloaded to the central database, and can then be verified by the ROAD ANGEL team for possible inclusion in future updates. -
Page 32: Updating The Database
It is critical to the accurate operation of your ROAD ANGEL Professional that you update your unit regularly to maintain the very latest data. With up to 100 new hazard locations added each month, we suggest that you update your ROAD ANGEL Professional fortnightly. -
Page 33: Background Information
4 satellites are in view at any one time. Using sophisticated aerials and triangulation techniques, units such as ROAD ANGEL Professional are able to compute your exact position with great accuracy. Laser Detection... -
Page 34: Targeting Explained
200m if it is targeted towards the unit At 200m the beam of the laser can be as little as 200mm across. If the Laser Gun is targeting your number plate, it is likely that your dashboard mounted ROAD ANGEL Professional will not detect the signal. -
Page 35: Long Range Targeting
On some Laser Guns, the sight is bigger than the vehicle. Wherever you have fitted ROAD ANGEL Professional, it is possible that a laser gun targeted in your direction (not necessarily at your car) may trigger it. -
Page 36: Rear Detection Of Laser
When the vehicle is targeted from the rear, the laser signal will pass thorough the rear windscreen and trigger a LASER ALERT as long as no obstructions are in the way. ROAD ANGEL Professional must be visible from the rear and not obstructed by headrests, high cargo, passengers or following vehicles. -
Page 37: Speed Cameras And Hazards
Speed Cameras and Hazards This section describes the type of cameras and road hazards covered by ROAD ANGEL Professional: Gatso The most common type of speed camera – used in fixed positions mounted on poles at the roadside. Measures vehicle speed using radar and, if the speed limit has been exceeded, photographs the rear of the vehicle. - Page 38 Semi-permanent (fixed location but only used part-time), system that uses pressure sensors in the road to measure vehicle speed. Connects to a camera on a tripod for evidence of any offence. ROAD ANGEL Professional relies on up-to-date database information for detection. Black spot...
- Page 39 There are substantial penalties if you do not pay the congestion charge. Primary Schools You can set up ROAD ANGEL Professional to alert you whenever you are within 125 metres of a primary school between 08.00-09.30 and 15.00-16.30 (Mon-Fri only).
-
Page 40: 10. Accessories
Please visit the ROAD ANGEL Professional online shop at www.roadangelgroup.com details. Road Angel Group Ltd. has made every effort to ensure that all the information contained in this manual is accurate and reliable. However, the information is subject to change without notice. - Page 41 . Assemble mounting bracket (see page 10). If preferred, prepare dashboard mounting pad (see page 13). . Your ROAD ANGEL Professional is now ready for use. Mount the unit in your vehicle (see page 12).
Need help?
Do you have a question about the Professional and is the answer not in the manual?
Questions and answers