Chapters
Table of Contents

Related Manuals for German pool PAM-181


Summary of Contents for German pool PAM-181
- Page 1 PAM-181 Automatic Noodles Machine 自 動 麵 條 機 在使用之前請詳細閱讀「使用說明書」及「保用條款」,並妥為保存。 Please read these instructions and warranty information carefully before use and keep them handy for future reference. U S E R M A N U A L 使 用 說 明 書...
- Page 2 請即進行保用登記﹗ 有關保用條款細則,請看本說明書最後一頁。 Please register your warranty information now ! For Warranty Terms & Conditions, please refer to the last page of these operating instructions.
-
Page 3: Table Of Contents
目錄 注意事項 5 - 6 產品結構 7 - 12 操作說明 常見問題及處理方法 清潔與保養 技術規格 保用條款... -
Page 4: 注意事項
注意事項 重要說明 為安全起見,使用產品前請先細閱本說明書,並保存說明書,以便作參考之用。 本產品只供家居使用。請必須依照說明書內的指示操作。 1. 使用時應將本機放置於平穩的檯面使用。 2. 使用本機時應有人監看,不要讓小孩和無自理能力的人操作本機。不要讓八歲以下兒童接觸 本機及電線。 3. 在不使用或清潔時請先拔去插頭,切勿把主機浸到水或其他液體中。 4. 如果本機的電源線損壞,必須由本公司或合格的專業技術人員來更換電源軟線。 5. 不要讓電源線掛在桌子或觸碰到運動部件。 6. 在通電狀態下,避免接觸任何運動部件。 7. 如果本機功能失效或有其它任何方式的損壞,請不要使用本機,應立即交給客戶服務及 維修中心進行測試、維修或調整。 8. 在機器工作前,確保機器是正確完整組裝。 9. 安裝及拆卸零部件前請確保電源已完全斷開。 10. 保持機器遠離熱源、火爐或處於啟動狀態的微波爐。 11. 不要在高溫或過低溫度的環境中使用機器。 12. 切勿讓機器空轉。 13. 切勿將本機另做其它用途。 14. 請不要使用非廠家提供的配件和附件,以免發生危險。 15. 打開攪拌盒上蓋或鎖定上蓋前應確定機器是處於關閉狀態,並確定壓麵杆已完全停止運轉後, 方可打開上蓋。 16. 本機配件或附件嚴禁用高溫消毒。 17. 本機連續工作20分鐘後,應停止工作20分鐘。 18. 請確認產品所標明的使用電壓,是否與接地插座電壓一致,並切勿與其他電器共用電源... -
Page 5: 產品結構
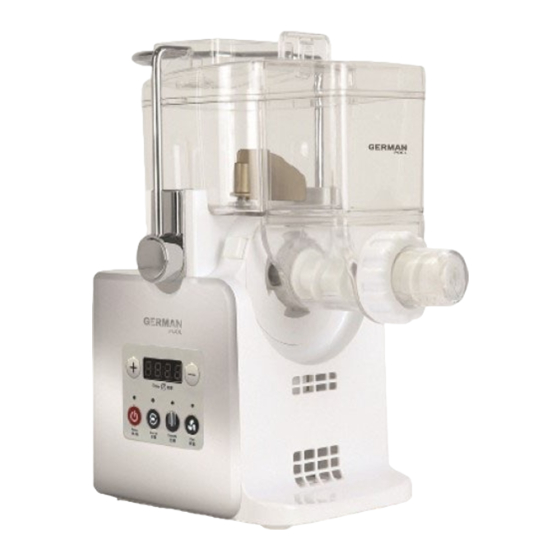
產品結構 主機 1. 隔板 8. 出麵杆 2. 上蓋 9. 鎖緊器 3. 攪拌刀 10.模杯 4. 攪拌盒 11.切麵刀 5. 壓鎖扣 12.主機 6. 解鎖按鈕 13.控制面板 7. 擠壓盒 14.吹風口 裝箱明細 名稱 麵粉量杯 水量杯 模杯 扳手 切麵刀 清潔刷 說明書 食譜 數量 1個 1個 6個 1個 1把 1個 1本 1本... - Page 6 產品結構 控制面板 時間控制及顯示區 時間 功能控制及指示區 開/關 和麵 出面 吹風...
-
Page 7: 操作說明
操作說明 安裝方法 注意:在安裝前,請務必切斷電源。 2. 將 擠壓盒插入主機並向左旋轉45°, 1. 打 開包裝箱,把機身和所有附件 聽到“啪”一聲,即說明已經將其固定 全部取出來,放置在水平桌面上。 於機身上。 4. 將 麵模杯的出麵口朝下放,在連接到 3. 將 出麵杆插入擠壓盒裏面。 出麵杆上。... - Page 8 操作說明 安裝方法 6. 攪 拌盒下面有三個缺口,將它對準插入 5. 把 鎖緊器擰緊。 機身最上面相應位置。 8. 將 隔板插到上蓋的插槽位,要插到底。 7. 將 攪拌刀對準插入和麵軸插入攪拌盒。 壓鎖扣 10.把壓鎖扣向上拉到中間,再向下壓 9. 把 上蓋蓋在攪拌盒上。 一下,確保壓緊上蓋。...
- Page 9 操作說明 拆卸方法 注意:在拆卸前,請切斷電源。 2. 把 攪拌盒的蓋子取下來。 1. 把 壓鎖扣向後拉,即可解開。 4. 將 隔板取下來。 3. 先 將攪拌刀取下來。...
- Page 10 操作說明 拆卸方法 6. 依 次取下鎖緊器、麵模杯、出麵杆。 5. 將 攪拌盒取下來。 解鎖按鈕 7. 按 住解鎖按鈕不放,同時順時針旋轉 擠壓盒,將擠壓盒取下,如未按此鎖扣, 則無法卸下擠壓盒。 P.10...
- Page 11 操作說明 加麵粉 1. 把 產品擺在平整檯面,確保安裝完好。 2. 打 開上蓋,確保已安裝好攪拌刀及隔板。 3. 用 麵粉量杯裝好麵粉倒入攪拌盒內。 4. 蓋 好上蓋,並將壓鎖扣扣緊。 注意事項: • 在加裝麵粉的過程中請不要通電。 • 請用配送的麵粉量杯來裝麵粉,一次以250g為最佳, 請不要超過300g麵粉。 和麵 5. 接 通電源,按“ ”鍵,開關指示燈亮。然後 加 再按“ ”鍵,和麵指示燈亮後,產品進入和 水 處 麵狀態(產品默認5分鐘工作時間,並可 按“ ” “ ”鍵來設定時間)。 6. 用 水量杯裝好水(按麵粉多少及個人口感適量調整) 分次倒入攪拌盒內。 注意事項: • 產品在進入和面狀態後,應立即把準備好的水 分次緩慢地從加水處倒入攪拌盒內。 • 建議在水中加入少量食鹽和食用油(食鹽約5g左右、 食用油約5ml,可根據個人口感適量調整)。 • 可在水中加入各類蔬菜汁(西紅柿、菠菜等)或 雞蛋等,攪勻後倒入攪拌盒內。 註:在和面過程中,請不要打開上蓋。 P.11...
- Page 12 操作說明 出麵 7. 請把盛麵條的容器放在模杯下方。 取出隔板 8. 當麵粉和成麵團後,按“ ”鍵停止和麵。 把隔板取出後,再按“ ”鍵(產品默認10分鐘 工作時間,並可按“ ” “ ”鍵來設定時間), 麵糰會被自動推到擠壓盒內。 向下擠壓 9. 用扳手手柄端從上蓋的孔中插入向下擠壓麵糰,以便 麵糰 麵糰能順利進入出麵杆。 10.在出麵過程中,吹風鍵指示燈亮。這樣以便快速吹乾 剛成型麵條的水分(如不需要,可按“ ”鍵停止 吹風)。 注意事項: • 在取出隔板前,應確保麵粉已和成麵糰。 • 當麵糰進入到擠麵盒後,請用力向下壓麵糰,這樣才能 保證麵糰能快速的進入出麵杆。 在出麵過程中,請不要打開上蓋。 在出麵過程中,請不要加入麵粉進行和麵。 取麵 11. 當麵糰被全部擠壓完後,請用切麵刀切斷麵條。 12. 按“ ”鍵,產品停止工作。 注意事項: • 產品工作20分鐘後停止20分鐘。 • 當取完麵條後,可繼續按上述方法繼續製作麵條。 • 若無需繼續製作麵條,請拆卸產品清洗,以便下次使用。 建議材料及比例 •200g麵粉加入約半茶匙鹽 •蛋漿(兩隻份量)加一杯水=合共110ml •於蛋漿加入約一茶匙油 注意事項: 因使用麵粉含水量不一樣,可在使用過程中根據經驗適當調整麵粉和水的比例。 P.12...
-
Page 13: 常見問題及處理方法
常見問題及處理方法 如遇以下一般情況,請按以下指示處理。如仍未能處理或未發現故障原因,請聯繫本公司客戶 服務及維修中心。 故障現象 原因分析 故障排除 通電後,啟動開關,產品 電源線未插到位;連續工作 將電源線插到位;停止 不工作 時間過長,智慧保護 20-30分鐘後再使用 如果多次使用後,仍會發出 最開始幾次使用產品時, 新電機最初使用正常現象 此氣味,請送至就近的維修 電機發出氣味 點檢測 出麵杆安裝不到位,運轉 異常震動或噪音大 重新安裝到位 平衡差 在出麵過程中出現反轉並 麵糰過於乾,需加入適量 關閉電源,重新啟動 停機 的水 清潔與保養 1. 清潔產品前,必須切斷電源。 2. 本機宜經常使用,以保持電機乾爽。 3. 如長期不用,請將本機保存在通風乾燥處。 4. 使用後請及時清洗產品。 5. 主機嚴禁用水沖洗,應用擰乾的濕布擦拭乾淨,其它部件可直接放入水中沖洗。 6. 部件清洗乾淨後,務必待風乾後再加以貯藏。 P.13... -
Page 14: 技術規格
技術規格 PAM-181 型號 220V/50Hz 電壓/頻率 180W 功率 (H)350mm (W)160mm (D)300mm 尺寸 4.2kg 淨重 本產品規格及設計如有變更,恕不另行通知。 中英文版本如有出入,一概以英文版為準。 本產品使用說明書以,www.germanpool.com 網上版為最新版本。 P.14... - Page 15 Contents Warning Product Structure 17 - 18 Operating Instructions 19 - 24 Troubleshooting Care & Maintenance Technical Specifications Warranty Terms & Conditions P.15...
-
Page 16: Warning
Warning Important For safety purposes, read the instructions carefully before using the appliance. Retain the User Manual for future reference. The appliance is designed for domestic use only, and may only be installed and operated in accordance with this User Manual. –... -
Page 17: Product Structure
Product Structure Main Unit 1. Slat 8. Extrusion Rod 2. Top Cover 9. Locking Collar 3. Kneading Blade 10. Nozzle 11. Noodle Cutter 4. Kneading Chamber 5. Safety Bracket 12. Main Unit 6. Unlock Button 13. Control Panel 7. Extrusion Box 14. - Page 18 Product Structure Control Panel Timer Control and Display 時間 Functional Control and Display 開/關 和麵 出面 吹風 P.18...
-
Page 19: Operating Instructions
Operating Instructions Installation Note : Make sure the power is disconnected before installation. 2. Plug in the Extrusion Box and rotate 45° 1. After unpacking, place the noodle maker until it is securely locked. and all the accessories on a stable and level surface. - Page 20 Operating Instructions Installation 6. The Kneading Chamber has three protrusions 5. Screw in the Locking Collar. on the bottom. Map them to the corresponding positions on the Main Unit. 8. Insert the Slat. Ensure that it is fully 7. Insert the Kneading Blade into the axle inserted.
- Page 21 Operating Instructions Dismounting Note : Make sure the power is disconnected before dismounting. 2. Lift the Top Cover and remove it from the 1. To remove the Top Cover, pull the Safety Kneading Chamber. Bracket backwards to unlock the Top Cover. 4.
- Page 22 Operating Instructions Dismounting 6. Take out the following in this order: the Locking 5. Take out the Kneading Chamber. Collar, the Nozzle, and the Extrusion Rod. Unlock Button 7. To take out the Kneading Chamber, press the unlock button while rotating the Kneading Chamber.
- Page 23 Operating Instructions Adding flour 1. After installation, place the machine on a stable and level surface. 2. Open the Top Cover. Make sure the Kneading Chamber and the Slat have been properly installed. 3. Add flour, water, and other ingredients into the Kneading Chamber. 4. Close the Top Cover and secure with the Safety Bracket. Note: • Disconnect the power when adding water and flour.
- Page 24 Operating Instructions Extrusion 7. Put a dish under the Extrusion Nozzle. Take out the 8. When the flour becomes a dough, press the Power button Clapboard to stop kneading. Take out the Slat and press the “Extrude” button. Default extrusion time is 10 minutes. Press “ ” “ ” to adjust extrusion time.
-
Page 25: Troubleshooting
Troubleshooting If you encounter the following common problems, please solve according to the following instructions. If the problem cannot be solved or a cause cannot be found, please contact our customer service centre. Problem Analysis Troubleshooting The plug has not been fully Power connected. -
Page 26: Technical Specifications
Technical Specifications Model no PAM-181 Voltage/Frequency 220V/50Hz Power 180W Dimensions (H)350mm (W)160mm (D)300mm Net Weight 4.2kg Specifications are subject to change without prior notice. If there is any inconsistency or ambiguity between the English version and the Chinese version, the English version shall prevail. Refer to www.germanpool.com for the most up-to-date version of the User Manual. -
Page 27: 保用條款
-產品經非認可之技術人員改裝或加裝任何配件; - serial number is modified, damaged or removed from the product. -機身編號被擅自塗改、破壞或刪除。 4. German Pool will, in its discretion, repair or replace any 4. 總代理有選擇維修或更換配件或其損壞部分。 defective part. 5. This warranty will be void if there is any transfer of 5. - Page 28 電話 Tel: +86 757 2980 8308 傳真 Fax: +86 757 2980 8318 © 版權所有。未獲德國寶授權,不得翻印、複製或使用本說明書作任何商業用途,違者必究。 © All rights reserved. Copying, reproducing or using the contents of this manual is not allowed without prior authorization from German Pool, violators will be prosecuted. P.16 P.28...
Need help?
Do you have a question about the PAM-181 and is the answer not in the manual?
Questions and answers