
Related Manuals for Jegs 555-81747


Summary of Contents for Jegs 555-81747
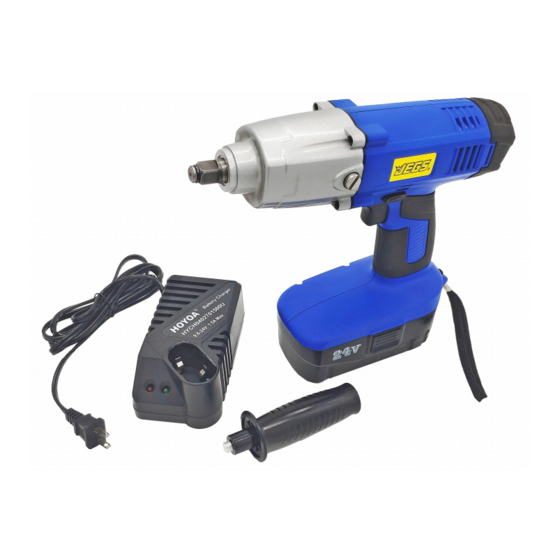
- Page 1 Installation Instructions for 24 Volt 1/2 in. Drive Cordless Impact Wrench 555-81747 1-800-345-4545 jegs.com...
- Page 3 SAVE THESE INSTRUCTIONS Work Area 1. Keep your work area clean and well lit. Cluttered benches and dark areas invite accidents. 2. Do not operate power tools in explosive atmospheres, such as in the presence of flammable liquids, gases, or dust.
- Page 4 19. Check for misalignment or binding of moving parts, breakage of part s, and any other condition that may affect the tool's operation. If damaged, have the tool serviced before using. Many accidents are caused by poorly maintained tools. 20. Use only accessories that are recommended by the manufacturer for your model. Accessories that may be suitable for one tool may create a risk of injury when used on another tool.
- Page 5 c. That wire size is at least as large as the one specified in the table below. 9. Do not operate charger with damaged cord or plug - replace them immediately. 10. Do not operate charger if it has received a sharp blow, been dropped, or otherwise damaged in any way; take it to a qualified serviceman.
- Page 6 FUNCTIONAL DESCRIPTION 1. Button 2. Battery cartridge CAUTION: Always be sure that the tool is switched off and the battery cartridge is removed before adjusting or checking function on the tool. Installing or removing battery cartridge 1. Always switch off the too l before insertion or removal of the battery cartridge. 2.
- Page 7 7. When the charge is complete the red LED will show a steady aspect along with the green LED. The battery pack is now ready for use. 8. NOTE: When new, the battery pack will have been shipped in a low charge state. It will take longer to charge initially, and several subsequent charges may also take a little longer than when the battery pack reaches its optimum performance.
Need help?
Do you have a question about the 555-81747 and is the answer not in the manual?
Questions and answers