
Summary of Contents for FRYAIR TOUCH
- Page 3 Use extreme caution when moving a cooking pot containing hot food. • Do not let the electrical cord hang over the edge of the table, counter, or touch any hot surface. • Place the appliance securely in the centre of the counter or work space.
- Page 4 Anything you cook in a normal oven can be cooked in the FryAir. Cooking times will be similar to a “fan-forced” convection oven. General warning. Your new FryAir is a cooking apparatus, it gets very hot! It generates steam and fat can splatter when opened – DO NOT LEAVE CHILDREN UNATTENDED AROUND THIS APPLIANCE! Preparing the FryAir for first time use.
-
Page 5: Specification
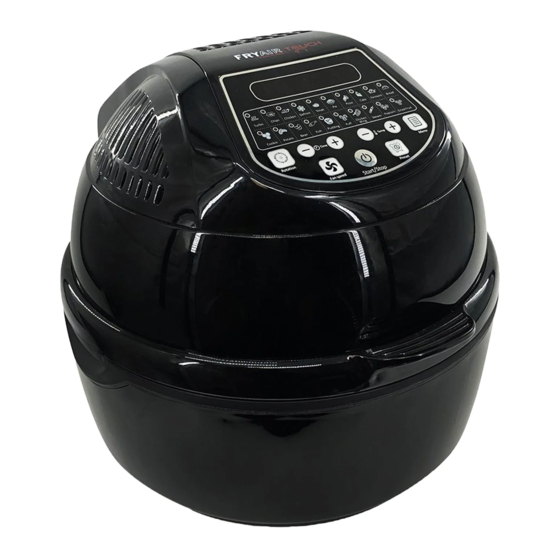
TEMPERATURE RAGE: 30℃ to 250℃ TIME SETTING: 1- 60mins Quick Start Guide to your FryAir 1. Pull up the lid to the designated angle by holding the lid handle. 2. Put in the cooking pot and the accessories (if required) and the food to be cooked. - Page 6 6. Transparent Cover Hole 3. Lid Handle 4. Lid Safety Latch Please note Number 4: Use this latch when closing the lid of your FryAir at all times. CARE MUST BE TAKEN WHEN OPENING THE MACHINE AND WHEN REMOVING THE FOOD...
-
Page 7: How To Use
Menu Key: Use this key to reach your desired pre-programmed cooking option. Preset Key: Use this key to set a timer for your FryAir to start cooking. This button allows for a 1min-12hr preset timer. How to use Preset Key: Press Preset Key, select your time for when you want your FryAir to start cooking then press the Menu Key. -
Page 8: Main Accessories
(‘chicken fork’), rack and grease filter. Tongs: This handy tool is designed especially for lifting hot food out of the FryAir. Baking Cage: Put the central rotisserie pole (centre pole used in the rotisserie set / chicken fork) through the centre of the baking cage to cook french fries, wedges, roasted root vegetables, prawns. - Page 9 OPTIONAL ACCESSORIES: DELUXE ACCESSORY PACK The Deluxe accessory pack makes the FryAir the most versatile counter top air fryer available. Steamer Tray: This tray is perfect for steaming all your favourite vegetables or seafood. Used in conjunction with the rack in high position.
- Page 10 SUGGESTED USAGE OF ACCESSORIES NOTE: The tongs are helpful to move the accessories and food. In order to heat the food completely, please do not put the food directly onto the cooking pot. Dual rack, steamer, baking pan 1. Put the rack into the cooking pot. Place the food directly on the rack. Or place the steamer or baking pan onto the rack, put the food inside and close the lid.
- Page 11 4. Insert the spindle in the hole of the cooking pot and into the rotisserie. Ensure the end of the spindle with a groove is connected to the cooking pot. 5. Select the function you need. Press “START”. Need some extra help? For informative video tutorials visit: www.fryair.com.au www.fryair.co.nz...
- Page 12 3. Insert the spindle of the steak cage to the cooking pot and rotisserie. 4. Select the function you need. Press “START”. Note:The tongs are helpful to move the accessories and food. Need some extra help? For informative video tutorials visit: www.fryair.com.au www.fryair.co.nz...
- Page 13 3. Fix the skewer rack to the cooking pot and rotisserie. 4.Select the function you need. Press “START”. Need some extra help? For informative video tutorials visit: www.fryair.com.au www.fryair.co.nz...
- Page 14 2. Place the filter under the heat shield, rotate clockwise. 3. Clean and dry the stainless steel filter after each use. How to clean The FryAir Let the body cool down before cleaning to prevent the risk of scalding. • Remove the plug from the power outlet before cleaning.
-
Page 15: Troubleshooting Guide
TROUBLE SHOOTING GUIDE Problem Probable Reason Solution FryAir light turns on and The FryAir is going During the cooking off. through a normal process the heating cooking cycle. elements and therefore THIS IS NORMAL the light will turn off and... -
Page 16: Warranty And Support
The FRYAIR doesn’t turn No Power Ensure that the cord is connected and plugged Not set into a switched on outlet. Check that the timer, temperature and fan- force settings are activated. My recipe requires At the end of 60... - Page 17 A QUICK COOKING GUIDE These cooking times are a guide only. They will vary depending on quantities, personal preferences, electricity supply, the cut, size of the meats and vegetables. Mode Default Temp Default Time Fan Speed Suggested (mins) Accessory Turbo Chips Baking Cage Chicken...
- Page 18 FRY AIR COOKING GUIDE These cooking times are a guide only. They will vary depending on quantities, personal preferences, electricity supply, the cut, size of the meats and vegetables. Chicken Size / Time Temperature Fan Force Accessory Amount Chicken 1100g 30 mins 240°C Rotisserie /...
- Page 19 • Large sizes of lamb need to be turned regularly during cooking. • Allow to rest in machine with lid closed for 5-10 minutes. • Lamb racks do not require browning prior to cooking. The FryAir will brown them during the cooking time.
- Page 20 FRY AIR COOKING GUIDE Beef Size / Time Temperature Fan Force Accessory Amount Beef Roast 60-70 mins 220°C Rotisserie / - Blade Low rack Beef Roast 60-70 mins 220°C Rotisserie / - Rolled Low rack • Allow to rest in machine with lid closed for 5-10 minutes. •...
- Page 21 Beans • Any frozen convenience foods that can be cooked in a regular oven can be cooked in your FryAir - using the instructions given for “fan-forced” cooking. Reduce the required cooking time by 5 minutes and increase the heat setting by 20 - 30 degrees. No pre-heating for the FryAir is required.
Need help?
Do you have a question about the TOUCH and is the answer not in the manual?
Questions and answers
how do you change the halogen bulb in fryair touch XL?
Where can I buy the accessories for FryAir touch?
The Menu key has stopped working and i cant use this machine