Table of Contents
Advertisement
Available languages
Available languages
Quick Links
Assembly Instructions & User's Manual
28" Gas Fire Pit
ITEM NO.: 2A-OC148
MODEL NO.: 2A-OC148
Please keep this instruction manual for future reference
WARNING
READ INSTRUCTION MANUAL BEFORE ATTEMPTING TO
ASSEMBLE OR OPERATE THIS PRODUCT .
Adult assembly required .
Keep screws and parts out of reach of children .
OR
(Made in China)
Advertisement
Table of Contents

Related Manuals for Red Mountain Valley 2A-OC148


Summary of Contents for Red Mountain Valley 2A-OC148
- Page 1 Assembly Instructions & User’s Manual 28" Gas Fire Pit ITEM NO.: 2A-OC148 MODEL NO.: 2A-OC148 Please keep this instruction manual for future reference WARNING READ INSTRUCTION MANUAL BEFORE ATTEMPTING TO ASSEMBLE OR OPERATE THIS PRODUCT . Adult assembly required .
- Page 2 WARNINGS AND CAUTIONS Read the instructions before use. This appliance must be installed in accordance with such regulations as are enforced. WARNING DANGER For Outdoor Use Only FIRE OR EXPLOSION HAZARD Installation and service must be performed by a qualified installer , If you smell gas : service agency , or the gas supplier .
-
Page 3: Table Of Contents
TABLE OF CONTENTS • Warnings and Cautions……………………......2,4-5 • Table of Contents. ……………………........• Exploded View. ……………………........... • Tools, Parts and Hardware. ……………………......• Assembly Instructions.……………………......8-11 • Installation Instructions ……………………......• Operation.……………………..........13-15 • Locating Heater For Use.……………………......• Maintenance and Storage.……………………...... 17-18 •... -
Page 4: Warnings And Cautions
WARNINGS AND CAUTIONS NOTE:PLEASE READ THE FOLLOWING SAFETY RULES When an appliance is for connection to a fixed piping system, the installation must conform with local codes, or in the absence of local codes with the National Fuel Gas Code, ANSI Z223.1 •... - Page 5 WARNINGS AND CAUTIONS NOTE : PLEASE READ THE FOLLOWING SAFETY RULES : Perform a leak test with a soapy solution : To check gas connections . After connecting a new cylinder . Upon re-assembly after disassembly . This appliance is designed to operate with a standard 20 lb propane cylinder with Approved Cylinder Connection .
-
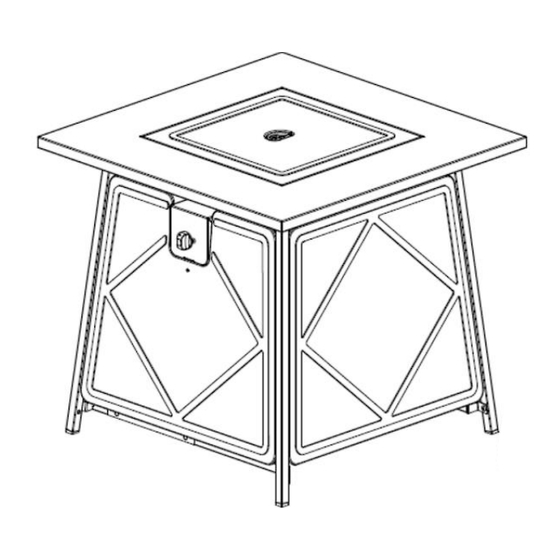
Page 6: Exploded View
EXPLODED VIEW Please check the contents of the packaging to ensure all parts are included. If missing parts, please contact customer service. Page 6 of 19... -
Page 7: Tools, Parts And Hardware
TOOLS AND PRATS ITEM DESCRIPTION PICTURE QTY. TABLE TOP CONTROL PANEL LEG WITHOUT MAGNET CYLINDER HOLDER ASSEMBLY FRONT PANEL SIDE PANEL LEG W/ MAGNET PROTECTIVE ROD DOOR PANEL COVER LID GLASSROCKS HARDWARE M5 x 10Bolt M4x 10Bolt TOOLS NEEDED: (NOT INCLUDED) Philips screwdriver Estimated time for assembly: 30 minutes. -
Page 8: Assembly Instructions
ASSEMBLY INSTRUCTIONS Choose a good, cleared assembly area and get a friend to help you put your gas fire pit together. Lay cardboard down to protect gas fire pit table top finish and assembly area. Warning : Do not install the table on a hard, unclean or foreign body surface to avoid scratches on the table top! Step 1 Place the Table Top (A) upside down to the soft,... - Page 9 ASSEMBLY INSTRUCTIONS Step 3 Attach the Leg W/Magnet (G) to the Table Top (A) with (3) M5 x 10 bolts (AA) as shown Attach the 3 Legs Without Magnet (C) to other three locations of Table Top (A) with (9) M5 x 10 bolts (AA) Step 4 Connect Control Panel (B) to the Front Panel (E)
- Page 10 ASSEMBLY INSTRUCTIONS Step 5 Connect the 2 side Panels (F) to Leg without Magnet (C) with (8) M5 x 10 bolts (AA) Step 6 Attach the Door Panel (I) to the Leg without Magnet (C) with (4) M4 x 10 bolts (BB). Close the Door Panel (I) after assembling.
- Page 11 ASSEMBLY INSTRUCTIONS Step 7 Connect the Cylinder Holder (D) to the four legs with (4) M5 x 10 bolts (AA). The side with cylinder locking bolts must face the door panel. Note: With the help of a friend, turn the gas fire pit into upright position after this step finished.
-
Page 12: Installation Instructions
INSTALLATION Two or more people are helpful for an easier installation. LOCATION Your fire pit must be installed on flat, stable surface, away from any combustible materials or construction. SET-UP 1. Place fire pit on any level, outdoor, non-combustible surface. NOTE: Do not place the appliance on grass or dirt . - Page 13 WARNING: DO NOT ATTEMPT TO OPERATE THE APPLIANCE UNTIL YOU HAVE READ AND UNDERSTAND ALL PRECAUTIONS . FAILURE TO DO SO CAN RESULT IN PROPERTY DAMAGE, SERIOUS INJURY, OR DEATH. WARNING!!! WARNING • Do not use an open flame to check for leakage. FOR YOUR SAFETY : •...
- Page 14 WARNING: DO NOT ATTEMPT TO OPERATE THIS HEATER UNTIL YOU HAVE READ AND UNDERSTAND ALL PRECAUTIONS. FAILURE TO DO SO CAN RESULT IN PROPERTY DAMAGE, SERIOUS INJURY, OR DEATH. Before Lighting The gas fire pit should be thoroughly inspected before each use, and by a qualified service person at least annually .
-
Page 15: Operation
CAUTION: AVOID INHALING FUMES EMITTED FROM THE GAS APPLIANCE’S FIRST USE. SMOKE AND ODOR FROM THE BURNING OF OILS USED IN MANUFACTURING WILL APPEAR. BOTH SMOKE AND ODOR WILL DISSIPATE AFTER APPROXIMATELY 30 MINUTES. THE GAS APPLIANCE SHOULD NOT PRODUCE THICK BLACK SMOKE. Note: The burner may be noisy when initially turned on . -
Page 16: Locating Heater For Use
CAUTION: WHEN CERTAIN MATERIALS OR ITEMS ARE LEFT ABOVE, BESIDE OR UNDER THIS HEATER WHILE IN USE, THEY WILL BE SUBJECT TO RADIANT HEAT AND COULD BE SERIOUSLY DAMAGED. This gas fire pit is primarily used for the heating of outdoor patios, decks, spas, pools and open working areas . -
Page 17: Maintenance And Storage
CLEANING AND MAINTENANCE: WARNING To enjoy years of outstanding performance FORYOUR SAFETY from your gas fire pit, make sure you DO NOT touch or move perform the following maintenance activities gas appliance for at least 45 minutes after use. on a regular basis: Allow all burner elements •... - Page 18 • Store the fire pit indoors during the winter if it will be subjected to freezing temperatures. • Disconnect and remove the cylinder from the appliance before the appliance can be stored indoors. NOTE: STORAGE Wait until gas appliance is cool •...
-
Page 19: Trouble Shooting
TROUBLE SHOOTING PROBLEM POSSIBLE CAUSE CORRECTIVE MEASURES OBSERVED Gas odor Gas leak Check all gas connections Delayed Low gas pressure Check gas supply pressure ignition Clogged or dirty burner ports Clean burner parts – see manual “CLEANING AND MAINTENANCE” section Incorrect Incorrect gas supply or pressure Check gas supply pressure... - Page 20 Assembly Instructions & User’s Manual Foyer au gaz de 28 po Numéro d’article. : 2A-OC148 Numéro de modèle : 2A-OC148 Veuillez garder ce mode d’emploi pour référence ultérieure Avertissement LISEZ LE MANUEL D’INSTRUCTIONS AVANT D’ ESSAYER D’ASSEMBLER OU D’UTILISER CE PRODUCT .
- Page 21 AVERTISSEMENTS ET PRÉCAUTIONS Lisez le mode d’emploi avant utilisation. Cet appareil doit être installé conformément aux prescriptions en vigueur. DANGER AVERTISSEMENT Pour usage extérirur uniquement RISQUE D’INCENDIE OU D’EXPLOSION L’installation et le service doivent être S’ily a une odeur de gaz : effectués par un installateur qualifié, une 1.
- Page 22 Annuaire • ……………………....Avertissements et précautions 2,4-5 • . ……………………..........Annuaire • . ……………………........... Vue explosée • . ……………………..... Outils, pièces et quincaillerie • .……………………......Instructions de montage 8-11 • ……………………......Instructions d’installation • .……………………..........Opération 13-15 •...
- Page 23 AVERTISSEMENTS ET PRÉCAUTIONS NOTE: Veuillez lire les règles de sécurité suivantes Lorsqu’un appareil doit être raccordé à un système de tuyauterie fixe, l’installation doit être conforme aux codes locaux ou, en l’absence de codes locaux, au Code National du gaz combustible , ANSI Z223.1 •...
- Page 24 AVERTISSEMENTS ET PRÉCAUTIONS NOTE: Veuillez lire les règles de sécurité suivantes : Effectuer un test d’étanchéité avec une solution savonneuse : Pour vérifier les connexions de gaz . Après avoir connecté un nouveau cylindre . Lors du remontage après démontage . Cet appareil est conçu pour fonctionner avec un cylindre de propane standard de 20 lb avec connexion de cylindre approuvée .
- Page 25 Vue éclatée Veuillez vérifier le contenu de l’emballage pour vous assurer que toutes les pièces sont incluses. S’il manque des pièces, contactez le service client . Page 6 sur 19...
- Page 26 Outils et Pièces Article DESCRIPTION Image Qté DESSUS DE LA TABLE PANNEAU DE CONFIGURATION JAMBE SANS AIMANT ENSEMBLE PORTE – CYLINDRE PANNEAU AVANT PANNEAU LATÉRAL AIMANT à JAMBES TIGE DE PROTECTION PANNEAU DE PORTE COUVERCLE ROCHES DE VERRE QUINCAILLERIE M5 x 10Bolt M4x 10Bolt OUTILS NÉCESSAIRES : (NON INCLUS) Tournevis Philips...
- Page 27 INSTRUCTIONS DE MONTAGE Choisissez une bonne zone de rassemblement et trouvez un ami pour vous aider à assembler votre foyer au gaz. Déposez le carton pour protéger la zone de finition et de montage au feu de gaz . AVERTISSEMENTS : n’installez pas la table sur un corps dur, impur ou étranger pour éviter les éraflures sur le dessus de la table! Étape 1 Placez le haut de la Table (A) à...
- Page 28 INSTRUCTIONS DE MONTAGE Étape 3 Attachez la jambe W/ aimant (G) au sommet de la Table (A) avec (3) M5 x 10 boulons (AA) comme indiqué Attacher les 3 jambes sans aimant (C) aux 3 autres endroits du haut de la Table (A) avec (9) M5 x 10 boulons (AA) Étape 4 Connecter le panneau de commande (B) au...
- Page 29 INSTRUCTIONS DE MONTAGE Étape 5 Raccorder les 2 panneaux latéraux (F) à une jambe sans aimant (C) avec (8) M5 x 10 boulons (AA) Étape 6 Attacher le panneau de porte (I) à la jambe sans aimant (C) avec (4) M4 x 10 boulons (BB). Fermer le panneau de porte (I) après assemblage.
- Page 30 INSTRUCTIONS DE MONTAGE Étape 7 Raccorder le porte-cylindre (D) aux quatre jambes par (4) M5 x 10 boulons (AA). Le côté avec verrous à cylindre doit faire face au panneau de porte. Note: avec l’aide d’un ami, mettre la foyer de feu à...
- Page 31 I INSTRUCTlONS D'lNSTALLATION INSTALLATION Deux personnes ou plus sont utiles pour une installation plus facile. EMPLACEMENT Votre fosse fine doit etre installee sur une surface plane et stable, loin de tout combustible ou construction. Fig. INSTALLER 1. Placer le foyer sur une surface exterieure, non combustible et de tout niveau.
Need help?
Do you have a question about the 2A-OC148 and is the answer not in the manual?
Questions and answers