Rockwell Shop Series Manual
Hide thumbs
Also See for Shop Series:
- Manual (25 pages) ,
- Instruction manual (12 pages) ,
- Manual (12 pages)
Table of Contents
Advertisement
Quick Links
Advertisement
Table of Contents

Related Manuals for Rockwell Shop Series


Summary of Contents for Rockwell Shop Series
- Page 1 250W/203mm Band SaW RS8851...
- Page 3 RS8851...
- Page 4 RS8851...
- Page 5 RS8851...
- Page 6 RS8851...
-
Page 7: Component List
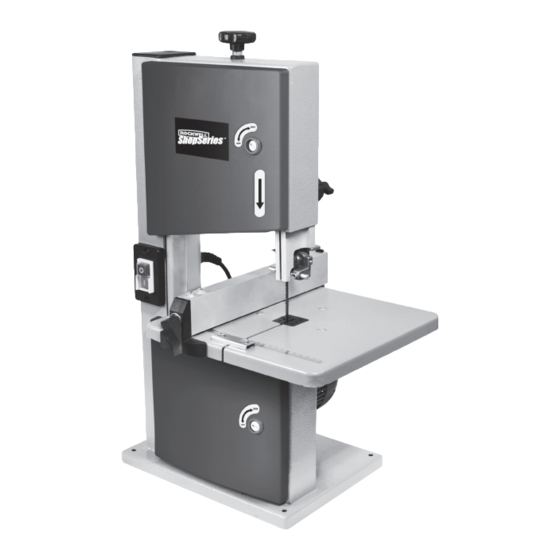
250W/203mm Band SaW COmPOnEnT LIST On/OFF SWITCh POWER CORd RuBBER TIRES WEB PanEL maChInE FOOT ExTRaCTOR SOCkET LOWER BLadE PuLLEy uPPER BLadE PuLLEy TIghTEnIng SCREW BLadE guaRd uPPER BLadE guIdE SIdE COvER hOOd CLOSuRE RETaInIng SCREW FOR uPPER BLadE PuLLEy SaW TaBIE dIaL SCaLE FOR TILT angLE PLaSTIC TaBLE InSERT... -
Page 8: Safety Instructions
250W/203mm Band SaW aCCESSORIES cord and keep them away from the work area. 5 - store idle tools parallel guide - When not in use, tools should be stored in a dry blade (on the machine) locked-up place, out of reach of children. hex key 6 - Do not force the tool screwdriver... - Page 9 250W/203mm Band SaW 15 - Disconnect tools - Replacement of the plug or the supply cord shall - When not in use, before servicing and when always be carried out by the manufacturer of the changing accessories such as blades, bits and tool or his service organisation, cutters, disconnect tools from the power supply.
- Page 10 250W/203mm Band SaW SymBOL work table. Never lift it by your hands; 10) Never adjust or assemble the rip fence or mitre gauge when the machine is working; To reduce the risk of injury, user must 11) When the workpiece is near to the saw blade, read instruction manual never use your hand to push it.
-
Page 11: Technical Data
250W/203mm Band SaW TEChnICaL daTa regulations in force in your area. The same applies for the general rules of occupational Voltage 230-240V~50hz health and safety. power 250W The manufacturer shall not be liable for any changes processing scope Max. height : 80mm made to the machine nor for any damage resulting from Max. - Page 12 250W/203mm Band SaW 2. TEnSIOnIng ThE BLadE (See Fig. B1&B2) 4.1. upper support bearing (30) CauTIOn! Remove the tension from the blade if the Undo the screw(33). bandsaw is not going to be used for some time. be sure Move the support bearing(30) so that it is no longer to re-tension the blade before you start the machine.
- Page 13 250W/203mm Band SaW re-adjust if necessary. take out through the slot in the table (15). CauTIOn! When the adjustments have been finished, Fit the new blade (26), aligned centrally on the Blade the blade Guard (34) must be closed again. Pulleys (7,8).
-
Page 14: Operation
250W/203mm Band SaW securely fixed. they are intended. You must always ensure that the parallel stop (24) is Always aim at making a complete cut in one pass positioned parallel to the blade (26). rather than in a stop-and-go operation requiring the workpiece to be withdrawn. -
Page 15: Ordering Replacement Parts
250W/203mm Band SaW 4.TRanSPORT To transport the bandsaw, hold the supporting foot (5) with one hand and the frame (25) with the other hand. ImPORTanT! Never use guards to lift or transport the equipment. maInTEnanCE CauTIOn! Pull out the power plug first. Remove dust and dirt regularly from the bandsaw. - Page 16 madE In PRC...
Need help?
Do you have a question about the Shop Series and is the answer not in the manual?
Questions and answers