Table of Contents
Advertisement
Available languages
Available languages
Advertisement
Table of Contents

Summary of Contents for ESPRESSO ITALIA GIMOKA ITALY CUP
- Page 1 Manuale d’Uso e Manutenzione Use and Maintenance Manual...
- Page 2 Il Costruttore si riserva il diritto di modificare, senza preavviso, le caratteristiche delle apparecchiature presentate in questa pubblicazione; declina inoltre ogni responsabilità per le eventuali inesattezze imputabili ad errori di stampa e/o trascrizione contenute nella stessa. Le istruzioni, i disegni e le informazioni in genere contenute nel presente fascicolo sono di natura riservata e non possono essere riprodotte ne completamente ne parzialmente od essere comunicate a terzi senza l'autorizzazione scritta del Costruttore che ne ha la proprietà...
-
Page 3: Table Of Contents
INDICE AVVERTENZE GENERALI ......... . DESCRIZIONE GENERALE DELLA MACCHINA . -
Page 4: Avvertenze Generali
1. AVVERTENZE GENERALI DI SICUREZZA Attenersi sempre e scrupolosamente alle istruzioni di utilizzo riportate su questo manuale e conservarlo per le future consultazioni. AVVERTENZA Prima di collegare o scollegare la macchina assicurarsi che l'interruttore sia sulla posizione "0". Dopo aver tolto dall'imballaggio l'apparecchio, assicuratevi della sua integrità, in caso di dubbio rivolgetevi a personale qualificato. - Page 5 La macchina non deve essere posizionata sotto lo scolapiatti od in prossimità del lavello, al fine di evitare possibili schizzi d’acqua. La macchina non deve essere posizionata in prossimità di forni od altre fonti di calore. Sorvegliare sempre l’apparecchio durante il funzionamento. Consigliamo di conservare il materiale d'imballaggio (scatola, protezioni, sacchetti, ecc..) al fine di riutilizzarlo per successivi rimessaggi o trasporti.
- Page 6 Quest' apparecchio deve essere destinato solo ed esclusivamente all'uso descritto in questo manuale (paragrafo "CLASSIFICAZIONE DELL’APPARECCHIO ED USI CONSENTITI"), ogni altro uso è da considerarsi improprio. Il costruttore declina ogni responsabilità per possibili danni causati da usi errati o irragionevoli dell'apparecchio. Prima di collegare l'apparecchio accertarsi che i dati di targa (Vedi Fig.
-
Page 7: Descrizione Generale Della Macchina
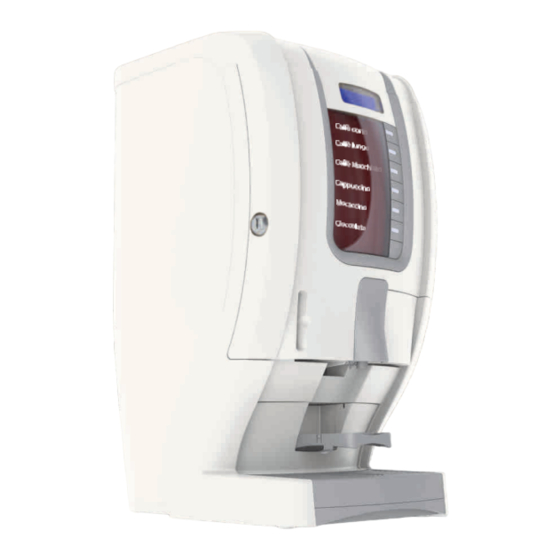
2. DESCRIZIONE GENERALE DELLA MACCHINA 2.1 ESTERNO MACCHINA Fig. 3 Coperchio ribaltabile Display Portello apertura macchina Tasti di selezione Etichetta selezioni Sportello inserimento capsule Ugelli erogatori Griglia poggiatazze ribaltabile Griglia poggiatazze estraibile 10. Fessura inserimento «Chip card» 11. Chiave apertura portello (fornita in dotazione) -
Page 8: Interno Macchina
2.2 INTERNO MACCHINA Fig. 4 Coperchio serbatoio acqua Coperchi contenitori Contenitore cioccolata solubile Mixer Contenitore latte solubile... -
Page 9: Pannello Di Controllo
2.3 PANNELLO DI CONTROLLO Fig. 5 Display Pulsante selezione «caffè corto» Pulsante selezione «caffè lungo» Pulsante selezione «caffè macchiato» Pulsante selezione «cappuccino» Pulsante selezione «mocaccino» Pulsante selezione «cioccolata»... -
Page 10: Etichette E Targhette Di Avvertenza \ Dati Tecnici Applicate Sull'apparecchio
3. ETICHETTE E TARGHETTE DI AVVERTENZA \ DATI TECNICI APPLICATE SULL’APPARECCHIO Nella figura sotto riportata sono qui rappresentate le etichette e le targhe di avvertenza \ dati tecnici poste sull’apparecchio. AVVERTENZA Dedicare il tempo necessario alla familiarizzazione con queste etichette. Assicurarsi che siano tutti leggibili e, a tale scopo, pulire quelle illeggibili, utilizzando un panno morbido, acqua e sapone. -
Page 11: Dati Tecnici
3.1 DATI TECNICI Dati elettrici: Fig. 7 (vedere targa dati su retro macchina); Capacità serbatoio: 3,6 lt.c.ca; Peso: 13 Kg c.ca.; Dimensioni d'ingombro (Fig. 7): L= 340 P=290 H=530 mm. Temperatura caffè in bicchiere: 70-85°C; 3.2 CLASSIFICAZIONE DELL'APPARECCHIO ED USI CONSENTITI Macchina adibita all'erogazione di caffè, caffè... -
Page 12: Ricezione Materiale Ed Installazione
4. RICEZIONE MATERIALE ED INSTALLAZIONE 4.1 CONTENUTO IMBALLO Alla consegna la macchina è imballata nell'apposita scatola personalizzata, il contenuto dell'imballo è: 1. macchina; 2. manuale istruzioni. Controllare che non manchi nulla, che non vi siano danni alla macchina e all'imballo o pezzi mancanti.In caso di pezzi mancanti o danneggiati rivolgersi subito al rivenditore prima di effettuare qualsiasi operazione di... -
Page 13: Istruzioni Per L'uso Della Macchina
5. ISTRUZIONI PER L'USO Fig. 8 DELLA MACCHINA Prima di utilizzare l'apparecchio per la prima volta, aprire il coperchio ribaltabile ed estrarre il serbatoio, lavare con cura e riempire con acqua fresca. Riposizionare nella sua sede. Collegare la Fig. 9 spina dell'apparecchio alla presa di corrente dell'impianto dotata di adeguata messa a terra. - Page 14 Accendere la macchina premendo Fig. 11 l'interruttore generale. CARICAMENTO CIRCUITO IDRAULICO: Alla 1° installazione eseguire almeno 3 lavaggi mixer (da attivare con la pressione simultanea del primo/secondo tasto) avendo cura di posizionare un bicchiere s u l l a g r i g l i a i n c o r r i s p o n d e n z a dell'erogatore.
-
Page 15: Brevi Note Sul Funzionamento
5.1 BREVI NOTE SUL FUNZIONAMENTO Avviando la macchina tramite l’interruttore generale si accende il display e visualizza la schermata a fianco in cui viene visualizzato il nome della macchina e la revisione del firmware contenuto in esso. Successivamente la macchina inizia la fase di riscaldamento, i pulsanti di selezione non sono illuminati ed il display visualizza la schermata a fianco. -
Page 16: Preparazione Del Caffè
AVVERTENZA Durante questa fase, potrebbe sentirsi un leggero gorgoglio proveniente dall'impianto di erogazione, dovuto alla presenza nello stesso di un mix di aria e acqua. Pertanto durante l'erogazione è possibile che alcune gocce possano scendere al di fuori della griglia del cassetto raccogli gocce. -
Page 17: Erogazione Caffè Corto
ATTENZIONE L’apertura del portello inserimento capsula deve essere effettuata solo per il tempo utile all’introduzione della stessa nell’apposita sede. Evitare di toccare con le mani o altri oggetti estranei le parti non interessate al caricamento e di manomettere il portacapsula o le altre parti in movimento. AVVERTENZA Durante qualsiasi tipo di erogazione di caffè... -
Page 18: Erogazione Caffè Lungo
Premere il pulsante « Caffè corto». Fig. 14 Nel caso in cui le erogazioni di caffè siano a pagamento il display visualizza per 2 secondi il numero di erogazioni restanti. Successivamente, durante l’erogazione, il display visualizza: L’erogazione termina nel momento in cui viene raggiunta la dose impostata dal tecnico oppure può... -
Page 19: Erogazione Caffè Macchiato
5.2.3 Erogazione caffè macchiato Per questo tipo di erogazione seguire la procedura adottata per l’erogazione di caffè corto premendo il pulsante «Caffè macchiato». 5.2.4 Erogazione cappuccino Per questo tipo di erogazione seguire la procedura adottata per l’erogazione di caffè corto premendo il pulsante «Cappuccino». 5.2.5 Erogazione mocaccino Per questo tipo di erogazione seguire la procedura adottata per l’erogazione di caffè... -
Page 20: Mancanza Acqua
Una volta raggiunto il numero massimo di capsule consentite nel cassetto la macchina non effettua erogazioni di caffè ma solo di solubile (dove non richiesta la capsula), ed il display ad ogni nuova richiesta di erogazione di bevanda con caffè, visualizza: NOTA Se il contenitore di raccolta capsule non viene svuotato per tempo, quando lo si... -
Page 21: Funzione Chip Card (Dove Presente)
6. FUNZIONE CHIP CARD (dove presente) La macchina da caffe' Italy Cup ha un sistema elettronico di abilitazione all'erogazione mediante Chipcard. Questo permette al gestore di impostare la macchina in 2 modalità di funzionamento: 1. Erogazione con decremento dei crediti presenti nella macchina, 2. -
Page 22: Menu Impostazioni
7. MENÙ IMPOSTAZIONI Fig. 16 Dal menù impostazioni l’operatore ha la facoltà di variare alcuni parametri di funzionamento dell’apparecchio. Per accedervi deve essere accesa la macchina, agendo sull’interruttore principale, e mantenuto premuto il pulsante 1 (caffè corto) per almeno 5 secondi. Una volta che l’apparecchio si è... -
Page 23: Scelta Lingua
Premere il pulsante 3 (Caffè macchiato) per Fig. 18 accedervi o premere il pulsante 4 (cappuccino) per tornare al funzionamento normale della macchina. 7.1 SCELTA LINGUA Una volta confermato l’accesso al menù impostazioni verrà visualizzato sul display. Premere il pulsante 3 (Caffè macchiato) per accedervi o premere il pulsante 4 (cappuccino) per tornare al menù... -
Page 24: Impostazioni Dosi
IMPOSTAZIONE DOSI Una volta confermato l’accesso al menù impostazioni premere il pulsante 2 (caffè lungo). Sul display verrà visualizzato: Premere il pulsante 3 (caffè macchiato) per accedervi. Il display visualizza la possibilità di impostare le dosi delle varie produzioni spostandosi con i pulsanti 1 (caffè... - Page 25 Una volta impostato l’offset pompa Fig. 21 desiderato premere il tasto 3 (caffè macchiato) per confermare. A display verrà visualizzata la possibilità di variare l’offset TR1 impostato agendo sui tasti 1 (caffè corto) e 2 (caffè lungo). Una volta impostato l’offset TR1 desiderato premere il tasto 3 (caffè...
-
Page 26: Pulizia Emanutenzione
PULIZIA E MANUTENZIONE 8.1 PULIZIA PERIODICA C o n f r e q u e n z a p e r i o d i c a , o p i ù frequentemente in funzione dell’utilizzo dell’apparecchio e della qualità dell’acqua in entrata, è... -
Page 27: Lavaggio Mixer
8.2.1 Lavaggio mixer L'apparecchio è preimpostato che dopo aver effettuato 50 erogazioni di prodotto, il display visualizza la richiesta di eseguire un lavaggio mixer. L'operazione si avvia premendo i primi due tasti caffè corto 2 e lungo 3 contemporaneamente, avendo cura di posizionare sulla griglia in corripondenza dell'erogatore un bicchiere per la raccolta dell'acqua, da svuotare in apposito... -
Page 28: Contenitore Prodotti Solubili
svitare la ventola frullatore; per svitare è sufficiente tenere bloccato con un dito il disco dentato montato sull’albero del motofrullatore; - Immergere i componenti per circa 20 minuti in un recipiente contenente la soluzione sanitizzante precedentemente preparata, avendo cura di rimuovere meccanicamente i residui e le pellicole visibili utilizzando, se necessario, scovolini e spazzole;... -
Page 29: Cassetto Raccogligoccie E Raccoglicapsule
8.2.4 Cassetto raccogligoccie Fig. 27 e raccoglicapsule Estrarre il cassetto raccogligoccie e capsule, vuotarli e sciacquarli attentamente per rimuovere tutte le tracce di caffè. Possono essere lavati con acqua calda e detersivo liquido per piatti o con polvere specifica per eliminare le tracce di caffè. NOTA I cassetti possono essere lavati anche in lavastoviglie. -
Page 30: Filtro Addolcitore
riaccensione riacquista rapidamente la temperatura d'esercizio ottimale. 8.4 FILTRO ADDOLCITORE L’accessorio addolcitore sviluppato per questo apparecchio non è incluso nella confezione della macchina al momento dell’acquisto ma è possibile acquistarlo separatamente. AVVERTENZA È consigliabile l’utilizzo dell’addolcitore. I danni causati dal calcare sono esclusi dalla garanzia. -
Page 31: Segnalazione Macchina
9 SEGNALAZIONE MACCHINA Le segnalazioni di errore o guasti sono visualizzate a display. Le seguenti segnalazioni di errore sono descritte in base alla loro priorità di visualizzazione (dalla più alta alla più bassa). Durante la segnalazione di errore, la resistenza della caldaia è attiva. Riscaldamento: Livello insufficiente in tanica acqua: Sportello inserimento capsule aperto:... - Page 32 Le seguenti segnalazioni di guasto sono descritte in base alla loro priorità di visualizzazione (dalla più alta alla più bassa). Durante la segnalazione di guasto, la macchina è bloccata e la resistenza (quando presente) è disattivata. La macchina deve essere spenta e riaccesa. Se il termostato non si apre entro un certo tempo (definito nel firmware, ad esempio 5 minuti):...
-
Page 33: Risoluzione Dei Problemi
10. RISOLUZIONE DEI PROBLEMI Problema Cause possibili Rimedio La macchina non si accende. Macchina non collegata alla Collegare la macchina alla rete di distribuzione elettrica. rete elettrica vedere paragrafo «INSTALLAZIONE», nel caso rivolgersi a centro assistenza autorizzato. Problema elettrico. Controllare che i dati di targa corrispondano a quelli della rete di distribuzione elettrica. - Page 35 INDEX GENERAL SAFETY ..........GENERAL DESCRIPTION OF THE APPLIANCE .
- Page 36 1. GENERAL SAFETY RULES Strictly follow the operating instructions contained in this manual at all times and keep the manual for future reference. WARNING Before connecting or disconnecting the machine, make sure that the switch is at '0' position. After unpacking the appliance, make sure that it has not been damaged; in case of doubt, refer to a skilled technician.
- Page 37 To avoid all possibility of contact with splashes, the machine must never be placed under a draining rack or close to a sink. The machine must never be placed near to ovens or other sources of heat. Always look after the machine while it is functioning. It is advisable to keep the packing material (box, protection, polythene bags, etc.) to be re- utilised for further storage purposes or transportation.
- Page 38 This appliance must be used only and exclusively for the intended uses described in this manual ('Classification of the appliance and allowed uses' section), any other use not described herein will be considered as misuse. The manufacturer shall not be liable for any damage or injury caused by incorrect or irrational use of this appliance.
- Page 39 2. GENERAL DESCRIPTION OF THE APPLIANCE 2.1 EXTERIOR OF THE APPLIANCE Fig. 3 Tip-up lid Display Door to enter the appliance Selection keys Selection label Door for inserting capsules Dispensing nozzles Tip-up cup supporting grill Removable cup supporting grill 10. Chip card slot 11.
- Page 40 2.2 INTERIOR OF THE APPLIANCE Fig. 4 Water tank cover Container covers Soluble chocolate container Mixer Soluble milk container...
- Page 41 2.3 CONTROL PANEL Fig. 5 Display “Short coffee” selection key “Long coffee” selection key “Coffee with a dash of milk” selection key “Cappuccino” selection key “Mocaccino” selection key “Chocolate” selection key...
- Page 42 3. WARNING LABELS AND PLATES/TECHNICAL DATA APPLIED TO THE APPLIANCE Warning/technical data labels and plates attached to the appliance are shown in the figure below. WARNING Dedicate time to familiarise yourself with these labels. Ensure that they are legible and keep them clean by using a soft cloth, soap and water. Do not use solvents, petrol, etc.
- Page 43 3.1 TECHNICAL DATA Electrical data: Fig. 7 (Refer to the data plate on the rear of the appliance); Tank capacity: Approx. 3.6 litres Weight: Approx. 13 kgs.; Overall dimensions (Fig. 7): Depth = 340 Width=290 Height=530 mm. Temperature of the coffee in the cup: 70-85°C;...
- Page 44 4. ON DELIVERY OF THE APPLIANCE AND INSTALLATION 4.1 PACKING CONTENTS The machine is delivered in a special customised box; the contents of the packaging are: 1. machine; 2. instruction manual. Check that none of these three are missing, that neither the machine nor the package has been damaged and there are no missing pieces.
- Page 45 5. INSTRUCTIONS FOR Fig. 8 MACHINE USE Before utilising the appliance for the first time, open the tip-up lid and remove the tank, wash it carefully and fill it with fresh water. Reposition the tank in its housing. Connect Fig. 9 the electrical plug of the appliance to the wall socket of an electrical installation system that has an adequate earthing...
- Page 46 Switch on the appliance by pressing the Fig. 11 main switch. HYDRAULIC CIRCUIT FILLING: When installing for the first time wash out the mixer at least three times (this operation is activated by a simultaneous pressure on the first and second key), taking care to position a glass on the cup supporting grill underneath the dispenser.
- Page 47 5.1 BRIEF NOTES ON APPLIANCE OPERATION When the main switch of the appliance is switched on, the display illuminates and visualises the screen on the right in which there is the name of the appliance and the revision of the firmware contained in the appliance.
- Page 48 WARNING During this phase, a slight gurgling might be heard coming from the dispensing system due to the presence of a mixture of air/water in the system. Therefore, during beverage dispensing, some drops may fall outside the drip tray. It is advisable not to place hands in the grid area at this stage.
- Page 49 ATTENTION Opening the capsule insertion door must be effectuated only to insert the capsule into the seat. Avoid touching the parts not involved in loading with your hands or any other foreign object. Do not tamper the capsule holder or any other moving components.
- Page 50 Press the “short coffee” key. Fig. 14 If the dispensing of coffee is against payment, the display visualises the number of remaining dispensations for 2 seconds. Subsequently, during the dispensation the display visualises: The dispensation stops when the dose is reached that has been set by the technician or can be stopped by pressing the “Short coffee”...
- Page 51 5.2.3 “Coffee with a dash of milk” dispensation For this dispensation, follow the procedure used for the “short coffee” dispensation pressing the “Coffee with a dash of milk” key. 5.2.4 Cappuccino dispensation For this dispensation, follow the procedure used for the “short coffee” dispensation pressing the “Cappuccino”...
- Page 52 Once the maximum number of capsule permitted has been reached, the appliance does not effectuate coffee dispensations but only soluble products (where the capsule is not required) and the display at each new request for the dispensation of coffee visualises: NOTE if the capsule collection drawer is not emptied in good time, when it is emptied,...
- Page 53 6. CHIP CARD FUNCTION (if available) The Italy Cup Espresso coffee machine has an electronic enablement system of the dispensations utilising a Chip card. This permits the appliance owner to set the appliance in two functioning modes: 1. Dispensation by decreasing the credits in the appliance.
- Page 54 7. SETTINGS MENU Fig. 16 The operator can vary certain functioning parameters of the appliance via the Settings menu. The appliance must be switched on at the main switch to gain access and the 1 (Short coffee) key must be kept pressed for at least 5 seconds.
- Page 55 Press the 3 (Coffee with a dash of milk) key Fig. 18 to gain access or press the 4 (Cappuccino) key to return to normal functioning of the appliance. 7.1 LANGUAGE SELECTION Once access to the Settings menu has been confirmed, it will be visualised on the display.
- Page 56 DOSE SETTINGS Once access to the Settings menu has been confirmed, press the 2 (Long coffee) key. The following will appear on the display: Press the 3 (Coffee with a dash of milk) key to gain access. The display visualises the possibility of setting the doses of the various productions by adjusting the settings using the 1 (Short coffee) key and the 2 (Long coffee) key.
- Page 57 Once the desired offset pump has been set, Fig. 21 press the 3 (Coffee with a dash of milk) key to confirm. The display visualises the possibility of altering the Offset TR1 set by adjusting the 1 (Short coffee) key and the 2 (Long coffee) key.
- Page 58 CLEANING AND MAINTENANCE 8.1 PERIODICAL CLEANING Depending on the how much the appliance is used and the quality of the water used, it is necessary to periodically, or more frequently, to clean and disinfect the whole alimentary circuit proceeding as follows. ATTENTION Before starting any cleaning operation, unplug the plug from the power socket.
- Page 59 8.2.1 Washing the mixer The appliance has been preset to advise when 50 dispensations of product have been dispensed and the request to effectuate the washing of the mixer is shown on the display. The operation is started by simultaneously pressing the 1 (Short coffee) key and the 2 (Long coffee) key, taking care to position a glass underneath the dispenser on the grill to collect the water and then to...
- Page 60 - unscrew the blender fan by holding the toothed disc mounted on the blender motor shaft with a finger; - immerse the components for approx. 20 minutes in a container containing the previously prepared sanitising solution, taking care to mechanically remove the residues and the visible films by utilising, if necessary, pipe cleaners and brushes;...
- Page 61 8.2.4 Drip and capsule Fig. 27 collector drawer Withdraw the drip and capsule collector drawer, empty them and carefully rinse to remove all traces of coffee. They can be washed with hot water and washing-up liquid or using specific powders to eliminate the traces of coffee. NOTE The drawers can be washed even in a dishwasher.
- Page 62 reaches its ideal operating temperature. 8.4 SOFTENER FILTER The softener accessory developed for this appliance is not included in the machine package at the moment of the purchase, but it can be acquired separately. WARNING it is advisable to use the softener. Damages caused by limestone are not covered by the warranty.
- Page 63 9 ALARM SIGNALS MADE BY THE APPLIANCE Error and fault alarm signals are visualised on the display. The following error alarm signals are described on the basis of their visualisation priority (from the highest to the lowest). During an error alarm signal, the resistance of the boiler is active.
- Page 64 The following error alarm signals are described on the basis of their visualisation priority (from the highest to the lowest). During the fault alarm signal, the appliance is blocked and the resistance (when present) is deactivated. The appliance must be switched off and switched on again.
- Page 65 10. TROUBLESHOOTING Problem Possible causes Solution Machine does not turn on. Machine not connected to the Connect the machine to t he mains. mai n s ; see t he 'Installation' sect ion. Contact an authorised service centre if required. Electrical problem.
- Page 66 Note:...
- Page 68 For more detailed information about recycling of this product, please contact your local city office, your household waste disposal service or the shop where you purchased the product. ESPRESSO ITALIA S.R.L. Via delle Industrie, 10 23014 Andalo Valtellino (SO) 0342.684166...
Need help?
Do you have a question about the GIMOKA ITALY CUP and is the answer not in the manual?
Questions and answers