
Summary of Contents for Mobius Trimmer M108S
- Page 1 USER GUIDE © 2 0 2 0 E T E R O S T E C H N O L O G I E S I N C . A L L R I G H T S R E S E R V E D . U G 2 0 0 4 M 1 0 8 S...
- Page 2 Please heed all safety warnings and instructions as they are critical for safe and effective use of the equipment. The M108S is a significant step forward in trimming technology and may operate differently than you are accustomed to. Following the instructions in this guide will allow you to benefit from these innovations.
-
Page 3: Table Of Contents
TABLE OF CONTENTS SAFETY SAFETY INSTRUCTIONS DISCLAIMER WARNING LABELS SERVICE & REPAIRS GENERAL SAFETY PRECAUTIONS MACHINE OVERVIEW M108S AIRTHREAD TENSION TUMBLER TRIFLEX BLADE SYSTEM VARIABLE SYSTEM CONTROL WHAT’S IN THE CRATE SETUP UNCRATING REASSEMBLY CONVEYOR SETUP TANDEM SETUP OPERATION OPERATION PREP... -
Page 4: Safety
SAFETY M O B I U S T R I M M E R M 1 0 8 S U S E R G U I D E... -
Page 5: Safety Instructions
Do not operate the M108S when fatigued. Be alert. If tired while operating the device, take a break. Fatigue may result in loss of control. -
Page 6: Warning Labels
WARNING LABELS WARNING IMPELLER CONTINUES MOVING AFTER ENGAGING E-STOP. DO NOT REMOVE FILTER BAG UNTIL IMPELLER COMES TO A FULL STOP. AVERTISSEMENT LA ROUE À AUBES CONTINUE À TOURNER MÊME APRÈS L’ENGAGEMENT DE L’ARRÊT D’URGENCE. NE RETIREZ PAS LE FILTRE À MANCHES JUSQU'À CE QUE LA ROUE À AUBES SOIT COMPLÈTEMENT ARRÊTÉE. SERVICE &... -
Page 7: General Safety Precautions
GENERAL SAFETY PRECAUTIONS 1. READ and become familiar with the entire User Guide. LEARN the equipment applications, limitations, and possible hazards. 2. KEEP GUARDS IN PLACE and in working order. 3. DO NOT USE THE DEVICE IN A DANGEROUS ENVIRONMENT or damp or wet locations. Never expose control panel directly to rain or water. -
Page 8: Machine Overview
MACHINE OVERVIEW M O B I U S T R I M M E R M 1 0 8 S U S E R G U I D E... -
Page 9: M108S
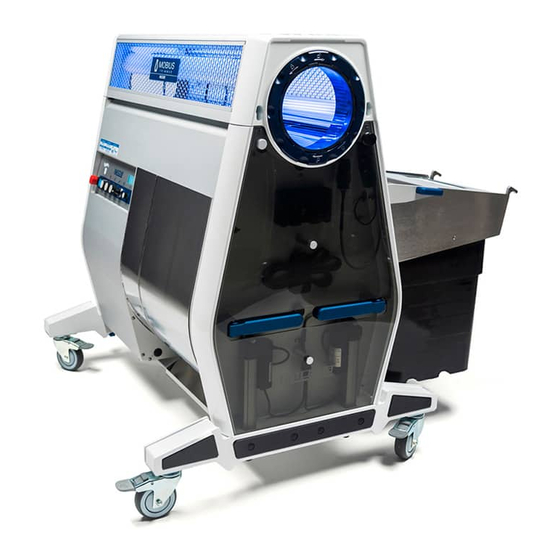
MOBIUS TRIMMER M108S Clear Top Screen Hex Screens Infeed Right Rear Sensor Block Hockey Stick Control Panel Accessory Caddy Fan Housing Spare Belt Separator Tilt Legs Outfeed Left Front Sensor Block Belt, Gears & Pulleys Trim Tote Fan Housing Air Filter... -
Page 10: Airthread Tension Tumbler
AIRTHREAD TENSION TUMBLER Tumbler Ring Infeed Tab Infeed End Cap Tumbler Rings Outfeed End Cap TRIFLEX BLADE SYSTEM Spacer Bar END VIEWS: Bed Knife Helical Blade Spacer Bar Spacer Bar Pin Gear Side Bed Knife Bed Knife Pin Bearing Block M O B I U S T R I M M E R M 1 0 8 S U S E R G U I D E... -
Page 11: Variable System Control
Suction Speed Angle Button WHAT’S IN THE CRATE Your MOBIUS TRIMMER M108S comes with the following items: • POWER CORD • 1 SPRING JACK TOOL to install and remove the tumbler • 2 AIRTHREAD TENSION TUMBLERS • 2 TRIM TOTES •... -
Page 12: Setup
SET-UP M O B I U S T R I M M E R M 1 0 8 S U S E R G U I D E... -
Page 13: Uncrating
2. Remove 2 boxes containing the hopper 3. Remove 3 remaining side panels and chute, set aside 4. Remove protective plastic from M108S 5. Remove blue plastic wrap holding 6. Place foam sheet on ground to be used and retain for future use... - Page 14 M108S outward. the crate-base. Set machine down and re-`lock the wheels .Remove power cord Note: 4 people should lift the M108S off from crate base the crate base with 1 person per handle M O B I U S T R I M M E R M 1 0 8 S U S E R G U I D E...
-
Page 15: Reassembly
3. Place the lid hinge on the body hinge and slowly rotate the lid toward the front of the 4. Reconnect the lid wire to the M108S machine in the closing motion As the lid closes, it will slide forward into the body hinge body. - Page 16 M108S TUMBLER INSTALLATION The electrical box filter assembly will help protect the electrical components in your Mobius Trimmer M108. The filter mesh should be checked before every trim session. The M108S is built with our all-new Spring Tension Technology. It delivers the high trim quality that you depend on with a simplified, reliable workflow.
- Page 17 I NS TAL LI N G T H E A I RTH RE AD TE N SI ON T UM BL ER View a video of this installation, or follow along below: 10. With the lid in the closed position, 11.
- Page 18 P E R FO R M T HE 6- PO IN T BLA DE I N SP EC T I ON The M108S is ready for safe operation when all blades are fully seated in their channel. The 6-Point Blade Inspection is confirming proper alignment for the 3 blade cartridges on both sides of the machine.
-
Page 19: Conveyor Setup
I NS TAL LI N G HO PPE R AN D CH UT E Note: The Check Hopper and Check Chute errors will be displayed when they are not installed. The hopper and chute will also be illuminated on the visual indicator at the left of the control panel. 29. - Page 20 OUTFEED CONVEYOR • Adjust the legs of the outfeed conveyor so that the height of the belt and kick plates are below the outfeed of the trimmer. • Position the outfeed conveyor adjacent to height to have the belt surface fill the conveyor belt with material prior to turning on either the trimmer or the conveyor.
-
Page 21: Tandem Setup
T A ND EM S E TU P Watch a video of this process in our Mobius Academy, or follow the instructions below: 1. Start by positioning the two units front 2. Remove the conveyor sensor over ride 3. Open both lids, and place tandem locks to back. -
Page 22: Operation
OPERATION M O B I U S T R I M M E R M 1 0 8 S U S E R G U I D E... -
Page 23: Operation Prep
OPERATION PREP Please take the following steps to confirm that Mobius Trimmer M108S is ready to operate: 1. Complete a thorough inspection of the blades and tumbler following the 6-Point Blade Inspection steps to ensure that the blades are seated properly. - Page 24 5. Ensure there is an empty tote on the outfeed end of the trim line to collect the material. 6. Ensure there is an empty trim tote stationed close to the back of the M108S, near the separator. 7. If using conveyors, put them into place and adjust the trimmer to the approximate angle you expect to be trimming at.
- Page 25 VACUUM (dry trim only): Because dry material is so much lighter than wet material, the vacuum can be used to adjust how long material is held in the tumbler, thus how tightly it is trimmed. Reducing the vacuum will allow material to flow through the tumbler more quickly with a looser trim;...
-
Page 26: Hot Swaps
HOT SWAPS The Mobius M108S was designed in a way that enables speedy swap-out of all plant-touching components. Depending on the material being run (wet, dry, strain, etc.), the temperature in the room, and a variety of other factors, some or all of these plant touching parts may need to be changed out during a trim session. -
Page 27: Wet Trimming
WET TRIMMING S IN GL E MO BI US UN I T When wet trimming with a single Mobius unit, try starting with the following parameters and adjust as necessary to reach the desired trim quality: • VFDs: Blades: at full power (11) Vacuum: at full power (11) Tumbler: at full power (11) •... -
Page 28: Dry Trimming
DRY TRIMMING S IN GL E MO BI US UN I T When dry trimming with a single Mobius unit, try starting with the following parameters and adjust as necessary to reach the desired trim quality: • VFDs: Blades: at full power (11) Vacuum: Start at 3/4 power (approximately 7). -
Page 29: Tips & Tricks
TIPS & TRICKS Our team has been into countless facilities all over the world since the release of the Mobius Trimmer and we’ve learned a lot along the way! Here are the tips & tricks that we use to maximize trimming throughput and quality. - Page 30 • The Mobius Trimmer can handle pretty much anything you can throw at it, but what you get out is directly related to what you put in. If you feed material that has been very well prepared, with all of the larger leaves removed, you can expect to perform less clean-up on the outfeed and to achieve a high flower to trim ratio.
-
Page 31: General
GENERAL M O B I U S T R I M M E R . C O M... -
Page 32: Cleaning
CLEANING While the body of the Mobius Trimmer cannot be power washed, many of the components can be. Once the removable parts are out of the machine, the body and lid can be washed and wiped as needed. The lid can be wiped down while installed on the body or removed for cleaning. The exterior should never be hosed or sprayed. - Page 33 PERFORM EVERY 50 HOURS (MAINTENANCE): 1. Remove dust and other particulate that may have accumulated inside the E-box of the machine. To access this area, remove the 6 screws from the site panel and use compressed air and a vacuum to remove the particulate. 2.
-
Page 34: Expected Service Life Of Standard Wear Parts
EXPECTED SERVICE LIFE OF STANDARD WEAR PARTS PART EXPECTED SERVICE LIFE E-box Filter Replace prior to each trim session 200 hours Brush 200 hours Tumblers 200 hours, provided they are properly handled, an infeed conveyor is used and the tumbler washer is employed to clean them Trim totes and gaskets Inspect prior to each use and replace as necessary... -
Page 35: Warranty
WARRANTY Thank you for purchasing Mobius Trimmer equipment from Eteros Technologies Inc. The Mobius Trimmer M108S, CannBucker MBX, Mill M210 and Mobius Automatic Tumbler and Brush Washer are covered by our manufacturer’s warranty as follows: • No warranty on consumable parts, including blades/blade bars, tumbler, fan housing filter bag, brush-bar, filters, trim tote gasket, die plates, rolls, and screens;... -
Page 36: Specifications
SPECIFICATIONS Wet / Dry Capable Construction Anodized aluminum & 304 Stainless Steel Speed Adjustments 1 - 11 Number of Blades Blade Treatment Nitrided 3 Phase, 208 V, 30 Amps Power Requirements Single Phase, 240V, 35 Amps Vacuum Motor Tumbler Motor 1/8 HP Cutter Motor 3/4 HP... -
Page 37: Appendices
APPENDIX A HOT SWAP KIT... - Page 38 AS REQUIRED TO HOT SWAP 1 M108S. 00-01-000512 HELICAL BLADE ASSEMBLY PLANT-TOUCHING COMPONENT TO BE REPLACED DURING A HOT SWAP. BOX OF 3 KNIVES AS REQUIRED TO HOT SWAP 1 M108S. 00-01-000583 BED KNIFE ASSEMBLY PLANT-TOUCHING COMPONENT TO BE REPLACED DURING A HOT SWAP.
- Page 39 PART NUMBER DESCRIPTION QUANTITY APPLICATION / USE PICTURE ELECTRICAL BOX FILTER MESH PARTICULATE SCREEN TO BE REPLACED AS REQUIRED. 04-02-002179 10-PACK SHOULD BE CHECKED REGULARLY. MULTI-PURPOSE TUB FOR CLEANING AND STORAGE. 00-02-001817 SOAK ‘N’ STORE TUBS ACCOMMODATES BLADE STORAGE RACKS. MULTI-PURPOSE RACK THAT ACCOMMODATES UP TO HELICAL BLADE STORAGE 3 HELICAL BLADES FOR CLEANING, OR 3 FULL BLADE...
- Page 40 APPENDIX B RECOMMENDED CLEANERS AND PROCEDURES MOBIUS TRIMMER M108S USER GUIDE...
- Page 41 RECOMMENDED CLEANERS FOR EACH MOBIUS PART: It is recommended that warm or hot water is used to make up your diluted cleaning solution for the Mobius. MOBIUS PART RECOMMENDED PH RECOMMENDED RECOMMENDED CLEANING PROCEDURE RANGE OF CLEANER CLEANER(S) STEP 1 - CLEAN BLADE SYSTEM 8.5 –...
- Page 42 MOBIUS PART RECOMMENDED PH RECOMMENDED RECOMMENDED CLEANING PROCEDURE RANGE OF CLEANER CLEANER(S) SEPARATOR HOUSING 8.5 – 10 STEP 1 - CLEAN Spray with diluted cleaning solution, let sit for 5 – 10 FAN HOUSING Tub O’ Towels Heavy Duty minutes, brush/wipe down any areas with significant (Anodized Aluminum Versions) Cleaning Wipes and/or resin build-up then rinse.
- Page 43 MOBIUS PART RECOMMENDED PH RECOMMENDED RECOMMENDED CLEANING PROCEDURE RANGE OF CLEANER CLEANER(S) TUMBLER 10 – 13 STEP 1 - CLEAN AUTOMATIC TUMBLER AND BRUSH WASHER: Add 1 part BRUSH Super Clean, cleaner to 4 parts hot water, turn on, allow tumbler Tub O’...
- Page 44 MOBIUS PART RECOMMENDED PH RECOMMENDED RECOMMENDED CLEANING PROCEDURE RANGE OF CLEANER CLEANER(S) FAN HOUSING FILTER BAG 10 – 13 STEP 1 - CLEAN Soak in diluted cleaning solution for 5 – 15 minutes, (200 mesh) Super Clean, then rinse. Pressure washer OK. Tub O’...
- Page 45 Eteros Technologies West Eteros Technologies East 202-17665 66A Ave. 502-130 Industrial Ave. Surrey, BC Carleton Place, ON V3S 2A7 K7C 3T2 1- 86 6- 87 4 - 6 24 4 I N F O@ M OB I U ST R I M M E R . C O M M OB I US T R I M M E R .
Need help?
Do you have a question about the M108S and is the answer not in the manual?
Questions and answers