Table of Contents
Advertisement
Quick Links
Advertisement
Table of Contents

Summary of Contents for Tennant Pro 2.0
- Page 1 Start Quick Guide Pro 2.0 www.senergy.us | live.well@senergy.us...
- Page 2 Pro 2.0 Tennant Biomodulator ® Please Keep this Guide handy and refer to it often DOC 600-001 Effective Date: 09/17/2006 Revision: G Revision Date: 08/26/2013 ©2007 Jerry Tennant, MD and Senergy Medical Group For educational purposes only All rights reserved...
-
Page 3: Table Of Contents
Table of Contents About this Guide………………………………………………………………………………….1 Batteries………….…..…………….……………………………………………………………..2 Statement of User Responsibility……………………………………………………………….3 Contraindications………………………………………………………………………………….4 What is an Electrode……………………………………………………………………………..5 Care of Device………………………………..……..……………………………………….…6 Can I do too much?......................7 Powering on the Device………………………………………………………..……………….8 Accessory Port………………………………………………………………….……………….9 Diagram – Front……………..………………………………………………………………….10 Diagram – Back.…………………………………………………………………………….….11 Mode Selection…..………………………………………………………………………….…12 Left & Right Arrows………….…………………………………………………………..13 Modes.……….………………………………………………………………………..…..14-17 Assess Mode……….…………………………………………………………………………18 Understanding Voltage Readings…………………………………………………………...19... - Page 5 Table of Contents Reaction Technology….……..………………………………………..………….………………24 Coefficients of Ongoing Reaction with Biofeedback………………………….………………25 Step by Step Using Your Device…….…………………………………………..…………..26-29 Treating Pain……………………………………………………………………….……………..30 Measure and Treat Each BioTerminal Point……………………………..…….……….……..31 Chart to Measure BioTerminal Points…………………………………………………………..32 Measuring Voltage Tips……………………………………………………….……………..33-34 Balancing Autonomic Nervous System………………………………………..………….35-38 Activating Primary Power Circuit…………………………...…………………..………………39 Using Biomodulator for Extended Time……………………………………….……………….40 Optional Attachments……………………………………………………………………………41 Electrodes Attached with Wires………………………………………………………………..42...
-
Page 7: About This Guide
• This material is intended to provide you with instructions to get you started using your device immediately. Dr. Tennant’s daily protocol is very easy to follow and is the best way for all people to get started using their device. -
Page 8: Batteries
Batteries • Tennant BioModulator uses 2 AA alkaline batteries included with the device. It is ® important to only use new batteries that are the same brand. • Do Not mix old and new batteries, as this can cause them to leak. Battery corrosion can destroy your device. -
Page 9: Statement Of User Responsibility
Statement of User Responsibility • You have obtained your Tennant BioModulator either ® PRO 2.1 because you are a licensed healthcare professional or because you have a prescription for the device on file with Senergy Medical Group. • The use and care of the device is solely your responsibility. -
Page 10: Contraindications
Contraindications • These only pertain to using the Tennant BioModulator® with the electrode directly on the skin. When we are using the Tennant BioTransducer® none of this is relevant. • Do not use with pacemaker without permission of cardiologist. • Avoid direct contact with any implanted electronics in the body. -
Page 11: What Is An Electrode
• The Tennant BioTransducer® is the only attachment that plugs into the Tennant BioModulator® that is NOT an electrode, and so you do not need skin contact and you do not feel any current. For educational purposes only... -
Page 12: Care Of Device
Care of Device Your Tennant BioModulator ® PRO 2.1 has software and advanced circuitry like a computer, it is important to remember this when handling your device. • Don’t turn on if below freezing. • Clean electrode only with a 70% isopropyl alcohol . -
Page 13: Can I Do Too Much
Can I do too much? • You can use the device for long therapy sessions when you have the need. There may be times when you are in pain from a serious injury, and you need to use it longer to help your body to heal. •... -
Page 14: Powering On The Device
Turn Tennant BioModulator PRO 2.1 On ® ON-OFF switch is on the side of the unit. Slide the switch up to turn it on. Slide the switch down to turn it off. For educational purposes only... -
Page 15: Accessory Port
Accessory Port Accessory port top right corner of unit. This port should be used for authorized accessories only! Do NOT force anything into this port or the warranty may be voided. Always unplug wire when not in use. For educational purposes only... -
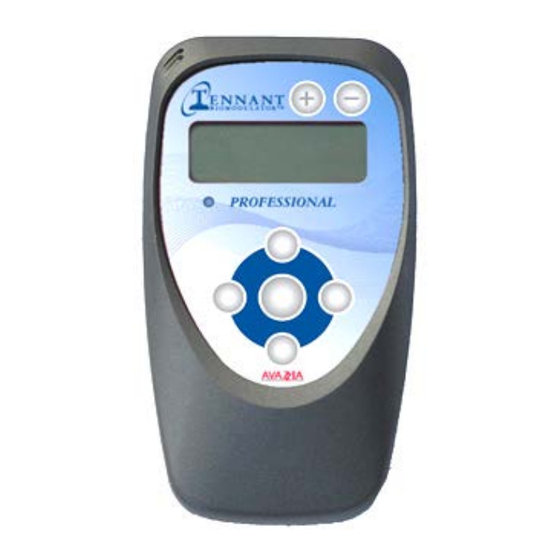
Page 16: Diagram - Front
Diagram – Front Power level control On / Off switch Accessory port Blue light indicates power is on For educational purposes only... -
Page 17: Diagram - Back
Diagram – Back 1. Built-in electrodes on back of unit. 2. Battery connectors: Only use alkaline AA batteries. 3. Serial number 4. Calibration/programming connector – Do not damage or insert anything. Very important to keep the battery compartment clean and dry. For educational purposes only... -
Page 18: Mode Selection
Mode Selection with Tennant BioModulator PRO 2.1 ® Navigation Keys When you have You may use the up reached the or down buttons to mode, you want scroll thru the modes. YOU MUST select it with the When using the down middle button. -
Page 19: Left & Right Arrows
Left and Right Arrows Advanced Function Keys These buttons take you to sub-menu options for advanced users. Ignore these buttons if you are a beginner. The left arrow takes you the Reaction option when you are using one The right arrow takes you to of the following modes;... - Page 20 This number is the voltage reading and is referred to as the initial reaction. • Modes that have an * are Dr. Tennant’s proprietary frequencies. • Any mode can be used with any attachment. An attachment is something that is plugged into the side of the Tennant BioModulator®...
- Page 21 Tennant BioModulator® Pro - Modes Features – Types of things the program can help with Mode Name / Frequency Measurement – used to measure the BioTerminal points and other areas of the body, gives a (voltage reaction) reading. Assess 60 Hz This is used with the electrode on the back of the device, placed firmly on skin.
- Page 22 Mode Name / Frequency Features Delta Brain Waves Deepest meditation and deep restorative sleep, Dreamless sleep. Healing and Rejuvenation. Delta waves suspend external 0.5 - 4.0 Hz awareness (located at back of head) - Occipital Lobe - Use with the BioTransducer® Theta Brain Waves 3 - 8 Hz Trance or hypnotic state more susceptible to hypnosis, daydream, twilight state, dream state, REM sleep.
- Page 23 Mode Name / Frequency Features Power 1 57 - 122 Hz Toning face (when using on the face keep the power level below 35 and only treat for 1 - 2 minutes on each area, on clean dry skin) – Most people use the Face Electrode for toning the face. Power Plus 57 - 122 Hz Toning of muscles (has modulation) Use electrode pads for toning large muscle groups.
-
Page 24: Assess Mode
Assess Mode • Assess – “voltmeter” Reads the voltage when placed on the skin. This is used to measure specific points on the body. Place the metal contact of the device on the skin to be measured. The voltage measurement is the Initial Reaction. For educational purposes only... -
Page 25: Understanding Voltage Readings
Understanding Voltage Readings Your Initial Reaction Number If your initial reaction number is between • 5 – 14 this is a low range and needs improvement • 15 – 24 this range is still slightly below normal • 25 – 34 this is the normal range •... -
Page 26: Automatic Mode
Automatic mode • This is a two-phase mode: (1) Reads your voltage first and then (2) Infinity™ therapy mode begins automatically and continues for one minute. A series of beeps sound when therapy session ends. It will then take another reading, so you can see if there was any improvement. -
Page 27: How To Use Power
Setting Power Level • Press and hold down the (+) button to increase the power • You set the power to what feels gentle and comfortable • A slight tingle should be felt • It is better to use too little power (rather than too much). -
Page 28: Fine Tune Power Setting
Fine-Tune Power Setting • This option is only used when the normal power settings are too high for a very sensitive person. It increases the power using baby steps. • To fine-tune your power setting you press the right arrow, then the up arrow. -
Page 29: Graft Of Power Curve
Graph of Power Curve For educational purposes only... -
Page 30: Reaction Technology
Reaction Technology D and Z • The device indicates initial reaction in modes where you see • The initial reaction is the voltage measurement that was discussed in the Assess mode, it is displayed in the top center of the screen. •... -
Page 31: Coefficients Of Ongoing Reaction With Biofeedback
Coefficients of Ongoing Reaction(X) and Initial Reaction (Y) This function is for advanced users, and you will need to reference the user manual for additional information. • Reaction mode displays; Ongoing Reaction, Coefficient of Form, D and Z progress. • Reaction mode is available for Assess, Blue Relax, Ten-8, BT modes, CH modes, individual modes and AVA modes, as indicated with ™... -
Page 32: Step By Step Using Your Device
Selecting A Mode Navigation Keys When you have You may use the up reached the or down buttons to mode, you want scroll thru the modes. you must select it with the middle When using the down button. arrow button, you will find all the modes in the order as they are listed on the program... - Page 33 Put The Device On Your Skin And Press The + Button Until You Feel A Slight Tingle • Move the device around on your skin to get an understanding of what it feels like. • It is important to feel comfortable with using Using your device in your Biomodulator.
- Page 34 • Some users feel initial concern about making mistakes. When you follow the instructions, you need not be concerned. • The Tennant BioModulator ® designed for general use and does not have to be used precisely. • Even if you are providing the therapy to...
- Page 35 Everyone starts with the Daily Protocol • Dr. Tennant has provided this protocol that addresses every area of balancing and charging up the body. • Do your daily protocol steps in order on a regular basis for all conditions. Then use your Tennant BioTransducer®...
-
Page 36: Treating Pain
Stimulate, Deep Stim, Blue Stim, Infinity. All these modes can help with pain. • After you choose the mode next you decide how you want to apply the therapy. • You can plug in your Tennant BioTransducer® and simply point the light at the pain. -
Page 37: Measure And Treat Each Bioterminal Point
Measuring and Treating BioTerminal Points ® • The purpose of measuring the body is to find where the body needs support. • When you want to take voltage readings, place the electrode on your device on each point shown in the image on the next page. You must have firm contact with skin. -
Page 38: Chart To Measure Bioterminal Points
Measure Voltage on each BioTerminal Point Brain, Eyes, Ears - BT-HD Brain, Eyes, Ears - BT -HD Lung- BT-NK Large Intestine - BT -NK Heart- BT-CH Small Intestine - BT-CH Spleen- BT-AB Stomach- BT -AB Kidney - BT -PV Bladder- BT -PV Liver- BT-BA Liver- BT-BA Gall Bladder- BT-CR... -
Page 39: Measuring Voltage Tips
Avoid Measuring Voltage When • The skin is hot and sweaty • The skin is very dry • You have not had at least 8oz. of water to drink in the last 30 min. If you take readings under these conditions, they will not be accurate •... - Page 40 Only Measure Voltage Once A Day • When measuring your points, it is important to place the electrode firmly on that point. • The first reading you get is the one that counts. • Please note that your voltage can be different from day to day.
-
Page 41: Balancing Autonomic Nervous System
Balancing the Autonomic Nervous System Fixing Your Bowling Ball Dr. Tennant teaches the importance of correcting imbalances in the body. The effects that take place with balancing of the autonomic nervous system are both physically seen and some unseen, but most definitely felt. - Page 42 Tennant Autonomic Balancing System Balancing the Autonomic Nervous System Fixing Your Bowling Ball This is done by using the Tennant BioModulator ® in the Infinity mode. 1. Place the Y electrode on the side of the neck half-way between the shoulder and the ear.
- Page 43 This Image Shows Where to Place the electrode for Balancing the Autonomic Nervous System ™ Tennant Autonomic Balancing System Fixing Your Bowling Ball Spinal Accessory (XI) Nerve For educational purposes only...
- Page 44 In the video Dr. Tennant is demonstrating the technique and saying to put the device in the Automatic mode because it will beep after just one minute to let you know that you are finished.
-
Page 45: Activating Primary Power Circuit
Activating Primary Power Circuit Place the Y electrode at the base of the skull. Treat using the Ten-8 mode for 3 minutes For educational purposes only... -
Page 46: Using Biomodulator For Extended Time
® for Extended Time. • You may want to use your Tennant BioModulator® for an extended amount of time for things like back pain and knee pain. • The electrode pads are very convenient because they stick to the body and can be worn under clothing. -
Page 47: Optional Attachments
Optional Attachments There is an Accessory Port on the right side of the unit. There are many different attachments that can be plugged into the Tennant Biomodulator ® that make it much easier to treat specific areas of the body. -
Page 48: Electrodes Attached With Wires
Electrode Pads Attached With Wires The electrode pads, are connected with a wire. The wire splits into two parts one side has a red end and the other side a black end that plugs into these pads. When using the electrode pads you would use 2 pads, or 4 depending on which wire you use. -
Page 49: Improve Total Body Voltage
• You would use the Solfeggio mode for about 30 minutes a day. • The image on the next page is showing the foot plates and hand grips. These attachments are highly recommended by Dr. Tennant for everyone to use to charge up their body. For educational purposes only... - Page 50 Foot Plates and Hand Grips Charge up the Muscle Battery Pack For educational purposes only...
-
Page 51: Chart Showing Where Black And Red Leads Go When Using Electrode Pads
Put the other pad on the corresponding site. • The pads can be placed left to right, or front to back. • Dr. Tennant teaches this placement because of how polarity is in our bodies. -
Page 52: Troubleshooting Voltage Readings
Troubleshooting Voltage Readings • If you can not get a reading; resolve these issues first – Person is dehydrated – drink more water – Reading takes longer to display (may take up to 10 seconds) when voltage is very low –... -
Page 53: Simple Daily Treatment
Now that you have balanced your body and provided a base of energy for your body you can work on any areas of pain or chronic illness. • An easy way to work on chronic pain or illness is with the Tennant BioTransducer®, simply point the light at any area of concern. •... -
Page 54: Things To Remember
Things to Remember • Infinity™ mode – starts out low and increases in intensity, wait and increase the power slowly and adjust for comfort. • Sleep mode - Device is programmed to go into sleep mode after one hour of use; to wake it up again push the (+) button. •... -
Page 55: Register For Conference
Register for Dr. Tennant’s Integrative Health Conference • If you are not yet registered to attend a conference, please contact Senergy to do so. • We value your comments and appreciate your sharing these with us. • Hope to see you at a conference soon! Live.well@senergy.us... -
Page 56: Warranty
Two-Year Limited Manufacturer Warranty • The warranty begins on the date of purchase and covers manufacturer defects only. • The warranty becomes invalid upon any of the following: – More than two years has passed since the purchase date. – The device was damaged or broken due to abuse, misuse or improper use. -
Page 57: Fda Classification
FDA Classification DOC 600-001 Effective Date: 09/17/2006 Revision: G Revision Date: 02/14/2022 For educational purposes only ©2007 Jerry Tennant, MD and Senergy Medical Group All rights reserved... - Page 58 © 2022. Tennant BioModulator , Tennant BioTransducer ® ® Tennant BioTerminals , are trademarks of Jerry Tennant, MD, ® NMD, HMD, FAAO, DPSc. and Senergy Medical Group in the United States. DOC 600-001 Effective Date: 09/17/2006 For educational purposes only Revision: G Revision Date: 02/14/2022 ©2007 Jerry Tennant, MD and...
Need help?
Do you have a question about the Pro 2.0 and is the answer not in the manual?
Questions and answers