Advertisement
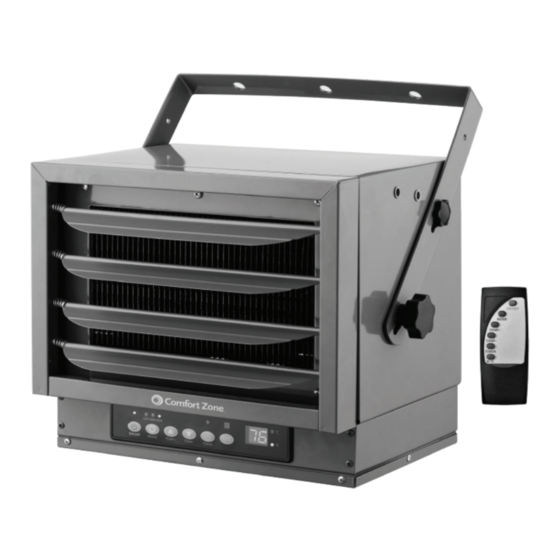
*Model pictured is CZ225ER.
Model purchased may look
slightly different.
Models
CZ225ER2C
CZ230ER2C
have 2
remote controls
Ceiling Mounted Heater
HARDWIRED INSTALLATION REQUIRED
This heater must be grounded and hardwired to a properly
sized current protection circuit breaker in accordance with
the (US) National Electric Code and local codes.
Description
• Adjustable Heat Settings with Digital Thermostat
• Fan-Forced for Wide Heat Circulation
• Fan Only Setting for Year-Round Air Circulation
• 12-Hour Timer with Auto Shut-Off
• Horizontal and Vertical Air Flow with Tilt Feature
• Sturdy Heavy Gauge Steel Body
• Remote Control
• High Limit Thermal Cut-Out Switch
www.comfortzoneproducts.com
Digital
Models: CZ225ER Series
CZ230ER Series
Save These Instructions
Advertisement
Table of Contents

Related Manuals for Comfort Zone CZ225ER Series


Summary of Contents for Comfort Zone CZ225ER Series
- Page 1 Models: CZ225ER Series CZ230ER Series *Model pictured is CZ225ER. Model purchased may look slightly different. Models CZ225ER2C CZ230ER2C have 2 remote controls Digital Ceiling Mounted Heater HARDWIRED INSTALLATION REQUIRED This heater must be grounded and hardwired to a properly sized current protection circuit breaker in accordance with the (US) National Electric Code and local codes.
-
Page 2: Intended Use
This is a precaution to prevent serious shock. visual imperfections. For repairs covered under warranty, see warranty 7. This heater is not suitable for use in hazardous locations as defined statement. For all other repairs contact Comfort Zone Customer ®... -
Page 3: Specifications
SPECIFICATIONS: CZ225ER SERIES DIGITAL HEAVY DUTY 6,000W ELECTRIC UTILITY HEATER WATTS SWITCH POSITION VOLTS (VAC) PHASE AMPS BTU/HOUR 6,000W HIGH (Default) 208-240V, 60Hz 20,470 4,500W MEDIUM 208-240V, 60Hz 18.1 15,360 3,000W 208-240V, 60Hz 11.9 10,240 FAN ONLY AIR THROW... - Page 4 www.comfortzoneproducts.com WARNING: FOR INDOOR USE ONLY, IN A DRY LOCATION FREE OF GASOLINE, PAINT, FLAMMABLE LIQUIDS OR COMBUSTIBLE DUST OR MATERIALS. DO NOT USE EXTENSION CORDS MAXIMUM MOUNTING HEIGHT USING BRACKET FOR: VERTICAL AIR FLOW: HORIZONTAL/ANGLED AIR FLOW: The maximum recommended ceiling height The maximum recommended ceiling for effective vertical air flow is 11 ft.
-
Page 5: Installing The Heater
www.comfortzoneproducts.com TIMER FUNCTION: The Timer function allows you to set the length of operation from 1 to 12 hours. Each time the TIMER button is pressed the length CEILING JOIST of operation will increase 1 hour. The duration the timer is set for will be displayed on the LED screen in hour increments. -
Page 6: Connecting The Power
www.comfortzoneproducts.com and secure with the small knob-screws and tighten all. See Figure 5. CONNECTING THE POWER: 1. With the power off at the breaker, remove all screws from the bottom lid for access to the electrical section of the heater. 2. -
Page 7: Care And Maintenance
www.comfortzoneproducts.com CARE AND MAINTENANCE: LIMITED WARRANTY CLEANING THE HEATER: This unit is guaranteed to the original retail purchaser against 1. Do not disassemble the heater to clean it. defects in quality or workmanship for a period of one year 2. The heater should be powered OFF and disconnected from from the date of original purchase. - Page 8 www.comfortzoneproducts.com ERROR CODE TROUBLESHOOTING GUIDE: Error Code Possible Cause Recommended Solution Clearing Error Codes Ensure Heater is Installed with Sufficient Clearance All-Around, See Figure 1. To Clear E1 Code: E1 (Fan Insufficient Clearance Around Heater *6 feet minimum mounting from floor Blade Not 1.
Need help?
Do you have a question about the CZ225ER Series and is the answer not in the manual?
Questions and answers
I have used my heater for a few months. It worked well. Now the thermostat display is fixed at 37 degrees C. so the heater will not come on because the temperature in my shop is lower than 37 degrees C. Is there a way to get it working again?
To fix the thermostat issue on your Comfort Zone CZ225ER Series heater stuck at 37°C, try the following steps:
1. Press the TEMP+ or TEMP– buttons on the unit or remote to adjust the temperature. The display will blink while adjusting.
2. Wait about 5 seconds after setting the desired temperature. The display should stop flashing and accept the new setting.
If the temperature remains stuck at 37°C and does not respond:
- Disconnect power to the unit.
- Open the bottom cover and inspect the room temperature sensor (thermocouple) located below the fan motor bracket.
- Ensure the wire insulation is undamaged and no internal conductor is exposed.
- Allow the unit to fully dry if moisture is present.
- Reattach all parts securely and restore power.
If the issue persists, it may indicate a sensor fault (e.g., E2 or E3 error), and you should contact the manufacturer for service or product return.
This answer is automatically generated