
Related Manuals for Samsung STP-103S


Summary of Contents for Samsung STP-103S
- Page 1 Date : February. 2004 Manual Reversion 2.3 STP-103S / STP-103P Operator’s Manual ELECTRO-MECHANICS TEL : 82-31-218-5594 FAX : 82-31-218-5589 http://www.samsungminiprinters.com KN04-00003A...
- Page 2 Safety Precautions In using the present appliance, please keep the following safety regulations in order to prevent any hazard or material damage. WARNING WARNING Violating following instructions can cause serious injury or death. Violating following instructions can cause slight wound or damage the appliance. Do not plug several products in one You must use only the supplied adapter.
- Page 3 2. Low noise thermal printing. own expense. 3. RS-232 serial interface (STP-103S), Parallel interface (STP-103P). 4. The data buffer allows the unit to receive print data even during printing. This equipment has been tasted and found to comply with the limits for a Class B 5.
-
Page 4: Table Of Contents
Make sure that there is enough space around the printer so that it can be used ..........29 easily. Chapter 9. Control Commands ................51 APPENDIX A - Connectors ............51 - Serial Type (STP-103S) ............51 - Parallel Type (STP-103P) .................52 APPENDIX B - Specification... -
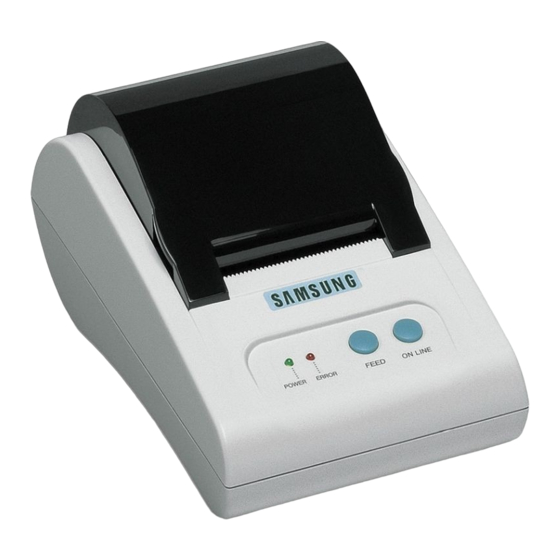
Page 5: Printer Part Names
The POWER light is on when the printer power is on. ERROR (red) 1) The error LED blinks fast when paper is out. 2) The error LED blinks when the Near End Sensor triggered. STP-103S STP-103P Control Panel POWER ERROR... -
Page 6: Chapter 2. Connecting The Cable
3. Plug the power supply's DC cable connector into the printer's power connector as shown below. STP-103S / STP-103P 3. Plug the other end of the cable into the computer. 4. Plug the AC adapter's power cord into an electrical outlet. -
Page 7: Chapter 3. Installing The Paper Roll
2-2. Connecting the printer to your Computer Chapter 3. Installing the Paper Roll STP-103P Use a paper roll that matches the specifications. You need an appropriate parallel interface cable to connect your computer to the NOTE printer's built-in interface. The printer must be turned off before installing the paper roll. 1. -
Page 8: Chapter 4. Setting The Dip Switching
Chapter 4. Setting the DIP Switches DIP Switch Functions Default CAUTION 2400 bps Turn off the printer while setting the DIP switch to prevent an electrical short, which 4800 bps can damage the printer. 9600 bps 19200 bps You can change your interface and printer density settings by changing the DIP 9600 switch setting. -
Page 9: Chapter 5. Running The Self Test
Chapter 5. Running the Self-test Chapter 6. Hexadecimal Dumping 1. Self-test printing This feature allows experienced users to see exactly what data is coming to the printer. This can be useful in finding software problems. When you turn on the 1) Starting the self test hexadecimal dump function, the printer prints all commands and data in hexadecimal format along with a guide section to help you find specific commands. -
Page 10: Chapter 7. Code Table
Chapter 7. Code Table The following pages show the character code tables. To find the character corresponding to a hexadecimal number, count across the top of the table for the For example, 4A=J. Page1 : KATAKANA PC437 : USA, Standard Europe... - Page 11 PC860 : Portuguese PC850 : Multilingual...
- Page 12 PC863 : Canadian – French PC865 : Nordic...
- Page 13 PC858: Euro Space Page...
-
Page 14: Chapter 8. Functions
Chapter 8. Functions The commands listed in the table below are available for control of the printer. Commands Command Classification Standard Command Name Mode Execution Setting Horizontal tab ○ ○ Print and line feed ○ ○ Print and carriage return ○... -
Page 15: Chapter 9. Control Commands
Chapter 9. Control Commands Command Notation XXXX Command [Name] The name of the command. [Format] The code sequence. Command Classification Standard Command Name Mode Execution Setting ASCII indicates the ASCII equivalents. Esc c 5 Enable/disable panel FEED buttons Hex indicates hexadecimal equivalents. Esc d Print and feed paper n lines Decimal indicates the decimal equivalent. - Page 16 n=3 : Error status [Name] Print and carriage return. Off/On decimal Function [Format] ASCII Not used. Fixed to Off. Not used. Fixed to On. Decimal Undefined. [Description] When automatic line feed is enabled, this command functions the Not used. Fixed to Off. same as LF;...
- Page 17 ESC ! n ESC & y c1 c2 [x1 d1… d(y X x1)]…[xk d1…d(y X xk)] [Name] Select print mode(s) [Name] Define user-defined characters [Format] ASCII ASCII ESC & y c1 c2 [x1 d1… d(y X x1)]…[xk d1…d(y X xk)] 1B 26 y c1 c2 [x1 d1…...
- Page 18 ESC 2 ESC @ [Name] Select 1/6-inch line spacing [Name] Initialize printer [Format] ASCII [Format] ASCII Decimal Decimal [Description] Selects 1/6-inch line spacing. [Description] Clears the data in the print buffer and resets the printer mode to the mode that was in effect when the power was turned on. ESC 3 n [Name] Set line spacing...
- Page 19 ESC R n ESC V n [Name] Select an international character set [Name] Turn 90° clockwise rotation mode on/off [Format] ASCII [Format] ASCII Decimal Decimal [Range] 0 ≤n ≤10 [Range] 0 ≤n ≤1, 48 ≤n ≤49 [Description] Selects an international character set n from the following table: [Description] Turns 90°...
- Page 20 ESC c 5 n ESC { n [Name] Enable/disable panel FEED buttons [Name] Turns upside-down printing mode on/off [Format] ASCII [Format] ASCII Decimal Decimal [Range] 0 ≤n ≤255 [Range] 0 ≤n ≤255 [Description] Enables or disables the panel buttons. [Description] Turns upside-down printing mode on or off. ●...
- Page 21 GS ! n GS / m [Name] Select character size [Name] Print downloaded bit image [Format] ASCII [Format] ASCII Decimal Decimal [Range] 0 ≤n ≤255 [Range] 0 ≤m ≤3,48 ≤m ≤51 Where 1 ≤ Number of times of character height ≤2 [Description] Prints downloaded bit image in mode m.
- Page 22 ● The printing area width is set to [(nL + 256 X nH) X horizontal Printer ID Specification ID(hexadecimal) motion unit] inches. 1,49 Printer model ID STP-103S / STP-103P 2,50 Type ID Printable area 3,51 ROM version ID Depends on ROM version...
- Page 23 ● When the LSB of m = 1: Second byte (printer information) After waiting for the period specified by t, the LED indicator Off/On Decimal Status for ASB blinks and the printer waits for the PAPER FEED button to be Undefined pressed.
- Page 24 GS f n Bar Code System Number of Characters Remarks [Name] Select font for Human Readable interpretation (HRI) characters. UPC-A 11≤n≤12 48≤d≤57 [Format] ASCII JAN13(EAN) 12≤n≤13 48≤d≤57 Decimal JAN8(EAN) 7≤n≤8 48≤d≤57 [Range] n = 0, 1, 48, 49 48≤d≤57,65≤d≤90,32, [Description] Selects a font for the HRI characters used when printing a bar code. CODE39 1≤n≤255 36,37,43,45,46,47...
- Page 25 <Example> Printing GS k 72 7 67 111 100 101 13 57 51 ② Special characters are defined by combining two characters “{“ and one character. The ASCII character “{“ is defined by transmitting “{“ twice consecutively. Transmit data Specific character ASCII Decimal SHIFT...
-
Page 26: Appendix A - Connectors
APPENDIX A : CONNECTORS GS v 0 xL xH yL yH dl…dk [Name] Print raster bit image [Format] ASCII dl…dk Serial Interface Connector (STP-103S) dl…dk Decimal dl…dk PRINTER HOST 0 ≤ m ≤ 3 , 48 ≤ m ≤ 51... -
Page 27: Appendix B - Specification
APPENDIX B : Specification Printing method Thermal line printing Dot density 200 x 200 Dpi (8 dot/mm) Printing width 48mm Paper width 58mm Characters per line 32 (Font A) (12x24) , 42 (Font B) (9x24) Approximately 1.97 inchs/sec Printing Speed 50 mm/sec at 25 /printing duty 12.5% ℃...