Table of Contents
Advertisement
Quick Links
ESP32-DevKitC V4 Getting Started Guide
This guide shows how to start using the ESP32-DevKitC V4 development board.
What You Need
ESP32-DevKitC V4 board
•
USB A / micro USB B cable
•
Computer running Windows, Linux, or macOS
•
You can skip the introduction sections and go directly to Section
Development.
Overview
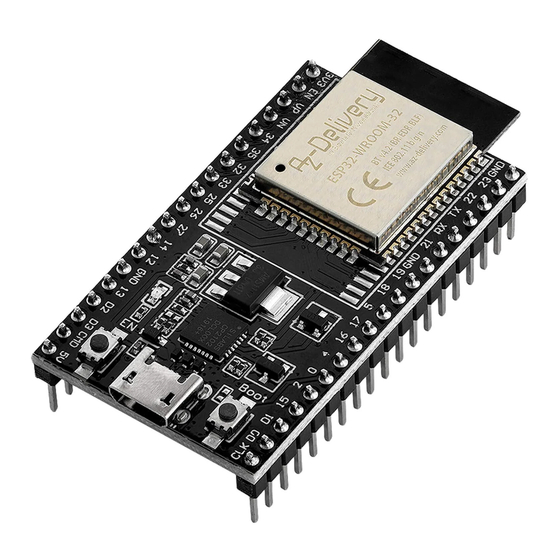
ESP32-DevKitC V4 is a small-sized ESP32-based development board produced
by Espressif. Most of the I/O pins are broken out to the pin headers on both sides for
easy interfacing. Developers can either connect peripherals with jumper wires or mount
ESP32-DevKitC V4 on a breadboard.
To cover a wide range of user requirements, the following versions of ESP32-DevKitC
V4 are available:
different ESP32 modules
•
male or female pin headers.
•
ESP32-WROOM-DA
o
ESP32-WROOM-32E
o
ESP32-WROOM-32UE
o
ESP32-WROOM-32D
o
ESP32-WROOM-32U
o
ESP32-SOLO-1
o
ESP32-WROVER-E
o
ESP32-WROVER-IE
o
Start Application
Advertisement
Table of Contents

Related Manuals for Espressif ESP32-DevKitC V4


Summary of Contents for Espressif ESP32-DevKitC V4
- Page 1 Overview ESP32-DevKitC V4 is a small-sized ESP32-based development board produced by Espressif. Most of the I/O pins are broken out to the pin headers on both sides for easy interfacing. Developers can either connect peripherals with jumper wires or mount ESP32-DevKitC V4 on a breadboard.
- Page 2 For details please refer to ESP Product Selector. Functional Description The following figure and the table below describe the key components, interfaces and controls of the ESP32-DevKitC V4 board. ESP32-DevKitC V4 with ESP32-WROOM-32 module soldered Key Component Description ESP32-WROOM- A module with ESP32 at its core. For more information, see...
- Page 3 Header Block The two tables below provide the Name and Function of I/O header pins on both sides of the board, as shown in ESP32-DevKitC V4 with ESP32-WROOM-32 module soldered. The numbering and names are the same as in the ESP32-DevKitC V4 schematics (PDF).
- Page 4 Name Type Function 3.3 V power supply CHIP_PU, Reset IO36 GPIO36, ADC1_CH0, S_VP IO39 GPIO39, ADC1_CH3, S_VN IO34 GPIO34, ADC1_CH6, VDET_1 IO35 GPIO35, ADC1_CH7, VDET_2 IO32 GPIO32, ADC1_CH4, TOUCH_CH9, XTAL_32K_P IO33 GPIO33, ADC1_CH5, TOUCH_CH8, XTAL_32K_N IO25 GPIO25, ADC1_CH8, DAC_1 IO26 GPIO26, ADC2_CH9, DAC_2 IO27 GPIO27, ADC2_CH7, TOUCH_CH7...
- Page 5 Name Type Function Ground IO23 GPIO23 IO22 GPIO22 GPIO1, U0TXD GPIO3, U0RXD IO21 GPIO21 Ground IO19 GPIO19 IO18 GPIO18 GPIO5 IO17 GPIO17 IO16 GPIO16 GPIO4, ADC2_CH0, TOUCH_CH0 GPIO0, ADC2_CH1, TOUCH_CH1, Boot GPIO2, ADC2_CH2, TOUCH_CH2 IO15 GPIO15, ADC2_CH3, TOUCH_CH3, MTDO GPIO8, D1 GPIO7, D0 GPIO6, SCK P: Power supply;...
- Page 6 ESP32-DevKitC Pin Layout (click to enlarge) Note on C15 The component C15 may cause the following issues on earlier ESP32-DevKitC V4 boards: The board may boot into Download mode • If you output clock on GPIO0, C15 may impact the signal •...
- Page 7 Location of C15 (yellow) on ESP32-DevKitC V4 board Start Application Development Before powering up your ESP32-DevKitC V4, please make sure that the board is in good condition with no obvious signs of damage.
- Page 8 After that, proceed to Started, where Section Installation Step by Step will quickly help you set up the development environment and then flash an example project onto your board. Board Dimensions Dimensions of ESP32-DevKitC board with ESP32-WROOM-32 module soldered - back (click to enlarge)
Need help?
Do you have a question about the ESP32-DevKitC V4 and is the answer not in the manual?
Questions and answers