
Related Manuals for Beko DUT36522X


Summary of Contents for Beko DUT36522X
- Page 1 Dishwasher User’s Manual DUT36522X DUT36522W 17 9688 01 00_BEKO_UC6_USA/ 02-02-22.(9:00)
-
Page 2: Table Of Contents
10.1 CARING FOR YOUR DISHWASHER EXTERIOR 10.2 CARING FOR YOUR DISHWASHER INTERIOR 10.3 CLEANING THE FILTERS 10.4 CLEANING THE HOSE FILTER 10.5 CLEANING THE WASH ARMS LOWER IMPELLER UPPER IMPELLER 11. TROUBLESHOOTING 12. TECHNICAL FEATURES 13. WARRANTY STATEMENT FOR THE BEKO DISHWASHERS... - Page 3 without the manufacturer’s permission INTRODUCTION Please read this user manual and as this may void the user’s authority to particularly the safety instructions operate the equipment” completely and carefully. They will save Use the dishwasher only for its • you time and effort and help to ensure intended purpose as described in optimum dishwasher performance.
- Page 4 Consult a doctor immediately if and Polarized wall receptacle that detergent has been swallowed or has been installed and tested by an inhaled. licensed electrician and that it has if the hot water has not been used been installed based on all Local, State •...
-
Page 5: Recycling
the possibility of recycling these For more information go to www. materials. P65Warnings.ca.gov Please check the water supply line • periodically. It is susceptible to Note: Nickel is a component in all stainless breakage. It becomes less flexible as steel and some other metal components. time goes by.Replace it immediately when it is torn, cut, swollen or there is SAVE THESE INSTRUCTIONS... -
Page 6: Getting To Know Your Dishwasher
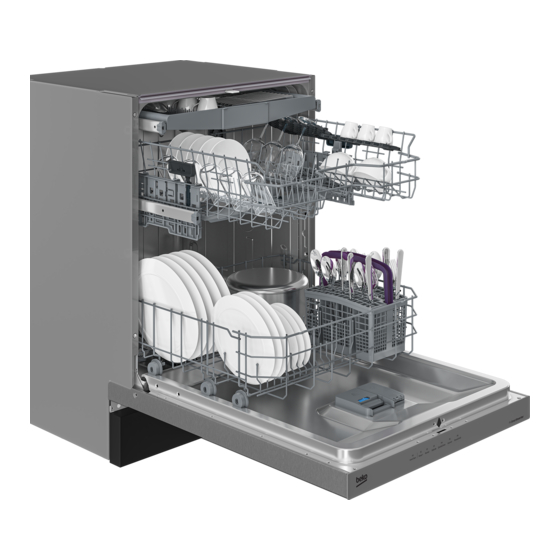
3. GETTING TO KNOW YOUR DISHWASHER 1. Upper basket 2. Upper impeller 3. Lower impeller 4. Cutlery basket 5. Door 6. Model and Serial Tag 7. Control panel 8. Detergent and rinse aid dispenser 9. Lower basket 10. Filters 11. Salt container (Select Models) 12. -
Page 7: Loading The Dishwasher
4. LOADING THE Upper cutlery basket (Select Models) DISHWASHER Pull the handle to open the door. If the door is opened during operation, the dishwasher will stop running. Once the door is closed the program will continue. Remove coarse food leftovers from tableware. - Page 8 Lower rack 4 2 3 Upper cutlery basket (Select Models) 3 2 4 Additional loading pattern for 10 place setting Upper rack...
- Page 9 Upper rack without upper cutlery Cutlery basket basket (Select Models) 1: Salad Fork 2: Teaspoon 3: Dinner fork 4: Knife 5: Serving spoon 6: Serving fork Lower rack without upper cutlery basket (Select Models) 1 1 4 1 1 4 CAUTION:Large knives and other utensils with sharp tips and edges must be placed horizontally into the...
-
Page 10: Upper Rack
4.1 UPPER RACK smaller knives and sharp utensils should be placed with sharp side down Load the upper rack with dessert plates, in the cutlery basket. cups, glasses etc. CAUTION:Use extreme caution when removing knives and other sharp utensils from the dishwasher. These items may have shifted position during the wash program, and may be wet or slippery. - Page 11 COLLAPSIBLE UPPER BASKET UPPER BASKET MULTIPURPOSE WIRES SERVICE RACK (Select Models) (Select Models) You can use collapsible wires when you This accessory located at the upper basket need a larger space for your dishes in the of your machine allows you to easily wash upper basket of your machine.
- Page 12 ADJUSTING THE HEIGHT OF THE To lower the basket, while it is in the uppermost position; UPPER BASKET (Select Models) Hold the upper basket wires with both The upper basket height adjustment hands, slightly lift up the basket and mechanism has been designed for you to simultaneously push and release the create large spaces in the lower or upper latches shown in the figure (B).
-
Page 13: Adjusting The Height Of The Upper Basket
ADJUSTING THE HEIGHT OF To raise the basket, hold the wires of the basket and pull the basket upwards THE UPPER BASKET with both hands while the basket is at (Select Models) the lowermost position (B) Upper basket height adjustment 2. -
Page 14: Lower Rack
HEIGHT SETTING (Select Models) In certain models, the height setting of the upper rack may be changed using the wheels which are present at two height levels. CAUTION:Make sure that the rack is empty. Changing the height setting while the rack contains tableware could cause the contents to dislodge, causing personal injury or damage to Push the latches back into the correct... - Page 15 COLLAPSIBLE LOWER BASKET COLLAPSIBLE LOWER BASKET TINES TINES (Select Models) (Select Models) There are foldable tines (A) located at There are foldable tines (A) located at the lower basket of the machine are the lower basket of the machine are designed for an easier placement of large designed for an easier placement of large pieces such as pans, bowls, etc.
- Page 16 SILVERWARE BASKET SILVERWARE BASKET (Select Models) (Select Models) Silverware basket is designed to wash your Silverware basket is designed to wash your dishes such as knife, fork, spoon, etc. in a dishes such as knife, fork, spoon, etc. in an cleaner manner.
- Page 17 TRAY WASH SUPPORTS SOFTTOUCH ACCESSORY (Select Models) (Select Models) Use the supports to wash trays in the The SoftTouch Accessory found in the bottom basket. lower basket of your machine enables a See the Auxiliary functions section safe washing for your fragile glasses. for appropriate program and function selection.
- Page 18 LOWER BASKET MULTIPURPOSE CEILING CUTLERY BASKET (Select Models) / HEIGHT ADJUSTABLE SERVICE Ceiling cutlery basket is designed to wash RACK (Select Models) your cutlery items such as forks, spoons This accessory located at the lower basket and etc. by placing them between the bars of your machine allows you to easily wash on the basket..
-
Page 19: Proper And Improper Loading Of Dishware
4.3 PROPER AND IMPROPER LOADING OF DISHWARE • Place all containers such as cups, glasses and pots into the dishwasher with the opening facing downwards (so that no water can collect). • The movement of the spray arms must not be hindered. •... -
Page 20: What Should Not Be Washed In Your Dishwasher
5. WHAT SHOULD NOT Do not wash sponges or dish cloths in • dishwasher. BE WASHED IN YOUR Do not wash art and craft articles in • DISHWASHER dishwasher. Rust-sensitive steel parts like iron Disposable plastics and disposable • • and cast iron that can rust and stain aluminum cannot withstand high other utensils and damage the interior... -
Page 21: Operating The Product
6. OPERATING THE PRODUCT Display 5. Function keys 2. On/Off key EverClean Function 3. Start/Pause/Cancel key Sanitize Function 4. Time Delay key SteamGloss function Fast+ function 6. Program Selection keys 7. Programme indicator 12. End of Programme indicator 8. Salt ( ) indicator (Select Models) 13. -
Page 22: Keys
6. Close the door of the dishwasher. 6.3 PROGRAMME 6.1 KEYS SELECTION On / Off key This key is used to turn the machine all on Press the On/Off button to turn on off. your machine. 2. Chose the desired program (See When turned “ON”, the machine program table on next Page) will default to Economy... -
Page 24: Auxiliary Functions
6.4 AUXILIARY FUNCTIONS Sanitize Function Sanitize function raises the water Washing programs of your dishwasher are temperature in the final rinse to meet the designed to obtain the best cleaning result, requirements of NSF/ANSI STANDARD considering the type of the soil, soiling 184 for Residential Dishwashers. -
Page 25: Programming The Washing Time
6.4 PROGRAMMING THE Interior Lighting (Select Models) WASHING TIME Some models have interior lighting to Time Delay illuminate the interior when the door is If an economical electricity tariff is applied opened. in your region, you can use the Time Changing the interior lighting Delay function to wash your dishes during setting... -
Page 26: Starting The Programme
To cancel the Time Delay function Your machine performs Press and hold Start / Pause / Cancel water softening depending key for 3 seconds. on the hardness level of the 2. When the Start / Pause / Cancel key supply water. Remaining is pressed and hold, "3", "2", "1"... -
Page 27: Child (Key) Lock
6.6 CHILD (KEY) LOCK of minutes the machine will fulfill the necessary operations required to You may prevent other people from cancel the programme. interrupting and changing the programme cycle and time delay while the machine is There might be residues of running. -
Page 28: End Of Programme
6.12 OVERFLOWING No rinse aid dispensed in P:0 wash position. WARNING 1 dose of rinse aid is dispensed in P:1 position. If the machine intakes too much water or 2 doses of rinse aid are dispensed in P:2 there is leakage at any of the components position. -
Page 29: Detergent
7. DETERGENT cm³) of detergent. Fill detergent up to .5 Ounces (15 cm³) or .85 ounces You can use powder, liquid/gel or tablet (25 cm³) level marks in the detergent detergents in the machine. dispenser according to fullness of the Only use in the machine the machine and/or soiling degree of the detergents produced particularly for... -
Page 30: Tablet Detergents
When you switch to powder Use powder or liquid/gel detergent detergent from tablet detergent: in short programs without prewash Make sure that salt (Select Models) and since the solubility of the tablet rinse aid reservoirs are full. detergent changes depending on the temperature and time. - Page 31 3. Slightly press the point (B) of the reservoir lid to close it. 4. If there are stains on tableware items after washing, level must be increased and if there is a blue trace after wiping them by hand, it must be decreased. This is set to position 3 as factory default.
-
Page 32: Adjusting The Water Softening System
8. ADJUSTING THE WATER SOFTENING SYSTEM (Select Models) Cleaning, rinsing and drying performance of your dishwasher will increase when water softening system is adjusted properly. Adjust the new water hardness level according to the Water hardness level instruction in this booklet. Use the test strip supplied with the product according to the steps given below to determine hardness level of your supply water. -
Page 33: Filling The Dishwasher Salt Dispenser
9. FILLING THE If the hardness level of the supply water is below 22 gpg, there is no need to use salt DISHWASHER SALT in your dishwasher. If this is the case, “No DISPENSER Salt Warning Indicator” (if any) illuminates (Select Models) continuously on the panel of your machine. - Page 34 You can put about 4.4 Pounds of softening salt into the salt reservoir. 5. Replace the lid and tighten it when the reservoir is full. You need to add salt right before starting the machine. Thus, the overflowing salty water will be flushed immediately, preventing the risk of corrosion in machine.
-
Page 35: Care And Maintenance
10. CARE AND Cleaning the stainless steel doors: Use a soft cloth with a cleaner made for MAINTENANCE cleaning stainless steel. For the best WARNING:Before cleaning or results, apply the stainless steel cleaner carrying out maintenance, switch off to a soft cloth and wipe the surface in the the appliance, disconnect the mains direction of the grain. -
Page 36: Cleaning The Filters
10.3 CLEANING THE FILTERS 3. Press the two pawls on the coarse filter inwards and separate the coarse Clean the filters at least once a week in filter from the assembly. order for the machine operates efficiently. Check if food residues are left on the filters. If there are food residues on filters, take them out and clean well under running water. -
Page 37: Cleaning The Hose Filter
10.4 CLEANING THE HOSE 10.5 CLEANING THE WASH FILTER ARMS Damages on the machine that may be Clean the impellers at least once a week in caused by impurities coming from the order for the machine operates efficiently. urban supply water or your own water LOWER IMPELLER installation (such as sand, dirt, rust, etc.) Check if the holes on the lower impeller (1) -
Page 38: Upper Impeller
Check if the holes on the lower impeller assembly are clogged. If they are clogged, remove and clean the impeller assembly. (Select Models) To remove and clean the lower impeller assembly together, hold by one hand from the (C) points shown in the figure and pull up to remove. -
Page 39: Troubleshooting
11. TROUBLESHOOTING Machine does not start. Power cable is unplugged. >>> Check if the power cable is plugged in. • Cicuit Breaker is blown. >>> Check the Cicuit Breaker in your house. • Water is cut. >>> Make sure that the water inlet tap is open. •... - Page 40 Machine is unloaded right after the program is over. >>> Do not unload your • machine right after washing process is completed. Slightly open the door and wait for evacuation of the steam inside for a while. Unload the dishes after the pieces cool down to a touchable level.
- Page 41 Filters are clogged. >>> Check if the filter system is clean. Clean the filter system • regularly as illustrated in section “Cleaning and Care”. Dirty dishes are kept in dishwasher for 2-3 days. >>> If you are not going to start •...
- Page 42 container if possible. For ease-of-storing, we recommend you to use tablet detergents. Wash Arm holes are clogged. >>> Lower and upper Wash Arm holes might be clogged • with food remnants such as lemon pips. Clean the Wash Arm regularly as illustrated in section “Cleaning and Care”.
- Page 43 Lid of the rinse aid reservoir is left open. >>> Make sure that the lid of the rinse aid • reservoir is closed after adding rinse aid. Kitchen utensils are broken. Dishes are not placed orderly in the machine. >>> Load the dishes as described in the •...
-
Page 44: Technical Features
12. TECHNICAL FEATURES 15 place settings Load capacity Permissible water 4.35 - 145 psi (0.3 - 10 bars) pressure 120 V (volts), 12 A (amps), 60Hz (hertz) Electrical connection 1400 W (watts) Total power 1100 W (watts) Heater power NOTICE: Because we continually strive to improve our products, we may change our specifications and design without prior notice. -
Page 45: Warranty Statement For The Beko Dishwashers
2 year (*) full warranty from date of (Labor charges are the first installation responsibility of the consumer) Beko will repair or replace at no cost to Disclaimers of warranties and the consumer any defective parts of the exclusions: dishwasher if used under normal household... - Page 46 Statement is the complete and exclusive OF ALL OTHER EXPRESSED AND warranty from the manufacturer. No IMPLIED WARRANTIES, INCLUDING employee of Beko or any other party THE IMPLIED WARRANTIES is authorized to make any warranty OF MERCHANTABILITY AND statements in addition to those made in FITNESS FOR A PARTICULAR this Warranty Statement.