Table of Contents
Advertisement
Available languages
Available languages
Quick Links
USING THE FREEZER
Operation . . . . . . . . . . . . . . . . . . . . . . . . . . . . .4
Temperature Control . . . . . . . . . . . . . . . . . . .5
Features . . . . . . . . . . . . . . . . . . . . . . . . . . . . . .6
INSTALLATION
. . . . . . . . . . . . . . . . . . 10
Normal Operating Characteristics . . . . . . . 12
Write the model and serial
numbers here:
Model # _________________
Serial # _________________
You can find the rating label on the
inside of the freezer.
. . . . . . . . .2
OWNER'S MANUAL
AND INSTALLATION
. . . . . . . . . . .7
ENGLISH/FRANÇAIS/
. . . . . . 11
. . . . . . . . . . . 15
. . . . . . . . . . 16
49-1000618 Rev. 2 08-22 GEA
INSTRUCTIONS
No-Frost Model
HUF13
ESPAÑOL
Advertisement
Chapters
Table of Contents

Related Manuals for Hotpoint HUF13


Summary of Contents for Hotpoint HUF13
-
Page 1: Table Of Contents
Features ......6 No-Frost Model HUF13 CARE AND CLEANING ...7 INSTALLATION . -
Page 2: Safety Information
IMPORTANT SAFETY INFORMATION READ ALL INSTRUCTIONS BEFORE USING THE APPLIANCE To reduce the risk of fire, explosion, electric shock, or injury when using your freezer, follow WARNING these basic safety precautions: ■ T his freezer must be properly installed and located in ■ T o avoid serious injury or death, children should not accordance with the Installation Instructions before it stand on, or play in or with the appliance. is used. - Page 3 IMPORTANT SAFETY INFORMATION READ ALL INSTRUCTIONS BEFORE USING THE APPLIANCE INSTALLATION WARNING EXPLOSION HAZARD Keep flammable materials and vapors, such as gasoline, away from freezer. Failure to do so can result in fire, explosion, or death. CONNECTING ELECTRICITY WARNING ELECTRICAL SHOCK HAZARD Plug into a grounded 3-prong outlet. Do not remove the ground prong. Do not use an adapter. Do not use an extension cord. Failure to follow these instructions can result in death, fire, or electrical shock. Do not, under any circumstances, cut or remove the third (ground) prong from the power cord. For personal safety, this appliance must be properly grounded.
-
Page 4: Temperature Control
Temperature Control For safe food storage, allow 4 hours for the freezer to When loading the freezer, freeze only 3 pounds of cool down completely. The freezer will run continuously fresh food per cubic foot of space at a time. Distribute for the first several hours. Foods that are already frozen packages evenly throughout the freezer. It is not may be placed in the freezer after the first few hours of necessary to turn the control knob to a colder setting operation. Unfrozen food should NOT be placed in the while freezing food. freezer until it has operated for 4 hours. Allow several hours after each one-step adjustment for the freezer temperature to stabilize. Starting the Freezer with Electronic Control 1. - Page 5 Temperature Control Temperature Setting Light Turbo Freeze Light Temperature Setting Selection Pad Warm Temperature Alarm Light Door Open Alarm Light Alarm Silencing Pad Door Open Alarm The electronic temperature control is located inside the freezer, on the left-side wall. The temperature is factory- If freezer door is left open for more than 2 minutes, an preset to “Default” to provide satisfactory food storage alarm will sound, and “Door” light will flash. temperature. To adjust the temperature setting, press To silence the alarm, press “Quiet Alarm”. “Door” light “Select Mode”. Allow several hours for the temperature will continue flashing until door is closed. to stabilize between adjustments. Disable and Enable Alarms Turbo Free If desired, Warm Temperature Alarm and Door Open To enable Turbo Freeze, press “Select Mode” for 3 Alarm can be disabled. Press “Quiet Alarm” for 3 seconds. “Turbo” light turns on. Freezer will stay in seconds to disable both Warm Temperature Alarm and Turbo Freeze mode for 5 hours. After the 5 hours, Door Open Alarm. “Warm” light and “Door” light will flash freezer will automatically exit Turbo Freeze mode and one time to indicate the alarms are disabled.
-
Page 6: Features
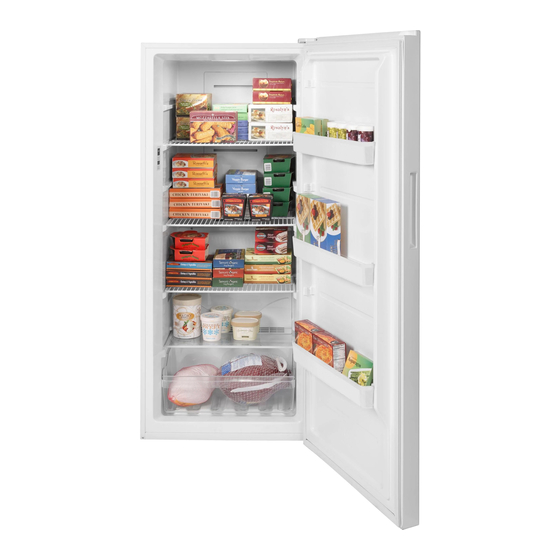
Features Drawer Adjustable Door Bins The drawer provides separate storage space. To remove There are 3 door bins in the freezer. All the door bins the drawer, pull out and lift up. are adjustable. Adjustable Shelves The shelves are adjustable. Some of the shelves are full depth and the others are partial depth. The full depth shelves shall be installed to higher positions where the freezer is deeper, and the partial depth shelves shall be installed to lower positions where the freezer is shallower. -
Page 7: Care And Cleaning
Care And Cleaning Cleaning the Inside CAUTION Do not clean glass shelves with warm To help prevent odors, leave an open box of baking water when they are cold. Glass shelves may break if soda in the freezer. exposed to sudden temperature changes or impact such as Unplug the freezer before cleaning. If this is not practical, bumping or dropping. Tempered glass is designed to shatter wring excess moisture out of sponge or cloth when into many small pieces if it breaks. cleaning around switches, lights or controls. Use warm Do not wash any plastic freezer parts, glass or wire water and baking soda solution--about a tablespoon (15 shelves in dishwasher. ml) of baking soda to a quart (1 liter) of water. This both Do not clean with any products containing detergent, cleans and neutralizes odors. Thoroughly rinse and wipe bleach or ammonia. They may damage the freezer. dry. After cleaning the door gaskets, apply a thin layer of Glass shelf can be cleaned with typical clean agents and petroleum jelly to the door gaskets at the hinge side. - Page 8 Care And Cleaning To Remove the Freezer Door 1. R emove the plastic hinge cover by gently prying the hinge cover with a flat head screwdriver. 2. R emove the screws holding the hinge to the top of the cabinet using a 10mm socket driver. 3. R emove the top hinge from the cabinet and lift the door up and off the lower hinge pin. Set the door aside. To replace the door, reverse the order of the above instructions. Hinge screws NOTICE: It is very important that all hinge screws are securely tightened to ensure a secure assembly and Hinge prevent hinge slippage. Do not overtighten the hinge screws. Tighten them until they are just snug, and then turn them another one-half turn.
- Page 9 Care And Cleaning In Case of Extended Power Failure ■ K eep freezer door closed. Your freezer will keep food CAUTION Handling of dry ice can cause frozen for 24 hours provided warm air is not admitted. freezing of the hands—gloves or other protection is ■ I f freezer is out of operation for 24 hours or more, add recommended. dry ice. Leave ice in large pieces. Add more ice as ■ I f dry ice is not available, move food to a frozen food required. locker temporarily—until power is restored. Preparing to Move Disconnect the power cord plug from the wall outlet. Be sure freezer stays in upright position during actual Remove foods and clean the freezer. moving and during transportation. The freezer must be secured during transportation to prevent movement. Secure all loose items such as baskets and shelves by Protect outside of freezer with blanket.
- Page 10 Installing the Freezer Packaging Consider recycling options for your appliance packaging material. Freezer Location Your freezer should be conveniently located for Be sure to install your freezer on a floor strong enough day-to-day use in a dry, well-ventilated room. to support it when it is fully loaded. Do not install the freezer where the temperature will go below 32°F or above 110°F, because it will not maintain proper temperatures. Clearances Allow at least 3" (76mm) on top and sides, 2" (51mm) on back for proper air circulation. Adjustable Legs Legs at the front corners of the freezer should be set so the freezer is firmly positioned on the floor, and the front is raised just enough so the door closes easily when opened about halfway.
-
Page 11: Troubleshooting Tips
Troubleshooting Tips... Before you call for service Save time and money! Review the charts on the following pages first and you may not need to call for service. Problem Possible Causes What to Do Freezer does not operate Freezer is unplugged. Push the plug completely into the outlet. The fuse is blown/circuit breaker is Replace fuse or reset the breaker. tripped. Freezer starts/stops too Door left open. Check to see if package is holding door open. frequently Too frequent or too long door Open the door less often. -
Page 12: Normal Operating Characteristics
Troubleshooting Tips... Before you call for service Problem Possible Causes What to Do Moisture forms on outside of Not unusual during periods of high Wipe surface dry. cabinet humidity. Door may not be seating properly, See Preparing to install the freezer. causing cold air from inside the freezer to meet warm moist air from the outside. - Page 13 Notes 49-1000618 Rev. 2...
- Page 14 Notes 49-1000618 Rev. 2...
-
Page 15: Limited Warranty
Freezer Limited Warranty Hotpoint.com Hotpoint is backed by GE Appliances Service. All warranty service is provided by our Factory Service Centers, or an authorized Customer Care technician. You can schedule service online at Hotpoint.com/service or call Hotpoint Service ® at 800.GE.CARES (800.432.2737). Please have your model number available when calling. In Canada, call 800.661.1616. For the Period of: Hotpoint Appliances Will Replace One Year For 12 months from the date of original retail purchase, Hotpoint Appliances will choose, at From the date of the its discretion, to replace or service the defective unit. Should Hotpoint Appliances decide to original purchase service the unit, Hotpoint Appliances will provide any part which fails due to a defect in materials or workmanship free of charge, along with any labor and related service costs to replace the defective part. During this period, should Hotpoint Appliances choose to replace the unit, it may do so by providing you with a certificate redeemable at a retailer for a replacement product. What Hotpoint Will Not Cover: ■... -
Page 16: Consumer Support
Consumer Support Hotpoint Appliances Website Visit www.hotpoint.com for all of your product and support needs. Register Your Appliance Register your new appliance on-line at your convenience! Timely product registration will allow for enhanced communication and prompt service under the terms of your warranty, should the need arise. You may also mail in the pre-printed registration card included in the packing material. In the US: GEAppliances.com/register In Canada: Prodsupport.mabe.ca/crm/Products/ProductRegistration.aspx Schedule Service Expert GE Appliances repair service is only one step away from your door. Get on-line and schedule your service at your convenience any day of the year. In the US: GEAppliances.com/service or call 800.432.2737 during normal business hours. In Canada: call 800.561.3344 Extended Warranties You may purchase a Hotpoint Appliances extended warranty online at GEAppliances.com/extended-warranty or call 800-626-2224. In Canada: call 866.277.9842 Parts and Accessories Individuals qualified to service their own appliances can have parts or accessories sent directly to their homes (VISA, MasterCard and Discover cards are accepted). Order on-line today 24 hours every day. - Page 17 Commande de la température ...5 Fonctionnalités ......6 Modèle sans givre HUF13 ENTRETIEN ET NETTOYAGE . . . .7 INSTALLATION .
- Page 18 INSTRUCTIONS IMPORTANTES DE SÉCURITÉ LIRE TOUTES LES INSTRUCTIONS AVANT D'UTILISER L'APPAREIL Pour réduire le risque d’incendie, d’explosion, de choc électrique ou de blessures lorsque vous AVERTISSEMENT utilisez votre congélateur, veuillez suivre ces consignes de sécurité : ■ C e congélateur doit être correctement installé ■ A fin de prévenir les accidents graves ou la mort, les conformément aux Consignes d’Installation avant toute enfants ne doivent pas se tenir ni jouer dans ou sur...
- Page 19 INSTRUCTIONS IMPORTANTES DE SÉCURITÉ LIRE TOUTES LES INSTRUCTIONS AVANT D'UTILISER L'APPAREIL INSTALLATION AVERTISSEMENT Risque d’explosion. Conservez les matériaux et vapeurs inflammables tels que l’essence à l’écart de votre appareil. Une explosion, un incendie voire la mort pourrait en résulter . BRANCHEMENTS ÉLECTRIQUES AVERTISSEMENT RISQUE DE CHOC ÉLECTRIQUE. Branchez l’appareil dans une prise triple avec terre . Ne retirez pas la broche de terre . N’utilisez pas d’adaptateur .
-
Page 20: Fonctionnalités
Commande de température Pour un stockage sûr des aliments, laissez complètement Lorsque vous chargez le congélateur, ne congelez pas plus refroidir votre congélateur pendant 4 heures . Pendant les de 3 livres (1,5 kg) d’aliments frais par pied cube de capacité premières heures, le congélateur fonctionnera en continu . - Page 21 Fonctionnalités Voyants du réglage de température Voyant de congélation turbo Touche de sélection de la température Voyant d’alerte de température chaude Voyant d’alerte de porte ouverte Touche d’interruption de l’alerte Alerte de porte ouverte La commande de température électronique est située à l’intérieur du congélateur sur la paroi gauche .
- Page 22 Caractéristiques Tiroir Balconnets réglables Le tiroir procure des espaces de rangement séparés . Pour retirer Le congélateur comporte 3 balconnets . Tous les balconnets le tiroir, tirez vers l’extérieur puis vers le haut . sont réglables . Tablettes réglables Les tablettes sont réglables . La profondeur des tablettes est soit pleine, soit partielle .
-
Page 23: Entretien Et Nettoyage
Entretien et nettoyage Nettoyage de l’intérieur ATTENTION Ne nettoyez pas les tablettes en verre Afin de prévenir les odeurs, laissez une boîte de bicarbonate avec de l’eau chaude lorsqu’ils sont froids . Les tablettes en de soude ouverte dans le congélateur . verre peuvent se briser s’ils sont exposés à... - Page 24 Entretien et nettoyage Enlèvement de la porte du congélateur 1. R etirez le couvercle de charnière en plastique en l’écartant avec soin à l’aide d’un tournevis à lame plate . 2. R etirez les vis qui fixent la charnière dans le haut de la carrosserie à l’aide d’un tournevis à douille 10 mm. 3. R etirez la charnière supérieure de la carrosserie et soulevez la porte pour la dégager de l’axe de charnière inférieur . Mettez la porte de côté...
- Page 25 Entretien et nettoyage Lors d’une panne de courant prolongée ■ Gardez la porte du congélateur fermé . Votre congélateur ATTENTION La manipulation de glace sèche peut causer peut garder les aliments congelés pendant 24 heures lorsque des gelures aux mains–il est recommandé de porter des gants la porte n’est pas ouvert .
- Page 26 Installation du Congélateur Emballage Jetez proprement le matériel d’emballage de l’appareil selon les options de recyclage à votre disposition . Emplacement du congélateur Votre congélateur doit être installé à un endroit pratique, en Assurez-vous que le plancher sur lequel sera installé votre vue d’une utilisation quotidienne, dans une pièce bien aérée où congélateur est suffisamment solide pour le supporter lorsqu’il l’air est sec .
- Page 27 Conseils de dépannage . . . Avant de faire un appel de service Économisez temps et argent! Consultez d’abord les tableaux des pages suivantes et vous pourriez vous éviter un appel de service. Problème Causes possibles Correctifs Le congélateur Commande de température réglée à OFF Réglez la commande de température entre 1 et 7. ne fonctionne (éteint). pas ou le voyant Le congélateur n’est pas branché. Enfoncez bien la fiche dans la prise murale. march-arrêt n’est pas allumé Le congélateur Porte ou couvercle laissé...
-
Page 28: Conseils De Dépannage
Conseils de dépannage... Avant de faire un appel de service Problème Causes possibles Correctifs Température trop basse Commande réglée à une température Consultez Fonctionnement de votre congélateur. dans le congélateur trop basse. De la condensation se forme Phénomène normal par temps très Essuyez bien l’extérieur. sur l’extérieur de l’appareil humide. -
Page 29: De Fonctionnement
Conseils de dépannage... Avant de faire un appel de service Caractéristiques normales de fonctionnement Ces phénomènes sont normaux et n’indiquent pas un besoin de réparation . ■ L’extérieur du congélateur devient chaud lorsque le système de réfrigération transfère la chaleur de l’intérieur vers l’extérieur à travers les parois extérieures du congélateur . ■ Le son du moteur du compresseur à rendement hautement efficace . 49-1000618 Rev. 2... - Page 30 Notes 49-1000618 Rev. 2...
-
Page 31: Garantie Limitée
Garantie limitée du congélateur Hotpoint.com Hotpoint est cautionnée par GE Appliances Service. Toutes les réparations en vertu de la garantie limitée sont fournis par nos Centre de Service d’Usine ou par un technicien autorisé Customer Care . Pour prévoir une réparation, consultez notre site ® electromenagersge.ca/fr/soutien/demande-de-service ou appelez le 800.661.1616 . Veuillez avoir votre numéro de série et votre numéro de modèle à... -
Page 32: Soutien Au Consommateur
Soutien au consommateur Site Web de Hotpoint Visitezle www.hotpoint.com pour tous vos besoins relatifs à votre produit ou à de l’assistance . Au Canada : Electromenagersge.ca Enregistrez votre électroménager nregistrez votre nouvel appareil en ligne au moment qui vous convient le mieux! L’enregistrement de votre produit dans les délais prescrits permet une meilleure communication et un service rapide, selon les modalités de votre garantie, si besoin est . - Page 33 Características . . . . . . . . . . . . . . . . . . . . . . . . . . .6 Modelo No-Frost HUF13 ENTRETIEN ET NETTOYAGE .
- Page 34 INFORMACIÓN IMPORTANTE DE SEGURIDAD LEA TODAS LAS INSTRUCCIONES ANTES DE USAR LA MÁQUINA A fin de reducir el riesgo de incendio, explosión, descargas eléctricas o lesiones al usar su ADVERTENCIA refrigerador, siga estas precauciones básicas de seguridad: ■ E ste freezer se deberá instalar y ubicar adecuadamente ■ P ara evitar lesiones graves o la muerte, los niños no se de acuerdo con las Instrucciones de Instalación antes de deberán parar sobre ni jugar en o con el electrodoméstico . ser usado .
- Page 35 INFORMACIÓN IMPORTANTE DE SEGURIDAD LEA TODAS LAS INSTRUCCIONES ANTES DE USAR LA MÁQUINA INSTALLATION ADVERTENCIA Riesgo de Explosión Mantenga cualquier material y vapores inflamables, tales como gasolina, alejados del freezer. Si no se cumple con esto se podrá producir una explosión, incendio o la muerte . CONEXIÓN DE LA ELECTRICIDAD ADVERTENCIA RIESGO DE DESCARGA ELÉCTRICA Enchufe en un tomacorriente con conexión a tierra de 3 cables . No elimine el cable de conexión a tierra .
-
Page 36: Control De Temperatura
Control de temperatura Para un almacenamiento de alimentos seguro, deje pasar Cuando cargue el congelador, congele sólo 3 libras de 4 horas hasta que el congelador se enfríe por completo . alimentos frescos por pie cúbico de espacio por vez. Distribuya El congelador funcionará en forma constante durante las los paquetes uniformemente en todo el congelador . -
Page 37: Características
Características Luz de Configuración de Temperatura Luz de Congelación Turbo Tecla de Selección de Configuración de Temperatura Luz de la Alarma de Temperatura Cálida Luz de la Alarma de Puerta Abierta Tecla para Silenciar la Alarma Alarma de Puerta Abierta El control de temperatura electrónico se encuentra ubicado dentro del freezer, sobre la pared del lado izquierdo . - Page 38 Caracteristicas Cajón Estantes de Puerta Ajustables El cajón brinda espacios de almacenamiento separados . Para Hay 3 estantes de puerta en el freezer . Todos los estantes de retirar el cajón, empuje hacia afuera y levante el mismo . puerta son ajustables . Repisas Ajustables Las repisas son ajustables .
- Page 39 Cuidado y limpieza Limpieza de la Parte Interior PRECAUCIÓN Para evitar olores, deje abierta una caja de bicarbonato de No limpie estantes de vidrio con sodio en el congelador . agua caliente cuando estén fríos . Los estantes de vidrio se pueden romper si son expuestos a cambios de temperatura Desenchufe el congelador antes de limpiar. Si esto no resulta repentinos o impactos tales como sacudones o caídas .
- Page 40 Cuidado y limpieza Para Retirar la Puerta del Freezer R etire la tapa de la bisagra de plástico haciendo palanca levemente sobre ésta con un destornillador de punta plana . 2. R etire los tornillos sosteniendo la bisagra en la parte superior del gabinete, usando un destornillador hueco de 10mm . 3. R etire la bisagra superior del gabinete y levante la puerta hacia arriba y afuera de la clavija de la bisagra inferior. Deje la puerta a un costado . Tornillos de la bisagra Para reemplazar las puerta, invierta el orden de las...
- Page 41 Cuidado y limpieza En caso de interrupción prolongada del suministro eléctrico ■ M antenga la puerta del congelador cerrada. El congelador PRECAUCIÓN mantendrá los alimentos congelados durante 24 horas La manipulación de hielo seco siempre que no permita el ingreso de aire cálido . puede causar congelamiento en las manos; se recomienda el uso de guantes o de otro tipo de protección .
-
Page 42: Instalación
Instalación del Freezer Embalaje Tenga en cuenta las opciones de reciclaje del material de embalaje de su electrodoméstico . Ubicación del congelador Deberá ubicar el congelador de forma conveniente para el uso Asegúrese de instalar el congelador en un piso que sea lo diario, en una habitación seca y bien ventilada . suficientemente firme como para sostenerlo cuando esté... - Page 43 Consejos para la Solución de Problemas... Antes de solicitar el servicio técnico ¡Ahorre tiempo y dinero! Primero revise los cuadros que aparecen en las siguientes páginas y es posible que no necesite solicitar reparaciones . Problema Causas Posibles Qué hacer El congelador no El control de temperatura está...
- Page 44 Consejos para la Solución de Problemas... Antes de solicitar el servicio técnico Problema Causas Posibles Qué hacer La temperatura del El control del temperatura está en un Vea Acerca de la operación del congelador. congelador es demasiado nivel demasiado frío. baja Se forma humedad en la No es extraño durante períodos de alta...
-
Page 45: Funcionamiento Normales
Consejos para la Solución de Problemas... Antes de solicitar el servicio técnico Características de funcionamiento normales Todo esto es normal y no indica necesidad de servicio . ■ Gabinete exterior tibio a medida que el sistema de refrigeración transfiere calor desde el interior hacia el exterior a través de las paredes externas del gabinete . ■ Sonido de motor compresor de alta eficiencia. - Page 46 Notas 49-1000618 Rev. 2...
-
Page 47: Garantía Limitada
EE .UU . Si el producto está en un área donde no se encuentra disponible un Proveedor Autorizado del Servicio Técnico de Hotpoint, usted será responsable por el costo de un viaje o se podrá requerir que traiga el producto a una ubicación del Servicio Técnico de Hotpoint Autorizado para recibir el servicio . - Page 48 Otros servicios técnicos generalmente deben ser derivados a personal calificado del servicio. Se deberá tener cuidado, ya que una reparación indebida podrá hacer que el funcionamiento no sea seguro. Contáctenos En caso de necesitar contactarnos por alguna razón, por favor visite Hotpoint .com/contact o llame al 800 .626 .2000 Usted también puede escribir a: En EE.UU.: General Manager, Customer Relations | GE Appliances, Appliance Park | Louisville, KY 40225 GEAppliances.com/contact...
Need help?
Do you have a question about the HUF13 and is the answer not in the manual?
Questions and answers