Table of Contents
Advertisement
Advertisement
Table of Contents

Related Manuals for LFF LWC215


Summary of Contents for LFF LWC215
- Page 1 DIGITAL ATOMIC WALL CLOCK WITH JUMBO DISPLAY Ref LWC215 -USER MANUAL-...
-
Page 2: Important Safety Instructions
IMPORTANT SAFETY INSTRUCTIONS Please read this user manual carefully before you use this product. CAUTION RISK OF ELECTRIC SHOCK DO NOT OPEN CAUTION: TO REDUCE THE RISK OF ELECTRIC The lighting flash and arrow The exclamation point within head within the triangle is the triangle is a warning sign SHOCK DO NOT REMOVE COVER (OR BACK). - Page 3 1 WALL CLOCK UNIT 3 4 5...
-
Page 4: Main Features
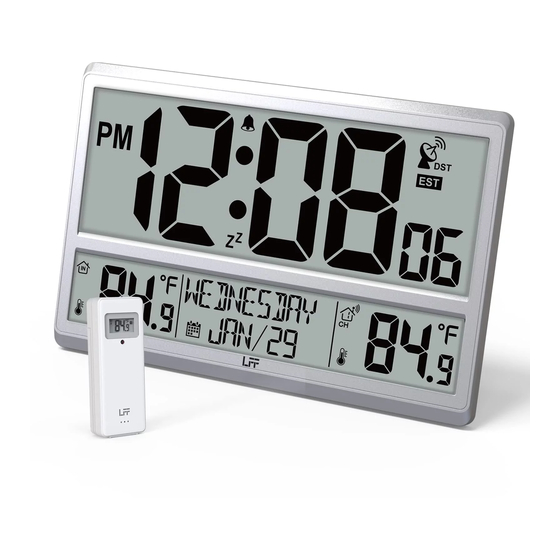
Time display Alarm indicator Atomic clock indicator DST (Daylight Savings Time) indicator Time Zone (EST, CST, MST, PST, AKT, HST) Indoor tempertaure reading Calendar with month, date and day display Channel indicator Outdoor sensor signal strength indicator Outdoor tempertaure reading Battery door (4 x AA batteries) SET button Alarm button... - Page 5 3 OUTDOOR TEMPERATURE SENSOR 3.1 MAIN FEATURES • Temperature measurement. • Low Battery Indication. LED : Flashes when the unit transmits a reading Wall mount Channel switch: Channel 1,2,3 inside battery compartment Battery compartment: use 2 x AAA batteries Battery door...
- Page 6 4 FIRST TIME TO USE 4.1 PAIR THE OUTDOOR REMOTE SENSOR First of all, it needs to do the pairing between outdoor remote sensor and wall clock. Please follow below procedures to pair the sensor. 1. Insert 4 new “AA” batteries into the wall clock. The screen is turned on.
- Page 7 3. Keep the outdoor sensor 5-10 feet from the wall clock. 4. When the RF connection is established, the temperature readings will appear on the station. 5. After 3 min sensor pairing time, the wall clock will automatically receive atomic clock signal, the tower icon will be flashing.
-
Page 8: Atomic Clock Reception
9. Allow the outdoor sensor and wall clock to sit together for 15 minutes to establish a strong connection. 10. Do not press button for 15 minutes. 11. After 15 minutes, place the sensor in a shaded outdoor location. 5 ATOMIC CLOCK RECEPTION •... -
Page 9: Setting Menu
6 SETTING MENU In Normal display, press and hold SET over 3s to enter setting mode. Press and release ▲ and ▼ to adjust the values. Hold to adjust quickly. Press and release SET to confirm and move to the next item. SETTING ORDER 1. -
Page 11: Set Alarm Time
7 SET ALARM TIME Press and hold ALARM button over 3s entering alarm setting. Alarm Hour flashes, press ▲ or ▼ to adjust the alarm hours. Press ALARM button to select the alarm minute. 1. Alarm Minute flashes, press ▲ or ▼ to adjust the alarm minutes. Press ALARM button to exit alarm setting. -
Page 12: Low Battery Indication
9 LOW BATTERY INDICATION • When battery indicator next to the outdoor temperature, replace batteries in your outdoor sensor. • When battery indicator shows next to your atomic tower icon, replace batteries in your wall clock. 10 SEARCH FOR OUTDOOR SENSOR •... -
Page 13: Specifications
14 IMPORTANT PLACEMENT GUIDELINES • Mounting under an eave or deck rail works well. • Mount the remote sensor on the North side where to prevent sun from causing incorrect readings • Be sure the outdoor sensor is mounted vertically to drain moisture. •... -
Page 14: Fcc Information
16 FCC INFORMATION This device complies with part 15 of FCC rules. Operation is subject to the following two conditions: 1. This device may NOT cause harmful interference. 2. This device must accept any interference received, including interference that may cause undesired operation. WARNING: Changes or modifications to this unit not expressly approved by the party responsible for compliance could void the user’s authority to operate the... -
Page 15: Weather Station
WEATHER STATION LWC215 support@lfftech.com Made in China...
Need help?
Do you have a question about the LWC215 and is the answer not in the manual?
Questions and answers