
Related Manuals for Kraus KWD100-100


Summary of Contents for Kraus KWD100-100
- Page 1 INSTALLATION MANUAL Food Waste Disposer KWD100-75, KWD100-100 www.kraususa.com Toll Free: 1.800.775.0703 © 2021 Kraus USA Plumbing LLC REV. October 12, 2021...
- Page 2 Congratulations on the purchase of your new Kraus plumbing fixture! Please keep the box and packaging materials until your product is completely installed. If you have any questions, require technical assistance or have any problems with your product: STOP DO NOT RETURN TO STORE Please contact our Customer Service Team 1-800-775-0703 / customerservice@kraususa.com...
- Page 3 Metal, such as bottle caps, tin cans, or utensils Hot grease or other hot liquids. When not operating a disposer, leave the drain cover in place to reduce the risk of objects falling into the disposer. SAVE THESE INSTRUCTIONS Download the Kraus Care & Maintenance Guide at: http://www.kraususa.com/maintenance...
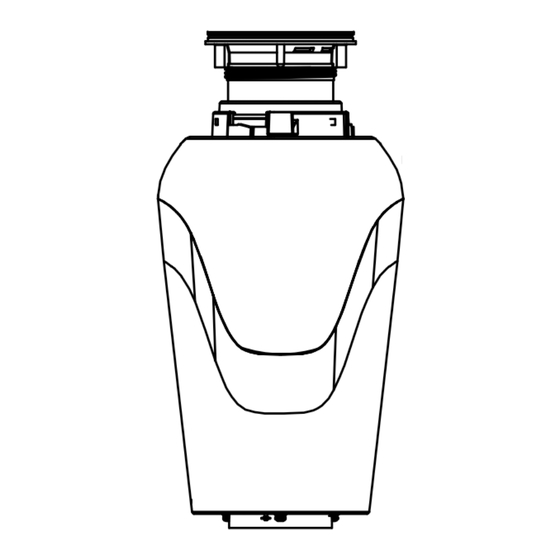
- Page 4 Dimensions 7 1/2" 10 1/4" (191mm) (259.3mm) 7 5/8" 4 1/2" (193mm) (113.7mm) KWD100-75 10 3/4" 8 5/8" (273.5mm) (220mm) 4 1/2" 8 5/8" (113.7mm) (220mm) KWD100-100...
-
Page 5: Grounding Instructions
Grounding Instructions This disposer must be grounded to reduce the risk of electric shock in the event of a malfunction or breakdown. Grounding provides a path of least resistance for electric current. This disposer is equipped with a cord having an equipment-grounding conductor and a grounding plug. -
Page 6: Tools You May Need
Tools You May Need Screwdriver Phillips Screwdriver Hacksaw Plumber's Putty Hammer Dishwasher Connector Kit Pipe Wrench Dowel or Steel Punch Important Safety Instructions INSTRUCTIONS PERTAINING TO A RISK OF FIRE, ELECTRIC SHOCK OR INJURY TO PERSONS. SAVE THESE INSTRUCTIONS. WARNING –... -
Page 7: Step 1. Removal Of Old Unit
Step 1. Removal of Old Unit Before starting this step, turn off electrical power at the circuit breaker or fuse box. If your old mount is the same as the mount on your new disposer, just reverse the assembly instructions found in section 3. If your new mount system is different, follow these instructions: Use a pipe wrench to disconnect drain line where it attaches to disposer discharge tube (see 1A). -
Page 8: Step 2. Dishwasher Connection
Step 2. Dishwasher Connection If you are utilizing a dishwasher, complete the following procedure. If dishwasher is not to be connected go on to section 3. Make use of a blunt instrument to knock out the housing cap(see 2A1), please sure to use a steel punch or wooden dowel but not sharp instrument. - Page 9 READ COMPLETELY BEFORE STARTING NOTE: Pay close attention to the order of mount assembly parts, as they have been correctly assembled by the factory. Also, reference the cushion mount detail in illustration 3D below for the proper orientation of the cushion mount. NOTE: Try practicing this assembly before you get under the sink to get the “feel”...
- Page 10 MOUNTING SEAL RING DETAIL SINK MOUNTING MOUNTING RING RUBBER TOP OF SINK FLANGE SINK WASHER FIBER MOUNTING WASHER BOTTOM "LIP" OF SINK BOTTOM FLANGE SINK BEAD OF GROOVE FLANGE MOUNTING SEAL RING MOUNTING RING SHOULD BE BOTTOM OPEN AREA, NO MOUNTING SEAL RING FREE TO MOVE UP &...
-
Page 11: Step 4. Electrical Connections
Step 4. Electrical Connections Now is the time to record the BATCH NUMBER (located on the bottom of the disposer) onto the warranty card. IF YOU ARE NOT FAMILIAR WITH ELECTRICAL POWER AND PROCEDURES, CALL A QUALIFIED ELECTRICIAN. WARNING: Improper connection of the equipment grounding conductor can result in a risk of electric shock. - Page 12 Step 6. Connecting Disposer to Mount Assembly EZ Mount Line up disposer under mounting assembly. Guide hopper projections into mounting ring slots. Turn mounting ring about 1/4”± to right so that disposer is temporarily supported (see 6A). Turn mounting ring and disposer until drain elbow lines up with trap (see 6B). Turn mounting ring to the right (clockwise) until it locks up tight.
-
Page 13: Tips For Successful Operation
TIPS FOR SUCCESSFUL OPERATION Be sure disposer is empty before using your dishwasher so it may drain properly. You may want to leave the stopper in the drain when not in use to prevent utensils and foreign objects from falling into the disposer. Your disposer is ruggedly built to give you many years of trouble free service. -
Page 14: Replacement Parts
Replacement Parts Replacement Parts List Part # 1. Sink Flange KP52000 2. Rubber Washer KP52001 3. Fiber Washer KP52002 4. Mounting Nut KP52003 5. Mounting Screw x 3 KP52004 KP52005 6. Mounting Ring KP52006 7. Mounting Seal Ring KP52007 8. Splash Guard 9. - Page 15 Troubleshooting Before seeking repair or replacement, we recommend that you review the following: LOUD NOISES: (Other than those during grinding of small bones and fruit pits): These are usually caused by accidental entry of a spoon, bottle cap or other foreign objects. To correct this, turn off electrical switch and water.
- Page 16 (5) years from the date of purchase from an authorized Kraus dealer. Any product reported to the authorized dealer or to Kraus as being defective within the warranty period will be repaired or replaced with a product of equal value at the option of Kraus.
- Page 17 TO THE MAXIMUM EXTENT PERMITTED BY APPLICABLE LAW, THIS WARRANTY DOES NOT COVER, AND KRAUS USA PLUMBING, LLC SHALL NOT BE LIABLE FOR, ANY SPECIAL, INCIDENTAL OR CONSEQUENTIAL DAMAGES (INCLUDING LABOR CHARGES TO REPAIR, REPLACE, INSTALL OR REMOVE THIS PRODUCT), WHETHER ARISING OUT OF BREACH OF ANY EXPRESS OR IMPLIED WARRANTY, BREACH OF CONTRACT, TORT, OR OTHERWISE.
- Page 18 IMPORTANT Register Your Kraus Product Activate Your Warranty Access Premium Customer Support Get Product Information REGISTER TODAY http://www.kraususa.com/registration www.kraususa.com...
Need help?
Do you have a question about the KWD100-100 and is the answer not in the manual?
Questions and answers