Table of Contents
Advertisement
Available languages
Available languages
Quick Links
Advertisement
Table of Contents

Related Manuals for Beper 70.210


Summary of Contents for Beper 70.210
- Page 1 • VENTILATORE CON NEBULIZZATORE MANUALE DI ISTRUZIONI • MIST FAN - USE INSTRUCTIONS • VENTILATEUR AVEC NÉBULISEUR MANUEL D’INSTRUCTIONS • VENTILATOR MIT VERNEBLER - BETRIEBSANLEITUNG VENTILADOR CON NEBULIZADOR • MANUAL DE INSTRUCCIONES Cod.: 70.210...
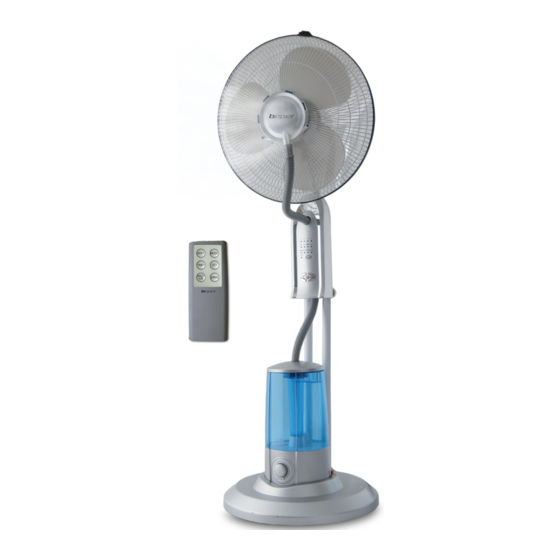
- Page 2 ITALIANO pag. 5 ENGLISH pag. 12 FRANÇAIS pag. 18 DEUTSCH pag. 25 ESPAÑOL pag. 32 For further information and/or for instructions for use in other languages , please visit: www.beper.com Fig. 1...
- Page 3 Fig. 2...
- Page 4 Fig. 3 Fig. 5 VELOCITA’ NEBULIZZA ½ H TIMER OSCILLA OSCILLA LENTO MEDIO VELOCE NEBULIZZA NATURA NORMALE BREZZA POWER MODE OSCILLA NEBULIZZA ON/VELOCITA’ TIMER Fig. 4 Fig. 6...
- Page 5 Ventilatore con nebulizzatore Manuale di istruzioni AVVERTENZE GENERALI LEGGERE QUESTE ISTRUZIONI PRIMA DI USARE L’APPARECCHIO. Leggere attentamente le avvertenze contenute nel presente libretto in quanto forniscono importanti indicazioni riguardanti la sicurezza di installazione, d’uso e di manutenzione. Conservare con cura questo libretto per ogni ulteriore consultazione.
- Page 6 Ventilatore con nebulizzatore Manuale di istruzioni Non toccare l’apparecchio con mani e/o piedi bagnati o umidi. Non lasciare esposto l’apparecchio ad agenti atmosferici (pioggia, sole, etc.). Non tenere l’apparecchio vicino a fonti di calore (es. termosifone). Mantenere una adeguata distanza da oggetti. Questo apparecchio non deve essere utilizzato da persone (compresi i bambini) con capacità...
-
Page 7: Istruzioni Per L'uso
Ventilatore con nebulizzatore Manuale di istruzioni ISTRUZIONI PER L’USO ASSEMBLAGGIO DEL VENTILATORE Fig.2 1 – Posizionare la base su una superficie piana. 2 – Inserire i tubi di sostegno e avvitare con forza le apposite viti. Assicurarsi che le viti siano avvita- te fermamente in modo da garantire una buona stabilità... - Page 8 Ventilatore con nebulizzatore Manuale di istruzioni Tasto NEBULIZZAZIONE Fig. 4 per attivare la nebulizzazione dell’acqua (si illumina il led blu NE- BULIZZAZIONE). Selezionare il tasto accensione/spegnimento sulla posizione I (si accende un led rosso sotto la manopola di regolazione nebulizzazione) e selezionare, attraverso la manopola, l’intensità...
- Page 9 Ventilatore con nebulizzatore Manuale di istruzioni Premere il tasto TIMER (quando il ventilatore è in funzionamento) per impostare il timer di spe- gnimento (si illuminano i led rossi in corrispondenza del tempo impostato). Il tempo impostabile è di 7,5 ore massimo; premendo il tasto TIMER viene impostato il tempo con una progressione di mezz’ora ogni volta che viene premuto e si accendono i led rossi in corrispondenza del tempo selezionato.
-
Page 10: Dati Tecnici
Area coperta: 20 m² Potenza: 75W Alimentazione. 220V ~ 50Hz In un’ottica di miglioramento continuo Beper si riserva la facoltà di apportare modifiche e migliorie al prodotto in oggetto senza previo preavviso. TRATTAMENTO DEI RIFIUTI DELLE APPARECCHIATURE ELETTRICHE ED ELETTRONICHE Il prodotto al termine del suo ciclo di vita deve essere smaltito seguendo le norme vigenti relative allo smaltimen- to differenziato e non può... -
Page 11: Certificato Di Garanzia
Anche dopo il periodo di garanzia prestiamo molta attenzione alle riparazioni. Per l’assistenza tecnica e/o riparazioni fuori dal periodo di garanzia ci si può rivolgere direttamente all’indirizzo sottostante. BEPER SRL Via Salieri, 30 37050 - Vallese di Oppeano - Verona Tel. - Page 12 Do not use the appliance after a possible irregular working. In this case, switch it off and do not break it open. Refer to an authorized Beper after-sale service for repair and require original spare parts only. Failing to follow these instructions may impair the safety of your appliance.
- Page 13 Mist Fan Use instructions If you decide not to use the appliance any longer, make it unserviceable by simply cutting the supply cable after disconnecting the plug from the socket. Also make any dangerous parts unserviceable, especially for children who could play whit the appliance. Let other potential users read these instructions.
- Page 14 Mist Fan Use instructions FAN ASSEMBLY Fig. 2 1 – Place the fan on a flat and stable surface. 2 – Insert the tubes together and strongly screw with the provided screws. Make sure that the screws are well screwed to guarantee the perfect stability to the fan, otherwise it will dangerously swing. 3 –...
- Page 15 Mist Fan Use instructions REMOTE CONTROL FUNCTION Fig. 5 Plug the supply cord to the socket. The red light illuminates. To use the remote control, remove the cover and insert 2 AAA batteries (not included) respecting the polarity. Close the cover. Press ON/SPEED to activate the blades (the red light NORMAL illuminate) and choose speed (the red light DOWN illuminate) ;...
-
Page 16: Disposal Of Old Electrical Appliances
TECHNICAL DATA Coverage area : 20 m² For any improvement reasons, Beper reser- Power : 75W ves the right to modify or improve the product Power supply . 220V ~ 50Hz without any notice. -
Page 17: Guarantee Certificate
Even after the guarantee period we will always pay attention to repairs for defected appliances. For technical assistance and/or repairs after the guarantee period you can directly contact the below address: CONTACT YOUR DISTRIBUTOR IN YOUR COUNTRY OR AFTER SALES DEPARTMENT BEPER. E-MAIL assistenza@beper.com WHICH WILL FORWARD YOUR ENQUIRIES TO YOUR DISTRIBUTOR. - Page 18 13. Ne pas empoigner l’appareil avec les mains ou les pieds mouillés. 14. Ne jamais utiliser d’accessoires non prévus par Beper. Cela pourrait comporter un risque de dommages graves. 15. Ne pas utiliser l’appareil à proximité de baignoire, douche, lavabo ou tout autre endroit où l’eau est présente.
- Page 19 Ventilateur avec nébuliseur Manuel d’instructions 18. Ne jamais exposer l’appareil à d’agents atmosphériques tels que la pluie, le vent, la neige, la grêle. 19. Débrancher toujours l’appareil en cas de non utilisation et avant son nettoyage. 20. Au cas où on deciderait de n’employer jamais plus cet appareil, il serait vivement recommandé de le rendre complètement inopérant et d’en couper le cordon d’alimentation électrique, après avoir débranché...
- Page 20 Ventilateur avec nébuliseur Manuel d’instructions CONSEILS D’UTILISATION ASSEMBLAGE DU VENTILATEUR Fig. 2 1 – Positionner la base sur une surface plane. 2 – Emboîter les tubes de soutien et visser fermement les vis fournies. S’assurer que les vis soient parfaitement vissées afin de garantir la bonne stabilité du ventilateur, dans le cas contraire le venti- lateur oscillerait dangereusement.
- Page 21 Ventilateur avec nébuliseur Manuel d’instructions !!IMPORTANT!!: le réservoir d’eau doit être rempli avant d’entreprendre cette procédure. A la fin de l’utilisation, régler la touche sur MIN, sélection la position 0 sur la touche allumer/ éteindre et appuyer sur la touche BRUMISATEUR (le voyant bleu s’éteind). Appuyer sur la touche TIMER (quand le ventilateur est en marche) pour programmer le timer pour l’extinction de l’appareil (une fois le temps réglé...
- Page 22 Ventilateur avec nébuliseur Manuel d’instructions INCLINATION DE LA TETE Fig. 6 Il est possible d’incliner la tête du ventilateur sur différentes positions, permettant ainsi de changer l’inclination du flux d’air. Eteindre le ventilateur avant de changer l’inclination. Empoigner le corps du moteur, dévisser l’axe de régulation et incliner la tête du ventilateur, à plu- sieurs crans, dans la position désirée et revisser fermement l’axe Attention : ne pas forcer le mouvement afin d’éviter la rupture du mécanisme d’inclination NETTOYAGE...
-
Page 23: Donnees Techniques
Surface couverte : 20 m² Puissance : 75W Alimentation . 220V ~ 50Hz Dans un soucis d’amélioration permanent Beper se réserve le droit d’apporter des modifica- tions et améliorations au produit sans aucun préavis. TRAITEMENT DES DECHETS DES APPAREILS ELECTRIQUES ET ELECTRONIQUES Le produit en fin de vie doit être détruit selon les normes en vigueur relatives à... -
Page 24: Certificat De Garantie
Pour toute assistance technique et/ou reparations en dehors de la garantie, veuillez vous adresser directement à l’adresse ci-desous : LE SERVICE APRÈS-VENTE EST EFFECTUÉ PAR VOTRE REVENDEUR OU PAR L’IMPORTATEUR/DISTRIBUTEUR DES PRODUITS BEPER. ÉCRIVEZ UN E-MAIL AU assistenza@beper.com POUR CONNAITRE LE CENTRE SERVICE AGRÉE BEPER LE PLUS PROCHE DE CHEZ VOUS. - Page 25 7. Gerät bei beschädigtem Anschlußkabel oder Stecker nicht benutzen. 8. Bei Störung und/oder Fehlbetrieb Gerät ausschalten und nicht eingreifen. Zur even- tuellen Reparatur das Gerät nur zu einer Beper Vertragsservicestelle bringen und nur den Einsatz von Originalersatzteiler, verlangen. Die Nichtbeachtung dieser Anleitungen kann die Sicherheit des Gerätes beeintrachtigen.
- Page 26 Ventilator mit Vernebler Betriebsanleitung 22. Es wird empfohlen das Gerät sauber zu halten um die o.g. Funktionsstörungen und Feuer -Ge- fahr zu vermeiden. 23. Achten Sie darauf, dass alle die das Gerät benutzen, diese Anleitungen lesen. 24. Diese Anleitungen aufbewahren. SICHERHEITSHINWEIS Netzstecker am Stromnetz erst anschließen, nachdem Sie alle Teile des Standventilators mit Sprühnebelfunktion zusammengebaut haben.
- Page 27 Ventilator mit Vernebler Betriebsanleitung GEBRAUCHSANWEISUNG ZUSAMMENBAU DES VENTILATORS Fig. 2 1-Standfußleiste (16) auf eine ebene Fläche aufstellen 2-Standröhre (13) mit den geeigneten Feststellschrauben (14) ganz fest anschrauben. Vergewis- sern Sie sich, dass die Schrauben bis zum Ende angeschraubt wurden, damit der Standventilator fest auf dem Boden steht und keine gefährliche Schwankungen aufweist.
- Page 28 Ventilator mit Vernebler Betriebsanleitung Danach Regler auf MIN einstellen, ON/OFF-Schalter auf 0 einstellen und SPRÜHNEBELFUNKTION einschalten (die blaue Anzeige leuchtet auf). Taste TIMER (mit dem Gerät im Betrieb) zur Einstellung der Schaltuhr zur Abschaltung (die roten Anzeigen neben der eingestellten Zeit leuchtet auf). Man kann die Schaltuhr bis zu maximal 7,5 Stunden einstellen;...
- Page 29 Ventilator mit Vernebler Betriebsanleitung NEIGUNG DES VENTILATORKOPFES Es besteht die Möglichkeit, die Position des Kopfes zu wechseln und somit auf die Neigung der Luftventilation. Vor diesem Vorgang schalten Sie das Gerät aus. Motorgehäuse greifen, Feststellschraube losschrauben und Kopf des Ventilators beige, bis er hör- bar in der gewünschten Position einrastet.
-
Page 30: Technische Daten
Ventilator mit Vernebler Betriebsanleitung TECHNISCHE DATEN Ventilationsfläche: 20 m² Leistung: 75W Stromversorgung: 220V ~ 50Hz Das Gerät kann Änderungen aufweisen, die aber nicht die Qualität und die Inbetriebnahme des Produktes beeinflussen. VERFAHREN FÜR DIE ENTSORGUNG VON ELEKTRO- UND ELEKTRONIKGERÄTE ABFALL Die WEEE-Richtlinie (von engl.: Waste Electrical and Electronic Equipment;... -
Page 31: Garantie
Nach Ablauf der Garantiezeit können Reparaturen kostenpfl ichtig vom entsprechenden Fachhandel oder Reparaturservice ausgeführt werden. TRETEN SIE BITTE IN VERBINDUNG MIT IHREN HÄNDLER IN IHREM LAND ODER POST SALES ABTEILUNG VON FA. BEPER. E-MAIL assistenza@beper.com DIE IHREN HÄNDLER NENNEN WIRD... - Page 32 Ventilador con nebulizador Manual de instrucciones ADVERTENCIAS GENERALES LEA LAS INTRUCCIONES ANTES DE USAR EL APARATO Lea con atención las advertenicas contenidas en este manual ya que dan informaciones importan- tes respecto a la seguridad de instalación, de uso y de mantenimiento. Guarde cuidadosamente este manual para futuras consultas.
- Page 33 Ventilador con nebulizador Manual de instrucciones No deje el producto fuera al alcance de las perturbaciones atmosfericas(lluvia, sol, etc.) No deje el aparato cerca de fuentes de calor (ej. Radiador) Este aparato no puede ser utilizado por personas (inclusos niños ) con capacidades físicas y psíqui- cas sensoriales o intelectivas limitadas, o por personas desprovista de la experiencia y del conoci- miento necesario salvo que esten bajo la supervisión de una persona responsable de sus seguridad o que reciban istrucciones sobre el uso del producto.
- Page 34 Ventilador con nebulizador Manual de instrucciones Instrucciones de uso Montaje del ventilador Fig. 2 1-Posicione la base (16) en una superficie llana 2-Inserte el asta de soporte (13) y atornillar los tornillos con fuerza (14). Asegúrense que los tornillos estén fijadas firmemente para garantizar la estabilidad del ventilador que en caso contrario podría oscilar de manera peligrosa.
- Page 35 Ventilador con nebulizador Manual de instrucciones ¡IMPORTANTE!: el tanque del agua tiene que estar lleno antes de seguir con esta función. Al final reglar la rueda en MIN, seleccionela tecla de encendido/apagado en la posición 0 y presione la tecla NEBULIZACIÓN (se apaga el led azul). Presione la tecla de TIMER (cuando el ventilador esté...
- Page 36 Ventilador con nebulizador Manual de instrucciones Presione la tecla de TIMER (cuando el ventilador esté en función) para programar el timer de apagamiento (se alumbran los ledes rojos en crrespondencia del tiempo programado). El tiempo máximo del timer es de máximo 7,5 horas; pulsando la tecla TIMER se programa el tiempo con una progresión de media hora cada vez que se presiona y se encienden los led rojos en corresponden- cia del tiempo seleccionado Presione la tecla OFF para terminar la ventilación, el led rojo in correspondencia de POWERqueda...
- Page 37 Ventilador con nebulizador Manual de instrucciones Ficha técnica Zona cubierta: 20 m² Potencia: 75W Alimentación. 220V ~ 50Hz El producto puede presentar cambios que no influyen en la calida del mismo y/o en el fun- cionamiento del mismo. PROCEDIMIENTO DE ELIMINACIÓN DE LOS EQUIPOS ELÉCTRICOS Y ELECTRÓNICOS Al término de la vida útil del aparato, no eliminar como residuo municipal sólido mixto sino eliminarlo en un centro de recogida específico colocado en vuestra zona o entregarlo al distribuidor a la hora...
- Page 38 Para la asistencia técnica y/o reparaciones fuera de la garantía, es necesario contactar directamen- te la dirección siguiente : CONTACTE CON EL DISTRIBUIDOR DE SU PAIS O EL DEPARTAMENTO DE POST VENTA DE BEPER . ENVIE UN E-MAIL assistenza@beper.com Y LE ENVIAREMOS DATOS DE SU SERVICIO TECNICO EN SU PAIS.
- Page 40 BEPER SRL Via Salieri, 30 37050 - Vallese di Oppeano - Verona Tel. 045/7134674 – Fax 045/6984019 e-mail: assistenza@beper.com www.beper.com...
Need help?
Do you have a question about the 70.210 and is the answer not in the manual?
Questions and answers