Advertisement
LARDER FRIDGE - MODELS RLA34,RLA36,RLM34,RLM36
INSTRUCTIONS FOR INSTALLATION & USE
GETTING STARTED:
STEP 1
Choose a location for your
fridge, away from any
heat sources and
allow adequate
ventilation - 30mm
(1
/
inch) gap above.
1
4
STEP 3
Level the fridge by
adjusting the front feet.
This will stop rocking or
vibration and keep the
door aligned.
STEP 5
Plug in and switch on.
Allow the fridge to cool
before placing food
inside.
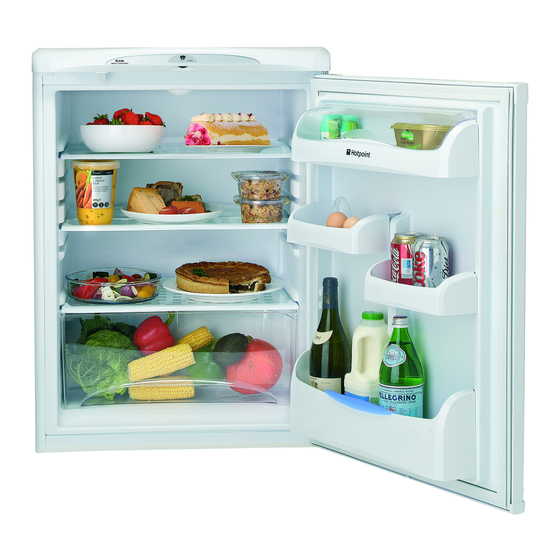
All food in the fridge
should be covered.
Read the rest of these instructions to get the best from your appliance
and remember to fill in your guarantee registration.
To ensure that your fridge runs reliably and efficiently follow these steps.
Keep this Book in a safe place for quick reference.
STEP 2
Move the fridge into
position, using the sides
of the cabinet. Take care
to avoid damaging the
refrigerant circuit pipe
work on the rear.
STEP 4
Before plugging in and
switching on, leave the
fridge in its final
location for at least 15
minutes to allow it to
settle.
STEP 6
Your fridge is now
working.
If after 24 hours your
fridge is not operating as
you want, refer to the
Troubleshooting section.
Advertisement
Table of Contents

Related Manuals for Hotpoint RLA36


Summary of Contents for Hotpoint RLA36
- Page 1 LARDER FRIDGE - MODELS RLA34,RLA36,RLM34,RLM36 INSTRUCTIONS FOR INSTALLATION & USE GETTING STARTED: To ensure that your fridge runs reliably and efficiently follow these steps. STEP 1 STEP 2 Choose a location for your Move the fridge into fridge, away from any...
-
Page 2: For Your Safety
For Your Safety For your safety, read the following advice: The fridge cooling system contains a small amount of gas which is environmentally friendly but flammable. To avoid any risk :- Install the fridge following the installation instructions and ensure that ventilation openings are kept clear of obstruction. -
Page 3: Installation
Installation Location & Air Circulation 30mm (1 inch) Locate your fridge away from sources of heat e.g. cookers, radiators, direct sunlight as extreme temperature will affect its performance. Allow a minimum 30mm (1 inch) between the top of the fridge and the underside of the worktop. Providing you follow the recommended ventilation requirements you will :- Prolong the life of the fridge. - Page 4 15 minutes to allow it to settle. Fitting a Fridge under a Work Top To minimise running costs Hotpoint recommend fitting a vent to the rear of your worktop, which is available from Hotpoint Genuine Parts & Accessories Mail Order Hotline (see KEY CONTACTS, back page).
- Page 5 This fridge is fitted with a special mains lead. If you need to replace the mains lead due to damage, one can be bought from Hotpoint Service (see KEY CONTACTS, back page). It is strongly advised that this work is carried out by a qualified electrician.
- Page 6 You can check the temperature of the fridge compartment by using a Fridge Freezer Thermometer available from Hotpoint Genuine Parts and Accessories Mail Order Hotline (see KEY CONTACTS back page). WARNING: Do not use a mercury filled thermometer, as breakage would cause a health hazard.
-
Page 7: Useful Advice
Useful Advice Note: The Rating Plate, which lists the appliance Model Number and Serial Number can be found near the bottom of the left hand internal wall. STORAGE ZONES Zone Type Food Storage Cool Dairy products, Cheese, butter, margarine, Low fat spreads, cooking fats / lards Preserves - Jam, curd, marmalade, spread, salad dressing or sauces. - Page 8 Microban® technology has been proven safe, durable and effective over many years of use in personal care and household consumer products. In addition, Hotpoint operate a rigorous antibacterial testing programme through approved independent testing laboratories.
- Page 9 Useful Advice Advice on Adjusting Shelves Make the most of the interior storage space by repositioning shelves to suit the various heights of individual items you wish to store. To remove, ensure that the door is open fully. Slide the shelf forward and tilt from position. Split glass shelf The split shelf can be used as a standard shelf but also as two half shelves.
-
Page 10: Defrosting And Cleaning
Defrosting and Cleaning No manual defrosting required The fridge compartment will defrost automatically. During defrost periods water droplets form on the interior back wall of your Larder Fridge and refreeze afterwards. Note : if your kitchen becomes exceptionally warm, your Larder Fridge may not defrost regularly. - Page 11 Changing the Light Bulb WARNING: Switch off at socket outlet and pull out the mains plug Obtain a replacement SES 15W bulb from the Hotpoint Genuine Parts and Accessories Mail Order Hotline (see KEY CONTACTS back page) and fit as follows : Remove any shelves from directly below the interior light, to make access easier.
-
Page 12: Maintenance
Maintenance You will need a selection of small hand tools, screwdrivers, spanners etc. to carry out this procedure. Our Service Department can arrange for an Engineer to do the conversion for you but a charge will be made. Door Reversal WARNING: Switch off electrical supply and pull out the mains plug. -
Page 13: Troubleshooting
4. Check the door is closed properly. The appliance is making a lot of noise If there is still a problem contact 1. Check that the rear pipe work is clear Hotpoint Service (See back page, for of the wall, skirting board and other contact details). - Page 14 Product Guarantee and Recycling and Disposal Information As part of Hotpoint’s continued commitment to helping Repair Information the environment, Hotpoint reserves the right to use quality, recycled components to keep down customer costs and minimise material wastage. Please dispose of packaging and old appliances Guarantee carefully.
- Page 16 195051328.04 3/2015...
Need help?
Do you have a question about the RLA36 and is the answer not in the manual?
Questions and answers