
Related Manuals for Myline Spa MARS

Summary of Contents for Myline Spa MARS
- Page 1 MARS USER’S GUIDE WM00175 MARS SPA User’s manual _____________________ Version: 02.2014...
-
Page 2: Standard Specification
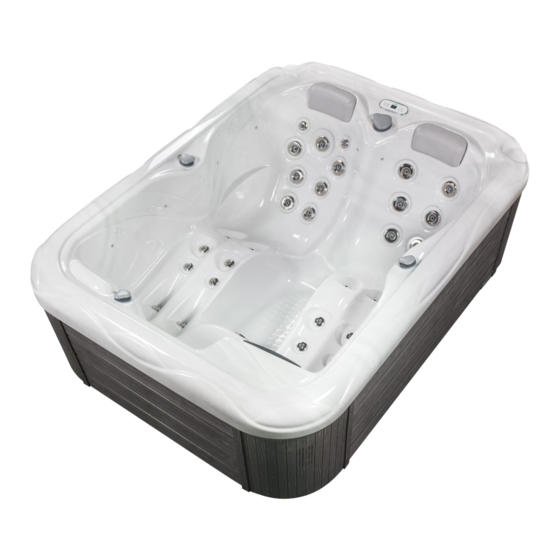
Standard Specification: 2130×1600×780 mm Shell material PU reinforced antimicrobial acrylic (6,3 mm) Persons 3 Prs Reclining places 2 Prs Sitting place 1 Prs Water volume 660 l Net weight ~250 kg Power requirement 1×25 A (230V/50Hz) optimum 1×16 A (230V/50Hz) minimum Total number of jets Hydro massage pump 1×2 HP 2 speed (230V/50Hz) -
Page 3: Warranty Letter
Signature: Signature: (stamp) (stamp) 2014 MyLine Spa Limited Warranty WARRANTY FOR EXPORT Warranty; Limitations of Liability and Damages. Company offers a limited warranty comprised of replacement of faulty parts and offers no reimbursement for labour of repairs outside any abnormal failure rates to be determined by both parties. - Page 4 2 years on spa plumbing: Spa fittings and plumbing are warranted against leaks due to de- fects in materials or workmanship for two years from the original date of delivery. There is no labour coverage on internal jet parts replacement, cleaning or adjusting. 2 years on standard and optional spa equipment –...
- Page 5 WARRANTY PERFORMANCE This warranty does not cover cleaning or adjusting spa or for customer error in following correct procedures. WELLIS Magyarország Kft. reserves the right to substitute a spa or component of equiv- alent value, either new or factory reconditioned and any such repair or replacement shall assume as its warranty only the remaining portion of the warranty on the original product.
- Page 6 SPA WARRANTY COVERAGE WILL BE VOID UNDER THE FOLLOWING CONDITIONS If damages caused by inefficient maintenance of water and/or chemical dosage. Terms of water hardness (limits): between 6-10 German degrees. If the spa surface or equipment has been damaged or discoloured as a result of im- proper water chemistry maintenance, including sanitizers such as trichlor type chlorine, calcium hypochlorite, sodium hypochlorite, and any other chemicals or a chemical dispenser that may rest on the spa surface.
- Page 7 Magyarország Kft. or its agents will not be liable for any incidental or consequential loss or injury. Nor will WELLIS Magyarország Kft. be liable for costs associated with but not limited to building alterations or finishes and under no circumstances will be liable for greater expense than the amount paid for the product.
-
Page 8: Service Work
Service-work The announcement date of damage: _____________________________ Date of received goods/parts for repair: _____________________________ Date of the return of repaired goods/parts: _____________________________ Date of site service: _____________________________ STAMP Improved error: _____________________________ Mode of repair: _____________________________ Failed component: _____________________________ New deadline for the warranty: _____________________________ The announcement date of damage: _____________________________... -
Page 9: Safety Instructions
SAFETy INSTRUCTIONS ATTENTION: PLEASE READ CAREFULLY AND FOLLOW THE INSTRUCTIONS AVOIDING THE RISK OF INJURy OF CHILDREN In order to reduce the risk of injury to children, do not allow children to use this spaalone unless they are carefully supervised at all the times. Lower water temperatures arerecommended for young children. -
Page 10: Installation Instructions
INSTALLATION INSTRUCTIONS SITE PREPARATION INDOOR/BASEMENT INSTALLATION If you take it place your spa indoors, be aware of some special requirements. Water willaccumulate around the spa, so the flooring materials must provide a good grip whenwet proper drainage is essential to prevent a build-up of water around the spa. When building a new room for the spa it is recommended that a floor drain isinstalled. - Page 11 OPERATING INSTRUCTIONS Close the drain stub and fill the spa with water After closing the drain stub, and fill up the tub with soft water to theindicated line inside of the body. If you see any leak(orflood) anywhere, stop the filling procedure until it will be fixed.
-
Page 12: General Information
CLEANING GENERAL INFORMATION: Water recirculation-filtering The basic conditions for keeping the water of the spa clean are the removal of mechanical dirt and the blending of the chemicals in the water with continuous water recirculation. In all our spa’s appliances comprising of a pump and a filter are used for this purpose. - The filter removes the dirt floating in the water or at the surface of the water. - Page 13 The chemical equilibrium of the water The water of the spa will be clean and clear if its chemical components are in equilibrium. pH-value: The first important indicator is the pH value of the water. pH is measured in a scale between 0-14 where 7 is the neutral value.
- Page 14 REPLACING UNDERWATER LIGHT 1. Turn off the power of the spa. 2. Remove plastic panel behind where the underwater light is situated. 3. There is a plug with two wires going into the back of the light. 4. Remove this plug by turning anticlockwise. 5.
-
Page 15: Troubleshooting
TROUBLESHOOTING Problem Probable causes Solutions Cloudy Water Dirty filters. Clean filters. Shock spa with sanitizer. Improper sanitization. Add sanitizer. Suspended particles/organic Adjust PH andl or alkalinity to recom- matter. mended range. Run jet pump(s) and clean filters. Overused water. Drain and refill the spa. Water Odor Excessive organics in water. - Page 16 Problem Probable causes Solutions Entire spa is inop- Power failure. Check power source. erative. GFCI tripped heater Reset GFCI, call for service if not reset. high-limit thermostat Disconnect power for at least thirty tripped. second to reset heater high limit. If it will not reset check for clogged filters.
-
Page 17: Software Version
GS100 Tech Sheet Balboa Water Group System PN 56300 System Model # MP7-GS100-DCA-3.0K Software Version # 41 EPN # 3825 Base PCBA - PN 56301 PCB VS100C - PN 24084 Rev A Base Panels VL200 (Mini) – PN 55123 VL240 (MVP240) – PN 55080 VL260 (MVP260) –... - Page 18 Basic System Features and Functions Power Requirements • 230VAC, 1~, 16A, 50Hz • 3 wires (line, neutral, ground) System Outputs Setup 1 (As Manufactured) • 230V Pump 1, 2-Speed • 230V Ozone • 10V Spa Light • 230V 3.0kW Heater PN 58202...
- Page 19 Basic System Features and Functions Any time you change a DIP Switch, other than A1, you must Power Up Display Sequence reset Persistent Memory for your new DIP Switch Settings Upon power up, you should see the following on the display: changes to take e ect.
- Page 20 Wiring Con guration and DIP Settings Setup 1 (As Manufactured) • 230V Pump 1, 2-Speed • 3.0kW @ 230VAC Heater • 10V Spa Light • VL401 Main Panel • 230V Ozone (with Pump 1 Low) GS100 PN 56300 CONTROL PANEL TO J1 12VAC-B AUX F...
- Page 21 DIP Switches and Jumpers De nitions SSID 100 59 41 Base Model VS100 DIP Switch Key A1 Test Mode (normally OFF) A2 “ON” position: Button layout will be: Pump 1, Light, Temp Down, Temp Up * “OFF” position: Button layout will be: Unused, Pump 1, Temp, Light A3 “ON”...
- Page 22 Ozone Connections Ozone Connector Voltage: The VS100 circuit board is factory con gured to deliver a preset voltage of 120V to the on-board ozone connector (J29). Balboa Ozone Generator: The board is set up to operate a 120V ozone generator; the connector on the ozone generator is likely to be con gured correctly, but should be compared to the illustration below.
- Page 23 Duplex Panel Con gurations Heat DIP switch A3 must be OFF Jets Jets Light Cool Warm VL403 (Lite Digital) Heat PN 54664 with Overlay PN 11884 • Connects to Main Panel terminal J1 Jets Jets Light Cool Warm VL401 (Lite Digital) PN 54665 with Overlay PN 11885 •...
- Page 24 MVP260 Kurzanleitung Betrieb ohne Umwälzpumpe Erstmaliges Einschalten Der Whirlpool läuft beim erstmaligen Einschalten im Spülmodus (angezeigt durch „ ”). Ausführliche Anweisungen zum Einschalten und Durchspülen der Pumpe finden Sie in der Installationsanleitung des M7-Bedienungssystems. Der Spülmodus dauert bis zu 5 Minuten, danach wird der Whirlpool aufgeheizt und die Wassertemperatur im Standardmodus beibehalten.
- Page 25 Diagnosemeldungen Meldung Bedeutung Erforderliche Maßnahme Keine Meldung angezeigt. Die Stromzufuhr zum Die Bedienungskonsole wird ausgeschaltet, bis die Stromversorgung Whirlpool wurde unterbrochen. wieder hergestellt ist. Die Whirlpool-Einstellungen bleiben bis zum nächsten Einschalten gespeichert. Temperatur nicht bekannt. Nachdem die Umwälzpumpe zwei Minuten gelaufen ist, wird die Temperatur angezeigt.
- Page 26 Warning! Qualified Technician Required for Service and Installation Basic Installation and CSA Compliance/Conformité Caution: Configuration Guidelines Use minimum 6AWG copper conductors only. each use of the spa. Torque field connections between 21 and 23 in lbs. Readily accessible disconnecting means to be provided at time of instal- lation.
- Page 27 Piping instructions of MARS spa 30mA safety relay is need to be installed! E: Electric hole ( 500 mm) to terminal facilities through spa cabinet. 3 m cabels are required! L : Drain connector ( 40 0 mm) ...
Need help?
Do you have a question about the MARS and is the answer not in the manual?
Questions and answers