Table of Contents
Advertisement
NATURAL GAS
CONVERSION KIT
For use with Commercial Series Dual Fuel™ Grills only.
This Natural Gas Conversion Kit can be used ONLY with
WARNING
CALIFORNIA PROPOSITION 65
1. Combustion by-products produced when using
this product contain chemicals known to the State of
California to cause cancer, birth defects, or other
reproductive harm.
2. This product contains chemicals, including lead
and lead compounds, known to the State of
California to cause cancer, birth defects or
other reproductive harm.
Wash your hands after handling this product.
WARNING
1. Failure to follow all manufacturer's instructions could
result in serious personal injury and/or property
damage.
2. Grill installation must conform with local codes,
regulations or in their absence with National Fuel
Gas Code, NFPA 54/ANSI Z223.1 (In Canada must
conform to CSA B 149.1).
CONSUMER:
Keep this manual for future reference.
INSTALLER/ASSEMBLER:
Leave this manual with consumer.
If you have questions or need assistance during assembly, please call
To insure your satisfaction and for follow-up service, register your grill online at www.grillregistration.com
Model # 4984619
FOR OUTDOOR USE ONLY
Dual Fuel™ grills.
If you smell gas:
1. Shut off gas to the appliance.
2. Extinguish any open flame.
3. Open lid.
4. If odor continues, keep away from the
appliance and immediately call your gas
supplier or your fire department.
1. Read and follow all safety statements, assembly
instructions, and use and care directions before
attempting to assemble and cook.
2. Some parts may contain sharp edges-especially as
noted in the manual! Wear protective gloves if
necessary.
DANGER
CAUTION
1-800-241-7548 (USA) or 1-800-387-6057 (Canada)
Natural Gas Conversion Kit •
3496258
• 09/29/07
Advertisement
Table of Contents

Related Manuals for Char-Broil Commercial 4984619


Summary of Contents for Char-Broil Commercial 4984619
-
Page 1: For Your Safety
Leave this manual with consumer. If you have questions or need assistance during assembly, please call To insure your satisfaction and for follow-up service, register your grill online at www.grillregistration.com Model # 4984619 FOR OUTDOOR USE ONLY Dual Fuel™ grills. -
Page 2: Table Of Contents
TABLE OF CONTENTS For Your Safety ........1 Grill Service Center. - Page 3 This unit should be hard plumbed using components that meet National Fuel Gas Code. WARNING Do not use flexible gas hose supplied for Drop-in Models. Connecting Your Grill to the Natural Gas Source. A professionally-installed shut-off valve between the supply piping and the socket is recommended, but not required, by the National Fuel Gas Code.
-
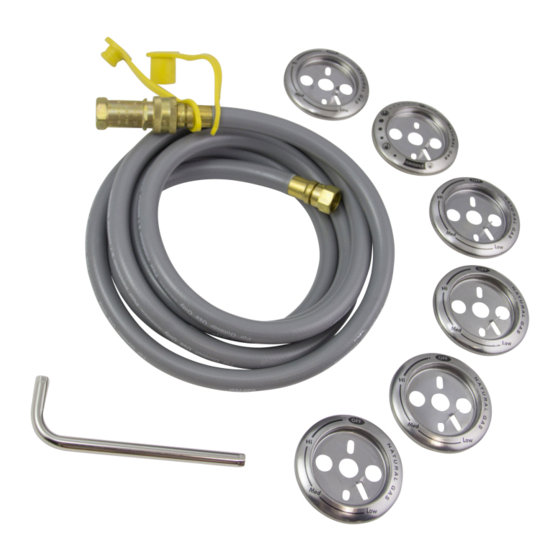
Page 4: Parts List
Leak Testing 1. Turn all grill control knobs to OFF. Be sure gas hose is tightly connected to gas source. Completely open gas source. If you hear a gas off immediately. There is a major leak at the connection. Correct before proceeding Brush soapy solution onto area circled below. -
Page 5: Tube Burner Conversion
Tube Burner Conversion First, make sure all control knobs are in the OFF position, LP tank valve is closed, and tank is disconnected from regulator and removed from grill. - Next, open Lid and remove Warming Rack, Cooking Grates, and Flame Tamers. Your Grill may differ from illustrations shown. - Page 6 - Remove two screws that secure each Electrode to Tube Burner (Electrode remains in Firebox). - Lift back end of burner while sliding Tube Burner out of Firebox, disengaging burners from Valves. Screws Tube Burner Electrode - Insert Orifice Removal Tool provided with Kit into Firebox Burner openings and unscrew Orifices from ends of Valves. Save removed Orifices for converting back to LP Tank Gas.
- Page 7 - Pull the Tube Burner Control Knobs off of Valve Stems. - Remove screws and washers that secure each Bezel to the Control Panel. Save removed Bezels for converting back to LP Tank Gas. - Install new Natural Gas Bezels provided with Kit (see illustration below) in place of old Bezels onto Control Panel, and secure using previously removed screws and washers.
-
Page 8: Natural Gas Hose Conversion
Natural Gas Hose Conversion - Using a wrench, not provided, remove LP Regulator Hose Assembly from Manifold Connection. Saved removed LP Manifold Connection for converting back to LP Tank Gas. Your LP Regulator hose will be located either inside the cart or under the sideburner shelf depending on what grill model you have. -
Page 9: Sideburner Conversion
Sideburner Conversion - Open sideburner lid and remove the sideburner cooking grate, burner cap and wind diverter. - Beneath sideburner shelf, remove the two screws, lock washers and flat washers that secure sideburner to shelf. - Remove sideburner from shelf. Sideburner Burner cap Sideburner... - Page 10 - Using the provided orifice removal tool, unscrew the orifice from the end of the sideburner valve. Save removed orifice for converting back to LP Tank Gas. No replacement orifice is required. - Pull the sideburner control knob off of valve stem. Remove the existing bezel by removing the two screws and washers securing bezel to shelf fascia.
- Page 11 - Return sideburner to shelf. Make sure burner engages sideburner valve. See illustration below for correct burner-to-valve engagement. Secure burner to shelf bracket with two screws, lock washers and flat washers. Sideburner - Place wind diverter and burner cap onto sideburner, then place sideburner cooking grate onto sideburner pan. Flat washer Lock washer Sideburner...
-
Page 12: Sideburner Conversion(Outdoor Stove & Griddle)
Sideburner Conversion (Outdoor Stove & Griddle) - Open sideburner lid and remove the sideburner cooking griddle, burner cap and wind diverter. - Beneath sideburner shelf, remove the two screws, lock washers and flat washers that secure sideburner to shelf. - Remove sideburner from shelf. Natural Gas Conversion Kit Griddle Sideburner... - Page 13 - Using the provided orifice removal tool, unscrew the orifice from the end of the sideburner valve. Save removed orifice for converting back to LP Tank Gas. No replacement orifice is required. - Pull the sideburner control knob off of valve stem. Remove the existing bezel by removing the two screws and washers securing bezel to shelf fascia.
- Page 14 - Return sideburner to shelf. Make sure burner engages sideburner valve. See illustration below for correct burner-to-valve engagement. Secure burner to shelf bracket with two screws, lock washers and flat washers. Correct burner-to-valve engagement. Sideburner Flat washer Lock washer - Place wind diverter and burner cap onto sideburner, then place sideburner cooking grate and griddle onto sideburner pan. Burner cap Griddle Sideburner...
-
Page 15: Rotisserie Burner Conversion
Rotisserie Burner Conversion - Remove screws, washers, and nuts that secures Rotisserie Cover to back of grill Firebox. - Remove Rotisserie Cover, if applicable. Your Grill may differ from illustration shown, it may not have a Rotisserie Cover. Lock Washer NOTE: Your Grill may not have bottom screws, instead brackets are... - Page 16 - Using Orifice Removal Tool provided with Kit, unscrew Orifice from Rotisserie Connector. Save Orifice for converting back to LP Tank Gas. - Replace with Natural Gas Orifice provided with this supplement and secure tightly to Rotisserie Connector. * Light Blue dot - 1.15mm Orifice Reinstall Rotisserie Burner - Insert Rotisserie Connector through cut-out of Rotisserie Support Bracket and tighten flush against bracket using previously removed Securing Nut.
-
Page 17: Troubleshooting
EMERGENCIES: If a gas leak cannot be stopped, or a fire occurs due to gas leakage, call the fire department. Emergencies Possible Cause • Damaged hose. Gas leaking from cracked/cut/burned hose. Troubleshooting Problem Possible Cause GAS ISSUES: Burner(s) will not light •... - Page 18 THIS PAGE INTENTIONALLY LEFT BLANK Natural Gas Conversion Kit 18...
- Page 19 THIS PAGE INTENTIONALLY LEFT BLANK Natural Gas Conversion Kit •19...
- Page 20 Char-Broil, LLC ® Columbus, GA 31902 Assembly Instructions © 2007...
Need help?
Do you have a question about the Commercial 4984619 and is the answer not in the manual?
Questions and answers