Table of Contents
Advertisement
Quick Links
User Manual
CIP-700M/700MS
• Thank you for purchasing COMMAX products.
• Thank you for purchasing COMMAX products.
• Please carefully read this User's Guide (in particular, precautions for safety) before using a product and follow
• Please carefully read this User's Guide (in particular, precautions for safety) before using a product and follow
instructions to use a product exactly.
instructions to use a product exactly.
• The company is not responsible for any safety accidents caused by abnormal operation of the product.
• The company is not responsible for any safety accidents caused by abnormal operation of the product.
Advertisement
Table of Contents

Related Manuals for Commax CIP-700M


Summary of Contents for Commax CIP-700M
- Page 1 User Manual CIP-700M/700MS • Thank you for purchasing COMMAX products. • Thank you for purchasing COMMAX products. • Please carefully read this User’s Guide (in particular, precautions for safety) before using a product and follow • Please carefully read this User’s Guide (in particular, precautions for safety) before using a product and follow instructions to use a product exactly.
-
Page 2: Table Of Contents
7. Convenient function ·································································23 7.1. Calculator ········································································23 8. Setting ··················································································24 8.1. Environment set up ····························································24 8.2. Password change ······························································24 8.3. Connect to COMMAX ··························································24 8.4. General setting ·································································25 8.5. Wireless network connection ················································25 8.6. Screen setting ··································································26 8.7. Language and key setting ····················································26 8.8. -
Page 3: Warnings And Caution
Warnings and caution Please follow the things described below in order to prevent any danger or property damage. Prohibition. Warning It may cause a serious damage or No disassembly injury if violated. No touch Must follow strictly. Shows plugging out the power cord Caution It may cause a minor damage or without an exception... - Page 4 Warning If an abnormal sound, burning Please don’ t disassemble, Please don’t insert any Please use only the designated repair or rebuild this product smell or smoke is coming out metallic or burnable materials batteries for the products of arbitrarily (please contact the of the product, please plug out into the ventilation hole.
-
Page 5: Introduction
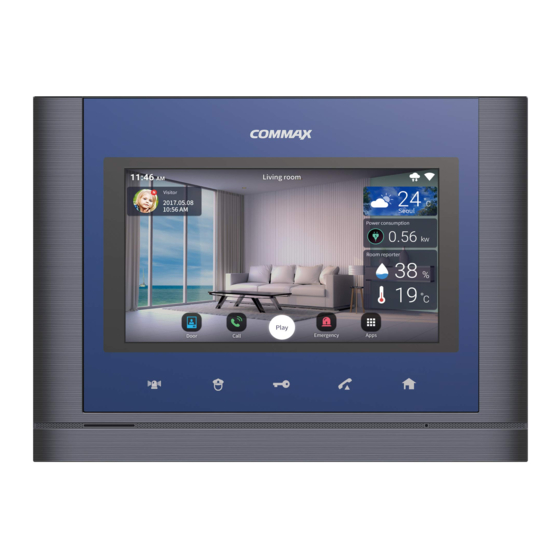
1. Introduction 1.1. Product component Touch Screen Call button Speaker Home button Emergency button Microphone Guard button Power switch Door open button Connection terminal 1.2. Screen composition The bottom button of home screen Go to home screen Go back... -
Page 6: Wireless Network Connection
1.3. Wireless network connection Press the ‘Setting’ button for setting screen. Wi-Fi On/Off Setting → Wi-Fi Click the check box to turn on or off Wi-Fi. Wi-Fi Connection Setting → Wi-Fi setting You can search surrounding network and connect to selected wireless network. Select the Wi-Fi from the network list of auto-discovered and enter the password to connect network if necessary. -
Page 7: Sign Up
1.4. Sign up Sign up Sign up Select ‘ Sign up’ button. Enter ‘ID’ and select ‘Duplication check’ button. Select y our country. Enter ‘Password’ and ‘Retype Password’ and select ‘Registration’ button. Your sign up is completed. Edit, Initialize If your ID is registered, your information will be shown. To change the password, select ‘P/W Change’ button.. -
Page 8: Using Smartphone
1.5. Using Smartphone Access Smartphone Run 'IP Home IoT’app. Click 'Call' button to make a call. Enter 'ID' and 'Password' and press 'Login' When you click 'Refuse' button, the call is button. disconnected. When the call is connected, the entrance screen If you press 'Open Door' button, a warning is shown. -
Page 9: Home Screen
2. Home screen 2.1. Screen composition Entrance monitoring, Visitor communication Entrance Call log To check Call log Emergency Home emergency button All installed apps list APPs ※f If you press and hold the home screen for about 1 second, you will get a menu that allows you to perform "Edit space / Device layout / Add device / Widget layout / App layout". -
Page 10: Edit Space Background
2.2. Edit space background Press and hold the Home screen for about a second. Click the 'Space Background' button. Select the background picture to use. Enter a space name. Press 'OK' button to save the background. Press 'Close' button to cancel editing. 2.3. -
Page 11: Iot Device Connection
2.4. IoT Device connection Press and hold the Home screen for about a second. Click the 'IoT Device connection' button. Connect each device according to the device pairing method. (It can be up to 60 seconds.) Press the 'Cancel' button to cancel the pairing connection. When the device is registered, the device is automatically placed on the home screen. -
Page 12: Call
3. Call Call screen Keypad Delete Call Log Call Contacts Door Extension conversation Call connection screen and call screen Activation and waiting call display Receive a Call Setting the front door of our house Call rejection, cancellation Connection screen Open the door Call volume and volume control Store visitor video Store visitor photo... -
Page 13: Entrance Call
3.1. Entrance Call Monitoring of my house entrance Monitor and call my house entrance You can monitor the entrance of our house by pressing the door icon or by pressing the 'door' button on the dial screen. Press the "Cancel call" button to cancel monitoring. -
Page 14: Call
Setting my home screen Press the 'entrance' button on the phone screen. Press the 'Screen Settings' button. On the Screen Settings tab, press the button (Color), (chroma), (Brightness), or (Contrast) you want to set and adjust the value with the (Left) and (Right) buttons. -
Page 15: Call Log
3.3. Call log Call log Call Type Make a call Call log screen Use call logs You can press the button from the call log and connect the call You can clear the call history by clicking the trash button at the top of the screen and pressing the 'OK' button 3.4. -
Page 16: Security
4. Security Emergency 4.1. Emergency Emergency detection An emergency situation occurs when the emergency button is pressed Emergency situation is proceeded in three steps (occurrence → stop → return). Emergency situation occurs You can make an emergency by pressing the emergency icon or by pressing the emergency button on the front of the product. -
Page 17: Control
5. Control Lighting control 5.1. Go to the Lighting tab. When you press power button of whole lightings, all lightings are turned When you press power button of whole lightings, all lightings are turned off. Press the power button of the lighting you want to control to turn the light on or off. -
Page 18: Magnetic Sensor Monitoring
Magnetic sensor monitoring 5.3. Go to the Safety tab. 'Detected' is displayed when door open is detected. If no door open is detected, "No detected" is displayed. [Magnetic sensor screen] Adding devices 5.4. Press the + button to enter the Add Device mode. -
Page 19: Edit Device
Edit device 5.5. Change the device nickname Select the device and change the nickname. Press ‘OK’ and then the name of device is changed. [Device edit screen] Remove device Press the "Trash" button. Select the device you want to delete. Press the 'Finish' button to delete the device. -
Page 20: Scenario/Schedule Setting
6. Scenario/schedule setting [Scenario/schedule control screen] Go to home screen Scenario view detail Scenario addition 6.1. Scenario addition Press "Add Scene" button on "Add Scene Main Screen The device selection dialogue window will be displayed, if you click 'Create scene ' Select the device to set and press the OK button on the upper right corner Select the device attribute and set the device Click the ‘Enter Name button’... - Page 21 6.2. Away mode Away mode on/off Away setting status display When you go out, you can set security sensor, visitor image storage, and detour call. Running Away mode Press the Away icon to set the away mode. The away mode will be executed automatically after the specified away delay time. Press the 'Close' button to cancel the away settings.
- Page 22 Security setting status display This function is implemented when a security sensor is installed in a household. Sensor usage setting can be set in [Setting> commax connection> Sensor use selection]. Security mode setting Check the security sensor to set by pressing the 'Security Zone ( )' button.
- Page 23 Control Scenery / Scenario Press 'Detail View' button on the main screen. Press 'Run' button to control the set devices in batch. 6.5. Scenario Edit ‘Press the 'Security: Apply>' button to enable or disable security for the scene. Press the 'Edit' button to edit the scene. You can add and edit device type, device attribute, scene name and icon on the edit screen.
-
Page 24: Convenient Function
7. Convenient function Calculator 7.1. Arithmetic operation You can use the arithmetic calculator function. Calculator screen... -
Page 25: Setting
Press the 'Set' button to display the setting screen. Settings Screen Password change 8.2. Settings → Commax → User Options → Password Change the password used for emergency release and exit mode setting cancellation. Press the 'Password' button. Enter the new password on the New Password Entry screen. -
Page 26: General Setting
General setting 8.4. Setting the ring tone Set up → COMMAX → Bell sound Select the location you want to set and then select the desired ring tone from the list. (Listening to the bell sound) ‘Press 'OK' button to set the selected ring tone. -
Page 27: Screen Setting
Wi-Fi Connection Setting → Wi-Fi You can search for nearby wireless networks and select the wireless network you want to connect to. Select the Wi-Fi you want from the list of automatically discovered wireless networks, enter your password if necessary, and tap Connect. If you have secured Wi-Fi with a padlock, you'll need to enter your password before you can use it. -
Page 28: Date And Time Setting
Date and time setting 8.8. Settings → Date and Time Setting the date and time automatically Check the date / time automatic setting. Setting the date and time manually Uncheck the automatic setting of date / time. The date and time setting items are activated. Click Date set. -
Page 29: Installation
9. INSTALLATION Installation 9.1. Wiring Diagram and Components 9.2. Precautions when wiring 1) When installing in the area where the high-voltage line passes around, use the coaxial wire to wire the metal pipe. 2) It may be short-circuited if internal wires are exposed due to scratches on the wire sheath, which may cause malfunction. - Page 30 Components 16 29...
-
Page 31: Specification
Individual Door : Electronic Chime with 3 Tones (For 2 consecutive times) Communication Range Individual Door : 30m with 0.65 Cable Operation Temperature 0 ~ +40 (32°F ~ 104°F) (Only CIP-700M) WI-FI (IEEE 892.11 b/g/n) Items Specification Receiver sensitivity -76dBm @ 802.11b 11Mbps -65dBm @ 802.11g 54Mbps -64dBm @ 802.11n MCS7... -
Page 32: System Diagram
11. System Diagram... - Page 33 513-11, Sangdaewon-dong, Jungwon-gu, Seongnam-si, Gyeonggi-do, Korea Int’l Business Dept. Tel. : +82-31-7393-540~550 Fax. : +82-31-745-2133 Web site : www.commax.com Printed In Korea / 2016.03.104...
Need help?
Do you have a question about the CIP-700M and is the answer not in the manual?
Questions and answers