Advertisement
Quick Links
• Notizen:
•
Notes:
•
Notes:
•
Apuntes:
•
Nota:
•
Notities:
28
Aufbauanleitung
Assembly plan
Instructions de montage
Instrucciones de montaje
Istruzioni di montaggio
Montagevoorschrift
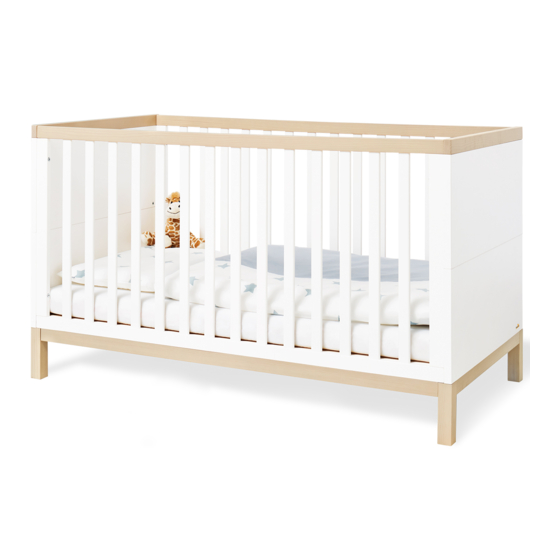
Kinderbett 'Bridge'
Cot bed 'Bridge' • Lit de bébé évolutif 'Bridge' • Cuna 'Bridge' • Lettino 'Bridge' • Babybed
'Bridge'
Jetzt unter garantie.pinolino.de
registrieren und 10 Jahre
Pinolino-Plus-Garantie sichern!
Art. - Nr. • Item No. • N° d´art. 11 34 66
Edelmatt: Uni, weiß lackiert und massiv, Esche klar lackiert • Classy matt: Plain, white lacquered and solid wood,
esh clear lacquered • Semi poli fin :Uni, laqué blanc et massif, frêne laqué clair • Mate noble: Uni, laqueado
blanco y macizo, fresno claro laqueado • Metallo nobile opaco: Uni, verniciato di bianco e massello, frassino
doorzichtig lak • Edelmat: Uni, wit gelakt en massief, es transparant gelakt
Pinolino Kinderträume GmbH | Sprakeler Straße 397 | 48159 Münster | Germany
service@pinolino.de | www.pinolino.de
SERIAL
XX-WW/YY
ohne Dekoration
without decoration
sans décoration
sin decoración
senza decorazione
zonder decoratie
Advertisement

Related Manuals for Pinolino Kinderträume Bridge 11 34 66


Summary of Contents for Pinolino Kinderträume Bridge 11 34 66
- Page 1 • Notizen: • Notes: Aufbauanleitung • Notes: • Apuntes: Assembly plan • Nota: • Instructions de montage Notities: Instrucciones de montaje SERIAL XX-WW/YY Istruzioni di montaggio Montagevoorschrift Kinderbett ‘Bridge’ Cot bed ‘Bridge’ • Lit de bébé évolutif ‘Bridge’ • Cuna ‘Bridge’ • Lettino ‘Bridge’ • Babybed ‘Bridge’...
- Page 2 WICHTIG, FÜR SPÄTERE VERWENDUNG AUFBEWAHREN: • Notizen: • Notes: SORGFÄLTIG LESEN. • Notes: • Apuntes: • Schön, dass du dich für Pinolino entschieden hast! Wir haben diesen Artikel mit großer Sorgfalt und nach den strengen Auflagen der Nota: Europäischen Sicherheitsnormen hergestellt. Bitte lies dir die Aufbauanleitung sorgfältig durch und kontrolliere die Vollständigkeit •...
- Page 3 IMPORTANT, KEEP FOR FUTURE USE: READ CAREFULLY. Thank you for choosing Pinolino! We have produced this article with great care and according to strict requirements of European safety standard. Please read the set-up instructions carefully and check the delivered parts' completeness. In case of improper handling or installation and especially changes to the construction the guarantee will be lost.
- Page 4 IMPORTANT, À CONSERVER POUR UNE UTILISATION EML 53x20x26 POSTÉRIEURE : LIRE ATTENTIVEMENT. Nous sommes ravis que vous ayez choisi Pinolino ! Nous avons fabriqué cet article avec le plus grand soin et selon les conditions strictes des normes de sécurité européennes. Veuillez lire attentivement les instructions de montage et contrôlez l'intégralité des pièces fournies.
- Page 5 ¡IMPORTANTE - LEERSE ATENTAMENTE! - GUARDAR PARA UTILIZACIÓN POSTERIOR Nos alegramos de que haya elegido Pinolino. Hemos fabricado este artículo con gran cuidado y de acuerdo con los estrictos requisitos de las normas de seguridad europeas. Lea atentamente las instrucciones de montaje y compruebe que las piezas suministradas están completas.
- Page 6 IMPORTANTE - LEGGERE ATTENTAMENTE! - CONSERVARE PER FUTURI RIFERIMENTI Siamo lieti che abbiate scelto Pinolino! Abbiamo prodotto questo articolo con grande cura e secondo i severi requisiti delle norme di sicurezza europee. Leggere attentamente le istruzioni di montaggio e verificare che le parti fornite siano complete. L'uso o il montaggio improprio, e in particolare le modifiche alla costruzione, invalidano la garanzia.
- Page 7 Umbau zum Juniorbett BELANGRIJK - ZORGVULDIG LEZEN!- Conversion into junior bed VOOR LATERE RAADPLEGING BEWAREN Transformation en lit junior Transformación en cama júnior Wij zijn blij dat u voor Pinolino gekozen heeft! Wij hebben dit artikel met grote zorg en volgens de strenge eisen van de Europese Conversione in letto Junior veiligheidsnormen vervaardigd.
- Page 8 Produktspezifikationen • Bitte Lattenrost mit Klammern/Schrauben nach oben montieren. Erst Lattenrost auf die • Product specifications • Spécifications du produit • Especificaciones del producto • Lattenrost-träger legen und dann mit Schrauben befestigen. Specificazioni del prodotto • Productspecificaties • Please assemble the mattress support with the staples / screws upwards. Place the mattress support on the metallic hardware Artikelmaß...
- Page 9 Wickelkommode breit • Changing unit wide • Commode à langer large • Cambiador ancho • Fasciatoio largo 13 34 66 B • Commode breed Wickelkommode extrabreit • Changing unit extra wide • Commode à langer extra large • Cambiador extra ancho • Fasciatoio extra 13 34 66 X largo •...
- Page 10 Beschläge • Hardware • Ferrure • Herraje • Ferramenta • Ijzerwaren 24 x WDH 8/35 WDH 8/60 WDH 5/30 WBE 2 Holzdübel Holzdübel Holzdübel Mittelwandbolzen Exzenter Dowel Dowel Dowel Centre panel bolts Eccentric cam Cheville en bois Cheville en bois Cheville en bois Goujon pour panneau mitoyen Boîtier de ferrure...
- Page 11 Umbau zum Sofa Montage • Assembly • Montage • Montaje • Assemblaggio • Montage Conversion into sofa Transformation en sofa WBE 2 Transformación en canapé Transformazione in divano Omzetting in bank • Wenn Ihr Kind keine Gitterseitenteile mehr benötigt, können Sie das Bett zum Sofa umbauen. •...
- Page 12 WBE 1 WDH 8/35 Montage der Himmelstange (nicht im Lieferumfang enthalten; optionales Zubehör) Assembly of the canopy frame (not included in the purchased package; optional accessory) Assemblage du support ciel de lit (non inclus dans la livraison; accessoire optionnel) El montaje de soporte de baldaquino(el soporte del baldaquino no está incluido en el bulto –accesorio opcional) Montaggio del supporto di sostegno del baldacchino (non incluso nel pacchetto acquistato;...
- Page 13 • Bitte Lattenrost mit Klammern/Schrauben nach oben montieren. Erst Lattenrost auf die WE 15 Lattenrost-träger legen und dann mit Schrauben befestigen. • Please assemble the mattress support with the staples / screws upwards. Place the mattress support on the metallic hardware and fix it with the screws.
- Page 14 VFZ 6/40 WE 15 VFZ 6/75 EML 53x20x26...
- Page 29 • Notizen: • Notes: Aufbauanleitung • Notes: • Apuntes: Assembly plan • Nota: • Notities: Instructions de montage Instrucciones de montaje Serien Nr. Istruzioni di montaggio Serial No. No. série Montagevoorschrift Serie No. No. serie Serienummer Kleiderschrank ‘Bridge’ groß Wardrobe ‘Bridge’ large • Armoire ‘Bridge’ grande • Armario ‘Bridge’ grande • Guardaroba ‘Bridge’ grande • Kast ‘Bridge’...
- Page 30 WICHTIG - SORGFÄLTIG LESEN! - FÜR SPÄTERE VERWENDUNG AUFBEWAHREN Sehr geehrte Kunden! Wir freuen uns, dass Sie sich für diesen hochwertigen Artikel entschieden haben. Wir von Pinolino haben diesen Artikel mit großer Sorgfalt hergestellt. Die von uns verwendeten Materialien sind umweltschonend und entsprechen den strengen Auflagen der Europäischen Sicherheitsnormen.
- Page 31 IMPORTANT - PLEASE READ CAREFULLY! - KEEP FOR FUTURE REFERENCE Dear clients, We are glad that you have chosen this premium product. We, the Pinolino staff, have manufactured this item with greatest care. The materials that were used are eco-friendly and comply with the strict European safety standards. To spare you unnecessary effort, carefully read the assembly instructions first.
- Page 32 IMPORTANT - LIRE ATTENTIVEMENT! - A GARDER POUR CONSULTATION ULTÉRIEURE Chers clients, Nous vous remercions pour avoir acheter cet article de haute qualité. Nous avons produit cet article avec le plus grand soin. Les matériaux utilisés sont écologiques et correspondent aux normes européennes de sécurité. Pour vous épargner tout effort inutile nous vous recommandons de lire attentivement et intégralement ces instructions de montage.
- Page 33 ¡IMPORTANTE - LEERSE ATENTAMENTE! - Achtung • Warning • Attention • Atención • Attenzione • Let op • D ie Türen nicht weiter als 95° öffnen, da es sonst zu einer Überdehnung der Scharniere kommen könnte. • Do not open the doors to more t han 95°, as the hinge could be over stretched. GUARDAR PARA UTILIZACIÓN POSTERIOR •...
- Page 34 IMPORTANTE - LEGGERE ATTENTAMENTE! - CONSERVARE PER FUTURE UTILIZZAZIONI Gentili Clienti, Complimenti per aver scelto questo prodotto di qualità. Noi, il personale della Pinolino, lo abbiamo creato con massima cura. I materiali utilizzati sono ecologici e sono conformi alle severe norme di sicurezza dell’Unione Europea. Per risparmiarvi fatica inutile, prima leggere attentamente le istruzioni di assemblaggio.
- Page 35 BELANGRIJK - ZORGVULDIG LEZEN!- VOOR LATERE RAADPLEGING BEWAREN Geachte klanten, Wij verheugen ons erop dat u voor dit kwaliteitsproduct heeft gekozen. Wij, de Pinolino-team hebben dit artikel zorgvuldig gemaakt. De gebruikte materialen zijn milieuvrendleijk en voldoen aan de strenge veiligheidsnormen van de Europese Unie. Om onnodige inspanning te besparen, leest u eerst zorgvuldig de montageaanwijzing.
- Page 36 Produktspezifikationen • Product specifications • Spécifications du produit • Especificaciones del producto • Specificazioni del prodotto • Productspecificaties Artikelmaß Karton • Product size • Dimensions de l'article • Mediciones • Pack • Carton • Embalaje • Confezione • Verpakking producto • Dimensioni del prodotto • Artikelafmetingen 183 cm Weitere Artikel aus diesem Programm...
- Page 37 Bauteile • Components • Composants • Componentes • Componenti • Onderdelen Detail 1 • Detail 1 • Détail 1 Seitenteil links Mittelwand Seitenteil rechts Platte oben Platte unten Mittelplatte • Detalle 1 Left side panel Intermediary panel Right side panel Upper panel Bottom plate Intermediary panel...
- Page 38 Beschläge • Hardware • Ferrure • Herraje • Ferramenta • Ijzerwaren Achtung • Warning • Attention • Atención • Attenzione • Let op • S chrauben Sie die Rückwand erst an, nachdem S ie sich davon überzeugt haben, dass der Kleiderschrank im rechten Winkel montiert ist. •...
- Page 39 Montage • Assembly • Montage • Montaje • Assemblaggio • Montage • Verbinden Sie die Schubkastenteile zunächst nur lose miteinander. Ziehen Sie die Schrauben erst f est, nachdem Sie sich davon überzeugt haben, dass die Schubkastenseiten im rechten Winkel montiert sind. •...
- Page 40 10 x VES 6,3/60 und • and • et • y • e • en WI 4 F 6/20 WDH 8/35...
- Page 41 VES 7/50 und • and • et • y • e • en WI 4 WDH 5/30 VES 7/50 und • and • et • y • e • en WE 15 WI 4 WDH 8/35 WDH 8/35 KP 4...
- Page 42 VSC 6,3/11,5 WSD-R WSD-L WSD-R WSD-L VSC 6,3/11,5 WDH 8/35 WDH 8/35 KP 4 KP 4 VS 3,5/30 WE 15...
Need help?
Do you have a question about the Bridge 11 34 66 and is the answer not in the manual?
Questions and answers