Table of Contents
Advertisement
Quick Links
Youshiko YC9361 Weather Station User Manual
Please read the operating instructions carefully to familiarize yourself
with the features and modes of operation before using the
instrument.Keep the manual for future reference and pass it on with
the device, if you pass on the device to other users.
General safety
This unit can be used by children of 8 years and above and persons
with reduced physical, sensory or mental capabilities or lack of
experience and knowledge if they are supervised or have been
instructed concerning the safe use of the device and understand the
resulting risks. Do not let children play with the device. Cleaning and
user maintenance must not be carried out by children without
supervision.
~ 1 ~
Advertisement
Table of Contents

Related Manuals for Youshiko YC9361


Summary of Contents for Youshiko YC9361
- Page 1 Youshiko YC9361 Weather Station User Manual Please read the operating instructions carefully to familiarize yourself with the features and modes of operation before using the instrument.Keep the manual for future reference and pass it on with the device, if you pass on the device to other users.
-
Page 2: Battery Instructions
Battery instructions Never recharge batteries! Risk of explosion! Keep batteries away from children, do not throw into fire, short- circuit or disassemble them. Always insert batteries according to the polarity regulations. Clean the battery and device contacts before inserting, if ... - Page 3 Products and batteries: Products and batteries should not be disposed of with normal household waste. According to Directive 2012/19/EU, the device is to be supplied at the end of its useful life to a proper disposal. The valuable materials contained in the device are supplied to recycling and avoid the burden of the environment.
- Page 4 Continuous perpetual calendar up to 2099 Display of Date, Month and Day of week Day of week display in English Calendar week display 2 alarms with snooze function ( 1x for week days / Mon - Fri; 1 x for week end / Sat –...
- Page 5 Power adapter for base unit Thermometer measuring range inside: 0° C to 50 ° C Thermometer measuring range outside: -20° C to ~60 ° C Outdoor Humidity Range: 20%-95% Indoor Humidity Range: 20%-95% Temperature Tolerance: +/- 1 C in 0~40C ...
- Page 6 Structure: weather station ~ 6 ~...
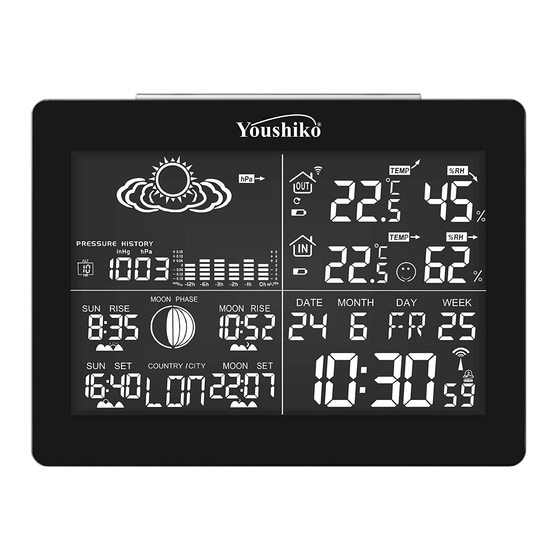
- Page 7 1. History of air pressure (selectable by pressing the "HISTORY", displayed between 0 to -12hours) 2. Air pressure 3. Frost indicator (displayed below +3° C indoor temperature) 4. Weather Forecast symbol 5. Bar graph for air pressure (Display updated continuously from right to left) 6.
- Page 8 21. Time 22. Day light savings time indicator (DST) 23. Date 24. Moonset time 25. Moonrise time 26. Moon phase 27. City abbreviation 28. Sunset time 29. Sunrise time A "MODE" button Press the button for 3 seconds to enter he manual setting, to advance and to select the following settings:date (year, month, day), 12/24hdisplay, time setting (hour, minute) city setting ...
- Page 9 Switch between display the current, minimum, maximum indoor, outdoor temperature and indoor, outdoor humidity Press the button for about 3 seconds to reset the MIN / MAX values To stop the alarm C "-" button: reduction, of values in the manual setting mode, the height setting mode, weather icon selection ...
-
Page 10: Structure: Outdoor Sensor
change of external temperature channels and continuous switching display of the outside temperature channels To stop the alarm F : Power adaptor socket G : "SNOOZE / LIGHT"button Press o activate the snooze function while wake up alarm rings ... -
Page 11: Mounting Options
1. RF radiation 2. selected channel 3. temperature 4. humidity A. channel choose switch B. temperature unit selection Mounting options: The weather station is intended to be located on flat surfaces, such as on tables or in cabinets. Through the loop on the rear of the transmitter, the transmitter is suitable for mounting on walls. - Page 12 Before putting in the batteries and connecting with power supply : First of all, find your location altitude, this will be needed as you set up this weather station’s barometer correctly, the easiest way to get this is to put your postcode into the following site: https://www.daftlogic.com/sandbox-google-maps-find- altitude.htm and / or search on Google for "Daft-logic altitude"...
- Page 13 Using “+“, “-“ button and go to 0 ( Zero ) first and then by pressing “+“, “-“ button , choose. Your location altitude, then press “HISTORY”, button. After pressing history button , weather symbol flashes, press the "+", "-"...
- Page 14 or moblie phones or similar electrical equipment etc , due to interference, so keep it away from those sorts of things. Also please note in some areas, it can take longer , from few minutes to few hours or max by 1am to 5 am ...
- Page 15 MSF Reception of radio controlled Information: Automatic time change for Spring & Autumn and automatic time checks, accurate to 1 second in 10 million years, have automatic set up for time and calendar (where applicable), The National Physical Laboratory (NPL) which is the UK's home of measurement and the nation's timekeeping.
- Page 16 repeated up until 5:00AM. If still not successful, the daily reception stops. Flashing “radio tower” symbol is displayed, while MSF radio signal reception is running. A static “radio tower” symbol is displayed after the MSF radio signal reception was successful. ...
- Page 17 Manual time set-up (the most important is to quit the reception of radio controlled signal by holding together “+“and“-” for 3 seconds in case of the “radio tower” symbol flashing before set-up ) Press and hold key “MODE“ for 3 seconds. ...
-
Page 18: Daily Alarm Set-Up
The display for the minutes is flashing. Use “+“ and “-“ to select the minutes. Press “MODE “ to confirm. The country /city flashing. Use “+“ and “-“ to select the city of Sunrise/Sunset and Moonrise /Moonset. You can find a list of all cities and their abbreviations at the end of this manual. -
Page 19: Daily Alarm On/Off
The minute display of the alarm time is flashing. Use “+“ and “-“ to select the minute. Press “MODE” to confirm. Then press“MODE” to switch from A1 display to A2 display The setting sequence for A2 is the same as for A1. Daily alarm on/off ... -
Page 20: Temperature Alert Set-Up
To activate the snooze function, follow the steps below Press the key “SNOOZE/LIGHT“, while the alarm sounds, to activate the snooze function. If the snooze function is activated, alarm symbol is flashing. The alarm repeat after 5 minutes. ... -
Page 21: Temperature Alert On/Off
Press and hold the key “-” then select between ON/OFF. Press “MODE” , the upper limit temperature is flashing, use “+” , “- “ to set the maximum alert temperature. Press “MODE “, the lower limit temperature is flashing, use “+” ,“- “... -
Page 22: Weather Forecast Symbols
A nearby city of your location must be set to correctly display the time of your area. 150 cities are selectable for Sunrise /Sunset and Moonrise /Moonset times, a list of cities can be found in the end of the manual 5 Weather forecast symbols Sunny... -
Page 23: Moon Phase Display
pressure and each change (± 2, ± 4, ± 6 or ± 0,06, ± 0,12, ± 0,18) represents how high or low in “hPa“ or “inHg” the past pressure was compared to the current pressure. For accurate barometric pressure trends, the weather station should operate at the same altitude for recordings (i.e. -
Page 24: Living Space Humidity
Living space humidity The weather station uses saved data to determine the humidity in the living space and shows the respective symbols. Comfortable, dry, humid 1. Dry : when the indoor temperature in any value, indoor humidity is less than 40% :when the indoor temperature in 20 to 28 ℃, indoor 2. -
Page 25: Wireless Connection To The Outdoor Sensor
Outdoor sensor low battery condition display: in the outdoor area of the display Wireless connection to the outdoor sensor Press the key “CHANNEL“to select a channel. You can read the data of up to 3 sensors at one weather station. Press and hold the key “CHANNEL“for 3 seconds to search for ... -
Page 26: Protection And Care Of This Item
• Inside moving vehicles • Near metallic structures Place the station at a location with optimal signal, i.e. close to a window and away from metal surfaces or electrical appliances. Keep in mind that the outdoor transmitter only has the optimal transmission range in open area with no obstructions. - Page 27 Declaration of Conformity: Hereby, Youshiko Ltd declares, that this weather station is in compliance with the essential requirements and other relevant provisions of Directive 1999/5/EC. 12: LIABILITY DISCLAIMER: •...
- Page 28 • This product is not a toy, Keep out of the reach of children. • No part of this manual may be reproduced without written authorization of the manufacturer. Supplied in Box: 1 x Youshiko YC9361 Weather station main Unit 1 x outdoor transmitter 1 x instruction manual...
- Page 29 Caims Saarbruecken Broome Schwerin Geralton Alborg Newcastle Arhus Danmark Rockhampton Copenhagen Mackay Odense Carnavon Alicante Esperance Andorra Albany Badajoz Mt.Gambier Barcelona Warrnambool Bilbao Albury Cadiz Brisbane Cordoba Auckland Ibiza Wellington La Coruna Spain Christchurch Leon Zealand Dunedin Las Palmas Aachen Madrid Berlin Malaga...
- Page 30 Perpignan Ireland Dublin Lille Luxembourg Luxemburg Rouen Bergen Norway Strasbourg Oslo Toulouse Stavanger Finland Helsinki Amsterdam Aberdeen Arnheim Belfast Eindhoven Netherlands Birmingham Enschede Bristol Groningen Edinburgh Den haag Glasgow Rotterdam London Evora Manchester Coimbra Plymouth Faro Portugal Hungary Budapest Leiria Croatia Zagreb Lisbon...
- Page 31 Brugge Brussels Charleroi Liege Basel Bern Chur Geneva Locarno Switzerland Lucerne St Moritz St Gallen Sion Vaduz Zurich Czech Prague ~ 31 ~...
Need help?
Do you have a question about the YC9361 and is the answer not in the manual?
Questions and answers