Table of Contents
Advertisement
Quick Links
Advertisement
Table of Contents

Related Manuals for Astone Rumba 800

Summary of Contents for Astone Rumba 800
-
Page 2: Table Of Contents
Content Legal Disclaimer...2. Warning...3. Brief Product Introduction...4. Features...8. Appearance...9. Basic operation...10. Voice Recording...13. Settings...14. Erase Files ...16. Memory space query...18. FM tuner...19. Hold...22. Communication with PC...23. Restore or upgrade the software ...28. -
Page 3: Legal Disclaimer
2. ASTONE will not be held liable for any loss, accident or miss use caused by incorrectly following these instructions. At the same time ASTONE will not be held responsible for damages caused by misinterpretation. -
Page 4: Warning
Warning Battery must be removed from the unit if it is to be left unused for an extended period. Failure to do so can result in the battery leaking, and damaging the unit. -
Page 5: Brief Product Introduction
fi les as well as listen to your favorite music where ever you are and whatever you are doing. The Rumba 800 Digital Music Drive fi ts perfectly in today’s technology and fashion conscious environment where having the best is only a matter of Astone. - Page 6 order to be able to hand them to a new owner in any eventual case of sales. You must guard against the loss of your important data by making backup copies. We do not assume liability for any data loss or damage to data storage units, and no claims can be accepted for damages resulting from the loss of data or any consequential losses.
- Page 7 short circuits. Before transportation, replace the cover of the USB socket. . Use only the USB Cable supplied with the product. Electromagnetic Compatibility When you use the product, follow the directives on electromagnetic compatibility (EMV). To avoid the risk of damage and the loss of onboard data, position the device at least one meter from high frequency and magnetic sources of interference (TV, stereo loudspeakers, mobile phone, etc.) Cleaning...
- Page 8 cloth. Legal Caution: The MP3 Player can only be used to copy or encode music tracks of which the user owns the copyright(s) or for which he has purchased or has been given the right of use from the holder or the copyright. Any user who violates these rights is prosecutable according to the laws and / or subject to claims from the holder of the rights.
-
Page 9: Features
FEATURES: MP3, WMA playback Voice recording and playback LCD Display with blue backlight Support ID3 tag Support A-B repeat/Repeat 1/Repeat All 5 Play Modes: Normal/Repeat Track/Repeat All/Shuffl e/Preview 6 EQ Modes: Normal/Rock/Jazz/Classical/Pop/full bass Built in USB plug Built in FM radio with 12 preset stations FM recording and playback USB mass storage, plug and play under Windows Me and above, software for Windows 98 on disc. -
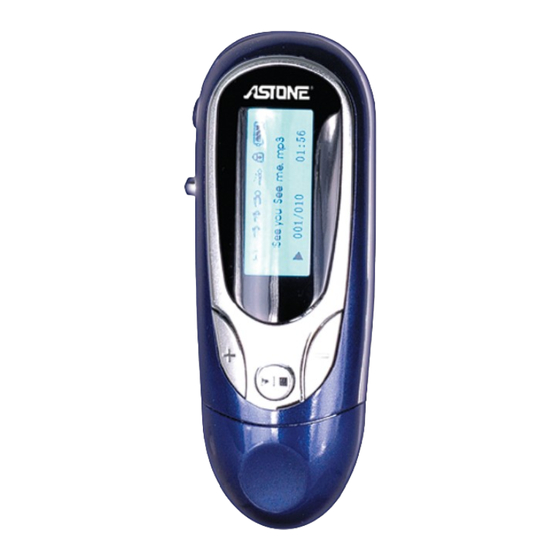
Page 10: Appearance
APPEARANCE Caution: The jog dial does not support press & slide at the same time. Otherwise, the jog dial may be locked/stuck in the housing. 1. Neck strap hole 2. 3.5mm earphone jack PLAY/STOP 4. Volume+ 5. Volume- 6. Menu jog-dial button 7. -
Page 11: Basic Operation
BASIC OPERATION Install the battery Open the battery compartment cover, install 1 AAA battery(1.5V) according to the polarity markings inside the battery compartment A” ” sign will fl ash on the screen if battery power is low, then replace with a new one. - Page 12 and the MP3 player will be powered off. Play/Pause/Stop 1) When the MP3 player is powered on, it will automatically enter the STOP status. Press the quickly to start playing, a “ corner of the screen. The current song title, track number, playing time, play mode will be displayed on the screen.
- Page 13 While the MP3 is playing, with select the start point A, an “A ” appears on the top left corner of the display. Press the Menu button briefl y again to set the end point B, a “A B” sign shows on the screen and the content between point A and point B will be repeated continuously.
-
Page 14: Voice Recording
VOICE RECORDING 1. Start recording Press and hold the “Menu” button to enter the main menu, dial the “MENU ” button to select “RECORD” category, press the “MENU” button to start recording. (See diagram left below) 2. Save a voice fi le Press the “MENU”... -
Page 15: Settings
to select “VOICE”, press the “MENU” button to enter the “VOICE” category, press button to play the voice fi le. SETTINGS 1. EQ SET Press and hold the “Menu” button to enter the main menu, dial the “MENU” button to select “Settings” category, dial the “MENU” button again to select “EQ SET”. - Page 16 sign will show accordingly on the screen. Press the “MENU” button to confi rm and return to the up one level category, dial the “MENU” button and select “Exit”. Repeat One: the current track will be repeated continuously; Repeat All: After all tracks are played, the MP3 player will start to play from the fi...
-
Page 17: Erase Files
the “MENU” button to select “Settings” category, dial the “MENU” button again to select “Power set”. Press and dial the “MENU” button to select Disable/1 Min/2 Min/5 Min/10 Min. Press the “MENU” button to confi rm and return to the up one level category, dial the “MENU”... - Page 18 1. Delete a music fi le Press the “Menu” button to select “Delete Music”, the music track’s name will show on the screen, dial the “Menu” button to select a track which need to be erased, press the “Menu” button and 2 options will be displayed on the screen. Press the “PLAY”...
-
Page 19: Memory Space Query
MEMORY SPACE QUERY Press and hold the “MENU” button to enter the main menu, dial the “MENU” button to select “About” category, press the “MENU” button to enter and view memory space information. VER: Firmware version INT: Total built-in memory capacity FREE: Current free memory space left FM TUNER Press and hold the “Menu”... - Page 20 ” button under FM mode. 1. FM receiving: When a “Radio” sign appears on the SCREEN, the built-in FM tuner is receiving program from pre-stored radio station: Dial the “Menu” button to scroll through all pre-stored radio channels. 2. FM scan and Store: Press the “Menu” button to switch to FM scan status, a “ Scan”...
- Page 21 to search the desired frequency, every time you dial the “Menu” button, the FM tuner skip 0.1 MHz frequency forward or backward. After a desired frequency is searched, press the “Menu” button to switch to FM store status, a “Store” sign will appear on the screen.
-
Page 22: Hold
named as “F00x.wav. 2) Play a recorded FM program: Press the “MENU” button to return to the main menu, dial the “MENU” button to select “VOICE”, press the “MENU” button to enter the “VOICE” category, press button to start playing the voice fi le. 4. -
Page 23: Communication With Pc
the screen. Press both the “VOL+” and “VOL-“ buttons at the same time to unlock the buttons. The hold “ ” sign disappears. Note: The hold function is not available when the MP3 player is recording voice or erasing fi les. LOCKED 001/003 COMMUNICATION WITH PC... - Page 24 folders. The following procedure is an example based on a computer running Windows XP. It assumes that your PC is already powered on. 1) Plug the MP3 Player into one of your PCs USB ports either directly or using the USB extension cable supplied.
- Page 25 NOTE: If the new drive is not listed it may be necessary to restart your computer. 4) You can simply copy fi les to the new drive as you would any other disk drive. Similarly fi les can be deleted from the new drive as you would any other disk drive.
- Page 26 Writing”. NOTES: Do not disconnect your MP3 player while fi les are being transferred as this will corrupt the data. The fi le structure will be preserved. When playing for the fi rst time any fi les in the root directory will be played fi...
- Page 27 6) Disconnect the MP3 player and replace the USB cover. -26-...
- Page 28 2. Mass storage As stated previously your Mp3 player can be used to store any type of fi le. It can, for example, be used to simply transfer fi les from one computer to another or as a backup device. When transferring fi les the folder structure will be preserved.
-
Page 29: Restore Or Upgrade The Software
Note: Unless there is anything abnormal with the MP3 player (for example, it cannot be started up), do not try to upgrade the software. Please refer to the website address to download the utility of relevant product. Download the utility from www.astone.com.au 2. Install the SETUP.exe in your PC. -28-... - Page 30 3. Plug the MP3 Player into one of your PCs USB ports either directly or using the USB extension cable supplied. Right click “My computer”—>“Attribute”—>“ Device manager”. Press and hold the button until “Player Recovery Device Class” appears on the Device manager (See below left fi gure); release the button;...
- Page 31 5. Execute the following procedures: Start—>Program—>SigmaTel MSCN Audio Player—>fi rmware download,(as shown in the upper right fi gure) and a progress bar will pop up as shown in the following fi gure. 6. After the dialog box shown in the fi gure above is automatically closed, a dialog box will pop up as shown in the fi...
- Page 32 option. Then start formatting by pressing “START”, and press “CLOSE” to close the program. A window will open on your PCs task bar stating that new hardware has been found and that it is a mass storage device. This will then change to a message stating that the new hardware is ready to use.
Need help?
Do you have a question about the Rumba 800 and is the answer not in the manual?
Questions and answers