Table of Contents
Advertisement
Quick Links
Advertisement
Table of Contents

Related Manuals for Argox PT-20


Summary of Contents for Argox PT-20
- Page 2 Argox will not be liable in case modifications are made by the customer. In such case the standard repair charge will be applicable. The standard charge for repair will also be applicable in case no defect is found at all.
- Page 3 This equipment has been tested and found to comply with the limits for a Class B digital device, pursuant to part 15 of the FCC rules. These limits are designed to provide reasonable protection against harmful interference in a residential installation. This equipment generates, uses and can radiate radio frequency energy and, if not installed and used in accordance with the instructions, may cause harmful interference to radio communications.
-
Page 4: Table Of Contents
Table of Content INTRODUCTION....................1 1.1 A ..................1 BOUT THIS ANUAL 1.2 U .................2 SER AND RODUCT AFETY 1.3 S .....................4 PECIFICATIONS GETTING STARTED ...................6 2.1 C ..................6 HECK THE PACKAGE 2.1.1 PDT Package ..................6 2.1.2 Cradle Package..................7 2.2 D .....................8 ETAILED 2.2.1 Terminal....................8 2.2.2 Cradle ....................9... - Page 5 7.1 RS232 C CRD-20 C ) .......33 ABLE FOR RADLE PIN TO 7.2 USB C CRD-20 C ............33 ONNECTOR FOR RADLE TROUBLE SHOOTING ..................34 8.1 G ..................34 ENERAL HECKS 8.2 C ..............35 OMMUNICATION ROBLEMS 8.3 R ..............36 PERATION ROBLEMS 8.4 T ..................37 ERMINAL ROBLEMS...
-
Page 6: Introduction
Introduction The PT-20 series portable data Terminal (PDT) is well suited for a variety of portable applications. It has a built-in CCD scanning engine that can scan all popular bar code labels at varying distance (up to 13 inches). User’s applications can be downloaded to the terminal to adapt the terminal to the user’s situation. -
Page 7: User And Product Safety
Conditions exceeding IP54 standards could result in water or other contaminants entering the PT-20. Use only the approved AC Adapter with the PT-20. Use of an unapproved AC Adapter could result in electrical problems, or even cause a fire or an electrical shock to the user. - Page 8 [ENT] key, which can discharge your batteries or change settings you do not want changed. Using the Cradle Do not place any product other than the PT-20 mobile terminal in the cradle. Maintenance There are no user-serviceable parts inside the mobile terminal or the cradle. So do not try to take it apart.
-
Page 9: Specifications
1.3 Specifications Model PT-20 PT-2010 Wireless Communication WPAN Bluetooth Class2, version 1.2 General Characteristics Proprietary ARM9 Core 266MHz 2MB/4MB/8MB Display 2.4” LCD TFT Transmissive, 320 x 240 QVGA 65K colors Blue, Green and Red Keypad 29 Numeric Alert Buzzer, Vibrator... - Page 10 Environment Operating Temperature to 60 / 14 to 140 ¡ ¡ Storage Temperature to 70 / -4 to 158 ¡ ¡ Humidity Operating: Non-condensed 10% to 90% Storage: Non-condensed 5% to 95% Impact resistance 1.2M/4ft (Terminal) 0.9M (Cradle) IP54 Electrostatic discharge +/- 15 KV air discharge +/- 8 KV direct discharge EMC Regulation...
-
Page 11: Getting Started
Getting Started This chapter describes the PT-20 physical characteristics, how to install and charge the batteries, how to remove and replace the strap assembly and how to start the PT-20 for the first time. 2.1 Check the package Carefully remove all protective material from around the PT-20 and save the shipping container for later storage and shipping. -
Page 12: Cradle Package
2.1.2 Cradle Package ν ν CRD-20 USB cable USB cable Cradle Figure 2-2 Cradle Package Inspect the package contents for damage. If any item is missing or damaged, please contact the Argox Technical Support Center immediately. -
Page 13: Detailed View
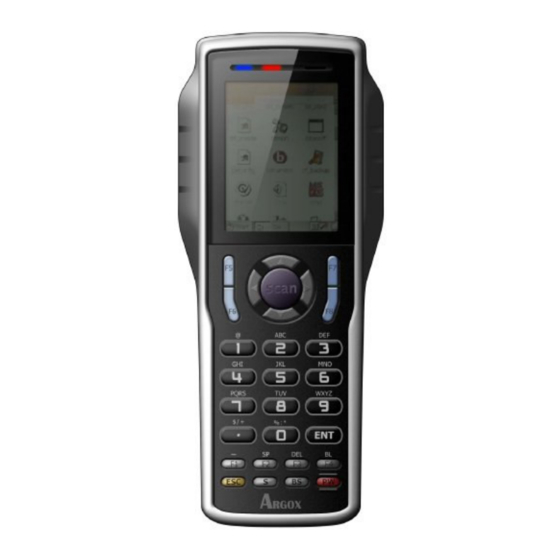
2.2 Detailed View 2.2.1 Terminal Dimensions of Terminal 169.0mm (L) x 70.1mm (W) x 34.0mm (H) Details of Terminal Left side Front Right side Back Bottom Reading Window Optical beam of LED for barcode reading will be emitted from here Can be used to indicate results, for example bar LED Indicator code reading / status of communication... -
Page 14: Cradle
Charging Slot For charging a spare rechargeable battery pack RS-232 Socket For connecting to PC serial port through Argox RS232 cable USB Socket For connecting to PC USB port through a standard USB cable... -
Page 15: Assembly
2.3 Assembly Follow the next steps to make your terminal ready for installation in a system that is described further in the manual. 2.3.1 Terminal The hand strap protects the Terminal from being damaged as a result of it being dropped by mistake during movement. -
Page 16: Cradle
Terminal on cradle Take notice that the PT-20 cradle is designed for the PT-20 terminal. No other type of terminal can be placed into this cradle. This can cause damages to the connector on the cradle. -
Page 17: Installing, Replacing And Charging Batteries
♦ Use the right charger for batteries. The rechargeable battery pack form Argox can be charged in the cradle when either it is in the terminal or alone in the charging slot in the back of the cradle. ♦... -
Page 18: Installing / Replacing The Battery Pack
2.4.1 Installing / Replacing the Battery Pack How to install or replace the main battery in the terminal Slide the main battery compartment cover lock to the FREE position and remove the cover Load a lithium-ion battery pack into the main battery compartment... - Page 19 How to install or replace the main battery in the gun grip Attach the battery compartment cover to the terminal and slide the main battery compartment cover lock to the LOCK position. Attach the battery compartment cover to the terminal and slide the main battery compartment cover lock to the LOCK position.
-
Page 20: Charging The Battery Pack With Cradle
Orange first and turn to Green at once. When the terminal is placed in the cradle, the rechargeable battery pack will be charged automatically. If you have a spare Argox battery pack, you can replace the empty battery pack with a full battery pack for continuous terminal operation. And put the empty battery pack in the charging slot of the cradle. -
Page 21: Installing In A System
2.5 Installing in a System Notes: ♦ Exercise caution at all times when working with AC-powered equipment. ♦ Turn off your devices before installation. ♦ Because of the special pin-out of the connectors, use the cables supplied by the manufacturer. ♦... -
Page 22: Operation Of The Terminal
Usually, the terminal is not equipped with software. There are only some simple functions can be tested (like scanning test, com port test). Tools provided by Argox for developing a user application are: Software Development Kit (SDK); ARM code, C compiler and C library for handheld terminal The user application must be downloaded from the PC into the terminal. -
Page 23: Hardware Description
3.2 Hardware Description 3.2.1 LCD Screen Description The LCD screen of the PT-20 data terminal shows program settings, operational procedures, calculation results and other information. Display Area 320 dots (V)*240 dots (H) Display Charactrs... -
Page 24: Keypad Description
3.2.2 Keypad Description The PT Series keypad consists of 29 rubber keys including one SCAN key. 1. Scan key Scan a bar code read operation 2. Cursor key This Cursor key navigates among applications. 3. 10-key pad The function of these keys depends on whether the Terminal is in the character input mode of the number input mode: Input alphanumeric and symbols. - Page 25 F2 (SP) Inputs a space. F3 (DEL) Deletes a character. F4 (BL) Turns the key lights ON and OFF F5 ( ) Increases buzzer volume F6 ( ) Increases LCD backlight Decreases Buzzer volume and program 1 (for user SDK define) Decrease LCD backlight and program 2 (for user SDK define) 7.Control keys Escape key...
-
Page 26: Power Management
3.2.3 Power Management Power On Status Normal power consumption is around 60mA. But it will be around 110mA at full- function condition. Power Off Status: Power consumption is around 1mA. Auto-Off: When the auto-off timer at Setting\ Environment\Auto off Timer. On\Auto-Off was set; the terminal will turn off automatically when it is idle for a time period equal to the set timer. -
Page 27: Configuration
To return to a previous page or menu, you many press [ESC] or follow the on-screen instructions. PT-20 is set up such a way that there are several operating modes. The system of terminal may operate in various modes for different purposes. -
Page 28: System Menu
4.1 System Menu How to access the System Menu? 1. Turn off the PT-20 terminal. 2. Press [3] + [9] + [Power] 4.1.1 Communication Communication > File Transfer Communication > Interface Communication > Baud Rate 115200bps 57600 bps 38400 bps 19200 bps 9600 bps 4800 bps 4.1.2... -
Page 29: Test
4.1.4 Test Test > Memory Test Test the data memory (SRAM), and the results will be shown on the screen. To stop and exit the test, press [ESC] Test > Buzzer Test Test the buzzer with different frequency / duration combination. Press [ENT] to start. To stop and exit the test, press any key. -
Page 30: Supervisor Menu
This memu is designed for engineering tests and maintenance ONLY. For this reason, the Supervisor Menu provides password protection to prevent unauthorized users from accidentantlly changing system settings. How to access the Supervisor Menu? 1. Turn off the PT-20 terminal. 2. Press [1] + [3] + [0] + [Power] Note: ♦... -
Page 31: Information
Beep Enable Code ID System Setting Default Values Disable Transmission Position Disable Invert Image System Setting Default Values Invert Image Disable Preamble Postamble Code Config. Group 1 System Setting Default Values Code-11 Disable Code-39 Enable Code-93 Disable Code-128 Enable EAN-8 Enable EAN-13 Enable... -
Page 32: Applications
19). The stored area of collected data Data C:\Data in program Note: Argox will not be liable for any damage or system crash by improper operations of firmware change without advice or instruction from Argox or Argox’s authorized support center. - Page 33 4.4 Upload /Download by File Manager The way to upload /download by supervisor menu will need the operator to set the terminal to supervisor menu by selecting Transfer in supervisor menu or calling system function n application program. The hardware and software of terminal is designed that the unit can be turned on by input from serial port.
-
Page 34: Scanning
5. Scanning Note: ♦ Observe handling precautions. ♦ Make sure the mobile terminal is installed according to instructions. ♦ Never remove the main batteries or battery pack while the mobile terminal is turned on. Doing so can cause loss of data in the mobile terminal. -
Page 35: Barcode Reading Problems
For larger bar codes, position the terminal so that the bar code fits into the LED light beam. When reading a very high density bar code, decrease the distance between the terminal and the bar code. For a low density bar code, increase the distance between the terminal and the bar code. -
Page 36: Communications
6. Communications 6.1 Cradle Communication The CRD-20 cradle provides two methods for data transmission: through an RS-232 cable (9- pin connector for PC and 9-pin connector for collector) and through a USB cable. When both RS-232 and USB cables are connected between the CRD-10 cradle and host computer, the USB interface takes priority for data transmission and the RS- 232communication is automatically disabled. -
Page 37: Bluetooth Communication
Bluetooth Communication The Bluetooth interface can be used to transfer data to and from a Bluetooth compatible printer. Data can be transferred if the terminal is located within three meters of the target device (and nothing is blocking the signal). Caution: Observe the following precautions to help ensure that Bluetooth communication is successful. -
Page 38: Cable Pin-Out
7. Cable Pin-out 7.1 RS232 Cable for CRD-20 Cradle (9-pin to 9-pin) 9 PIN / D-Sub Male Type 9 PIN / D-Sub Female Type Connector for CRD-10 Connector for PC Signal Description Signal Description Transmit data Receive data Receive data Transmit data Ground Ground... -
Page 39: Trouble Shooting
When the terminal needs to be repaired, please ensure that the label with the serial number is still present. If sending the terminal or cradle back to your local supplier or Argox, please use the original package to minimize the chances of damage during transmission. -
Page 40: Roblems
The backup battery is empty ♦ Recharging again with the main battery and backup battery. If the backup battery is still empty, the terminal needs to be sent back to your local supplier or Argox to replace with a new one. -
Page 41: Roblems
8.3 Read Operation Problems When the terminal has a problem with reading the barcode label The resolution of the bar code is too high ♦ Decrease the distance between the bar code and the terminal. The angle between the label and the terminal is too high ♦... - Page 42 Terminal does not respond to key press while the display stays on Message “No Programs…” is shown when you try to start a program ♦ There is no user’s application program for PT-20 / PT-20 loaded in the terminal. Contact your supplier.
Need help?
Do you have a question about the PT-20 and is the answer not in the manual?
Questions and answers